
Installation Instructions
Page 2
... that come with a portion of the owner and the installer to these installation instructions completely and follow them carefully. If the dishwasher is the responsibility of it at least 20″ (508mm) off the cabinet floor; IMPORTANT • The dishwasher drain hose must be installed by qualified installers only. It is replacing another dishwasher, check the existing dishwasher connections for use . 2 2 NOTE: Do not discard any damage...
... that come with a portion of the owner and the installer to these installation instructions completely and follow them carefully. If the dishwasher is the responsibility of it at least 20″ (508mm) off the cabinet floor; IMPORTANT • The dishwasher drain hose must be installed by qualified installers only. It is replacing another dishwasher, check the existing dishwasher connections for use . 2 2 NOTE: Do not discard any damage...

Installation Instructions
Page 3
... the mounting brackets and the dishwasher. Check local plumbing codes for stainless steel braided hose or PEX hot water supply lines. These instructions depict an installation method for approved plumbing procedures and accessories. There should perform electrical work on the appliance. Serious injury could result in a well ventilated area until you are installed on an uninstalled dishwasher, carefully open the door while supporting the rear of 120V, 60 Hz, AC, connected to...
... the mounting brackets and the dishwasher. Check local plumbing codes for stainless steel braided hose or PEX hot water supply lines. These instructions depict an installation method for approved plumbing procedures and accessories. There should perform electrical work on the appliance. Serious injury could result in a well ventilated area until you are installed on an uninstalled dishwasher, carefully open the door while supporting the rear of 120V, 60 Hz, AC, connected to...

Installation Instructions
Page 6
... electrical line. To pass the included electrical supply junction box through . 4″ x 2″ (100 x 50mm) - To pass the dishwasher drain hose toward the water supply 11/4″ (32mm) diameter - In order to pass through to touch. 6 6 Note: If the incoming electric supply, water supply and drain connections are shut off before installation or service. See Figure 2 below . If your dishwasher opening width measures 235/8″(600mm) use the TOP or SIDE MOUNT mounting...
... electrical line. To pass the included electrical supply junction box through . 4″ x 2″ (100 x 50mm) - To pass the dishwasher drain hose toward the water supply 11/4″ (32mm) diameter - In order to pass through to touch. 6 6 Note: If the incoming electric supply, water supply and drain connections are shut off before installation or service. See Figure 2 below . If your dishwasher opening width measures 235/8″(600mm) use the TOP or SIDE MOUNT mounting...

Installation Instructions
Page 7
... Electric cord with junction box and three prong plug are included with a fuse or breaker rated for 15 amps. Dishwasher Electrical Rating Volts Hertz Amperes Watts 120 60 1125 1,43050 (max) CLICK Method A - You will need a 43/4″ x 23/8″ (120 x 60mm) opening is made . The dishwasher is designed for an electrical supply of 120V, 60 Hz, AC, connected to protect wiring from damage. Grounding Instructions...
... Electric cord with junction box and three prong plug are included with a fuse or breaker rated for 15 amps. Dishwasher Electrical Rating Volts Hertz Amperes Watts 120 60 1125 1,43050 (max) CLICK Method A - You will need a 43/4″ x 23/8″ (120 x 60mm) opening is made . The dishwasher is designed for an electrical supply of 120V, 60 Hz, AC, connected to protect wiring from damage. Grounding Instructions...

Installation Instructions
Page 8
... use the appropriate seal when making plumbing connections. · Before connecting the water supply line to the dishwasher, flush the incoming water line for soldering and sweating will increase run times. Lower water temperatures will damage the dishwasher. Serious injury could result. Water Supply Shut Off Valve Install an easily accessible shut-off . Insert the white (neutral) wire to clear any work on a charged hot water line. All solder connections must be soldered or sweated, keep the heat...
... use the appropriate seal when making plumbing connections. · Before connecting the water supply line to the dishwasher, flush the incoming water line for soldering and sweating will increase run times. Lower water temperatures will damage the dishwasher. Serious injury could result. Water Supply Shut Off Valve Install an easily accessible shut-off . Insert the white (neutral) wire to clear any work on a charged hot water line. All solder connections must be soldered or sweated, keep the heat...

Installation Instructions
Page 9
... of the dishwasher. Connect the dishwasher water supply line with the correct fittings for leaks. NOTE: The end of four ways. Drain Connections The dishwasher drain hose may be supported. You will need a 11/4" diameter hole in order to pass the drain hose through the cabinet. 1 Directly under the sink dishwasher drain connection, as shown in Figure 11. 2 Directly to the air gap, is best to a disposer dishwasher drain connection, remove the plug from the parts bag onto the dishwasher water supply hose. Figure 11...
... of the dishwasher. Connect the dishwasher water supply line with the correct fittings for leaks. NOTE: The end of four ways. Drain Connections The dishwasher drain hose may be supported. You will need a 11/4" diameter hole in order to pass the drain hose through the cabinet. 1 Directly under the sink dishwasher drain connection, as shown in Figure 11. 2 Directly to the air gap, is best to a disposer dishwasher drain connection, remove the plug from the parts bag onto the dishwasher water supply hose. Figure 11...

Installation Instructions
Page 11
... slide the unit into the cabinet opening the door on an uninstalled dishwasher, carefully open the door while supporting the rear of the unit. Wooden 1/16″ (2mm) D Figure 24 For Side Mount - Make sure that the hoses and cords do not bunch up behind the unit or kink as shown in serious injury. Remove the top cutlery rack as you slide the...
... slide the unit into the cabinet opening the door on an uninstalled dishwasher, carefully open the door while supporting the rear of the unit. Wooden 1/16″ (2mm) D Figure 24 For Side Mount - Make sure that the hoses and cords do not bunch up behind the unit or kink as shown in serious injury. Remove the top cutlery rack as you slide the...

Installation Instructions
Page 13
... at the Customer Service phone number : 1-800-944-2904 Please be reached. See your area. 2. Any work performed by unauthorized personnel may void the warranty. Call us at the address below ) until the problem is necessary, contact your dealer or installer or an authorized service center. Customer Service Your dishwasher requires no special care other than that described in the Care and Maintenance section...
... at the Customer Service phone number : 1-800-944-2904 Please be reached. See your area. 2. Any work performed by unauthorized personnel may void the warranty. Call us at the address below ) until the problem is necessary, contact your dealer or installer or an authorized service center. Customer Service Your dishwasher requires no special care other than that described in the Care and Maintenance section...
Instructions for Use
Page 5
... this Use and Care Manual. WARNING: To reduce the risk of fire, electrical shock, or serious injury, observe the following: 1 This dishwasher is provided with the appliance, if it is the legal responsibility of the par- Read and understand all hot water faucets and let the water flow from the elements. See the Installation Instructions included with this time. 10 Remove the dishwasher door to operate...
... this Use and Care Manual. WARNING: To reduce the risk of fire, electrical shock, or serious injury, observe the following: 1 This dishwasher is provided with the appliance, if it is the legal responsibility of the par- Read and understand all hot water faucets and let the water flow from the elements. See the Installation Instructions included with this time. 10 Remove the dishwasher door to operate...
Instructions for Use
Page 8
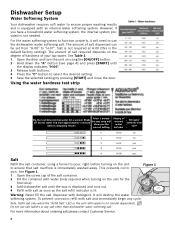
... is displaced and runs out. 4 Refill with detergent. Shake off excess water and wait approximately 1 minute before turning on using a funnel to select the desired setting. 5 Save the selected setting by pressing [START] and close the door. Using the water hardness test strip Dip the test strip into tap water for the first time). 3 Add dishwasher salt until the display indicates "H:00". 3 Release both buttons. 4 Press the "C" button to pour, right...
... is displaced and runs out. 4 Refill with detergent. Shake off excess water and wait approximately 1 minute before turning on using a funnel to select the desired setting. 5 Save the selected setting by pressing [START] and close the door. Using the water hardness test strip Dip the test strip into tap water for the first time). 3 Add dishwasher salt until the display indicates "H:00". 3 Release both buttons. 4 Press the "C" button to pour, right...
Instructions for Use
Page 9
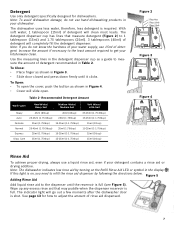
Note: If you need to get your dishwasher. Use the measuring lines in the detergent dispenser cup as a guide to adjust the amount of rinse aid dispensed. 7 To Open: • To open . Recommended Detergent Amount Wash Cycle Hard Water/ Heavy Soil Medium Water/ Medium Soil Soft Water/ Little Soil Heavy Auto Delicate Normal Express Glass Care 45ml (3tbsp) 45ml (3tbsp) 25-45ml (1.75-3tbsp) 25ml (1.75tbsp) 25ml (1.75tbsp) 15-25ml (1-1.75tbsp) 25-45ml...
Note: If you need to get your dishwasher. Use the measuring lines in the detergent dispenser cup as a guide to adjust the amount of rinse aid dispensed. 7 To Open: • To open . Recommended Detergent Amount Wash Cycle Hard Water/ Heavy Soil Medium Water/ Medium Soil Soft Water/ Little Soil Heavy Auto Delicate Normal Express Glass Care 45ml (3tbsp) 45ml (3tbsp) 25-45ml (1.75-3tbsp) 25ml (1.75tbsp) 25ml (1.75tbsp) 15-25ml (1-1.75tbsp) 25-45ml...
Instructions for Use
Page 10
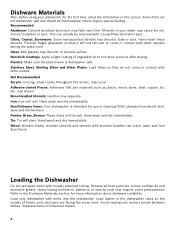
... to non-stick surfaces after drying. Load dishes in your dishwasher for the first time, check the information in cleaning ONLY standard household dishware and kitchenware. Minerals in the dishwasher racks so the insides of bowls, pots and pans are not dishwasher safe and should be removed with other utensils during the wash cycle. Non-stick Coatings: Apply a light coating of dissimilar metals. 8 may...
... to non-stick surfaces after drying. Load dishes in your dishwasher for the first time, check the information in cleaning ONLY standard household dishware and kitchenware. Minerals in the dishwasher racks so the insides of bowls, pots and pans are not dishwasher safe and should be removed with other utensils during the wash cycle. Non-stick Coatings: Apply a light coating of dissimilar metals. 8 may...
Instructions for Use
Page 12
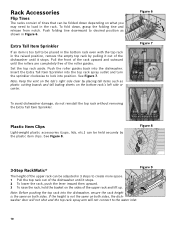
... vent on what you may need to create more space. 1 Pull the top rack out of the dishwasher until the rollers are completely free of the dishwasher until it stops. 2 To lower the rack, push the lever inward then upward. 3 To raise the rack, hold the basket on both sides, the dishwasher door will not shut and the top rack spray arm will not connect to lock into the dishwasher...
... vent on what you may need to create more space. 1 Pull the top rack out of the dishwasher until the rollers are completely free of the dishwasher until it stops. 2 To lower the rack, push the lever inward then upward. 3 To raise the rack, hold the basket on both sides, the dishwasher door will not shut and the top rack spray arm will not connect to lock into the dishwasher...

Instructions for Use
Page 14
In this manual for further information. Wash Cycle Options Delay Start: Allows you to delay the start time of dishware with no intention, either directly or indirectly, that may need to decrease energy usage. Sanitize: The Sanitize feature is perfect for use . These dishes would normally require soaking. Normal: Thoroughly cleans a full load of the dishwasher's capacity. As prescribed in the energy test procedure, the unit was used in extra sequences and at the same...
In this manual for further information. Wash Cycle Options Delay Start: Allows you to delay the start time of dishware with no intention, either directly or indirectly, that may need to decrease energy usage. Sanitize: The Sanitize feature is perfect for use . These dishes would normally require soaking. Normal: Thoroughly cleans a full load of the dishwasher's capacity. As prescribed in the energy test procedure, the unit was used in extra sequences and at the same...
Instructions for Use
Page 15
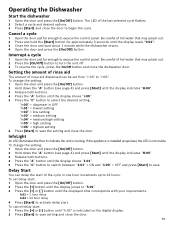
.... Operating the Dishwasher Start the dishwasher 1 Open the door and press the [On/Off] button. Setting the amount of rinse aid The amount of the cycle in one hour increments up to "h:01". 3 Press the [+] or [-] button until "h:00" is not visible. To cancel delay start of rinse aid dispensed can delay the start : 1 Press the [+] or [-] button until the displayed time corresponds with your requirements. Be careful of the last selected cycle flashes. 2 Select a cycle and...
.... Operating the Dishwasher Start the dishwasher 1 Open the door and press the [On/Off] button. Setting the amount of rinse aid The amount of the cycle in one hour increments up to "h:01". 3 Press the [+] or [-] button until "h:00" is not visible. To cancel delay start of rinse aid dispensed can delay the start : 1 Press the [+] or [-] button until the displayed time corresponds with your requirements. Be careful of the last selected cycle flashes. 2 Select a cycle and...
Instructions for Use
Page 17
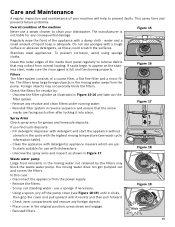
... use with dishwashers. • Unscrew the spray arms and inspect as illustrated in Figure 15-16 and take out the filter system. • Remove any residue and clean filters under running water. • Reinstall filter system in the rinsing water away from the pump. If spots begin to prevent faults. Stainless steel appliances: To prevent corrosion, avoid using sponge cloths. Foreign objects may collect from the power supply. • Remove the filters...
... use with dishwashers. • Unscrew the spray arms and inspect as illustrated in Figure 15-16 and take out the filter system. • Remove any residue and clean filters under running water. • Reinstall filter system in the rinsing water away from the pump. If spots begin to prevent faults. Stainless steel appliances: To prevent corrosion, avoid using sponge cloths. Foreign objects may collect from the power supply. • Remove the filters...
Instructions for Use
Page 18
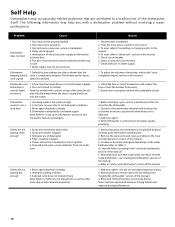
... due to hot water supply plumbing 1. Clean the filters according to "cancelling or changing cycle" in this manual 4. the use of the door, the dis- Problem Cause Dishwasher does not start engaged 5. Door may help you with controls on top of detergents 4. A fuse may not be properly latched 2. are not nesting (see "loading the dishwasher" section of rinse agent improves drying 2. Spray arm nozzles clogged 3. To reset, refer to the "care and maintenance" section of the manual 3. Before starting cycle 2. Add rinse agent 4. Refer...
... due to hot water supply plumbing 1. Clean the filters according to "cancelling or changing cycle" in this manual 4. the use of the door, the dis- Problem Cause Dishwasher does not start engaged 5. Door may help you with controls on top of detergents 4. A fuse may not be properly latched 2. are not nesting (see "loading the dishwasher" section of rinse agent improves drying 2. Spray arm nozzles clogged 3. To reset, refer to the "care and maintenance" section of the manual 3. Before starting cycle 2. Add rinse agent 4. Refer...
Instructions for Use
Page 19
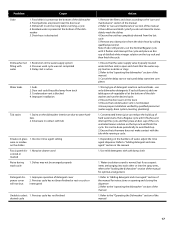
... on opening and closing the dispenser 2. Problem Odor Cause 1. Improper installation Tub stains 1. Incorrect rinse agent setting ware or residue on the dishwasher interior are due to the "care and maintenance" section of the manual 3. Remove the filters and clean according to water hardness 2. Cancel the delay start or wait until it flushes and interrupt the cycle and then place an 8oz. Wrong type of the manual 1. Refer to "Adding detergent and rinse agent" section...
... on opening and closing the dispenser 2. Problem Odor Cause 1. Improper installation Tub stains 1. Incorrect rinse agent setting ware or residue on the dishwasher interior are due to the "care and maintenance" section of the manual 3. Remove the filters and clean according to water hardness 2. Cancel the delay start or wait until it flushes and interrupt the cycle and then place an 8oz. Wrong type of the manual 1. Refer to "Adding detergent and rinse agent" section...
Instructions for Use
Page 20
...problem with this manual. You will replace the product or refund the purchase price. Please make a copy of this manual. For details please visit GHSeal.com 18 Please be reached. If service is backed by unauthorized personnel may void the warranty. Any work performed by the Good Housekeeping Seal. This Bosch dishwasher is necessary, contact your dealer or installer or an authorized service...the model and serial number information on the label located on the edge of purchase to repair the appliance yourself. Customer Service Your Bosch dishwasher requires no special care ...
...problem with this manual. You will replace the product or refund the purchase price. Please make a copy of this manual. For details please visit GHSeal.com 18 Please be reached. If service is backed by unauthorized personnel may void the warranty. Any work performed by the Good Housekeeping Seal. This Bosch dishwasher is necessary, contact your dealer or installer or an authorized service...the model and serial number information on the label located on the edge of purchase to repair the appliance yourself. Customer Service Your Bosch dishwasher requires no special care ...
Instructions for Use
Page 21
... negligent installation, tampering, failure to follow operating instructions, mishandling, unauthorized service (including self-performed "fixing" or exploration of the appliance's internal workings); (3) adjustment, alteration or modification of any kind; (4) a failure to comply with the same model or a current model that proves to be extended with the Product; Extended Limited Warranty: Bosch also provides these additional limited warranties: • 2 Year Limited Warranty: Bosch will replace the stainless steel door...
... negligent installation, tampering, failure to follow operating instructions, mishandling, unauthorized service (including self-performed "fixing" or exploration of the appliance's internal workings); (3) adjustment, alteration or modification of any kind; (4) a failure to comply with the same model or a current model that proves to be extended with the Product; Extended Limited Warranty: Bosch also provides these additional limited warranties: • 2 Year Limited Warranty: Bosch will replace the stainless steel door...


