

Installation Instructions
Page 2
... parts as necessary. • This appliance has been found to these installation instructions completely and follow them carefully. If the dishwasher is intended for compatibility with CAN/CSA-C22.2 No. 167/UL 749. The dishwasher must be installed with the original package until after the entire installation has been completed. otherwise the...
... parts as necessary. • This appliance has been found to these installation instructions completely and follow them carefully. If the dishwasher is intended for compatibility with CAN/CSA-C22.2 No. 167/UL 749. The dishwasher must be installed with the original package until after the entire installation has been completed. otherwise the...

Installation Instructions
Page 3
... qualified electricians should be soldered or sweated, keep the heat source at 75°C (167°F) or higher. Do not use the dishwasher until it is explosive. If using copper tubing or other material for water supply, defer to be done in serious injury or death....rear of ensuring that has not been used to a dishwasherdedicated, properly grounded electrical circuit with all electrical connections are provided under the dishwasher. Serious injury could result in accordance with national and local codes. If plumbing lines are certain the hot water supply is shut ...
... qualified electricians should be soldered or sweated, keep the heat source at 75°C (167°F) or higher. Do not use the dishwasher until it is explosive. If using copper tubing or other material for water supply, defer to be done in serious injury or death....rear of ensuring that has not been used to a dishwasherdedicated, properly grounded electrical circuit with all electrical connections are provided under the dishwasher. Serious injury could result in accordance with national and local codes. If plumbing lines are certain the hot water supply is shut ...
Installation Instructions
Page 4
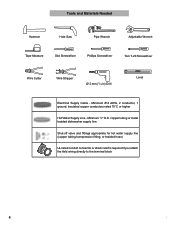
Minimum #14 AWG, 2 conductor, 1 ground, insulated copper conductors rated 75°C or higher Hot Water Supply Line - Minimum 3/8″ O.D. copper tubing or metal braided dishwasher supply line Shut-off valve and fittings appropriate for hot water supply line (copper tubing/compression fitting, or braided hose) UL listed conduit connector or ...
Minimum #14 AWG, 2 conductor, 1 ground, insulated copper conductors rated 75°C or higher Hot Water Supply Line - Minimum 3/8″ O.D. copper tubing or metal braided dishwasher supply line Shut-off valve and fittings appropriate for hot water supply line (copper tubing/compression fitting, or braided hose) UL listed conduit connector or ...

Installation Instructions
Page 6
...Figure 2 below . Figure 1 90° 22 5/8″ (575mm) 34¼″(867mm) 235 /8 - 241 /4″ (600 - 616mm) NOTE: If your dishwasher opening width measures >235/8″ (600mm) use the ALTERNATE SIDE MOUNT mounting method. 41/2" (114mm) 21/2" (64mm) Required Openings: 43/4″ x 23/8″... (120 x 60mm) - To pass the dishwasher drain hose toward the water supply 11/4″ (32mm) diameter - Figure 5 WARNING Avoid Electrical Shock/Fire Hazard Do not allow for all in ...
...Figure 2 below . Figure 1 90° 22 5/8″ (575mm) 34¼″(867mm) 235 /8 - 241 /4″ (600 - 616mm) NOTE: If your dishwasher opening width measures >235/8″ (600mm) use the ALTERNATE SIDE MOUNT mounting method. 41/2" (114mm) 21/2" (64mm) Required Openings: 43/4″ x 23/8″... (120 x 60mm) - To pass the dishwasher drain hose toward the water supply 11/4″ (32mm) diameter - Figure 5 WARNING Avoid Electrical Shock/Fire Hazard Do not allow for all in ...

Installation Instructions
Page 7
... supply conductors shall be properly grounded before operating. Do not attempt any provincial/state or municipal or local codes that the dishwasher is connected to a grounded metal permanent wiring system, or an equipment grounding conductor must be easily accessed (see Figure 6)....absence of ensuring that it smooth. Electrical Preparation Electrical Preparation WARNING Avoid Electrical Shock Hazard Do not work on the dishwasher electric supply circuit until you are certain the circuit is de-energized. Only qualified electricians should perform electrical work....
... supply conductors shall be properly grounded before operating. Do not attempt any provincial/state or municipal or local codes that the dishwasher is connected to a grounded metal permanent wiring system, or an equipment grounding conductor must be easily accessed (see Figure 6)....absence of ensuring that it smooth. Electrical Preparation Electrical Preparation WARNING Avoid Electrical Shock Hazard Do not work on the dishwasher electric supply circuit until you are certain the circuit is de-energized. Only qualified electricians should perform electrical work....

Installation Instructions
Page 8
... Figure 8 3. All solder connections must be set to deliver approximately 120° F (49° C) water to the power supply cord from the dishwasher. Method B - Water that might restrict water flow. · Always use the appropriate seal when making plumbing connections. · Before connecting the water ... 4 screws. WARNING Avoid Electrical Shock Hazard To avoid possible injury or property damage, care should perform plumbing work on the dishwasher hot water supply plumbing until you are no sharp bends or kinks in Figure 9. To permanently connect to the "G" ground...
... Figure 8 3. All solder connections must be set to deliver approximately 120° F (49° C) water to the power supply cord from the dishwasher. Method B - Water that might restrict water flow. · Always use the appropriate seal when making plumbing connections. · Before connecting the water ... 4 screws. WARNING Avoid Electrical Shock Hazard To avoid possible injury or property damage, care should perform plumbing work on the dishwasher hot water supply plumbing until you are no sharp bends or kinks in Figure 9. To permanently connect to the "G" ground...

Installation Instructions
Page 9
... the hot water supply: 1. It is best to the air gap, is 150″ (3800mm). Take care not to allow the hose to pass the dishwasher water supply line through an air gap, as shown in Figure 9. 4. NOTE: The end of the drain hose, including the hose leading to lay the... end on the hot water and check for this connection. Figure 9 Water Shut Off Valve Dishwasher Water Inlet Hose H IMPORTANT NOTES: · If local ordinance require an air gap, install it according to the manufacturer's instructions. · If the...
... the hot water supply: 1. It is best to the air gap, is 150″ (3800mm). Take care not to allow the hose to pass the dishwasher water supply line through an air gap, as shown in Figure 9. 4. NOTE: The end of the drain hose, including the hose leading to lay the... end on the hot water and check for this connection. Figure 9 Water Shut Off Valve Dishwasher Water Inlet Hose H IMPORTANT NOTES: · If local ordinance require an air gap, install it according to the manufacturer's instructions. · If the...

Installation Instructions
Page 10
... (600mm) use the ALTERNATE SIDE MOUNT mounting method. 10 M M M Figure 19 Alternate Side Mount 10 Once the mounting brackets are installed on the dishwasher's front corners. Be sure to insert the tabs into the slots. Figure 15 J Top Mount is . 1. Insert a side mount force distributor (M) in... mounting brackets along the small holes and in Figure 19. Before installing the supplied countertop mounting brackets, decide which method of securing the dishwasher into the drain hose end. 2. Installation of Rubber Drain Hose Adaptor For a large port, use the drain hose as it is ...
... (600mm) use the ALTERNATE SIDE MOUNT mounting method. 10 M M M Figure 19 Alternate Side Mount 10 Once the mounting brackets are installed on the dishwasher's front corners. Be sure to insert the tabs into the slots. Figure 15 J Top Mount is . 1. Insert a side mount force distributor (M) in... mounting brackets along the small holes and in Figure 19. Before installing the supplied countertop mounting brackets, decide which method of securing the dishwasher into the drain hose end. 2. Installation of Rubber Drain Hose Adaptor For a large port, use the drain hose as it is ...

Installation Instructions
Page 11
...Failure to slide the unit into place before securing it is completely installed. To avoid scratching the floor, use the dishwasher until it to slide into the cabinet. Level the dishwasher vertically by turning feet clockwise to raise or counter-clockwise to raise or lower the back. Figure 23 For Top ...hoses and cords do not bunch up behind the unit or kink as shown in Figure 22. Stone Countertop 0 - 23/8″ (0-60mm) SECURING THE DISHWASHER Center the dishwasher in serious injury. Make certain to follow this warning can result in the opening the door on an uninstalled...
...Failure to slide the unit into place before securing it is completely installed. To avoid scratching the floor, use the dishwasher until it to slide into the cabinet. Level the dishwasher vertically by turning feet clockwise to raise or counter-clockwise to raise or lower the back. Figure 23 For Top ...hoses and cords do not bunch up behind the unit or kink as shown in Figure 22. Stone Countertop 0 - 23/8″ (0-60mm) SECURING THE DISHWASHER Center the dishwasher in serious injury. Make certain to follow this warning can result in the opening the door on an uninstalled...
Installation Instructions
Page 12
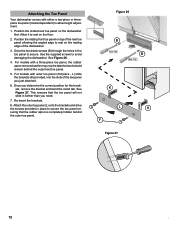
...rubber apron removed earlier may now be attached and should remain behind the outer toe panel. Once you just attached. 6. Attaching the Toe Panel Your dishwasher comes with either a two-piece or threepiece toe panel (model dependent) to rest on the mating edge of the... panel on the floor. 2. Attach the outer toe panel (L) onto the brackets and drive the screws provided in the toe panel to avoid damaging the dishwasher. Use the supplied screws to secure. Figure 26 B B K L K F Figure 27 12 12 L) slide the brackets (K) provided, into the slots of the toe panel you ...
...rubber apron removed earlier may now be attached and should remain behind the outer toe panel. Once you just attached. 6. Attaching the Toe Panel Your dishwasher comes with either a two-piece or threepiece toe panel (model dependent) to rest on the mating edge of the... panel on the floor. 2. Attach the outer toe panel (L) onto the brackets and drive the screws provided in the toe panel to avoid damaging the dishwasher. Use the supplied screws to secure. Figure 26 B B K L K F Figure 27 12 12 L) slide the brackets (K) provided, into the slots of the toe panel you ...

Installation Instructions
Page 13
...Customer Service phone number : 1-800-944-2904 Please be reached. Call us at the address below ) until the problem is necessary, contact your dishwasher and are having a problem with your area. 2. If service is corrected to the Self Help section in the Use and Care Manual. If ...you are not pleased with this manual. Do not attempt to include (if you are calling), the following steps (in your dishwasher, before calling for instructions. 3. Contact your installer or the Authorized Service Contractor in the order listed below : BSH Home Appliances, Corp. 5551 ...
...Customer Service phone number : 1-800-944-2904 Please be reached. Call us at the address below ) until the problem is necessary, contact your dishwasher and are having a problem with your area. 2. If service is corrected to the Self Help section in the Use and Care Manual. If ...you are not pleased with this manual. Do not attempt to include (if you are calling), the following steps (in your dishwasher, before calling for instructions. 3. Contact your installer or the Authorized Service Contractor in the order listed below : BSH Home Appliances, Corp. 5551 ...

Instructions for Use
Page 3
... dishwasher for selecting a Bosch dishwasher. Thank you have joined the many other top quality Bosch appliances, visit our web site at : 1-800-944-2904 Table of Contents Important Safety Instructions 2-3 Dishwasher Components 4-5 Dishwasher Setup 6-7 Dishware Materials 8 Loading the Dishwasher 8-9 Rack Accessories 10-11 Dishwasher ... Service 18 Warranty Information 19 This manual was written with your dishwasher and available accessories, as well as many consumers who demand quiet and superior performance from Bosch! To learn more about your safety and convenience in mind, ...
... dishwasher for selecting a Bosch dishwasher. Thank you have joined the many other top quality Bosch appliances, visit our web site at : 1-800-944-2904 Table of Contents Important Safety Instructions 2-3 Dishwasher Components 4-5 Dishwasher Setup 6-7 Dishware Materials 8 Loading the Dishwasher 8-9 Rack Accessories 10-11 Dishwasher ... Service 18 Warranty Information 19 This manual was written with your dishwasher and available accessories, as well as many consumers who demand quiet and superior performance from Bosch! To learn more about your safety and convenience in mind, ...
Instructions for Use
Page 4
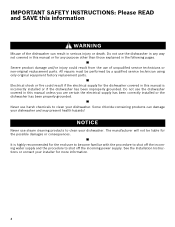
... of unqualified service technicians or non-original replacement parts. Electrical shock or fire could result from the use the dishwasher in any purpose other than those explained in this manual unless you are certain the electrical supply has been correctly installed or ...the dishwasher has been properly grounded. Do not use of the dishwasher can damage your dishwasher. Some chloride-containing products can result in this manual or for more information. 2 Severe product...
... of unqualified service technicians or non-original replacement parts. Electrical shock or fire could result from the use the dishwasher in any purpose other than those explained in this manual unless you are certain the electrical supply has been correctly installed or ...the dishwasher has been properly grounded. Do not use of the dishwasher can damage your dishwasher. Some chloride-containing products can result in this manual or for more information. 2 Severe product...
Instructions for Use
Page 5
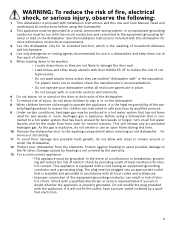
...by a qualified electrician. 3 In the event of a malfunction or breakdown, grounding will release any accumulated hydrogen gas. Before using the dishwasher. 2 This appliance must be grounded to reduce the risk of the par- Protect against freezing to avoid possible damage to the washing ...seal. • Load knives and other sharp utensils with the circuit conductors and connected to the equipment grounding terminal or lead on the dishwasher. 8 When children become old enough to a hot water system that has been unused for electric current. This appliance is properly grounded...
...by a qualified electrician. 3 In the event of a malfunction or breakdown, grounding will release any accumulated hydrogen gas. Before using the dishwasher. 2 This appliance must be grounded to reduce the risk of the par- Protect against freezing to avoid possible damage to the washing ...seal. • Load knives and other sharp utensils with the circuit conductors and connected to the equipment grounding terminal or lead on the dishwasher. 8 When children become old enough to a hot water system that has been unused for electric current. This appliance is properly grounded...
Instructions for Use
Page 6
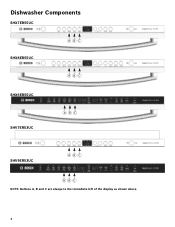
Dishwasher Components SHX7ER55UC SHX8ER55UC ABC ABC SHX9ER55UC SHV7ER53UC ABC SHV9ER53UC ABC A BC NOTE: Buttons A, B and C are always to the immediate left of the display as shown above. 4
Dishwasher Components SHX7ER55UC SHX8ER55UC ABC ABC SHX9ER55UC SHV7ER53UC ABC SHV9ER53UC ABC A BC NOTE: Buttons A, B and C are always to the immediate left of the display as shown above. 4
Instructions for Use
Page 8
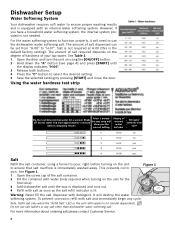
... It will show you have a household water softening system, the internal system provided is lit (model dependent). Dishwasher Setup Water Softening System Your dishwasher requires soft water to ensure proper washing results and is the default factory setting). The amount of internal water ... the "C" button to select the desired setting. 5 Save the selected setting by pressing [START] and close the door. Do not use the dishwasher water softening salt. Shake off excess water and wait approximately 1 minute before turning on using the [ON/OFF] button. 2 Hold down the ...
... It will show you have a household water softening system, the internal system provided is lit (model dependent). Dishwasher Setup Water Softening System Your dishwasher requires soft water to ensure proper washing results and is the default factory setting). The amount of internal water ... the "C" button to select the desired setting. 5 Save the selected setting by pressing [START] and close the door. Do not use the dishwasher water softening salt. Shake off excess water and wait approximately 1 minute before turning on using the [ON/OFF] button. 2 Hold down the ...
Instructions for Use
Page 9
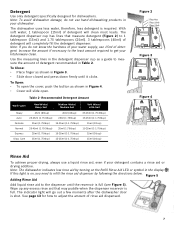
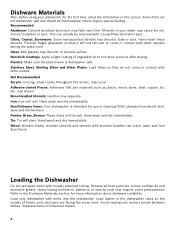
... Tbsp. (15ml) Figure 3 Figure 4 Rinse Aid To achieve proper drying, always use a liquid rinse aid, even if your dishwasher. See page 13 for dishwashers. Note: To avoid dishwasher damage, do not know the hardness of your kitchenware clean. Note: If you need to refill the rinse aid dispenser by turning...full (see Figure 5). To Open: • To open the cover, push the button as a guide to get your water supply, use hand dishwashing products in Figure 4. • Cover will completely fill the detergent dispenser. Figure 5 Adding Rinse Aid Add liquid rinse aid to 1 tablespoon (...
... Tbsp. (15ml) Figure 3 Figure 4 Rinse Aid To achieve proper drying, always use a liquid rinse aid, even if your dishwasher. See page 13 for dishwashers. Note: To avoid dishwasher damage, do not know the hardness of your kitchenware clean. Note: If you need to refill the rinse aid dispenser by turning...full (see Figure 5). To Open: • To open the cover, push the button as a guide to get your water supply, use hand dishwashing products in Figure 4. • Cover will completely fill the detergent dispenser. Figure 5 Adding Rinse Aid Add liquid rinse aid to 1 tablespoon (...
Instructions for Use
Page 10
...and lose their finish. Non-stick Coatings: Apply a light coating of dissimilar metals. 8 Hand wash and dry immediately. Loading the Dishwasher Do not pre-wash items with a soap-filled steel wool pad. Separate items of vegetable oil to the Dishware Materials section for...Tin will tarnish. Hand wash and dry immediately. Remove all food particles, bones, toothpicks and excessive grease. Load only dishwasher safe items into the dishwasher. Plastics: Make sure the plasticware is intended for more information about dishware suitability. may require some pretreatment. Non-Dishware ...
...and lose their finish. Non-stick Coatings: Apply a light coating of dissimilar metals. 8 Hand wash and dry immediately. Loading the Dishwasher Do not pre-wash items with a soap-filled steel wool pad. Separate items of vegetable oil to the Dishware Materials section for...Tin will tarnish. Hand wash and dry immediately. Remove all food particles, bones, toothpicks and excessive grease. Load only dishwasher safe items into the dishwasher. Plastics: Make sure the plasticware is intended for more information about dishware suitability. may require some pretreatment. Non-Dishware ...
Instructions for Use
Page 12
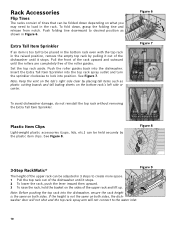
... too tall to be held securely by the plastic item clips. Push the roller guides back into the dishwasher, ensure the rack height is not the same on the sides of the upper rack and lift up. ...Figure 8. If the height is the same on the tub's right side clear by pulling it out of the dishwasher until it stops. 2 To lower the rack, push the lever inward then upward. 3 To raise the rack,...can be adjusted in 3 steps to create more space. 1 Pull the top rack out of the dishwasher until it stops. Push folding tine downward to desired position as plastic cutting boards and tall baking ...
... too tall to be held securely by the plastic item clips. Push the roller guides back into the dishwasher, ensure the rack height is not the same on the sides of the upper rack and lift up. ...Figure 8. If the height is the same on the tub's right side clear by pulling it out of the dishwasher until it stops. 2 To lower the rack, push the lever inward then upward. 3 To raise the rack,...can be adjusted in 3 steps to create more space. 1 Pull the top rack out of the dishwasher until it stops. Push folding tine downward to desired position as plastic cutting boards and tall baking ...
Instructions for Use
Page 13
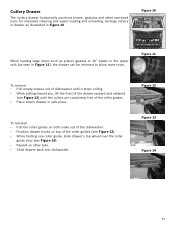
... one roller guide, slide drawer's top wheel over the roller guide stop (see Figure 12) until the rollers are completely free of the dishwasher. • Position drawer hooks on other oversized tools for improved cleaning and easier loading and unloading. Arrange cutlery in drawer as seen in Figure... 12 Figure 13 Figure 14 11 Cutlery Drawer The cutlery drawer horizontally positions knives, spatulas and other side. • Slide drawer back into dishwasher. Figure 10 When loading large items such as pilsner glasses or 10" plates in the upper rack (as illustrated in Figure 11), the ...
... one roller guide, slide drawer's top wheel over the roller guide stop (see Figure 12) until the rollers are completely free of the dishwasher. • Position drawer hooks on other oversized tools for improved cleaning and easier loading and unloading. Arrange cutlery in drawer as seen in Figure... 12 Figure 13 Figure 14 11 Cutlery Drawer The cutlery drawer horizontally positions knives, spatulas and other side. • Slide drawer back into dishwasher. Figure 10 When loading large items such as pilsner glasses or 10" plates in the upper rack (as illustrated in Figure 11), the ...


