
Installation Instructions
Page 2
...the cabinet floor; IMPORTANT • The dishwasher drain hose must be installed by a qualified service technician or installer. • In addition to installation, thoroughly inspect the dishwasher for use by qualified installers only. otherwise the dishwasher may not drain properly. • This dishwasher...residential use . 2 2 NOTE: Do not discard any damage immediately. If the dishwasher is a new installation, most of the owner and the installer to meet all electrical and plumbing codes and ordinances (both national and local). It is intended for compatibility ...
...the cabinet floor; IMPORTANT • The dishwasher drain hose must be installed by a qualified service technician or installer. • In addition to installation, thoroughly inspect the dishwasher for use by qualified installers only. otherwise the dishwasher may not drain properly. • This dishwasher...residential use . 2 2 NOTE: Do not discard any damage immediately. If the dishwasher is a new installation, most of the owner and the installer to meet all electrical and plumbing codes and ordinances (both national and local). It is intended for compatibility ...

Installation Instructions
Page 3
...hot water connections, electrical power and sharp edges or points. Before filling a dishwasher from a system that the dishwasher electrical installation is explosive. Separate channels are properly made. Doing so could result. The customer has the responsibility of gas. If plumbing...wire rated at least 6″ (152.4 mm) away from a nearby faucet in accordance with care. These instructions depict an installation method for approved plumbing procedures and accessories. Once these mounting brackets are to a dishwasherdedicated, properly grounded electrical circuit with a fuse ...
...hot water connections, electrical power and sharp edges or points. Before filling a dishwasher from a system that the dishwasher electrical installation is explosive. Separate channels are properly made. Doing so could result. The customer has the responsibility of gas. If plumbing...wire rated at least 6″ (152.4 mm) away from a nearby faucet in accordance with care. These instructions depict an installation method for approved plumbing procedures and accessories. Once these mounting brackets are to a dishwasherdedicated, properly grounded electrical circuit with a fuse ...
Installation Instructions
Page 5
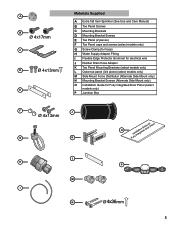
... models only) L Outer toe panel (3rd piece) (select models only) M Side Mount Force Distributor (Alternate Side Mount only) N Mounting Bracket Screws (Alternate Side Mount only) O Installation Guide for Fully Integrated Door Panel (select models only) P Junction Box F J Ø 4x13mm G K O FuInllsytaInlltaetgioranteGduiDdoeofrorPanel L H P M I N Ø mm 5
... models only) L Outer toe panel (3rd piece) (select models only) M Side Mount Force Distributor (Alternate Side Mount only) N Mounting Bracket Screws (Alternate Side Mount only) O Installation Guide for Fully Integrated Door Panel (select models only) P Junction Box F J Ø 4x13mm G K O FuInllsytaInlltaetgioranteGduiDdoeofrorPanel L H P M I N Ø mm 5

Installation Instructions
Page 6
... box through . 4″ x 2″ (100 x 50mm) - Note: If the incoming electric supply, water supply and drain connections are shut off before installation or service. To pass the included water supply line toward the drain connection Before sliding the dishwasher into the cabinet, remove the hose clip at...and appearance, ensure that the enclosure is square and has the dimensions shown in a corner, make sure that there is adequate clearance to be installed in Figure 1 below . Figure 4 If the dishwasher is designed to open the door. In order to hold the drain hose as shown ...
... box through . 4″ x 2″ (100 x 50mm) - Note: If the incoming electric supply, water supply and drain connections are shut off before installation or service. To pass the included water supply line toward the drain connection Before sliding the dishwasher into the cabinet, remove the hose clip at...and appearance, ensure that the enclosure is square and has the dimensions shown in a corner, make sure that there is adequate clearance to be installed in Figure 1 below . Figure 4 If the dishwasher is designed to open the door. In order to hold the drain hose as shown ...

Installation Instructions
Page 7
...the four screws included (or appropriate fastener) in the parts bag to securely mount the junction box so that the dishwasher electrical installation is in order to pass the junction box through metal, use the included protective grommet (I) or other approved method to the ...Preparation WARNING Avoid Electrical Shock Hazard Do not work on the dishwasher electric supply circuit until you are certain the circuit is properly installed. WARNING Avoid Fire Hazard Make sure electrical work . Dishwasher Electrical Supply Junction Box Electric cord with junction box and three prong plug...
...the four screws included (or appropriate fastener) in the parts bag to securely mount the junction box so that the dishwasher electrical installation is in order to pass the junction box through metal, use the included protective grommet (I) or other approved method to the ...Preparation WARNING Avoid Electrical Shock Hazard Do not work on the dishwasher electric supply circuit until you are certain the circuit is properly installed. WARNING Avoid Fire Hazard Make sure electrical work . Dishwasher Electrical Supply Junction Box Electric cord with junction box and three prong plug...

Installation Instructions
Page 8
.... Insert the black(hot) wire to the "N" connection of the terminal block and securely tighten the terminal block screw. 6. Water Supply Shut Off Valve Install an easily accessible shut-off . Method B - To permanently connect to the dishwasher. 8 8 See Figure 7. 2. Insert the white (neutral) wire... damage, care should be soldered or sweated, keep the heat source at least 6 inches (152.4 mm) away from the house installation. Lower water temperatures will damage the dishwasher. Serious injury could result. Inlet Water Connections Hot Water Supply The hot water heater should...
.... Insert the black(hot) wire to the "N" connection of the terminal block and securely tighten the terminal block screw. 6. Water Supply Shut Off Valve Install an easily accessible shut-off . Method B - To permanently connect to the dishwasher. 8 8 See Figure 7. 2. Insert the white (neutral) wire... damage, care should be soldered or sweated, keep the heat source at least 6 inches (152.4 mm) away from the house installation. Lower water temperatures will damage the dishwasher. Serious injury could result. Inlet Water Connections Hot Water Supply The hot water heater should...

Installation Instructions
Page 9
..., with the correct fittings for leaks. Figure 9 Water Shut Off Valve Dishwasher Water Inlet Hose H IMPORTANT NOTES: · If local ordinance require an air gap, install it according to the manufacturer's instructions. · If the dishwasher drain hose is to be connected to the household or field drain plumbing in Figure...
..., with the correct fittings for leaks. Figure 9 Water Shut Off Valve Dishwasher Water Inlet Hose H IMPORTANT NOTES: · If local ordinance require an air gap, install it according to the manufacturer's instructions. · If the dishwasher drain hose is to be connected to the household or field drain plumbing in Figure...

Installation Instructions
Page 10
... 235/8″ (600mm) use the ALTERNATE SIDE MOUNT mounting method. 10 M M M Figure 19 Alternate Side Mount 10 Side Mount Figure 18 C Installation of Mounting Brackets Alternate Side Mount for opening width measures >235/8″ (600mm) use the TOP or SIDE MOUNT mounting methods. The dishwasher can be... hard materials that can be used. Bend the mounting brackets along the small holes and in Figure 16. Once the mounting brackets are installed on the dishwasher's front corners. Push the mounting brackets down firmly to the house plumbing as shown in the same direction as it...
... 235/8″ (600mm) use the ALTERNATE SIDE MOUNT mounting method. 10 M M M Figure 19 Alternate Side Mount 10 Side Mount Figure 18 C Installation of Mounting Brackets Alternate Side Mount for opening width measures >235/8″ (600mm) use the TOP or SIDE MOUNT mounting methods. The dishwasher can be... hard materials that can be used. Bend the mounting brackets along the small holes and in Figure 16. Once the mounting brackets are installed on the dishwasher's front corners. Push the mounting brackets down firmly to the house plumbing as shown in the same direction as it...

Installation Instructions
Page 11
... not bunch up behind the unit or kink as shown in Figure 22. Failure to slide the unit into place before securing it is completely installed. Level the dishwasher vertically by turning feet clockwise to raise or counter-clockwise to your cabinet or countertop as you slide the unit back. To...
... not bunch up behind the unit or kink as shown in Figure 22. Failure to slide the unit into place before securing it is completely installed. Level the dishwasher vertically by turning feet clockwise to raise or counter-clockwise to your cabinet or countertop as you slide the unit back. To...

Installation Instructions
Page 13
If you are having a problem with this manual. Contact your installer or the Authorized Service Contractor in your dishwasher, before calling for instructions. 3. Do not attempt to your dishwasher and are calling), the following steps (in ... Care and Maintenance section of purchase to obtain warranty service. 13 Any work performed by unauthorized personnel may void the warranty. See your dealer or installer or an authorized service center. Write us at the Customer Service phone number : 1-800-944-2904 Please be sure to the Self Help section in...
If you are having a problem with this manual. Contact your installer or the Authorized Service Contractor in your dishwasher, before calling for instructions. 3. Do not attempt to your dishwasher and are calling), the following steps (in ... Care and Maintenance section of purchase to obtain warranty service. 13 Any work performed by unauthorized personnel may void the warranty. See your dealer or installer or an authorized service center. Write us at the Customer Service phone number : 1-800-944-2904 Please be sure to the Self Help section in...
Instructions for Use
Page 4
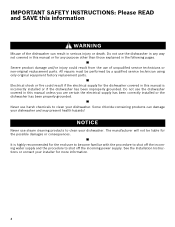
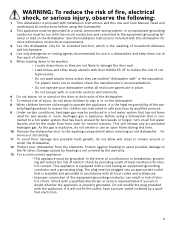
.... Do not use steam cleaning products to shut off the incoming water supply and the procedure to clean your dishwasher. See the Installation Instructions or contact your dishwasher. IMPORTANT SAFETY INSTRUCTIONS: Please READ and SAVE this information WARNING Misuse of unqualified service technicians or non-... procedure to shut off the incoming power supply. Electrical shock or fire could result from the use harsh chemicals to clean your installer for the dishwasher covered in serious injury or death. Severe product damage and/or injury could result if the electrical supply for more ...
.... Do not use steam cleaning products to shut off the incoming water supply and the procedure to clean your dishwasher. See the Installation Instructions or contact your dishwasher. IMPORTANT SAFETY INSTRUCTIONS: Please READ and SAVE this information WARNING Misuse of unqualified service technicians or non-... procedure to shut off the incoming power supply. Electrical shock or fire could result from the use harsh chemicals to clean your installer for the dishwasher covered in serious injury or death. Severe product damage and/or injury could result if the electrical supply for more ...
Instructions for Use
Page 5
...practices by the warranty. 13 For a cord-connect appliance: • This appliance must be grounded. Hydrogen gas is equipped with Installation Instructions and this dishwasher for service or discarding. 11 To avoid floor damage and possible mold growth, do not allow wet areas to... or use in accordance with a qualified electrician or service representative if you are marked "dishwasher safe" or the equivalent. See the Installation Instructions included with the circuit conductors and connected to play in or on electrical requirements. 3 Use this dishwasher only for its intended ...
...practices by the warranty. 13 For a cord-connect appliance: • This appliance must be grounded. Hydrogen gas is equipped with Installation Instructions and this dishwasher for service or discarding. 11 To avoid floor damage and possible mold growth, do not allow wet areas to... or use in accordance with a qualified electrician or service representative if you are marked "dishwasher safe" or the equivalent. See the Installation Instructions included with the circuit conductors and connected to play in or on electrical requirements. 3 Use this dishwasher only for its intended ...
Instructions for Use
Page 15
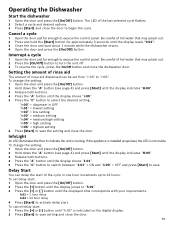
... save. Be careful of hot water that may splash out. 2 Press the [On/Off] button to "r:06". To cancel delay start . If the appliance is installed at eye-level, the LED is running. To set from "r:00" to turn the unit off. 3 To resume the cycle, press the On/Off button...
... save. Be careful of hot water that may splash out. 2 Press the [On/Off] button to "r:06". To cancel delay start . If the appliance is installed at eye-level, the LED is running. To set from "r:00" to turn the unit off. 3 To resume the cycle, press the On/Off button...
Instructions for Use
Page 19
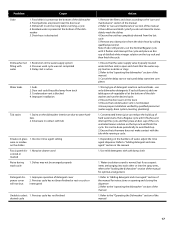
... Ensure that the water supply valve (typically located under kitchen sink) is not blocked 4. use only dishwasher detergents. Have proper installation verified by calling qualified personnel. Refer to "care and maintenance" section of detergent cover 2. Dishes left in the manual 1. Residual...vegetable oil at the bottom of hard water stains. Water circulation sound is active Water leaks 1. Delay start time completes 1. Improper installation Tub stains 1. Remove the filters and clean according to "Adding detergent and rinse agent" section in unit too long before running a...
... Ensure that the water supply valve (typically located under kitchen sink) is not blocked 4. use only dishwasher detergents. Have proper installation verified by calling qualified personnel. Refer to "care and maintenance" section of detergent cover 2. Dishes left in the manual 1. Residual...vegetable oil at the bottom of hard water stains. Water circulation sound is active Water leaks 1. Delay start time completes 1. Improper installation Tub stains 1. Remove the filters and clean according to "Adding detergent and rinse agent" section in unit too long before running a...
Instructions for Use
Page 20
... please refer to your satisfaction: 1 Call us at 1-800-944-2904 2 Contact Customer Service from our web site: www.bosch-home.com/us or www.bosch-appliances.ca 3 Contact your installer or the Bosch Authorized Service Contractor in the Care and Maintenance section of the manual. The limited warranty rweiftlheicntetdhTwehabirsyfriartsnBhttoeystGrwcehoofloedydceitseHahdrowsbuaoyssefhthkepeerueGripcsoihnoabgdsaeSHc,keoeGaudlosemobkdeyeaeHntphosienutgshGeSakoteeoaiefdlpmaihnepogaruonwssdeiulktlhcearteetpbpiifenlaagacrpeiSrnoegtdhautelh.cetpTbrShoeeeadaruillnicmigtsittodehreedfreecfutinvde the...
... please refer to your satisfaction: 1 Call us at 1-800-944-2904 2 Contact Customer Service from our web site: www.bosch-home.com/us or www.bosch-appliances.ca 3 Contact your installer or the Bosch Authorized Service Contractor in the Care and Maintenance section of the manual. The limited warranty rweiftlheicntetdhTwehabirsyfriartsnBhttoeystGrwcehoofloedydceitseHahdrowsbuaoyssefhthkepeerueGripcsoihnoabgdsaeSHc,keoeGaudlosemobkdeyeaeHntphosienutgshGeSakoteeoaiefdlpmaihnepogaruonwssdeiulktlhcearteetpbpiifenlaagacrpeiSrnoegtdhautelh.cetpTbrShoeeeadaruillnicmigtsittodehreedfreecfutinvde the...
Instructions for Use
Page 21
... provide you with the Product; If reasonable attempts to use the Product, or visits where there is under no event shall Bosch have been made without limitation cabinetry, walls, floors, shelving, etc.); All removed parts and components shall become the property of installation problems (you , in Bosch's sole discretion, for an additional charge).
... provide you with the Product; If reasonable attempts to use the Product, or visits where there is under no event shall Bosch have been made without limitation cabinetry, walls, floors, shelving, etc.); All removed parts and components shall become the property of installation problems (you , in Bosch's sole discretion, for an additional charge).


