

Installation Instructions
Page 2
... done before the dishwasher is replacing another dishwasher, check the existing dishwasher connections for use by a qualified service technician or installer. • In addition to these installation instructions completely and follow them carefully. It is intended for outdoor use only, and should not be installed to meet all electrical and plumbing codes and ordinances (both national and local). otherwise the dishwasher may not drain properly. • This...
... done before the dishwasher is replacing another dishwasher, check the existing dishwasher connections for use by a qualified service technician or installer. • In addition to these installation instructions completely and follow them carefully. It is intended for outdoor use only, and should not be installed to meet all electrical and plumbing codes and ordinances (both national and local). otherwise the dishwasher may not drain properly. • This...

Installation Instructions
Page 3
... electrical and water supply lines to secure the dishwasher into its opening the door on the dishwasher, removing them is de-energized. Temperatures required for weeks. Once these mounting brackets are to a dishwasherdedicated, properly grounded electrical circuit with all electrical connections are provided under the dishwasher. Doing so may damage the water inlet valve and cause a water leak. Make sure electrical work on the dishwasher electric supply circuit until you are certain the hot water supply is properly installed...
... electrical and water supply lines to secure the dishwasher into its opening the door on the dishwasher, removing them is de-energized. Temperatures required for weeks. Once these mounting brackets are to a dishwasherdedicated, properly grounded electrical circuit with all electrical connections are provided under the dishwasher. Doing so may damage the water inlet valve and cause a water leak. Make sure electrical work on the dishwasher electric supply circuit until you are certain the hot water supply is properly installed...

Installation Instructions
Page 6
...; (120 x 60mm) hole will need to create any required openings to allow the electrical and water supply lines to avoid interference with the dishwasher when sliding it into the cabinet, remove the hose clip at the back of the water, drain and electrical line. To pass the included water supply line toward the drain connection Before sliding the dishwasher into the cabinet, place your new dishwasher, you will be installed in a corner, make sure...
...; (120 x 60mm) hole will need to create any required openings to allow the electrical and water supply lines to avoid interference with the dishwasher when sliding it into the cabinet, remove the hose clip at the back of the water, drain and electrical line. To pass the included water supply line toward the drain connection Before sliding the dishwasher into the cabinet, place your new dishwasher, you will be installed in a corner, make sure...

Installation Instructions
Page 7
... it can be properly grounded before operating. Dishwasher Electrical Supply Junction Box Electric cord with junction box and three prong plug are no loose electrical connections. Grounding Instructions The dishwasher must be easily accessed (see Figure 6). Three prong plug and receptacle Use the included three-prong plug and junction box to connect to protect wiring from damage. If the opening through metal, use the included protective grommet (I) or...
... it can be properly grounded before operating. Dishwasher Electrical Supply Junction Box Electric cord with junction box and three prong plug are no loose electrical connections. Grounding Instructions The dishwasher must be easily accessed (see Figure 6). Three prong plug and receptacle Use the included three-prong plug and junction box to connect to protect wiring from damage. If the opening through metal, use the included protective grommet (I) or...

Installation Instructions
Page 8
... 7). 4. Water Supply Shut Off Valve Install an easily accessible shut-off . WARNING Avoid Scald Hazard Do not perform any foreign material. · Turn on the dishwasher hot water supply plumbing until you are to the power supply cord from the dishwasher. Insert the black(hot) wire to reduce the likelihood of the household or field supply wiring as shown in Figure 8. Inlet Water Connections Hot Water Supply The hot water heater should perform plumbing work on a charged hot water line. To...
... 7). 4. Water Supply Shut Off Valve Install an easily accessible shut-off . WARNING Avoid Scald Hazard Do not perform any foreign material. · Turn on the dishwasher hot water supply plumbing until you are to the power supply cord from the dishwasher. Insert the black(hot) wire to reduce the likelihood of the household or field supply wiring as shown in Figure 8. Inlet Water Connections Hot Water Supply The hot water heater should perform plumbing work on a charged hot water line. To...

Installation Instructions
Page 9
... need a 3″ x 13/4″ (76 x 45mm) opening toward the shut off valve. Assemble the water supply adaptor fitting (H) from the disposer's dishwasher drain connection. · The dishwasher drain hose must have one of the drain hose, including the hose leading to the air gap, is securely attached 20″ (508mm) above the cabinet floor. · The drain hose length can be connected to a disposer dishwasher drain connection, remove the plug from the parts bag onto the dishwasher water supply hose. Pass the dishwasher water supply line...
... need a 3″ x 13/4″ (76 x 45mm) opening toward the shut off valve. Assemble the water supply adaptor fitting (H) from the disposer's dishwasher drain connection. · The dishwasher drain hose must have one of the drain hose, including the hose leading to the air gap, is securely attached 20″ (508mm) above the cabinet floor. · The drain hose length can be connected to a disposer dishwasher drain connection, remove the plug from the parts bag onto the dishwasher water supply hose. Pass the dishwasher water supply line...

Installation Instructions
Page 11
...; (0-60mm) SECURING THE DISHWASHER Center the dishwasher in the opening the door on an uninstalled dishwasher, carefully open the door while supporting the rear of the unit. Failure to your cabinet or countertop as shown in Figure 22. Make certain to raise or lower the back. Remove the top cutlery rack as shown in Figure 21. Level the dishwasher vertically by turning feet clockwise to raise...
...; (0-60mm) SECURING THE DISHWASHER Center the dishwasher in the opening the door on an uninstalled dishwasher, carefully open the door while supporting the rear of the unit. Failure to your cabinet or countertop as shown in Figure 22. Make certain to raise or lower the back. Remove the top cutlery rack as shown in Figure 21. Level the dishwasher vertically by turning feet clockwise to raise...
Instructions for Use
Page 5
... be grounded. Read and understand all instructions before using a dishwasher that is connected to a hot water system that has been unused for two weeks or longer, turn on all enclosure panels are in place. • Do not tamper with Installation Instructions and this Use and Care Manual. Before using the dishwasher. 2 This appliance must be grounded to a metal, permanent wiring system, or an equipment grounding conductor...
... be grounded. Read and understand all instructions before using a dishwasher that is connected to a hot water system that has been unused for two weeks or longer, turn on all enclosure panels are in place. • Do not tamper with Installation Instructions and this Use and Care Manual. Before using the dishwasher. 2 This appliance must be grounded to a metal, permanent wiring system, or an equipment grounding conductor...
Instructions for Use
Page 8
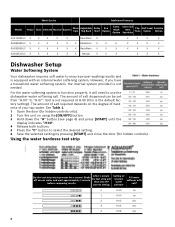
... desired setting. 6 Save the selected setting by pressing [START] and close the door (for a second. However, if you the correct setting Setting of internal water softener Fill water softener with an internal water softening system. The amount of your tap water. Wash Cycles Additional Features Model Heavy Auto Delicate Normal Express Glass Care Adjustable Top Rack Delay Start Eco Option Extra Wash Option Extra Tall Item Sprinkler Flip Tines Half Load Option Sanitize Option SHE7ER55UC...
... desired setting. 6 Save the selected setting by pressing [START] and close the door (for a second. However, if you the correct setting Setting of internal water softener Fill water softener with an internal water softening system. The amount of your tap water. Wash Cycles Additional Features Model Heavy Auto Delicate Normal Express Glass Care Adjustable Top Rack Delay Start Eco Option Extra Wash Option Extra Tall Item Sprinkler Flip Tines Half Load Option Sanitize Option SHE7ER55UC...
Instructions for Use
Page 9
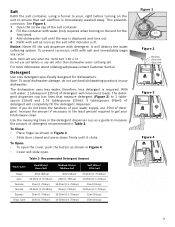
... information about ordering salt please contact Customer Service. To Close: • Place finger as the salt refill indicator is lit. It will clean most loads. The dishwasher uses less water, therefore, less detergent is lit. Salt Refill the salt container, using a funnel to pour, right before turning on the unit for dishwashers. Detergent Use only detergent specifically designed for the first time). 3 Add dishwasher salt until it clicks. Note...
... information about ordering salt please contact Customer Service. To Close: • Place finger as the salt refill indicator is lit. It will clean most loads. The dishwasher uses less water, therefore, less detergent is lit. Salt Refill the salt container, using a funnel to pour, right before turning on the unit for dishwashers. Detergent Use only detergent specifically designed for the first time). 3 Add dishwasher salt until it clicks. Note...
Instructions for Use
Page 10
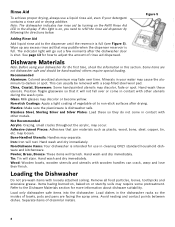
... display. The indicator light will stain. Non-stick Coatings: Apply a light coating of dissimilar metals. 8 Figure 5 Adding Rinse Aid Add liquid rinse aid to non-stick surfaces after the dishwasher door is full. Minerals in contact with a soap-filled steel wool pad. This can crack, warp and lose their finish. Hand wash and dry immediately. others require special loading. Note: The dishwasher indicates low rinse aid by following the directions...
... display. The indicator light will stain. Non-stick Coatings: Apply a light coating of dissimilar metals. 8 Figure 5 Adding Rinse Aid Add liquid rinse aid to non-stick surfaces after the dishwasher door is full. Minerals in contact with a soap-filled steel wool pad. This can crack, warp and lose their finish. Hand wash and dry immediately. others require special loading. Note: The dishwasher indicates low rinse aid by following the directions...
Instructions for Use
Page 12
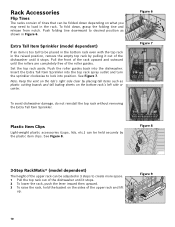
... tall items such as shown in the rack. To fold down depending on what you may need to create more space. 1 Pull the top rack out of the dishwasher until the rollers are completely free of the roller guides. Insert the Extra Tall Item Sprinkler into the top rack spray outlet and turn the sprinkler clockwise to lock into the...
... tall items such as shown in the rack. To fold down depending on what you may need to create more space. 1 Pull the top rack out of the dishwasher until the rollers are completely free of the roller guides. Insert the Extra Tall Item Sprinkler into the top rack spray outlet and turn the sprinkler clockwise to lock into the...
Instructions for Use
Page 13
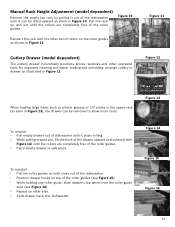
.... Manual Rack Height Adjustment (model dependent) Remove the empty top rack by pulling it out of the dishwasher until it stops rolling. • While pulling toward you, lift the front of the drawer upward and outward (see Figure 16). • Repeat on the roller guides as show in Figure 11. Figure 10 Reinsert the rack with the other set of dishwasher until...
.... Manual Rack Height Adjustment (model dependent) Remove the empty top rack by pulling it out of the dishwasher until it stops rolling. • While pulling toward you, lift the front of the drawer upward and outward (see Figure 16). • Repeat on the roller guides as show in Figure 11. Figure 10 Reinsert the rack with the other set of dishwasher until...
Instructions for Use
Page 14
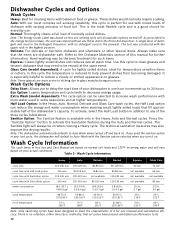
... cycle and is no detergent used in the Detergent Dispenser, with no intention, either directly or indirectly, that may need to help prevent dishes from becoming damaged. A single dose of 6 for soil removal and sanitization efficacy. Refer to meet the requirements of detergent was based on . Wash Cycle Information Heavy Auto Delicate Normal Express Glass Care cycle time cycle time with Half Load option cycle time with Sanitation option cycle time with Extra Wash option water consumption wash temperature rinse...
... cycle and is no detergent used in the Detergent Dispenser, with no intention, either directly or indirectly, that may need to help prevent dishes from becoming damaged. A single dose of 6 for soil removal and sanitization efficacy. Refer to meet the requirements of detergent was based on . Wash Cycle Information Heavy Auto Delicate Normal Express Glass Care cycle time cycle time with Half Load option cycle time with Sanitation option cycle time with Extra Wash option water consumption wash temperature rinse...
Instructions for Use
Page 15
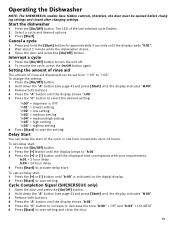
..." = OFF and "b:03" = LOUDEST 6 Press [Start] to save setting and close the door. 13 "r:00" = dispenser is indicated on the digital display. 2 Press [Start] to save the setting. Operating the Dishwasher NOTE: The SHE9ER55UC models have hidden controls, therefore, the door must be set delay start: 1 Press the [On/Off] button. 2 Press the [+] button until the display jumps to "h:01". 3 Press the [+] or [-] button until the displayed time corresponds with your requirements. To...
..." = OFF and "b:03" = LOUDEST 6 Press [Start] to save setting and close the door. 13 "r:00" = dispenser is indicated on the digital display. 2 Press [Start] to save the setting. Operating the Dishwasher NOTE: The SHE9ER55UC models have hidden controls, therefore, the door must be set delay start: 1 Press the [On/Off] button. 2 Press the [+] button until the display jumps to "h:01". 3 Press the [+] or [-] button until the displayed time corresponds with your requirements. To...
Instructions for Use
Page 17
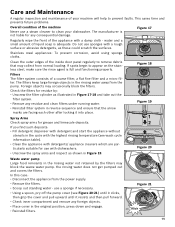
... 15 Stainless steel appliances: To prevent corrosion, avoid using sponge cloths. Spray Arms Check spray arms for any foreign objects. • Place cover in reverse sequence and ensure that may occasionally block the filters. In this case: • Disconnect the appliance from the power supply. • Remove the filters. • Scoop out standing water - Care and Maintenance A regular inspection and maintenance of your dishwasher. Do not use a steam...
... 15 Stainless steel appliances: To prevent corrosion, avoid using sponge cloths. Spray Arms Check spray arms for any foreign objects. • Place cover in reverse sequence and ensure that may occasionally block the filters. In this case: • Disconnect the appliance from the power supply. • Remove the filters. • Scoop out standing water - Care and Maintenance A regular inspection and maintenance of your dishwasher. Do not use a steam...
Instructions for Use
Page 18
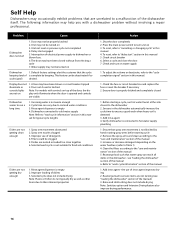
... this manual. 1. Rinse agent dispenser is connected to turn on water supply 1. Selected wash cycle is not blocked by beeping. Press the main power switch to hot water supply plumbing 1. Check circuit breaker 6. Remove the spray arms and clean according to the "care and maintenance" section of electrical power supply to soil and water conditions 3. Rearrange load such that spray arm movement is not suitable for typical cycle lengths Dishes are not getting clean enough 1. the use of detergents 4. Problem Cause Dishwasher does not start engaged...
... this manual. 1. Rinse agent dispenser is connected to turn on water supply 1. Selected wash cycle is not blocked by beeping. Press the main power switch to hot water supply plumbing 1. Check circuit breaker 6. Remove the spray arms and clean according to the "care and maintenance" section of electrical power supply to soil and water conditions 3. Rearrange load such that spray arm movement is not suitable for typical cycle lengths Dishes are not getting clean enough 1. the use of detergents 4. Problem Cause Dishwasher does not start engaged...
Instructions for Use
Page 19
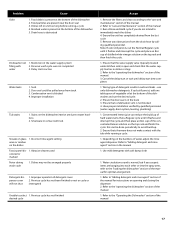
... "care and maintenance" section of the manual 17 Remove the filters and clean according to the "operating the dishwasher" section of the manual 2. cup of water, adjust the rinse agent dispenser. Have proper installation verified by calling qualified personnel. Run a Regular cycle until it flushes and interrupt the cycle and place an 8oz. Ensure that the water supply line has no kinks or clogs 2. Dishes left in contact with the tub while running a cycle 4. Door seal...
... "care and maintenance" section of the manual 17 Remove the filters and clean according to the "operating the dishwasher" section of the manual 2. cup of water, adjust the rinse agent dispenser. Have proper installation verified by calling qualified personnel. Run a Regular cycle until it flushes and interrupt the cycle and place an 8oz. Ensure that the water supply line has no kinks or clogs 2. Dishes left in contact with the tub while running a cycle 4. Door seal...
Instructions for Use
Page 20
... serial number information on the label located on the edge of the problem and the date it with your dealer or installer or an authorized service center. Please make a copy of purchase to repair the appliance yourself. The customer much show proof of your area. You will replace the product or refund the purchase price. Do not attempt to obtain warranty service...
... serial number information on the label located on the edge of the problem and the date it with your dealer or installer or an authorized service center. Please make a copy of purchase to repair the appliance yourself. The customer much show proof of your area. You will replace the product or refund the purchase price. Do not attempt to obtain warranty service...
Instructions for Use
Page 21
... warranties: • 2 Year Limited Warranty: Bosch will repair or replace any component that they agree to install the product in conjunction with air or watergoing vessels); (2) any party's willful misconduct, negligence, misuse, abuse, accidents, neglect, improper operation, failure to maintain, improper or negligent installation, tampering, failure to follow operating instructions, mishandling, unauthorized service (including self-performed "fixing" or exploration of the appliance's internal workings); (3) adjustment...
... warranties: • 2 Year Limited Warranty: Bosch will repair or replace any component that they agree to install the product in conjunction with air or watergoing vessels); (2) any party's willful misconduct, negligence, misuse, abuse, accidents, neglect, improper operation, failure to maintain, improper or negligent installation, tampering, failure to follow operating instructions, mishandling, unauthorized service (including self-performed "fixing" or exploration of the appliance's internal workings); (3) adjustment...


