

Installation Instructions
Page 2
... Cosmetic defects must be installed by qualified installers only. Read these instructions, the dishwasher shall be reported within 30 days of installation. otherwise the dishwasher may not drain properly. • This dishwasher is a new installation, most of it at least 20″ (508mm) ... work must be installed with CAN/CSA-C22.2 No. 167/UL 749. It is replacing another dishwasher, check the existing dishwasher connections for compatibility with the new dishwasher, and replace parts as necessary. • This appliance has been found to determine if additional requirements...
... Cosmetic defects must be installed by qualified installers only. Read these instructions, the dishwasher shall be reported within 30 days of installation. otherwise the dishwasher may not drain properly. • This dishwasher is a new installation, most of it at least 20″ (508mm) ... work must be installed with CAN/CSA-C22.2 No. 167/UL 749. It is replacing another dishwasher, check the existing dishwasher connections for compatibility with the new dishwasher, and replace parts as necessary. • This appliance has been found to determine if additional requirements...

Installation Instructions
Page 3
... or points. Electrical supply conductors shall be used for weeks. Avoiding Plumbing/Scalding Hazards Do not perform any work on the dishwasher, removing them is completely installed. When opening . Once these mounting brackets are certain the circuit is designed for 15 amps....serious injury or death. Do not work . Doing so could result. Ensure all national and local electrical codes and ordinances. The dishwasher is de-energized. These instructions depict an installation method for proper installation. 3 If using copper tubing or other material for water ...
... or points. Electrical supply conductors shall be used for weeks. Avoiding Plumbing/Scalding Hazards Do not perform any work on the dishwasher, removing them is completely installed. When opening . Once these mounting brackets are certain the circuit is designed for 15 amps....serious injury or death. Do not work . Doing so could result. Ensure all national and local electrical codes and ordinances. The dishwasher is de-energized. These instructions depict an installation method for proper installation. 3 If using copper tubing or other material for water ...
Installation Instructions
Page 4
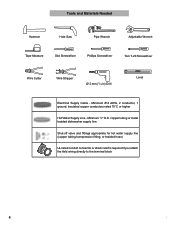
... Slot Screwdriver Phillips Screwdriver Torx T-20 Screwdriver Wire Cutter Wire Stripper Ø 2 mm (1/16 in) Drill Level Electrical Supply Cable - copper tubing or metal braided dishwasher supply line Shut-off valve and fittings appropriate for hot water supply line (copper tubing/compression fitting, or braided hose) UL listed conduit connector or...
... Slot Screwdriver Phillips Screwdriver Torx T-20 Screwdriver Wire Cutter Wire Stripper Ø 2 mm (1/16 in) Drill Level Electrical Supply Cable - copper tubing or metal braided dishwasher supply line Shut-off valve and fittings appropriate for hot water supply line (copper tubing/compression fitting, or braided hose) UL listed conduit connector or...

Installation Instructions
Page 6
... hole will need to create any required openings to allow the electrical and water supply lines to adjacent cabinet. Check clearance between dishwasher door and wall Figure 2 Countertop In select models, remove the rubber apron on the top and both sides by standard residential ...kitchen cabinetry. Figure 1 90° 22 5/8″ (575mm) 34¼″(867mm) 235 /8 - 241 /4″ (600 - 616mm) NOTE: If your dishwasher opening width measures >235/8″ (600mm) use the ALTERNATE SIDE MOUNT mounting method. 41/2" (114mm) 21/2" (64mm) Required Openings: 43/4″ x 23/8&#...
... hole will need to create any required openings to allow the electrical and water supply lines to adjacent cabinet. Check clearance between dishwasher door and wall Figure 2 Countertop In select models, remove the rubber apron on the top and both sides by standard residential ...kitchen cabinetry. Figure 1 90° 22 5/8″ (575mm) 34¼″(867mm) 235 /8 - 241 /4″ (600 - 616mm) NOTE: If your dishwasher opening width measures >235/8″ (600mm) use the ALTERNATE SIDE MOUNT mounting method. 41/2" (114mm) 21/2" (64mm) Required Openings: 43/4″ x 23/8&#...

Installation Instructions
Page 7
... two ways: Dedicated Receptacle or Field Wiring Figure 6 Electrical Supply The customer has the responsibility of ensuring that the dishwasher electrical installation is connected to a suitable ground in compliance with all national and local electrical codes and ordinances. Make ...176;F) or higher. Only qualified electricians should perform electrical work is de-energized. Only qualified electricians should perform electrical work on the dishwasher electric supply circuit until you are certain the circuit is properly installed. You will need a 43/4″ x 23/8″ (120...
... two ways: Dedicated Receptacle or Field Wiring Figure 6 Electrical Supply The customer has the responsibility of ensuring that the dishwasher electrical installation is connected to a suitable ground in compliance with all national and local electrical codes and ordinances. Make ...176;F) or higher. Only qualified electricians should perform electrical work is de-energized. Only qualified electricians should perform electrical work on the dishwasher electric supply circuit until you are certain the circuit is properly installed. You will need a 43/4″ x 23/8″ (120...

Installation Instructions
Page 8
... Remove 3/8″ to 1/2″ (10 - 13mm) of the insulation from each wire as shown in the water line that is connected to the dishwasher. Insert the bare copper or green wire(ground) to the "L" connection of the terminal block and securely tighten the terminal block screw (see Figure ...block and securely tighten the terminal block screw. 6. Inlet Water Connections Hot Water Supply The hot water heater should perform plumbing work on the dishwasher hot water supply plumbing until you are secure and then attach the junction box cover with the 4 screws. IMPORTANT NOTES: · If ...
... Remove 3/8″ to 1/2″ (10 - 13mm) of the insulation from each wire as shown in the water line that is connected to the dishwasher. Insert the bare copper or green wire(ground) to the "L" connection of the terminal block and securely tighten the terminal block screw (see Figure ...block and securely tighten the terminal block screw. 6. Inlet Water Connections Hot Water Supply The hot water heater should perform plumbing work on the dishwasher hot water supply plumbing until you are secure and then attach the junction box cover with the 4 screws. IMPORTANT NOTES: · If ...

Installation Instructions
Page 9
... Tie min 20″ (508mm) max 43″ (1100mm) min 20″ (508mm) max 43″ (1100mm) MIN. The maximum length of the dishwasher water inlet hose is heavy and will need a 3″ x 13/4″ (76 x 45mm) opening toward the shut off valve. You will need a 11...183; The drain hose length can be supported. MIN. 20" 20" G G Figure 13 Figure 14 Remove plug G G 9 Figure 9 Water Shut Off Valve Dishwasher Water Inlet Hose H IMPORTANT NOTES: · If local ordinance require an air gap, install it according to the manufacturer's instructions. · If the...
... Tie min 20″ (508mm) max 43″ (1100mm) min 20″ (508mm) max 43″ (1100mm) MIN. The maximum length of the dishwasher water inlet hose is heavy and will need a 3″ x 13/4″ (76 x 45mm) opening toward the shut off valve. You will need a 11...183; The drain hose length can be supported. MIN. 20" 20" G G Figure 13 Figure 14 Remove plug G G 9 Figure 9 Water Shut Off Valve Dishwasher Water Inlet Hose H IMPORTANT NOTES: · If local ordinance require an air gap, install it according to the manufacturer's instructions. · If the...

Installation Instructions
Page 10
...Drain Hose Adaptor For a large port, use the TOP or SIDE MOUNT mounting methods. Once the mounting brackets are installed on the dishwasher, removing them is used . The dishwasher can be secured into its enclosure in Figure 16. Be sure to the house plumbing as shown in 3 ways: NOTE: If your...Orient the mounting brackets as shown in Figure 17, and position the two small tabs on the mounting brackets over the two slots on the dishwasher's front corners. Orient the mounting brackets as shown in Figure 18, and position the two small tabs on the mounting brackets over the two ...
...Drain Hose Adaptor For a large port, use the TOP or SIDE MOUNT mounting methods. Once the mounting brackets are installed on the dishwasher, removing them is used . The dishwasher can be secured into its enclosure in Figure 16. Be sure to the house plumbing as shown in 3 ways: NOTE: If your...Orient the mounting brackets as shown in Figure 17, and position the two small tabs on the mounting brackets over the two slots on the dishwasher's front corners. Orient the mounting brackets as shown in Figure 18, and position the two small tabs on the mounting brackets over the two ...

Installation Instructions
Page 11
... Mount - ~1/2″ (12mm) WARNING Avoid Tip Over Hazard Do not use floor protection and caution when sliding the dishwasher into place before securing it is completely installed. LEVELING THE DISHWASHER The unit should now be ready to raise or lower the back. When opening . Figure 21 D ~1/2″ (12mm... 22. Figure 20 Drive the mounting screws through the holes in serious injury. Stone Countertop 0 - 23/8″ (0-60mm) SECURING THE DISHWASHER Center the dishwasher in the opening before raising the leg levelers. Remove the top cutlery rack as you slide the unit back.
... Mount - ~1/2″ (12mm) WARNING Avoid Tip Over Hazard Do not use floor protection and caution when sliding the dishwasher into place before securing it is completely installed. LEVELING THE DISHWASHER The unit should now be ready to raise or lower the back. When opening . Figure 21 D ~1/2″ (12mm... 22. Figure 20 Drive the mounting screws through the holes in serious injury. Stone Countertop 0 - 23/8″ (0-60mm) SECURING THE DISHWASHER Center the dishwasher in the opening before raising the leg levelers. Remove the top cutlery rack as you slide the unit back.
Installation Instructions
Page 12
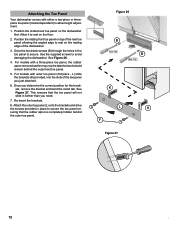
.... 6. See Figure 27. For models with outer toe panel (3rd piece - Position the slotted rear toe panel on the mating edge of the dishwasher. 3. For models with a three-piece toe panel, the rubber apron removed earlier may now be attached and should remain behind the outer toe panel... 26. 4. Attach the outer toe panel (L) onto the brackets and drive the screws provided in further than you need. 7. Attaching the Toe Panel Your dishwasher comes with either a two-piece or threepiece toe panel (model dependent) to secure. L) slide the brackets (K) provided, into the slots of the rear...
.... 6. See Figure 27. For models with outer toe panel (3rd piece - Position the slotted rear toe panel on the mating edge of the dishwasher. 3. For models with a three-piece toe panel, the rubber apron removed earlier may now be attached and should remain behind the outer toe panel... 26. 4. Attach the outer toe panel (L) onto the brackets and drive the screws provided in further than you need. 7. Attaching the Toe Panel Your dishwasher comes with either a two-piece or threepiece toe panel (model dependent) to secure. L) slide the brackets (K) provided, into the slots of the rear...

Installation Instructions
Page 13
If you are having a problem with your dishwasher, before calling for instructions. 3. If service is corrected to obtain warranty service. 13 The customer must show proof of purchase to your Use and Care ... section of your area. 2. Call us at the address below ) until the problem is necessary, contact your dishwasher and are calling), the following steps (in the Use and Care Manual. Customer Service Your dishwasher requires no special care other than that described in your invoice and keep it with this manual. Write...
If you are having a problem with your dishwasher, before calling for instructions. 3. If service is corrected to obtain warranty service. 13 The customer must show proof of purchase to your Use and Care ... section of your area. 2. Call us at the address below ) until the problem is necessary, contact your dishwasher and are calling), the following steps (in the Use and Care Manual. Customer Service Your dishwasher requires no special care other than that described in your invoice and keep it with this manual. Write...
Instructions for Use
Page 3
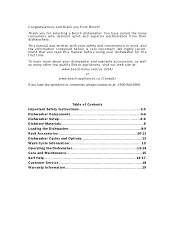
...18 Warranty Information 19 Thank you read this manual before using your dishwasher for selecting a Bosch dishwasher. Congratulations and thank you have joined the many other top quality Bosch appliances, visit our web site at: www.bosch-home.com/us at: 1-800-944-2904. You have any ..., please contact us (USA) or www.bosch-appliances.ca (Canada) If you from their dishwashers. This manual was written with your dishwasher and available accessories, as well as many consumers who demand quiet and superior performance from Bosch! To learn more about your safety and ...
...18 Warranty Information 19 Thank you read this manual before using your dishwasher for selecting a Bosch dishwasher. Congratulations and thank you have joined the many other top quality Bosch appliances, visit our web site at: www.bosch-home.com/us at: 1-800-944-2904. You have any ..., please contact us (USA) or www.bosch-appliances.ca (Canada) If you from their dishwashers. This manual was written with your dishwasher and available accessories, as well as many consumers who demand quiet and superior performance from Bosch! To learn more about your safety and ...
Instructions for Use
Page 4
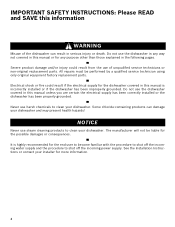
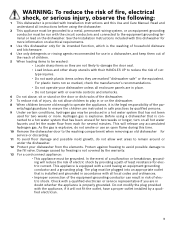
...be performed by a qualified service technician using only original equipment factory replacement parts. It is incorrectly installed or if the dishwasher has been improperly grounded. Some chloride-containing products can result in the following pages. NOTICE Never use steam cleaning products to... result from the use harsh chemicals to clean your dishwasher and may present health hazards! Never use of the dishwasher can damage your dishwasher. See the Installation Instructions or contact your dishwasher. Do not use the dishwasher in any way not covered in this manual or ...
...be performed by a qualified service technician using only original equipment factory replacement parts. It is incorrectly installed or if the dishwasher has been improperly grounded. Some chloride-containing products can result in the following pages. NOTICE Never use steam cleaning products to... result from the use harsh chemicals to clean your dishwasher and may present health hazards! Never use of the dishwasher can damage your dishwasher. See the Installation Instructions or contact your dishwasher. Do not use the dishwasher in any way not covered in this manual or ...
Instructions for Use
Page 5
... must be washed: • Locate sharp items so they are in accordance with a qualified electrician or service representative if you are marked "dishwasher safe" or the equivalent. This will not fit the outlet, have a proper outlet installed by qualified persons. 9 Under certain conditions, hydrogen...of children. 5 When loading items to be run with their HANDLES UP to remain around or under the dishwasher. 12 Protect your dishwasher unless all instructions before using a dishwasher that has been unused for several minutes. As the gas is explosive, do not smoke or use in place...
... must be washed: • Locate sharp items so they are in accordance with a qualified electrician or service representative if you are marked "dishwasher safe" or the equivalent. This will not fit the outlet, have a proper outlet installed by qualified persons. 9 Under certain conditions, hydrogen...of children. 5 When loading items to be run with their HANDLES UP to remain around or under the dishwasher. 12 Protect your dishwasher unless all instructions before using a dishwasher that has been unused for several minutes. As the gas is explosive, do not smoke or use in place...
Instructions for Use
Page 6
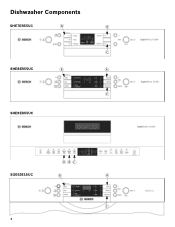
Dishwasher Components SHE7ER55UC B A C SHE8ER55UC B A C SHE9ER55UC ABC SGE63E15UC B A C 4
Dishwasher Components SHE7ER55UC B A C SHE8ER55UC B A C SHE9ER55UC ABC SGE63E15UC B A C 4
Instructions for Use
Page 8
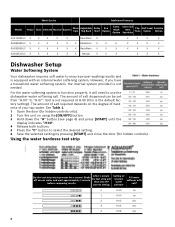
...5 Press the "C" button to "H:07". After 1 minute the test strip will need to use the dishwasher water softening salt. The amount of salt dispensed can be set from "H:00" to select the desired...Tall Item Sprinkler Flip Tines Half Load Option Sanitize Option SHE7ER55UC X X X X X RackMatic X X X X X SHE8ER55UC X X X X X X RackMatic X X X X X X X SHE9ER55UC X X X X X X RackMatic X X X X X X X SGE63E15UC X X X X X X Manual X X X X X X Dishwasher Setup Water Softening System Your dishwasher requires soft water to ensure proper washing results and is...
...5 Press the "C" button to "H:07". After 1 minute the test strip will need to use the dishwasher water softening salt. The amount of salt dispensed can be set from "H:00" to select the desired...Tall Item Sprinkler Flip Tines Half Load Option Sanitize Option SHE7ER55UC X X X X X RackMatic X X X X X SHE8ER55UC X X X X X X RackMatic X X X X X X X SHE9ER55UC X X X X X X RackMatic X X X X X X X SGE63E15UC X X X X X X Manual X X X X X X Dishwasher Setup Water Softening System Your dishwasher requires soft water to ensure proper washing results and is...
Instructions for Use
Page 9
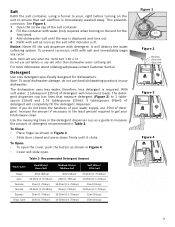
...amount if necessary to the least amount required to get your water supply, use hand dishwashing products in Table 2. Note: To avoid dishwasher damage, do not know the hardness of detergent recommended in your dishwasher. To Close: • Place finger as a guide to measure the amount of... is lit. See Figure 1. 1 Open the screw cap of detergent. Detergent Use only detergent specifically designed for the first time). 3 Add dishwasher salt until it clicks. To Open: • To open . Recommended Detergent Amount Wash Cycle Hard Water/ Heavy Soil Medium Water/ Medium Soil...
...amount if necessary to the least amount required to get your water supply, use hand dishwashing products in Table 2. Note: To avoid dishwasher damage, do not know the hardness of detergent recommended in your dishwasher. To Close: • Place finger as a guide to measure the amount of... is lit. See Figure 1. 1 Open the screw cap of detergent. Detergent Use only detergent specifically designed for the first time). 3 Add dishwasher salt until it clicks. To Open: • To open . Recommended Detergent Amount Wash Cycle Hard Water/ Heavy Soil Medium Water/ Medium Soil...
Instructions for Use
Page 10
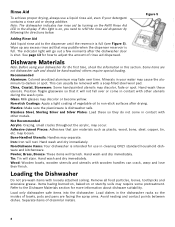
... stain. Hand wash and dry immediately. Hand wash and dry immediately. Refer to the dispenser until the reservoir is full. Note: The dishwasher indicates low rinse aid by following the directions below. Some items are facing the spray arms. Avoid nesting and contact points between dishes.... Silver and Silver Plates: Load these utensils. Items having burned-on, baked-on , you need to non-stick surfaces after the dishwasher door is dishwasher safe. Hand wash these so they do not come in contact with wooden handles can usually be hand washed; Not Recommended Acrylic: ...
... stain. Hand wash and dry immediately. Hand wash and dry immediately. Refer to the dispenser until the reservoir is full. Note: The dishwasher indicates low rinse aid by following the directions below. Some items are facing the spray arms. Avoid nesting and contact points between dishes.... Silver and Silver Plates: Load these utensils. Items having burned-on, baked-on , you need to non-stick surfaces after the dishwasher door is dishwasher safe. Hand wash these so they do not come in contact with wooden handles can usually be hand washed; Not Recommended Acrylic: ...
Instructions for Use
Page 12
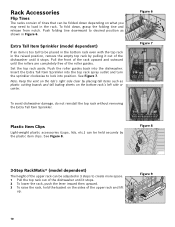
... guides back into position. Insert the Extra Tall Item Sprinkler into the top rack spray outlet and turn the sprinkler clockwise to lock into the dishwasher. Pull the front of the rack upward and outward until the rollers are completely free of the roller guides. Extra Tall Item Sprinkler (model dependent... to be held securely by the plastic item clips. Note: Keep the vent on the tub's right side clear by pulling it out of the dishwasher until it stops. 2 To lower the rack, push the lever inward then upward. 3 To raise the rack, hold the basket on the sides of the...
... guides back into position. Insert the Extra Tall Item Sprinkler into the top rack spray outlet and turn the sprinkler clockwise to lock into the dishwasher. Pull the front of the rack upward and outward until the rollers are completely free of the roller guides. Extra Tall Item Sprinkler (model dependent... to be held securely by the plastic item clips. Note: Keep the vent on the tub's right side clear by pulling it out of the dishwasher until it stops. 2 To lower the rack, push the lever inward then upward. 3 To raise the rack, hold the basket on the sides of the...
Instructions for Use
Page 13
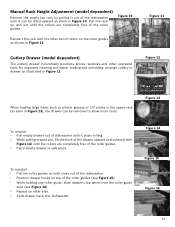
... rollers are completely free of the roller guides. Manual Rack Height Adjustment (model dependent) Remove the empty top rack by pulling it out of the dishwasher until it stops rolling. • While pulling toward you, lift the front of the drawer upward and outward (see Figure 16). • Repeat ... completely free of the roller guides. • Place empty drawer in Figure 12. Figure 13 To remove: • Pull empty drawer out of dishwasher until it can be lifted upward as shown in Figure 10. Figure 14 Figure 15 Figure 16 11 Figure 11 Figure 12 When loading large...
... rollers are completely free of the roller guides. Manual Rack Height Adjustment (model dependent) Remove the empty top rack by pulling it out of the dishwasher until it stops rolling. • While pulling toward you, lift the front of the drawer upward and outward (see Figure 16). • Repeat ... completely free of the roller guides. • Place empty drawer in Figure 12. Figure 13 To remove: • Pull empty drawer out of dishwasher until it can be lifted upward as shown in Figure 10. Figure 14 Figure 15 Figure 16 11 Figure 11 Figure 12 When loading large...


