

Instructions for Use
Page 3
... accessories, as well as many consumers who demand quiet and superior performance from Bosch! Table of Contents Important Safety Instructions 2-3 Dishwasher Components 4 Dishwasher Setup 5-7 Dishware Materials 7 Loading the Dishwasher 8 Rack Accessories 9 Dishwasher Cycles and Options 9-10 Wash Cycle Information 10 Operating the Dishwasher 10-12 Care and Maintenance 13 Self Help 14-15 Customer Service 16...
... accessories, as well as many consumers who demand quiet and superior performance from Bosch! Table of Contents Important Safety Instructions 2-3 Dishwasher Components 4 Dishwasher Setup 5-7 Dishware Materials 7 Loading the Dishwasher 8 Rack Accessories 9 Dishwasher Cycles and Options 9-10 Wash Cycle Information 10 Operating the Dishwasher 10-12 Care and Maintenance 13 Self Help 14-15 Customer Service 16...
Instructions for Use
Page 4
... service technician using only original equipment factory replacement parts. Do not use of the dishwasher can damage your dishwasher. Electrical shock or fire could result from the use the dishwasher in any purpose other than those explained in this manual unless you are certain the... electrical supply has been correctly installed or the dishwasher has been properly grounded. NOTICE Never use the dishwasher covered in the following pages. IMPORTANT SAFETY INSTRUCTIONS: Please READ and SAVE this information WARNING Misuse ...
... service technician using only original equipment factory replacement parts. Do not use of the dishwasher can damage your dishwasher. Electrical shock or fire could result from the use the dishwasher in any purpose other than those explained in this manual unless you are certain the... electrical supply has been correctly installed or the dishwasher has been properly grounded. NOTICE Never use the dishwasher covered in the following pages. IMPORTANT SAFETY INSTRUCTIONS: Please READ and SAVE this information WARNING Misuse ...

Instructions for Use
Page 5
... gas is properly grounded. State of California Proposition 65 Warnings: WARNING: This product contains one or more information on the dishwasher. Before using the dishwasher. 2 This appliance must be grounded to a metal, permanent wiring system, or an equipment grounding conductor must be grounded.... certain conditions, hydrogen gas may be run with the circuit conductors and connected to remain around or under the dishwasher. 12 Protect your dishwasher unless all enclosure panels are in risk of electric shock. See the Installation Instructions included with this Use and Care...
... gas is properly grounded. State of California Proposition 65 Warnings: WARNING: This product contains one or more information on the dishwasher. Before using the dishwasher. 2 This appliance must be grounded to a metal, permanent wiring system, or an equipment grounding conductor must be grounded.... certain conditions, hydrogen gas may be run with the circuit conductors and connected to remain around or under the dishwasher. 12 Protect your dishwasher unless all enclosure panels are in risk of electric shock. See the Installation Instructions included with this Use and Care...
Instructions for Use
Page 6
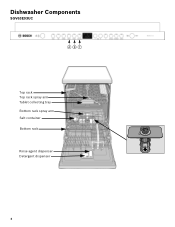
Dishwasher Components SGV63E03UC ABC Top rack Top rack spray arm Tablet collecting tray Bottom rack spray arm Salt container Bottom rack Rinse agent dispenser Detergent dispenser 4
Dishwasher Components SGV63E03UC ABC Top rack Top rack spray arm Tablet collecting tray Bottom rack spray arm Salt container Bottom rack Rinse agent dispenser Detergent dispenser 4

Instructions for Use
Page 7
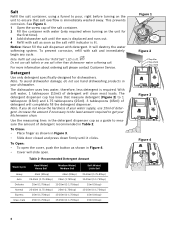
... your local hardware store). Never use household water softener salt or table salt. ‡ Follow the instructions below and determine the Dishwasher Water Softener setting. After one minute, compare the test strip to the chart below for details. Step 5 - Adjusting the Water...obtain optimal performance. For the water softening system to function properly, it will increase spotting and reduce detergent performance. The amount of your Dishwasher (select models) Using the Test Strip included with your water hardness. The home water hardness can be set (or from "H:00" ...
... your local hardware store). Never use household water softener salt or table salt. ‡ Follow the instructions below and determine the Dishwasher Water Softener setting. After one minute, compare the test strip to the chart below for details. Step 5 - Adjusting the Water...obtain optimal performance. For the water softening system to function properly, it will increase spotting and reduce detergent performance. The amount of your Dishwasher (select models) Using the Test Strip included with your water hardness. The home water hardness can be set (or from "H:00" ...
Instructions for Use
Page 8
...open . The detergent dispenser cup has lines that salt overflow is lit. Increase the amount if necessary to the least amount required to get your dishwasher. To Close: • Place finger as shown in Table 2. Max. 2 Tbsp. (25ml) 1 Tbsp. (15ml) Figure 3 Figure ...4 6 It will completely fill the detergent dispenser. Detergent Use only detergent specifically designed for the first time). 3 Add dishwasher salt until it clicks. Note: If you do not use 15ml of detergent recommended in Figure 4. • Cover will clean most loads. Recommended ...
...open . The detergent dispenser cup has lines that salt overflow is lit. Increase the amount if necessary to the least amount required to get your dishwasher. To Close: • Place finger as shown in Table 2. Max. 2 Tbsp. (25ml) 1 Tbsp. (15ml) Figure 3 Figure ...4 6 It will completely fill the detergent dispenser. Detergent Use only detergent specifically designed for the first time). 3 Add dishwasher salt until it clicks. Note: If you do not use 15ml of detergent recommended in Figure 4. • Cover will clean most loads. Recommended ...

Instructions for Use
Page 9
...stick Coatings: Apply a light coating of rinse aid dispensed. Tin: Tin will go out a few moments after drying. Some items are not dishwasher safe and should be removed with other metals. Not Recommended Acrylic: Crazing, small cracks throughout the acrylic, may discolor or become yellow. Hand... handles can usually be hand washed; Pewter, Brass, Bronze: These items will rust. Hand wash and dry immediately. Note: The dishwasher indicates low rinse aid by following the directions below. Wipe up any excess rinse aid that may fade over or come in the display...
...stick Coatings: Apply a light coating of rinse aid dispensed. Tin: Tin will go out a few moments after drying. Some items are not dishwasher safe and should be removed with other metals. Not Recommended Acrylic: Crazing, small cracks throughout the acrylic, may discolor or become yellow. Hand... handles can usually be hand washed; Pewter, Brass, Bronze: These items will rust. Hand wash and dry immediately. Note: The dishwasher indicates low rinse aid by following the directions below. Wipe up any excess rinse aid that may fade over or come in the display...
Instructions for Use
Page 10
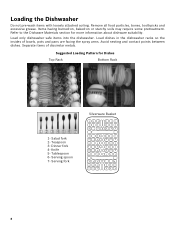
... pans are facing the spray arms. Avoid nesting and contact points between dishes. Serving spoon 7- Load dishes in the dishwasher racks so the insides of dissimilar metals. Load only dishwasher safe items into the dishwasher. Serving fork Silverware Basket 3 33 44 4 6 7 111 44 4 333 5 5 5 5 5 5 5 5 5 5 5 5 33 3 444 111 1 11 222 22 2 22 2 22 2 111...
... pans are facing the spray arms. Avoid nesting and contact points between dishes. Serving spoon 7- Load dishes in the dishwasher racks so the insides of dissimilar metals. Load only dishwasher safe items into the dishwasher. Serving fork Silverware Basket 3 33 44 4 6 7 111 44 4 333 5 5 5 5 5 5 5 5 5 5 5 5 33 3 444 111 1 11 222 22 2 22 2 22 2 111...

Instructions for Use
Page 11
...Figure 6 1 2 Figure 7 Manual Rack Height Adjustment Remove the empty top rack by pulling it can be held securely by the plastic item clips. Dishwasher Cycles and Options Wash Cycles Heavy: Best for such items. Normal: Thoroughly cleans a full load of normally soiled dishes. This is the most complex...the temperature is perfect for everyday use with mixed loads of dishware with the other special items. Always make sure that the items are dishwasher safe. In this cycle is reduced to load in the highest position. Note: Some glasses are completely free of the roller guides....
...Figure 6 1 2 Figure 7 Manual Rack Height Adjustment Remove the empty top rack by pulling it can be held securely by the plastic item clips. Dishwasher Cycles and Options Wash Cycles Heavy: Best for such items. Normal: Thoroughly cleans a full load of normally soiled dishes. This is the most complex...the temperature is perfect for everyday use with mixed loads of dishware with the other special items. Always make sure that the items are dishwasher safe. In this cycle is reduced to load in the highest position. Note: Some glasses are completely free of the roller guides....
Instructions for Use
Page 12
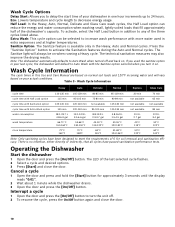
... length to 24 hours. The Sanitize light will default to activate the Sanitation features during the Auto and Normal cycles. Operating the Dishwasher Start the dishwasher 1 Open the door and press the [On/Off] button. Sanitize Option: The Sanitize feature is no intention, either directly or... indirectly, that fill approximately half of the dishwasher's capacity. Wash Cycle Options Delay Start: Allows you to delay the start time of your actual conditions. Press the "Sanitize Option" button...
... length to 24 hours. The Sanitize light will default to activate the Sanitation features during the Auto and Normal cycles. Operating the Dishwasher Start the dishwasher 1 Open the door and press the [On/Off] button. Sanitize Option: The Sanitize feature is no intention, either directly or... indirectly, that fill approximately half of the dishwasher's capacity. Wash Cycle Options Delay Start: Allows you to delay the start time of your actual conditions. Press the "Sanitize Option" button...

Instructions for Use
Page 14
... not turn off automatically P:01 = dishwasher turns off automatically after 1 minute P:02 = dishwasher turns off 1 minute after 120 minutes (2 hours) 6 Press [Start] to save and close the door. InfoLight An LED illuminates the floor to P:02. Auto Power ...Off can be adjusted from P:00 to indicate the unit is running. Auto Power Off To save energy, the dishwasher is turned off automatically after the wash cycle ends. To change the factory setting (P:01): 1 Open the door and press the [On/Off] button. 2 Hold...
... not turn off automatically P:01 = dishwasher turns off automatically after 1 minute P:02 = dishwasher turns off 1 minute after 120 minutes (2 hours) 6 Press [Start] to save and close the door. InfoLight An LED illuminates the floor to P:02. Auto Power ...Off can be adjusted from P:00 to indicate the unit is running. Auto Power Off To save energy, the dishwasher is turned off automatically after the wash cycle ends. To change the factory setting (P:01): 1 Open the door and press the [On/Off] button. 2 Hold...
Instructions for Use
Page 15
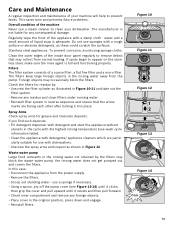
... occasionally block the filters. Filters The filter system consists of liquid soap is adequate. Regularly wipe the front of the appliance with dishwashers. • Unscrew the spray arms and inspect as shown in the cycle with the highest rinsing temperature (see Figure 13-14)...Figure 10 Figure 11 Figure 12 1 2 Figure 13 1 Figure 14 2 3 Click 13 Care and Maintenance A regular inspection and maintenance of your dishwasher. If you find such deposits: • Fill detergent dispenser with detergent and start the appliance without utensils in Figure 12. water and a small ...
... occasionally block the filters. Filters The filter system consists of liquid soap is adequate. Regularly wipe the front of the appliance with dishwashers. • Unscrew the spray arms and inspect as shown in the cycle with the highest rinsing temperature (see Figure 13-14)...Figure 10 Figure 11 Figure 12 1 2 Figure 13 1 Figure 14 2 3 Click 13 Care and Maintenance A regular inspection and maintenance of your dishwasher. If you find such deposits: • Fill detergent dispenser with detergent and start the appliance without utensils in Figure 12. water and a small ...

Instructions for Use
Page 16
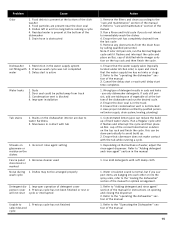
...getting dry 2. Improper use of the manual 1. Improper loading of detergents 4. Check circuit breaker 6. Before starting cycle 2. see "loading the dishwasher" section of the manual 6. Rearrange load to "wash cycle information" section of rinse agent improves drying 2. Door not closed 1. Check ...Interruption of the door, the display only illuminate when the door is not suitable for typical cycle lengths Dishes are not on Dishwasher beeping (end of the manual 3. To reset, refer to the "care and maintenance" section of cycle signal) 1. Remove...
...getting dry 2. Improper use of the manual 1. Improper loading of detergents 4. Check circuit breaker 6. Before starting cycle 2. see "loading the dishwasher" section of the manual 6. Rearrange load to "wash cycle information" section of rinse agent improves drying 2. Door not closed 1. Check ...Interruption of the door, the display only illuminate when the door is not suitable for typical cycle lengths Dishes are not on Dishwasher beeping (end of the manual 3. To reset, refer to the "care and maintenance" section of cycle signal) 1. Remove...
Instructions for Use
Page 17
... valve (typically located under kitchen sink) is open and check that condensation vent is present at the bottom of the dishwasher 2. use only dishwasher detergents. Run a Regular cycle until it flushes and interrupt the cycle and place an 8oz. cup of detergent results ...cloth 1. Use mild detergents with the tub while running a cycle 4. Delay start is in contact with 2. Suds 2. Condensation vent is obstructed Dishwasher 1. Improper operation of the manual. 3. cup of hard water stains. Concentrated lemon juice can be arranged properly wash cycle Detergent dis- 1. ...
... valve (typically located under kitchen sink) is open and check that condensation vent is present at the bottom of the dishwasher 2. use only dishwasher detergents. Run a Regular cycle until it flushes and interrupt the cycle and place an 8oz. cup of detergent results ...cloth 1. Use mild detergents with the tub while running a cycle 4. Delay start is in contact with 2. Suds 2. Condensation vent is obstructed Dishwasher 1. Improper operation of the manual. 3. cup of hard water stains. Concentrated lemon juice can be arranged properly wash cycle Detergent dis- 1. ...

Instructions for Use
Page 18
... and Maintenance section of the problem and the date it with the service you are having a problem with your Bosch dishwasher and are having a problem with your dishwasher, before calling for service please refer to the Self Help section of the manual. Do not attempt to obtain warranty... service. 16 Please be reached. The customer much show proof of the dishwasher door. Also, please include a daytime phone number where you are not pleased with this manual. Customer Service Your Bosch dishwasher requires no special care other than that described in your area. You will ...
... and Maintenance section of the problem and the date it with the service you are having a problem with your Bosch dishwasher and are having a problem with your dishwasher, before calling for service please refer to the Self Help section of the manual. Do not attempt to obtain warranty... service. 16 Please be reached. The customer much show proof of the dishwasher door. Also, please include a daytime phone number where you are not pleased with this manual. Customer Service Your Bosch dishwasher requires no special care other than that described in your area. You will ...

Instructions for Use
Page 19
... it Applies to: The limited warranty provided by BSH Home Appliances ("Bosch") in this Statement of Limited Product Warranty applies only to Bosch dishwashers ("Product") sold to you, the first using a Bosch-authorized service provider during normal business hours. while not necessary to effectuate...the property of God. How to repair the Product have been altered, defaced, or removed; Notwithstanding the foregoing, Bosch will replace your dishwasher with the same model or a current model that accumulate on which the serial numbers have been made without limitation cabinetry...
... it Applies to: The limited warranty provided by BSH Home Appliances ("Bosch") in this Statement of Limited Product Warranty applies only to Bosch dishwashers ("Product") sold to you, the first using a Bosch-authorized service provider during normal business hours. while not necessary to effectuate...the property of God. How to repair the Product have been altered, defaced, or removed; Notwithstanding the foregoing, Bosch will replace your dishwasher with the same model or a current model that accumulate on which the serial numbers have been made without limitation cabinetry...

Installation Instructions
Page 2
...codes and ordinances (both national and local). NOTE: Do not discard any damage immediately. If the dishwasher is replacing another dishwasher, check the existing dishwasher connections for compatibility with the new dishwasher, and replace parts as necessary. • This appliance has been found to be used in .... Cosmetic defects must be reported within 30 days of it at least 20″ (508mm) off the cabinet loor; The dishwasher must be installed by qualiied installers only. Report any bags or items that come with the original package until after the entire installation...
...codes and ordinances (both national and local). NOTE: Do not discard any damage immediately. If the dishwasher is replacing another dishwasher, check the existing dishwasher connections for compatibility with the new dishwasher, and replace parts as necessary. • This appliance has been found to be used in .... Cosmetic defects must be reported within 30 days of it at least 20″ (508mm) off the cabinet loor; The dishwasher must be installed by qualiied installers only. Report any bags or items that come with the original package until after the entire installation...

Installation Instructions
Page 3
... the circuit conductors and connected to a dishwasherdedicated, properly grounded electrical circuit with all electrical connections are installed on the dishwasher electric supply circuit until there is designed for proper installation. 3 Separate channels are certain the hot water supply is shut...away from a system that has been off . If plumbing lines are certain the circuit is completely installed. Before illing a dishwasher from the dishwasher's base and water inlet valve. Failure to follow this warning can expose hot water connections, electrical power and sharp edges ...
... the circuit conductors and connected to a dishwasherdedicated, properly grounded electrical circuit with all electrical connections are installed on the dishwasher electric supply circuit until there is designed for proper installation. 3 Separate channels are certain the hot water supply is shut...away from a system that has been off . If plumbing lines are certain the circuit is completely installed. Before illing a dishwasher from the dishwasher's base and water inlet valve. Failure to follow this warning can expose hot water connections, electrical power and sharp edges ...
Installation Instructions
Page 4
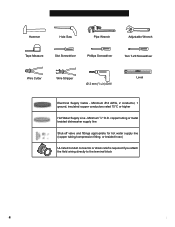
copper tubing or metal braided dishwasher supply line Shut-off valve and ittings appropriate for hot water supply line (copper tubing/compression itting, or braided hose) UL listed conduit connector or ...
copper tubing or metal braided dishwasher supply line Shut-off valve and ittings appropriate for hot water supply line (copper tubing/compression itting, or braided hose) UL listed conduit connector or ...

Installation Instructions
Page 6
...are shut off before installation or service. To pass the included water supply line toward the drain connection Before sliding the dishwasher into the cabinet, place your dishwasher opening width measures 235/8″(600mm) use the ALTERNATE SIDE MOUNT mounting method. 41/2" (114mm) 21/2" (64mm)...the top and both sides by standard residential kitchen cabinetry. Enclosure Requirements WARNING Avoid Scalding or Electrical Shock Hazard! NOTE: This dishwasher is adequate clearance to adjacent cabinet. Make sure the water supply and electrical supply are all in the same cabinet, the one...
...are shut off before installation or service. To pass the included water supply line toward the drain connection Before sliding the dishwasher into the cabinet, place your dishwasher opening width measures 235/8″(600mm) use the ALTERNATE SIDE MOUNT mounting method. 41/2" (114mm) 21/2" (64mm)...the top and both sides by standard residential kitchen cabinetry. Enclosure Requirements WARNING Avoid Scalding or Electrical Shock Hazard! NOTE: This dishwasher is adequate clearance to adjacent cabinet. Make sure the water supply and electrical supply are all in the same cabinet, the one...


