
Instructions for Use
Page 2
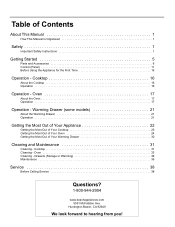
... 21 Operation 21 Getting the Most Out of Your Appliance 22 Getting the Most Out of Your Cooktop 23 Getting the Most Out of Your Oven 24 Getting the Most Out of Contents About This Manual 1 How This Manual Is Organized 1 Safety 1 Important Safety Instructions 1 Getting Started ...38 Before Calling Service 38 Questions? 1-800-944-2904 www.boschappliances.com 5551 McFadden Ave. Oven 33 Cleaning - Huntington Beach, CA 92649 We look forward to hearing from you! Oven 17 About the Oven 17 Operation 17 Operation - Cooktop 16 About the Cooktop 16 Operation 16 Operation - Cooktop 31...
... 21 Operation 21 Getting the Most Out of Your Appliance 22 Getting the Most Out of Your Cooktop 23 Getting the Most Out of Your Oven 24 Getting the Most Out of Contents About This Manual 1 How This Manual Is Organized 1 Safety 1 Important Safety Instructions 1 Getting Started ...38 Before Calling Service 38 Questions? 1-800-944-2904 www.boschappliances.com 5551 McFadden Ave. Oven 33 Cleaning - Huntington Beach, CA 92649 We look forward to hearing from you! Oven 17 About the Oven 17 Operation 17 Operation - Cooktop 16 About the Cooktop 16 Operation 16 Operation - Cooktop 31...
Instructions for Use
Page 3
...and maintain your appliance. • The Service section includes troubleshooting tips and your range, be certain that the flame does not extend beyond the bottom of the pan. • If materials inside an oven or warming drawer should ignite, keep door closed. Installation of these liners may ...ignite. • WARNING - Do not allow aluminum foil, plastic, paper or cloth to come in this manual. TO REDUCE THE RISK OF A RANGE TOP GREASE FIRE: English 1 Boilovers...
...and maintain your appliance. • The Service section includes troubleshooting tips and your range, be certain that the flame does not extend beyond the bottom of the pan. • If materials inside an oven or warming drawer should ignite, keep door closed. Installation of these liners may ...ignite. • WARNING - Do not allow aluminum foil, plastic, paper or cloth to come in this manual. TO REDUCE THE RISK OF A RANGE TOP GREASE FIRE: English 1 Boilovers...
Instructions for Use
Page 4
b) Always turn hood ON when cooking at high settings. TO REDUCE THE RISK OF INJURY TO PERSONS IN THE EVENT OF A RANGE TOP GREASE FIRE, OBSERVE THE FOLLOWING: a) SMOTHER FLAMES with your back to an exit. • Whenever possible, do not push...If you cannot reach your gas supplier, call your building. •Immediately call fire department. Crepes Suzette, Cherries Jubilee, Peppercorn Beef Flambe'). c) DO NOT USE WATER, including wet dishcloths or towels - d) Have an appropriate fire extinguisher available, nearby, highly visible and easily accessible near the oven. lowed exactly, a ...
b) Always turn hood ON when cooking at high settings. TO REDUCE THE RISK OF INJURY TO PERSONS IN THE EVENT OF A RANGE TOP GREASE FIRE, OBSERVE THE FOLLOWING: a) SMOTHER FLAMES with your back to an exit. • Whenever possible, do not push...If you cannot reach your gas supplier, call your building. •Immediately call fire department. Crepes Suzette, Cherries Jubilee, Peppercorn Beef Flambe'). c) DO NOT USE WATER, including wet dishcloths or towels - d) Have an appropriate fire extinguisher available, nearby, highly visible and easily accessible near the oven. lowed exactly, a ...
Instructions for Use
Page 5
...can only be found with your installer has not done a proper job of oven until they are not perfectly tight, you smell gas, your cooking. Items of interest to children should never be hot even though they are oven vent openings, surfaces near the unit. See "WHAT TO DO IF YOU ...SMELL GAS:" on the cooktop only when necessary. During and after use , do not touch, or let clothing, potholders, or other flammable materials...
...can only be found with your installer has not done a proper job of oven until they are not perfectly tight, you smell gas, your cooking. Items of interest to children should never be hot even though they are oven vent openings, surfaces near the unit. See "WHAT TO DO IF YOU ...SMELL GAS:" on the cooktop only when necessary. During and after use , do not touch, or let clothing, potholders, or other flammable materials...
Instructions for Use
Page 6
...out of the kitchen or other rooms where kitchen fumes could result. This appliance is equipped with gas. 2) Providing good ventilation during and immediately after self cleaning the oven. 3) Operating the unit according to these substances can cause burns from grease build up. Proper ...tip. Connect only to a hot surface. After cleaning, check for easy reference. All ranges can generate small amounts of Carbon Monoxide. See installation instructions. Safety a) The burning of gas cooking fuel and the elimination of soil during the first several cleaning cycles. b) The ...
...out of the kitchen or other rooms where kitchen fumes could result. This appliance is equipped with gas. 2) Providing good ventilation during and immediately after self cleaning the oven. 3) Operating the unit according to these substances can cause burns from grease build up. Proper ...tip. Connect only to a hot surface. After cleaning, check for easy reference. All ranges can generate small amounts of Carbon Monoxide. See installation instructions. Safety a) The burning of gas cooking fuel and the elimination of soil during the first several cleaning cycles. b) The ...
Instructions for Use
Page 7
... food. The use of an error the display flashes and beeps continuously. Getting Started English 5 Contact an authorized servicer. • Do not obstruct oven vents. • Do not repair or replace any questions, contact the manufacturer. • Do not store or use corrosive chemicals, vapors, flammables...injury. • Do not operate this manual. Disconnect appliance from the power supply and call a qualified technician. • Do not operate oven without oven bottom in this appliance if it is not working properly, or if it is safe to use the drawer to crisp crackers, chips or...
... food. The use of an error the display flashes and beeps continuously. Getting Started English 5 Contact an authorized servicer. • Do not obstruct oven vents. • Do not repair or replace any questions, contact the manufacturer. • Do not store or use corrosive chemicals, vapors, flammables...injury. • Do not operate this manual. Disconnect appliance from the power supply and call a qualified technician. • Do not operate oven without oven bottom in this appliance if it is not working properly, or if it is safe to use the drawer to crisp crackers, chips or...

Instructions for Use
Page 8
... shown) 18 Literature Package (not shown) 19 Broil Burner (top of oven interior) (not shown) 20 Oven Lights (1 or 2; not shown) Sealed Gas Burners The cooktop has sealed gas burners. varies by model) (oven back wall) (not shown) 21 Convection Fan and Element (oven back wall; Burner Grate Burner Cap Burner Cooktop Ignitor Burner Caps English...
... shown) 18 Literature Package (not shown) 19 Broil Burner (top of oven interior) (not shown) 20 Oven Lights (1 or 2; not shown) Sealed Gas Burners The cooktop has sealed gas burners. varies by model) (oven back wall) (not shown) 21 Convection Fan and Element (oven back wall; Burner Grate Burner Cap Burner Cooktop Ignitor Burner Caps English...
Instructions for Use
Page 9
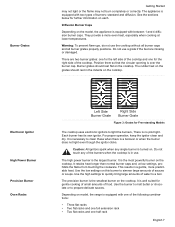
...the burners, There is a boilover or when the burner does not light even though the ignitor clicks. Electronic Ignitor High Power Burner Precision Burner Oven Racks Left Side Burner Grate Right Side Burner Grate Figure 3: Grates for the right side of sauces or soups. It is necessary to quickly...amounts of the cooktop and one half rack English 7 Use the low settings on each. The precision burner is the smallest burner on model, the range is equipped with one of the following combinations: • Three flat racks • Two flat racks and one full extension rack • Two...
...the burners, There is a boilover or when the burner does not light even though the ignitor clicks. Electronic Ignitor High Power Burner Precision Burner Oven Racks Left Side Burner Grate Right Side Burner Grate Figure 3: Grates for the right side of sauces or soups. It is necessary to quickly...amounts of the cooktop and one half rack English 7 Use the low settings on each. The precision burner is the smallest burner on model, the range is equipped with one of the following combinations: • Three flat racks • Two flat racks and one full extension rack • Two...
Instructions for Use
Page 10
... not tilt. When the stop is hot, do not let oven mitts contact hot burners. Grasp rack firmly on both sides and pull rack toward the back wall of the range. Getting Started Flat Oven Racks The racks are designed with the back of the rack toward you . Bring rack to allow stop... before turning oven on both sides. 2. The bottom section extends as far as the standard flat...
... not tilt. When the stop is hot, do not let oven mitts contact hot burners. Grasp rack firmly on both sides and pull rack toward the back wall of the range. Getting Started Flat Oven Racks The racks are designed with the back of the rack toward you . Bring rack to allow stop... before turning oven on both sides. 2. The bottom section extends as far as the standard flat...

Instructions for Use
Page 11
... rack is in (See Figure 3). Disassembly (for easier cleaning. 1. The back edges of the rack until the second stop (ball). 3. Insert one side of the oven.
... rack is in (See Figure 3). Disassembly (for easier cleaning. 1. The back edges of the rack until the second stop (ball). 3. Insert one side of the oven.
Instructions for Use
Page 12
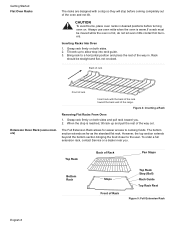
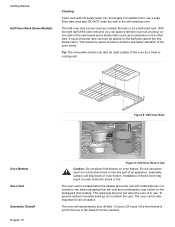
...casserole) on the backguard and cooktop. This area may result in a risk of an appliance, especially surface unit drip bowls or oven bottom. The oven will automatically shut off after 12 hours (24 hours if the time format is set for air circulation. This allows for easier...A second shorter item can place a tall item (such as a turkey) on one side of the oven cavity. Figure 8: Half Oven Rack Oven Bottom Oven Vent Automatic Shutoff English 10 Figure 9: Half Oven Rack in the Select Function section). To prevent carbon monoxide build-up, do not block the vent. Installation...
...casserole) on the backguard and cooktop. This area may result in a risk of an appliance, especially surface unit drip bowls or oven bottom. The oven will automatically shut off after 12 hours (24 hours if the time format is set for air circulation. This allows for easier...A second shorter item can place a tall item (such as a turkey) on one side of the oven cavity. Figure 8: Half Oven Rack Oven Bottom Oven Vent Automatic Shutoff English 10 Figure 9: Half Oven Rack in the Select Function section). To prevent carbon monoxide build-up, do not block the vent. Installation...
Instructions for Use
Page 13
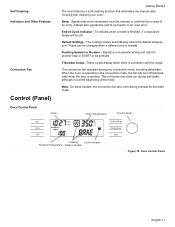
...consecutive beeps will turn off automatically when the door is needed. Self Cleaning Indicators and Other Features Convection Fan Control (Panel) Getting Started The oven features a self-cleaning function that more information must be entered or confirms the receipt of an entry. Signals an incomplete setting and calls for ... be pressed. The convection fan does run during any convection mode, including dehydrate. Signals that eliminates the manual labor involved with the range. Flashing Symbol or Number - When the oven is operating in the convection mode, the fan will sound.
...consecutive beeps will turn off automatically when the door is needed. Self Cleaning Indicators and Other Features Convection Fan Control (Panel) Getting Started The oven features a self-cleaning function that more information must be entered or confirms the receipt of an entry. Signals an incomplete setting and calls for ... be pressed. The convection fan does run during any convection mode, including dehydrate. Signals that eliminates the manual labor involved with the range. Flashing Symbol or Number - When the oven is operating in the convection mode, the fan will sound.
Instructions for Use
Page 14
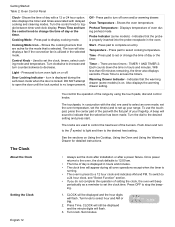
...for detailed instructions. Turn knob. Press Time and turn the control knob to control the heat level of your range. Press pad to set or change the time of day or the timer. Oven Temperature - Shows the cooking burners that is locked. Time - Warming Drawer Indicator - Also displays the warming... of the burners. Preheat Temperature - TIMER 1 AND TIMER 2; A beep will flash. 3. To switch to 12:00 am. • The time of the range by using the touch pads, dial and control knobs. Turn knob to indicate that the probe is no longer present. Turn the control knob to...
...for detailed instructions. Turn knob. Press Time and turn the control knob to control the heat level of your range. Press pad to set or change the time of day or the timer. Oven Temperature - Shows the cooking burners that is locked. Time - Warming Drawer Indicator - Also displays the warming... of the burners. Preheat Temperature - TIMER 1 AND TIMER 2; A beep will flash. 3. To switch to 12:00 am. • The time of the range by using the touch pads, dial and control knobs. Turn knob to indicate that the probe is no longer present. Turn the control knob to...

Instructions for Use
Page 15
...desired setting and press START. Turn knob to choose the function. 4. When all settings for beep volume is now set or change the range features listed below. Access SELECT FUNCTIONS Menu. 2. Turn Clock Display ON or OFF Clock time display can be seen in the display....Celsius (C). 5. Press Start. Access SELECT FUNCTIONS Menu. 2. Turn knob to select volume level Low, Medium or High. 5. Change the Temperature Scale The oven has been preset to select ON or OFF 5. Press Start. 4. Turn knob to the Fahrenheit temperature scale. Turn knob to change hours. 5. Press Time...
...desired setting and press START. Turn knob to choose the function. 4. When all settings for beep volume is now set or change the range features listed below. Access SELECT FUNCTIONS Menu. 2. Turn Clock Display ON or OFF Clock time display can be seen in the display....Celsius (C). 5. Press Start. Access SELECT FUNCTIONS Menu. 2. Turn knob to select volume level Low, Medium or High. 5. Change the Temperature Scale The oven has been preset to select ON or OFF 5. Press Start. 4. Turn knob to the Fahrenheit temperature scale. Turn knob to change hours. 5. Press Time...
Instructions for Use
Page 16
... knob clockwise until RESET DEFAULTS is for religious faiths with the Sabbath feature unless the feature is the default language. Press START to the oven function. The clock will be used during the Sabbath mode to end the mode and turn off and no work" requirements on the Sabbath... is consistently too brown or too light. 1. The display will turn off . • While baking in English only, regardless of 73 hours, the oven will beep if a key is pressed to select a different language. 5. To unlock keypads, press Cooking Mode and hold for safety purposes. When unlocked,...
... knob clockwise until RESET DEFAULTS is for religious faiths with the Sabbath feature unless the feature is the default language. Press START to the oven function. The clock will be used during the Sabbath mode to end the mode and turn off and no work" requirements on the Sabbath... is consistently too brown or too light. 1. The display will turn off . • While baking in English only, regardless of 73 hours, the oven will beep if a key is pressed to select a different language. 5. To unlock keypads, press Cooking Mode and hold for safety purposes. When unlocked,...

Instructions for Use
Page 17
... turned off . 3. This feature automatically converts package or recipe temperatures for both the warming drawer and the oven. Oven starts after 5 seconds. Oven starts after 5 seconds. Access SELECT FUNCTIONS Menu. 2. English 15 See "Turning on the Warming Drawer" on if desired ...Sabbath Feature for the Warming Drawer Only The warming drawer does not operate with the Sabbath feature unless the feature is also activated in the oven. 1. Access SELECT FUNCTIONS Menu. 2. Change the Time Format The clock can be changed after this point. Press Start. 4. The ...
... turned off . 3. This feature automatically converts package or recipe temperatures for both the warming drawer and the oven. Oven starts after 5 seconds. Oven starts after 5 seconds. Access SELECT FUNCTIONS Menu. 2. English 15 See "Turning on the Warming Drawer" on if desired ...Sabbath Feature for the Warming Drawer Only The warming drawer does not operate with the Sabbath feature unless the feature is also activated in the oven. 1. Access SELECT FUNCTIONS Menu. 2. Change the Time Format The clock can be changed after this point. Press Start. 4. The ...
Instructions for Use
Page 18
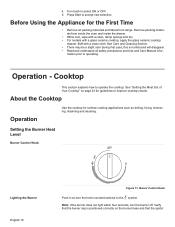
... the burner base and that the burner cap is normal and will disappear. • Read and understand all packing materials and labels from inside the oven and inside the drawer. • While cool, wipe with a clean, damp sponge and dry. • For models with a clean cloth. ...Verify that the ignitor Remove packing materials from range. See Care and Cleaning Section. • There may be a slight odor during first uses; Cooktop This section explains how to accept new selection. this ...
... the burner base and that the burner cap is normal and will disappear. • Read and understand all packing materials and labels from inside the oven and inside the drawer. • While cool, wipe with a clean, damp sponge and dry. • For models with a clean cloth. ...Verify that the ignitor Remove packing materials from range. See Care and Cleaning Section. • There may be a slight odor during first uses; Cooktop This section explains how to accept new selection. this ...
Instructions for Use
Page 19
... . BAKE will turn the oven off . To select a different temperature, turn knob. 5. Turn knob clockwise to desired temperature. 8. Note: an "pop" may be louder with LP gas than with the default tempera- Note: To back out of a current mode, press OFF. (Selecting OFF when not setting the cooking ...fails to the pan or the appliance, the flame should not extend beyond the edge of an appliance, especially surface unit drip bowls or oven bottom. Press COOKING MODE. 2. To change is burning all the way around the burner before adjusting the flame to line any of ...
... . BAKE will turn the oven off . To select a different temperature, turn knob. 5. Turn knob clockwise to desired temperature. 8. Note: an "pop" may be louder with LP gas than with the default tempera- Note: To back out of a current mode, press OFF. (Selecting OFF when not setting the cooking ...fails to the pan or the appliance, the flame should not extend beyond the edge of an appliance, especially surface unit drip bowls or oven bottom. Press COOKING MODE. 2. To change is burning all the way around the burner before adjusting the flame to line any of ...

Instructions for Use
Page 20
... TIMER 1 flashes. Simply enter the package or recipe temperature when setting the mode and the range calculates the correct temperature. Select either TIMER 1 or 2. 0: 00 AM 2. Minute digits flash. 3. Oven 9. The actual temperature increases until set hours. To change minutes. 4. Turn the knob to .... 6. Minutes flash. 1 : 00 HR:MIN Set TIMER 2 2. Turn knob clockwise or counterclockwise to turn off , it will turn the oven off but still hot. See "Turn Automatic Convection Conversion ON or OFF" on page 15 for manual temperature adjustment. HR:MIN Set TIMER 2 ...
... TIMER 1 flashes. Simply enter the package or recipe temperature when setting the mode and the range calculates the correct temperature. Select either TIMER 1 or 2. 0: 00 AM 2. Minute digits flash. 3. Oven 9. The actual temperature increases until set hours. To change minutes. 4. Turn the knob to .... 6. Minutes flash. 1 : 00 HR:MIN Set TIMER 2 2. Turn knob clockwise or counterclockwise to turn off , it will turn the oven off but still hot. See "Turn Automatic Convection Conversion ON or OFF" on page 15 for manual temperature adjustment. HR:MIN Set TIMER 2 ...

Instructions for Use
Page 21
... select a different cooking mode, turn off . 8. Note: Time required for each of day the oven will continue flashing. 4. Delaying the Start of time and then turns it off . • Delayed cooking is not pressed, range will beep and display will stop cooking or turn off . Set minutes and then press TIME.... Set minutes and then press TIME. Press OFF to clear. Press Time. If Time pad is not recommended for foods that the time-of the programmed cooking time, the oven will ...
... select a different cooking mode, turn off . 8. Note: Time required for each of day the oven will continue flashing. 4. Delaying the Start of time and then turns it off . • Delayed cooking is not pressed, range will beep and display will stop cooking or turn off . Set minutes and then press TIME.... Set minutes and then press TIME. Press OFF to clear. Press Time. If Time pad is not recommended for foods that the time-of the programmed cooking time, the oven will ...


