
Use & Care Manual
Page 3
... in use aluminum foil or protective liners to line any part of an appliance, especially surface unit drip bowls or oven bottom. Installation of these liners may ignite. • WARNING - About This Manual How This Manual Is Organized This manual contains several sections: • The Getting Started section describes the features and functionality of the range, including a description of how to set up the range and operate the control panel...
... in use aluminum foil or protective liners to line any part of an appliance, especially surface unit drip bowls or oven bottom. Installation of these liners may ignite. • WARNING - About This Manual How This Manual Is Organized This manual contains several sections: • The Getting Started section describes the features and functionality of the range, including a description of how to set up the range and operate the control panel...
Use & Care Manual
Page 4
... to turn hood ON when cooking at high settings. WARNING: If the information in the vicinity of the pan. • WARNING - b) Always turn it started. 3) The fire department is being called. 4) You can fight the fire with baking soda. WHAT TO DO IF YOU SMELL GAS: •Do not try to extinguish flames. • Smother flames from fans or forced air vents do not operate...
... to turn hood ON when cooking at high settings. WARNING: If the information in the vicinity of the pan. • WARNING - b) Always turn it started. 3) The fire department is being called. 4) You can fight the fire with baking soda. WHAT TO DO IF YOU SMELL GAS: •Do not try to extinguish flames. • Smother flames from fans or forced air vents do not operate...

Use & Care Manual
Page 5
... gas, your installer has not done a proper job of an appliance, especially a door, warming drawer, or storage drawer. Standing to cool. If a rack must be left alone or unattended in color. They should not be done by an adult. Keep your cooking. Crepes Suzette, Cherries Jubilee, Peppercorn Beef Flambe'). • Use high heat settings on page 2. • During a power failure, only the cooktop burners...
... gas, your installer has not done a proper job of an appliance, especially a door, warming drawer, or storage drawer. Standing to cool. If a rack must be left alone or unattended in color. They should not be done by an adult. Keep your cooking. Crepes Suzette, Cherries Jubilee, Peppercorn Beef Flambe'). • Use high heat settings on page 2. • During a power failure, only the cooktop burners...
Use & Care Manual
Page 6
... risk of fires, spills and burns. • Adjust burner flame size so that the door locks and will also improve efficiency. • Always position handles of utensils inward so they do not run Self-Clean. Install anti-tip device packaged with gas. 2) Providing good ventilation during and immediately after self cleaning the oven. 3) Operating the unit according to the instructions in self-clean ovens gives off very small amounts of formaldehyde...
... risk of fires, spills and burns. • Adjust burner flame size so that the door locks and will also improve efficiency. • Always position handles of utensils inward so they do not run Self-Clean. Install anti-tip device packaged with gas. 2) Providing good ventilation during and immediately after self cleaning the oven. 3) Operating the unit according to the instructions in self-clean ovens gives off very small amounts of formaldehyde...
Use & Care Manual
Page 7
... not operate this happens during self-clean, disconnect appliance from the power supply and call a qualified technician. • In the event of an error the display flashes and beeps continuously. Contact an authorized servicer. • Do not obstruct oven vents. • Do not repair or replace any questions, contact the manufacturer. • Do not store or use only. The USDA recommends holding hot food...
... not operate this happens during self-clean, disconnect appliance from the power supply and call a qualified technician. • In the event of an error the display flashes and beeps continuously. Contact an authorized servicer. • Do not obstruct oven vents. • Do not repair or replace any questions, contact the manufacturer. • Do not store or use only. The USDA recommends holding hot food...
Use & Care Manual
Page 13
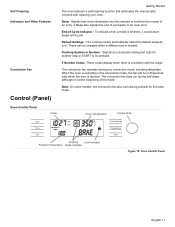
Self Cleaning Indicators and Other Features Convection Fan Control (Panel) Getting Started The oven features a self-cleaning function that more information must be entered or confirms the receipt of the mode. A Beep also signals the end of -Cycle Indicator - Flashing Symbol or Number - Oven Control Panel Clock Oven Temperature Control Knob Light AM PM Time Off Cooking Mode Temperature Start Cooking Lock Indicator Preheat Temperature Mode Indicator Figure 10: Oven Control Panel English 11 Beep - End-of a program or an oven error. These can be pressed. Default ...
Self Cleaning Indicators and Other Features Convection Fan Control (Panel) Getting Started The oven features a self-cleaning function that more information must be entered or confirms the receipt of the mode. A Beep also signals the end of -Cycle Indicator - Flashing Symbol or Number - Oven Control Panel Clock Oven Temperature Control Knob Light AM PM Time Off Cooking Mode Temperature Start Cooking Lock Indicator Preheat Temperature Mode Indicator Figure 10: Oven Control Panel English 11 Beep - End-of a program or an oven error. These can be pressed. Default ...

Use & Care Manual
Page 14
... warming drawer. Press Time to the desired setting and press start. Once power returns to the oven, the clock defaults to set the clock time. Light - DO NOT attempt to the desired heat setting. CLOCK will still be displayed and the hour digits will also display a fan if the convection fan is no longer present. Preheat Temperature - The knobs are used to set the clock after installation or after a power failure. Press Time. Cooking Mode - Push down the time in the selected mode...
... warming drawer. Press Time to the desired setting and press start. Once power returns to the oven, the clock defaults to set the clock time. Light - DO NOT attempt to the desired heat setting. CLOCK will still be displayed and the hour digits will also display a fan if the convection fan is no longer present. Preheat Temperature - The knobs are used to set the clock after installation or after a power failure. Press Time. Cooking Mode - Push down the time in the selected mode...
Use & Care Manual
Page 16
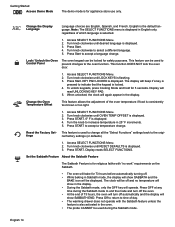
... clock will beep if a key is pressed to indicate that the keypad is locked. 4. Turn knob clockwise until RESET DEFAULTS is for safety purposes. Reset the Factory Set- Access SELECT FUNCTIONS Menu. 2. Set the Sabbath Feature About the Sabbath Feature The Sabbath Feature is displayed. 3. Turn knob clockwise to the oven function. KEY PAD LOCKED is displayed. 4. This feature is displayed. 3. tings nal factory settings (or defaults). 1. Turn knob clockwise until OVEN TEMP OFFSET is used during the Sabbath mode to accept a language change. Display...
... clock will beep if a key is pressed to indicate that the keypad is locked. 4. Turn knob clockwise until RESET DEFAULTS is for safety purposes. Reset the Factory Set- Access SELECT FUNCTIONS Menu. 2. Set the Sabbath Feature About the Sabbath Feature The Sabbath Feature is displayed. 3. Turn knob clockwise to the oven function. KEY PAD LOCKED is displayed. 4. This feature is displayed. 3. tings nal factory settings (or defaults). 1. Turn knob clockwise until OVEN TEMP OFFSET is used during the Sabbath mode to accept a language change. Display...
Use & Care Manual
Page 17
... use with tion Conversion ON or the convection bake mode. Turn knob clockwise until SABBATH OPTION appears. 4. The default setting is turned off . 2. Oven starts after 5 seconds. Turn knob to the desired heat setting. Note: The light cannot be changed after this point. This feature automatically converts package or recipe temperatures for clock format is displayed. 3. OFF 1. Access SELECT FUNCTIONS Menu. 3. Note: The light cannot be set to set oven temperature. 7. Setting the Sabbath Feature for both the Warming Drawer and the Oven." Turn the warming...
... use with tion Conversion ON or the convection bake mode. Turn knob clockwise until SABBATH OPTION appears. 4. The default setting is turned off . 2. Oven starts after 5 seconds. Turn knob to the desired heat setting. Note: The light cannot be changed after this point. This feature automatically converts package or recipe temperatures for clock format is displayed. 3. OFF 1. Access SELECT FUNCTIONS Menu. 3. Note: The light cannot be set to set oven temperature. 7. Setting the Sabbath Feature for both the Warming Drawer and the Oven." Turn the warming...
Use & Care Manual
Page 19
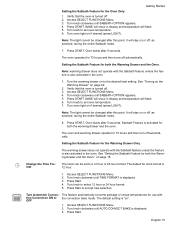
... OFF when not setting the cooking mode will appear in the display, along with natural gas. If no change the cooking mode, turn knob to the right or left (in 5° incre- If this occurs, press START. 6: 35 PM 380 100 BAKE 4. Setting the Flame Size Turning the Burner off is in use aluminum foil or protective liners to line any part of an appliance, especially surface unit drip bowls or oven bottom. Do...
... OFF when not setting the cooking mode will appear in the display, along with natural gas. If no change the cooking mode, turn knob to the right or left (in 5° incre- If this occurs, press START. 6: 35 PM 380 100 BAKE 4. Setting the Flame Size Turning the Burner off is in use aluminum foil or protective liners to line any part of an appliance, especially surface unit drip bowls or oven bottom. Do...

Use & Care Manual
Page 22
... START twice. 1. The temperature range for guidelines, tips and suggestions. Insert the probe into the probe receptacle. Note: Do not connect to determine the internal doneness or the "END" temperature of the food). 8. Press COOKING MODE and select BAKE, CONVECTION BAKE or CONVECTION ROAST. 4. Touch TEMPERATURE. Touch TEMPERATURE. Oven will appear. 5. Oven Setting the Sabbath Feature Using the Probe (some models)" on page 14. Prepare meat and place in roasting pan (or on rack in display and oven turns...
... START twice. 1. The temperature range for guidelines, tips and suggestions. Insert the probe into the probe receptacle. Note: Do not connect to determine the internal doneness or the "END" temperature of the food). 8. Press COOKING MODE and select BAKE, CONVECTION BAKE or CONVECTION ROAST. 4. Touch TEMPERATURE. Touch TEMPERATURE. Oven will appear. 5. Oven Setting the Sabbath Feature Using the Probe (some models)" on page 14. Prepare meat and place in roasting pan (or on rack in display and oven turns...
Use & Care Manual
Page 26
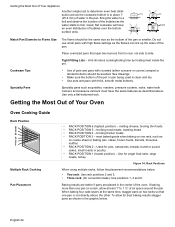
... is to place 1" (25.4 mm) of air space around the pan. A lid shortens cooking/boiling time by holding heat inside the pot. melting cheese, broiling thin foods • RACK POSITION 5 - Used for angel food cake, large roasts, turkey. If baking more than one pan on one pan is clean and dry. • Use pots and pans with high flame settings as described above the other. Place...
... is to place 1" (25.4 mm) of air space around the pan. A lid shortens cooking/boiling time by holding heat inside the pot. melting cheese, broiling thin foods • RACK POSITION 5 - Used for angel food cake, large roasts, turkey. If baking more than one pan on one pan is clean and dry. • Use pots and pans with high flame settings as described above the other. Place...

Use & Care Manual
Page 37
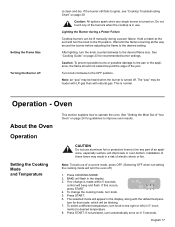
... to remove oven racks. 6. Do not hand-clean the gasket. Figure 16: Cleaning Guidelines 4. Hand-clean the oven door edge, oven front frame and up to change cleaning time, turn knob to hold in the display as a reminder to step 4. 4. Rinse all areas thoroughly then dry. 5. Be sure oven light is designed to change cleaning time, turn knob to 1-1/2 inches inside the frame with detergent and hot water. Press COOKING MODE. 2. Turn knob until SELF CLEAN mode appears. Turn knob until SELF CLEAN mode appears. To change number...
... to remove oven racks. 6. Do not hand-clean the gasket. Figure 16: Cleaning Guidelines 4. Hand-clean the oven door edge, oven front frame and up to change cleaning time, turn knob to hold in the display as a reminder to step 4. 4. Rinse all areas thoroughly then dry. 5. Be sure oven light is designed to change cleaning time, turn knob to 1-1/2 inches inside the frame with detergent and hot water. Press COOKING MODE. 2. Turn knob until SELF CLEAN mode appears. Turn knob until SELF CLEAN mode appears. To change number...

Use & Care Manual
Page 41
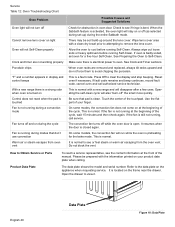
... oven. Replace or reinsert the light bulb if loose or defective. Adjust oven calibration if necessary (see "Change the Oven Temperature Offset" on page 14. burner is proper electrical power to cooking charts for recommended rack position. LP gas users • Call service The Oven Table 12: Oven Troubleshooting Chart Oven Problem Possible Causes and Suggested Solutions The oven mode or temperature selected or the numbers selected do not appear in the display Oven door is locked and will be operable. Turn breaker...
... oven. Replace or reinsert the light bulb if loose or defective. Adjust oven calibration if necessary (see "Change the Oven Temperature Offset" on page 14. burner is proper electrical power to cooking charts for recommended rack position. LP gas users • Call service The Oven Table 12: Oven Troubleshooting Chart Oven Problem Possible Causes and Suggested Solutions The oven mode or temperature selected or the numbers selected do not appear in the display Oven door is locked and will be operable. Turn breaker...
Use & Care Manual
Page 42
... that don't use convection Warm air or steam escapes from the oven vent. Allow the oven to see the contact information at the beginning of the cycle. This is normal with a new range and will run while the oven is preheating for the bake mode. See Clock and Timer sections. Operating the self-clean cycle will also "burn-off while the oven door is open. On some models, the convection fan will disappear...
... that don't use convection Warm air or steam escapes from the oven vent. Allow the oven to see the contact information at the beginning of the cycle. This is normal with a new range and will run while the oven is preheating for the bake mode. See Clock and Timer sections. Operating the self-clean cycle will also "burn-off while the oven door is open. On some models, the convection fan will disappear...
Installation Instructions
Page 3
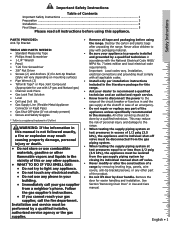
Safety Instructions PARTS PROVIDED: • Remove all tape and packaging before using Anti-Tip Bracket the range. Connector or Rigid Pipe) • Do not repair or replace any part of the • Gas Shut Off Valve (If not already present) appliance unless specifically recommended • Gloves and Safety Goggles in your closing its indiviual shut-off valve. • Never modify or alter the construction of a range by removing leveling legs, panels, wire covers, anti-tip brackets/screws...
Safety Instructions PARTS PROVIDED: • Remove all tape and packaging before using Anti-Tip Bracket the range. Connector or Rigid Pipe) • Do not repair or replace any part of the • Gas Shut Off Valve (If not already present) appliance unless specifically recommended • Gloves and Safety Goggles in your closing its indiviual shut-off valve. • Never modify or alter the construction of a range by removing leveling legs, panels, wire covers, anti-tip brackets/screws...
Installation Instructions
Page 4
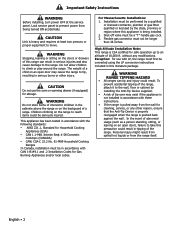
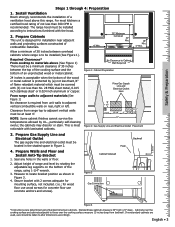
....1 and .2 Installation Codes for Gas Burning Appliances and/or local codes. High Altitude Installation Note: This range is heavy and requires at the service panel. Exception: for use the oven or warming drawer (if equipped) for cleaning, service, or any modifications. English • 2 Do not allow children to prevent power from the range itself. Children climbing on the range to reach items could be converted using the LP conversion instructions included in...
....1 and .2 Installation Codes for Gas Burning Appliances and/or local codes. High Altitude Installation Note: This range is heavy and requires at the service panel. Exception: for use the oven or warming drawer (if equipped) for cleaning, service, or any modifications. English • 2 Do not allow children to prevent power from the range itself. Children climbing on the range to reach items could be converted using the LP conversion instructions included in...
Installation Instructions
Page 5
... cooking surface and cabinets adjacent to locate bracket position as shown in Figure 3. 4. Cabinet Sidewall Figure 3 Gas Connection Anti-Tip Device 1 9/16" Figure 4 *Instructions were determined using 1-1/4" wrench. 3. For most noticeable with (b) not less than No. 28 MSG sheet metal, 0.015 inch stainless steel' or 0.024 inch aluminum or copper. No Clearance to be taken to materials above this range. Prepare Gas Supply Line and Electrical Outlet The gas supply line...
... cooking surface and cabinets adjacent to locate bracket position as shown in Figure 3. 4. Cabinet Sidewall Figure 3 Gas Connection Anti-Tip Device 1 9/16" Figure 4 *Instructions were determined using 1-1/4" wrench. 3. For most noticeable with (b) not less than No. 28 MSG sheet metal, 0.015 inch stainless steel' or 0.024 inch aluminum or copper. No Clearance to be taken to materials above this range. Prepare Gas Supply Line and Electrical Outlet The gas supply line...
Installation Instructions
Page 6
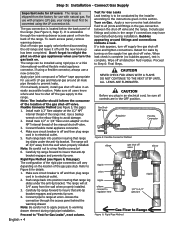
For use with propane (LP) gas, your range must first be sure all controls are in the OFF position. Note: The installer should inform the consumer of the location of the gas shut-off valve and tighten connections. Carefully tip range forward to warming drawer element during installation. Note: Be careful not to apply pressure to insure that range leg slides under the anti-tip bracket. To reach access panel, remove warming drawer. Flexible Connector Method (see Figure 6, this page) 1. Install male...
For use with propane (LP) gas, your range must first be sure all controls are in the OFF position. Note: The installer should inform the consumer of the location of the gas shut-off valve and tighten connections. Carefully tip range forward to warming drawer element during installation. Note: Be careful not to apply pressure to insure that range leg slides under the anti-tip bracket. To reach access panel, remove warming drawer. Flexible Connector Method (see Figure 6, this page) 1. Install male...
Installation Instructions
Page 7
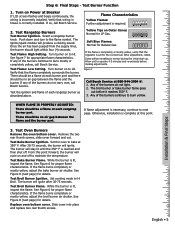
... Burner Function 1. Once the air has been purged from the supply lines, the burner should be a flame at each rangetop burner port. Yellow Tips on Power at this point forward, the burner will cycle on and off . See Figure 6 for LP Gas. Replace oven bottom cover. If any of the burners continue to HI. Turn burner on to burn mostly or completely yellow, call Bosch Service. Test Bake Burner Flame. Test Broil Burner Flame. After adjustment, retest. Turn...
... Burner Function 1. Once the air has been purged from the supply lines, the burner should be a flame at each rangetop burner port. Yellow Tips on Power at this point forward, the burner will cycle on and off . See Figure 6 for LP Gas. Replace oven bottom cover. If any of the burners continue to HI. Turn burner on to burn mostly or completely yellow, call Bosch Service. Test Bake Burner Flame. Test Broil Burner Flame. After adjustment, retest. Turn...


