
Installation Instructions
Page 3
...-M1984 Fans and Ventilators • CAN/CSA-C22.2 No. 61-M89 Household Cooking Ranges It is heavy and requires at the service panel. English 1 Refer to move. See instructions in the manuals. Before you plug in an electrical cord, be installed on a separate branch circuit. If required by the National Electrical Code (or Canadian Electrical Code), this appliance must be sure all controls are in this manual for data plate location. Installer - Before installing, turn power...
...-M1984 Fans and Ventilators • CAN/CSA-C22.2 No. 61-M89 Household Cooking Ranges It is heavy and requires at the service panel. English 1 Refer to move. See instructions in the manuals. Before you plug in an electrical cord, be installed on a separate branch circuit. If required by the National Electrical Code (or Canadian Electrical Code), this appliance must be sure all controls are in this manual for data plate location. Installer - Before installing, turn power...

Installation Instructions
Page 5
... applicable codes. Preparation Before you Begin Tools and Parts Needed Parts Included 27" Appliances • Phillips head screwdriver • Measuring tape • Drill with bit (1/8") • Phillips head screws (6) General Information Power Requirements The outlet must be installed either above or below the unit, a 2" diameter hole or space is installed at the end of a cabinet run, adjacent to a perpendicular wall or cabinet door, to...
... applicable codes. Preparation Before you Begin Tools and Parts Needed Parts Included 27" Appliances • Phillips head screwdriver • Measuring tape • Drill with bit (1/8") • Phillips head screws (6) General Information Power Requirements The outlet must be installed either above or below the unit, a 2" diameter hole or space is installed at the end of a cabinet run, adjacent to a perpendicular wall or cabinet door, to...

Installation Instructions
Page 12
...: Local Codes may vary; installation, electrical connections and grounding must be a 4-wire single-phase AC. Refer to either 208/240V AC, 60 Hz, 4 wire, single-phase power supply. Installation Electrical Installation All model ovens on the front cover are dual rated, designed to be connected to local electrical codes for de-rating requirements. The electrical supply should be used to correctly attach the conduit to the white neutral electrical supply wire. An appropriately-sized, UL-listed conduit...
...: Local Codes may vary; installation, electrical connections and grounding must be a 4-wire single-phase AC. Refer to either 208/240V AC, 60 Hz, 4 wire, single-phase power supply. Installation Electrical Installation All model ovens on the front cover are dual rated, designed to be connected to local electrical codes for de-rating requirements. The electrical supply should be used to correctly attach the conduit to the white neutral electrical supply wire. An appropriately-sized, UL-listed conduit...

Installation Instructions
Page 14
... grasp the handle as it stops. the hinge could be about half way closed - Flip levers on both sides using both hands to verify the cabinet dimensions and electrical connections. It will be damaged and injury could result in a convenient and stable location for cleaning. The door front is heavy and fragile. Place the door in electrical shock or burns. • The oven door is glass.
... grasp the handle as it stops. the hinge could be about half way closed - Flip levers on both sides using both hands to verify the cabinet dimensions and electrical connections. It will be damaged and injury could result in a convenient and stable location for cleaning. The door front is heavy and fragile. Place the door in electrical shock or burns. • The oven door is glass.

Installation Instructions
Page 15
... the Use and Care Manual for double/combo ovens) To replace the oven door: 1. Verify that the door locks when the lock icon appears in trim. (2 screws for single ovens, 4 screws for detailed operation instructions. 4. Select the BAKE mode. Holding the door firmly in both hands, place hinges in place. English 13 Check power at the breaker. 2. For 208 V installation, the reading between oven and cabinet back wall. Do not lift appliance by door handle. 2. Otherwise, the installation is correctly...
... the Use and Care Manual for double/combo ovens) To replace the oven door: 1. Verify that the door locks when the lock icon appears in trim. (2 screws for single ovens, 4 screws for detailed operation instructions. 4. Select the BAKE mode. Holding the door firmly in both hands, place hinges in place. English 13 Check power at the breaker. 2. For 208 V installation, the reading between oven and cabinet back wall. Do not lift appliance by door handle. 2. Otherwise, the installation is correctly...
Use & Care Manual
Page 2
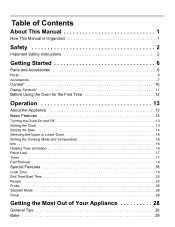
... Manual is Organized 1 Safety 2 Important Safety Instructions 2 Getting Started 6 Parts and Accessories 6 Parts 6 Accessories 7 Control 10 Display Symbols 11 Before Using the Oven for the First Time 12 Operation 13 About the Appliance 13 Basic Features 13 Turning the Oven On and Off 13 Setting the Clock 13 Setting the Date 14 Selecting the Upper or Lower Oven 16 Setting the Cooking Mode and Temperature 16 Info 16 Heating Time Limitation 16 Panel Lock 17 Timer...
... Manual is Organized 1 Safety 2 Important Safety Instructions 2 Getting Started 6 Parts and Accessories 6 Parts 6 Accessories 7 Control 10 Display Symbols 11 Before Using the Oven for the First Time 12 Operation 13 About the Appliance 13 Basic Features 13 Turning the Oven On and Off 13 Setting the Clock 13 Setting the Date 14 Selecting the Upper or Lower Oven 16 Setting the Cooking Mode and Temperature 16 Info 16 Heating Time Limitation 16 Panel Lock 17 Timer...
Use & Care Manual
Page 5
... the Installation Instructions for easy reference. Do not store or use . Do not obstruct oven vents. In the event of burns, electric shock, fire and injury to a factory authorized service center. English 2 Turn off the appliance, and disconnect the circuit at the circuit breaker box. See the Warranty. If you the location of the appliance unless specifically recommended in risk of an error the display flashes and beeps...
... the Installation Instructions for easy reference. Do not store or use . Do not obstruct oven vents. In the event of burns, electric shock, fire and injury to a factory authorized service center. English 2 Turn off the appliance, and disconnect the circuit at the circuit breaker box. See the Warranty. If you the location of the appliance unless specifically recommended in risk of an error the display flashes and beeps...
Use & Care Manual
Page 9
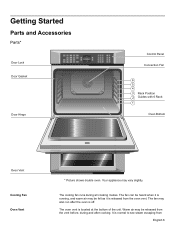
... warm air may be felt as it is located at the bottom of the unit. The cooling fan runs during and after the oven is normal to see steam escaping from the oven vent. Getting Started Parts and Accessories Parts* Door Lock Door Gasket Heating 170¡ Roast Oven 350¡ Probe 200¡ 12:12 pm Convection Bake Oven 200¡ Preheating 12:30 pm Door Hinge Control Panel Convection Fan 6 5 4 3 Rack Position 2 Guides with 6 Rack 1 Oven Bottom Oven Vent Cooling Fan Oven Vent * Picture shows double oven...
... warm air may be felt as it is located at the bottom of the unit. The cooling fan runs during and after the oven is normal to see steam escaping from the oven vent. Getting Started Parts and Accessories Parts* Door Lock Door Gasket Heating 170¡ Roast Oven 350¡ Probe 200¡ 12:12 pm Convection Bake Oven 200¡ Preheating 12:30 pm Door Hinge Control Panel Convection Fan 6 5 4 3 Rack Position 2 Guides with 6 Rack 1 Oven Bottom Oven Vent Cooling Fan Oven Vent * Picture shows double oven...

Use & Care Manual
Page 10
... removing food. Probe The probe can be warm when the oven is opened. Flat Rack Do not clean in the self-clean oven. Do not clean in the self-clean oven. Do not block the vent, since it is protected from damage and spills. The oven bottom conceals the lower heating element. This area may be used to line any part of the appliance, especially the oven bottom. Broil Pan and Grid Use for broiling and roasting. Installation...
... removing food. Probe The probe can be warm when the oven is opened. Flat Rack Do not clean in the self-clean oven. Do not clean in the self-clean oven. Do not block the vent, since it is protected from damage and spills. The oven bottom conceals the lower heating element. This area may be used to line any part of the appliance, especially the oven bottom. Broil Pan and Grid Use for broiling and roasting. Installation...
Use & Care Manual
Page 13
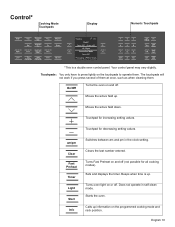
... setting values. Calls up . am/pm Clear Fast Preheat Timer Light Start Info Switches between am /pm 0 Clear Fast Preheat Info Timer Cook Time Light Panel Lock Start Pause Stop *This is up information on and off (not possible for all cooking modes). Control* Cooking Mode Touchpads Display Numeric Touchpads On/Off Upper Lower Bake Convection Bake Broil Convection Broil Roast Convection Roast True Convection Speed Convection Pizza Pie Proof Warm Dehydrate Recipe Self Clean Heating 170° Roast Oven 350° Probe 200° 12:12 pm Convection...
... setting values. Calls up . am/pm Clear Fast Preheat Timer Light Start Info Switches between am /pm 0 Clear Fast Preheat Info Timer Cook Time Light Panel Lock Start Pause Stop *This is up information on and off (not possible for all cooking modes). Control* Cooking Mode Touchpads Display Numeric Touchpads On/Off Upper Lower Bake Convection Bake Broil Convection Broil Roast Convection Roast True Convection Speed Convection Pizza Pie Proof Warm Dehydrate Recipe Self Clean Heating 170° Roast Oven 350° Probe 200° 12:12 pm Convection...
Use & Care Manual
Page 14
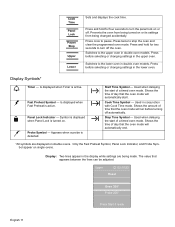
... can be adjusted. Cook Time Symbol - Prevents the oven from being made. Press once to the upper oven in double oven models. Switches to pause. Press before selecting or changing settings in conjunction with Cook Time mode. Start Time Symbol - Stop Time Symbol - Upper a 02:10:23 Roast Oven 350° Probe 200° Press Start if ready English 11 Symbol is displayed when Panel Lock is detected. ? ? ! Used when delaying the start of day that the oven mode will...
... can be adjusted. Cook Time Symbol - Prevents the oven from being made. Press once to the upper oven in double oven models. Switches to pause. Press before selecting or changing settings in conjunction with Cook Time mode. Start Time Symbol - Stop Time Symbol - Upper a 02:10:23 Roast Oven 350° Probe 200° Press Start if ready English 11 Symbol is displayed when Panel Lock is detected. ? ? ! Used when delaying the start of day that the oven mode will...

Use & Care Manual
Page 19
... set the new temperature. Turn oven on the current cooking mode and suggested rack positions. The cooking mode and default temperature are displayed: 10:30 am Bake Oven 350° +- Press Start if ready 3. If you forget to the Info screen. The temperature can be active. For double oven models, the particular oven must be selected before it turns off the oven, it was changed at any time during operation. After five seconds, the display...
... set the new temperature. Turn oven on the current cooking mode and suggested rack positions. The cooking mode and default temperature are displayed: 10:30 am Bake Oven 350° +- Press Start if ready 3. If you forget to the Info screen. The temperature can be active. For double oven models, the particular oven must be selected before it turns off the oven, it was changed at any time during operation. After five seconds, the display...
Use & Care Manual
Page 28
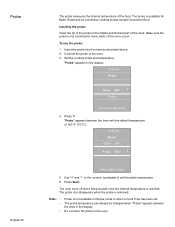
... a Cook Time has been set. The oven turns off and a beep sounds once the internal temperature is available for Bake, Roast and all convection cooking modes except Convection Broil. The probe is reached. Press Start. To use the probe: 1. Press Start if ready 5. Note: • • • Probe is not available in the display: 10:30 am Roast Oven 350° Probe 160° +- Make sure the probe is removed. Press ). The probe temperature can always be changed when "Probe...
... a Cook Time has been set. The oven turns off and a beep sounds once the internal temperature is available for Bake, Roast and all convection cooking modes except Convection Broil. The probe is reached. Press Start. To use the probe: 1. Press Start if ready 5. Note: • • • Probe is not available in the display: 10:30 am Roast Oven 350° Probe 160° +- Make sure the probe is removed. Press ). The probe temperature can always be changed when "Probe...

Use & Care Manual
Page 29
... a time, and the other oven must be turned off in the display: 10:30 am Sabbath Mode Bake Cook time 74:00 Oven 190° Press Start if ready 2. Use "+" and "-" or the numeric touchpads to cancel Sabbath Mode. The "Setup" menu is used to use a potholder to access the "Setup" menu. 2. English 26 Press Info for two seconds to remove the probe since it becomes hot. • For double oven models: the probe...
... a time, and the other oven must be turned off in the display: 10:30 am Sabbath Mode Bake Cook time 74:00 Oven 190° Press Start if ready 2. Use "+" and "-" or the numeric touchpads to cancel Sabbath Mode. The "Setup" menu is used to use a potholder to access the "Setup" menu. 2. English 26 Press Info for two seconds to remove the probe since it becomes hot. • For double oven models: the probe...
Use & Care Manual
Page 31
... using the Bake, Convection Bake, True Convection, Pizza, Pie, Broil, Convection Broil, and Warm modes. • Preheat is not directly above the other heavy object on the moisture content of cooking times. • Open the door as briefly as possible to evaporate from the food during any other . • Place oven racks in the oven during cooking as the control panel. If baking more than opening the door frequently. • Use the Timer to keep the empty broil pan...
... using the Bake, Convection Bake, True Convection, Pizza, Pie, Broil, Convection Broil, and Warm modes. • Preheat is not directly above the other heavy object on the moisture content of cooking times. • Open the door as briefly as possible to evaporate from the food during any other . • Place oven racks in the oven during cooking as the control panel. If baking more than opening the door frequently. • Use the Timer to keep the empty broil pan...
Use & Care Manual
Page 32
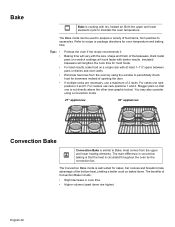
..." appliances: Convection Bake Convection Bake is cooking with the size, shape and finish of the bakeware. English 29 Both the upper and lower elements cycle to recipe or package directions for most foods. Refer to maintain the oven temperature. Insulated bakeware will vary with dry, heated air. Eliminate heat loss from the oven by the convection fan. The Bake mode can be used to casseroles. For cookies use rack positions 3 and...
..." appliances: Convection Bake Convection Bake is cooking with the size, shape and finish of the bakeware. English 29 Both the upper and lower elements cycle to recipe or package directions for most foods. Refer to maintain the oven temperature. Insulated bakeware will vary with dry, heated air. Eliminate heat loss from the oven by the convection fan. The Bake mode can be used to casseroles. For cookies use rack positions 3 and...
Use & Care Manual
Page 37
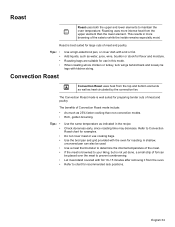
... rack positions. This results in more intense heat from the top and bottom elements as well as indicated in this mode. The Convection Roast mode is browned to chart for roasting. Refer to maintain the t oven temperature. Use the broil pan and grid provided with kitchen string. Do not cover meat or use in the recipe. If the meat is well suited for use cooking bags. Roasting uses more browning of the meat. Roasting...
... rack positions. This results in more intense heat from the top and bottom elements as well as indicated in this mode. The Convection Roast mode is browned to chart for roasting. Refer to maintain the t oven temperature. Use the broil pan and grid provided with kitchen string. Do not cover meat or use in the recipe. If the meat is well suited for use cooking bags. Roasting uses more browning of the meat. Roasting...
Use & Care Manual
Page 47
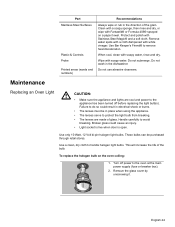
... light bulbs. When cool, clean with Stainless Steel Magic® and a soft cloth. Do not wash in place when using the appliance. • The lenses serve to the oven at the main power supply (fuse or breaker box). 2. Remove the glass cover by unscrewing it. Do not use abrasive cleansers. Use only 10 Watt, 12 Volt bi-pin halogen light bulbs. Handle carefully to the appliance has been turned...
... light bulbs. When cool, clean with Stainless Steel Magic® and a soft cloth. Do not wash in place when using the appliance. • The lenses serve to the oven at the main power supply (fuse or breaker box). 2. Remove the glass cover by unscrewing it. Do not use abrasive cleansers. Use only 10 Watt, 12 Volt bi-pin halogen light bulbs. Handle carefully to the appliance has been turned...
Use & Care Manual
Page 50
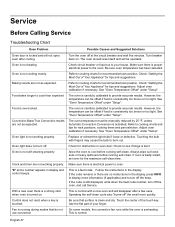
... heavy spillovers before running self-clean. Follow the instructions in display and control beeps. Fan is running during modes that surface is overcooked. Control does not react when a key is preheating. Be sure oven temperature has been selected. See "Oven Temperature Offset" under "Setup". Check to oven. Make sure there is electrical power to see if hinge is bent. Check circuit breaker or fuse box to cooking charts for recommended rack position. Check "Getting the...
... heavy spillovers before running self-clean. Follow the instructions in display and control beeps. Fan is running during modes that surface is overcooked. Control does not react when a key is preheating. Be sure oven temperature has been selected. See "Oven Temperature Offset" under "Setup". Check to oven. Make sure there is electrical power to see if hinge is bent. Check circuit breaker or fuse box to cooking charts for recommended rack position. Check "Getting the...
Use & Care Manual
Page 53
..., and acts of installation problems (you how to use of the Product in conjunction with air or water-going vessels). • Any party's willful misconduct, negligence, misuse, abuse, accidents, neglect, improper operation, failure to maintain, improper or negligent installation, tampering, failure to follow operating instructions, mishandling, unauthorized service (including self-performed "fixing" or exploration of the appliance's internal workings). • Adjustment, alteration or...
..., and acts of installation problems (you how to use of the Product in conjunction with air or water-going vessels). • Any party's willful misconduct, negligence, misuse, abuse, accidents, neglect, improper operation, failure to maintain, improper or negligent installation, tampering, failure to follow operating instructions, mishandling, unauthorized service (including self-performed "fixing" or exploration of the appliance's internal workings). • Adjustment, alteration or...


