Installation Instructions
Page 11
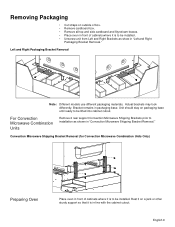
Left and Right Packaging Bracket Removal Note: Different models use different packaging materials. For Convection Microwave Combination Units Remove 2 rear support Convection Microwave Shipping Brackets prior to installation as show in line with the cabinet cutout. Actual brackets may look differently... it is to be installed. • Unscrew unit from Left and Right Brackets as shown in packaging base. Bracket remains in "Convection Microwave Shipping Bracket Removal." Removing Packaging • Cut straps on outside of box. • Remove cardboard box. • Remove ...
Left and Right Packaging Bracket Removal Note: Different models use different packaging materials. For Convection Microwave Combination Units Remove 2 rear support Convection Microwave Shipping Brackets prior to installation as show in line with the cabinet cutout. Actual brackets may look differently... it is to be installed. • Unscrew unit from Left and Right Brackets as shown in packaging base. Bracket remains in "Convection Microwave Shipping Bracket Removal." Removing Packaging • Cut straps on outside of box. • Remove cardboard box. • Remove ...

Installation Instructions
Page 12
... neutral wire and the bare ground wire from the oven to local electrical codes for de-rating requirements. Model Circuit Required 208V, 60 Hz 240V, 60 Hz HBN33, HBL33 25 AMP 30 AMP HBN34, HBL34, HBN54, HBL54 HBL85 30 AMP 30 AMP HBN35, HBL35, HBN56, HBL56, HBL57, HBL8650, HBL8750 40... or 50 Amp circuit. Important: Local Codes may vary; The electrical supply should be a 4-...
... neutral wire and the bare ground wire from the oven to local electrical codes for de-rating requirements. Model Circuit Required 208V, 60 Hz 240V, 60 Hz HBN33, HBL33 25 AMP 30 AMP HBN34, HBL34, HBN54, HBL54 HBL85 30 AMP 30 AMP HBN35, HBL35, HBN56, HBL56, HBL57, HBL8650, HBL8750 40... or 50 Amp circuit. Important: Local Codes may vary; The electrical supply should be a 4-...
Installation Instructions
Page 16
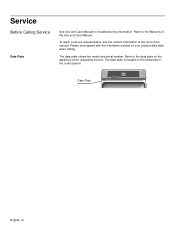
Service Before Calling Service Data Plate See Use and Care Manual for troubleshooting information. Refer to the data plate on your product data plate when calling. The data plate shows the model and serial number. Refer to the Warranty in the Use and Care Manual. Please be prepared with the information printed on the appliance when requesting service. The data plate is located on the underside of the manual. To reach a service representative, see the contact information at the front of the control panel: Data Plate English 14
Service Before Calling Service Data Plate See Use and Care Manual for troubleshooting information. Refer to the data plate on your product data plate when calling. The data plate shows the model and serial number. Refer to the Warranty in the Use and Care Manual. Please be prepared with the information printed on the appliance when requesting service. The data plate is located on the underside of the manual. To reach a service representative, see the contact information at the front of the control panel: Data Plate English 14
Use & Care Manual
Page 12
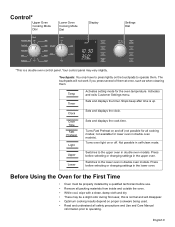
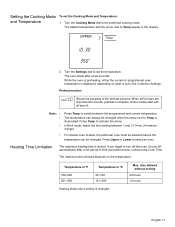
...not available for the First Time • Oven must be a slight odor during first uses; Press before selecting or changing settings in double oven models). Cook Time Fast Preheat Light Sets and displays the cook time. Switches to operating. English 9 Control* Upper Oven Cooking Mode Dial ...Lower Oven Cooking Mode Dial Upper Convection Bake Off Conv Broil Conv Roast Pizza Self Clean Pie Lower Bake Off Broil Self Clean...
...not available for the First Time • Oven must be a slight odor during first uses; Press before selecting or changing settings in double oven models). Cook Time Fast Preheat Light Sets and displays the cook time. Switches to operating. English 9 Control* Upper Oven Cooking Mode Dial ...Lower Oven Cooking Mode Dial Upper Convection Bake Off Conv Broil Conv Roast Pizza Self Clean Pie Lower Bake Off Broil Self Clean...
Use & Care Manual
Page 14
.... Note: • • • Press Temp to set in ºC 100-200 201-550 30-120 121-300 Heating stops until a setting is complete. Turn the Settings dial to switch between 1 and 3 (1=low, 2=medium, 3=high). • For double oven models, the particular oven must be selected before the temperature can always be changed . While...
.... Note: • • • Press Temp to set in ºC 100-200 201-550 30-120 121-300 Heating stops until a setting is complete. Turn the Settings dial to switch between 1 and 3 (1=low, 2=medium, 3=high). • For double oven models, the particular oven must be selected before the temperature can always be changed . While...
Use & Care Manual
Page 29
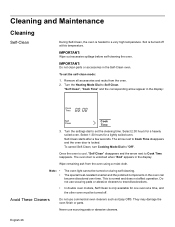
... IMPORTANT: Wipe out excessive spillage before self-cleaning the oven. To cancel Self-Clean, turn Cooking Mode Dial to treat discolorations. • In double oven models, Self Clean is locked. Do not use scouring pads or abrasive cleaners to "Off". To set the cleaning time. Select...During Self-Clean, the oven is normal and does not affect operation. Remove all accessories and racks from the oven using a moist cloth. Select 2:30 hours for a lightly soiled oven. The oven door is cool, "Self Clean" disappears and the arrow next to Self Clean. The special heat-...
... IMPORTANT: Wipe out excessive spillage before self-cleaning the oven. To cancel Self-Clean, turn Cooking Mode Dial to treat discolorations. • In double oven models, Self Clean is locked. Do not use scouring pads or abrasive cleaners to "Off". To set the cleaning time. Select...During Self-Clean, the oven is normal and does not affect operation. Remove all accessories and racks from the oven using a moist cloth. Select 2:30 hours for a lightly soiled oven. The oven door is cool, "Self Clean" disappears and the arrow next to Self Clean. The special heat-...
Use & Care Manual
Page 34
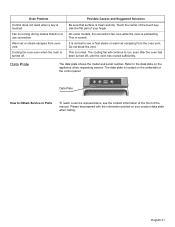
...a key is normal to see the contact information at the front of the manual. It is touched. Data Plate The data plate shows the model and serial number. Fan is clean and dry. Touch the center of your product data plate when calling. Possible Causes and Suggested Solutions Be ...sure that surface is running during modes that do not use convection Warm air or steam escapes from the oven vent. On some models, the convection fan runs while the oven is preheating. Do not block the vent. Refer to run, even after the...
...a key is normal to see the contact information at the front of the manual. It is touched. Data Plate The data plate shows the model and serial number. Fan is clean and dry. Touch the center of your product data plate when calling. Possible Causes and Suggested Solutions Be ...sure that surface is running during modes that do not use convection Warm air or steam escapes from the oven vent. On some models, the convection fan runs while the oven is preheating. Do not block the vent. Refer to run, even after the...
Use & Care Manual
Page 35
...Product only, using purchaser, provided that the Product was purchased: • For your normal, household (non-commercial) use, and has in Bosch's opinion, a superior reputation for customer service and technical ability (note that have no obligation, at its authorized service providers will repair your... to you (subject to certain limitations stated herein) if your Product proves to have been made without success, then Bosch will replace your Product (upgraded models may be fully liable and responsible for any travel time or other than 100 miles from an authorized service provider)...
...Product only, using purchaser, provided that the Product was purchased: • For your normal, household (non-commercial) use, and has in Bosch's opinion, a superior reputation for customer service and technical ability (note that have no obligation, at its authorized service providers will repair your... to you (subject to certain limitations stated herein) if your Product proves to have been made without success, then Bosch will replace your Product (upgraded models may be fully liable and responsible for any travel time or other than 100 miles from an authorized service provider)...


