Bosch B36IB70NSP Support and Manuals
Get Help and Manuals for this Bosch item
View All Support Options Below
Free Bosch B36IB70NSP manuals!
Problems with Bosch B36IB70NSP?
Ask a Question
Free Bosch B36IB70NSP manuals!
Problems with Bosch B36IB70NSP?
Ask a Question
Most Recent Bosch B36IB70NSP Questions

Refrigerator Will Not Cool
The refrigerator has power, but will not cool. The freezer section is working fine. I reset to origi...
The refrigerator has power, but will not cool. The freezer section is working fine. I reset to origi...
(Posted by bergeroni 12 years ago)
Popular Bosch B36IB70NSP Manual Pages
Installation Instructions - Page 3
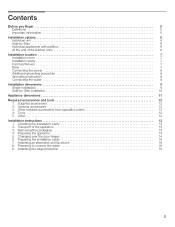
Other 12 Installation instructions 13 1. Tools 12 5. Preparing the appliance 14 5. Attaching an alternative antiĆtip device 18 8. Optional accessories 12 3. Removing the packaging 13 4. Preparing to connect the water 18 9. Transport of the kitchen units 6
Installation location 7 Installation room 7 Installation cavity 7 Furniture/fixtures 7 Base 7 Connecting the...
Installation Instructions - Page 5
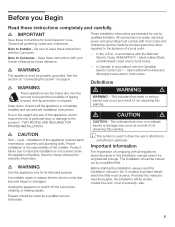
... leave these instructions completely and carefully. latest edition/State and Municipal codes and/or local codes. Due to the weight and size of this installation manual in accordance with the National Electric Code, ANSI/NFPA70 - Immediately repair or replace electric service cords that minor or moderate injuries or damage may occur as a result of this warning. In Canada, in full...
Installation Instructions - Page 6
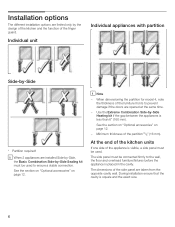
... of the partition 5/8" (16 mm).
During installation ensure that the cavity is less than 6" (160 mm). i When 2 appliances are installed SideĆbyĆSide, the Basic Combination...
4. The dimensions of the appliance is placed in the cavity.
When dimensioning the partition for model 4, note the thickness of the furniture fronts to prevent damage if the doors are taken from...
Installation Instructions - Page 7
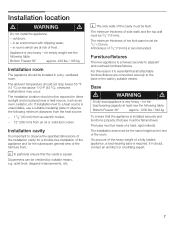
... the cavity is very heavy ć for the subsequent general view of the room. The installation area must be 5/8" (16 mm). outdoors, -
If installation next to observe the specified dimensions of the installation cavity for a troubleĆfree installation of the appliance and for the loadĆbearing capacity at risk of frost. Squareness can...
Installation Instructions - Page 8
...d
WARNING
d
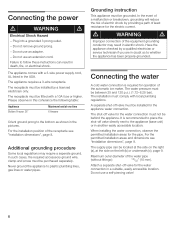
Improper connection of electric shock by a qualified electrician or service technician if you are in doubt as shown in a suitable, easily ...instruction
This appliance must not be grounded. The appliance requires a 3Ćwire receptacle. Some local regulations may result in death, fire, or electrical shock.
For the installation position of the automatic ice maker...
Installation Instructions - Page 12
...work.
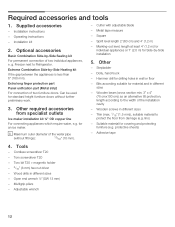
3. Other required accessories from damage (e.g. Metal tape measure
- Square
- Wood drills in different sizes - Required accessories and tools
1. Operating instructions -
Can be used for an ice maker...specialist outlets
Ice maker installation kit ¼" OD copper line
For connecting appliances which require water, e.g. Freezer next to Refrigerator. Cordless ...
Installation Instructions - Page 13
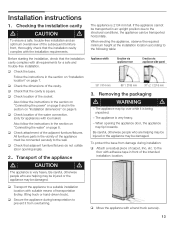
...installation location according to the structural conditions, the appliance can be damaged. When opening angle).
2..
Installation instructions
1.
Also follow the instructions in the vicinity of carpet, lino, etc. All furniture parts... on Installation dimensions" on page 7. The appliance is 2134 mm tall.
to the floor with ice maker)
Also follow the instructions in the...
Installation Instructions - Page 14
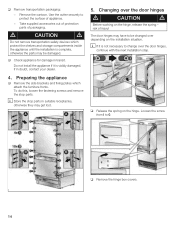
... suitable receptacles, otherwise they may be changed over the door hinges
d
CAUTION
d
Before working on the hinge.
Changing over depending on the installation situation.
If in transit. i Store the stop parts. Use the cutter securely to 0. d
CAUTION
d
Do not remove transportation safety devices which attach the furniture fronts. q Remove the hinge box covers...
Installation Instructions - Page 16

...;brackets are no electrical wires or plumbing in the area which the screws could penetrate - The supplied set contains fastening screws for each appliance or appliance combination (SideĆbyĆSide). In some installations the subĆflooring or finished floor may necessitate angling the wood screws used to the section...
Installation Instructions - Page 17
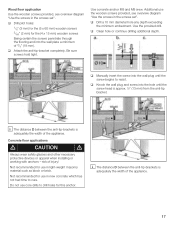
... and M8 srew.
q Manually insert the screw into the wall plate a minimum of injury! Wood floor application
Use the wooden screws provided, see overview diagram Use the screws in the screws set ". Concrete floor applications
d
CAUTION
d
Always wear safety glasses and other necessary protective devices or apparel when installing or working with anchors ć risk...
Installation Instructions - Page 18
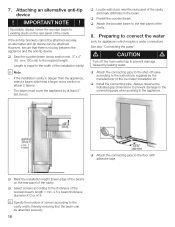
... pipe. q Select screws according to the instructions supplied by the manufacturer of the installation cavity!
q Attach the connecting pipe to the shutĆoff the main water tap to the cavity width, thereby ensuring that there is equal to the width of the ice maker installation kit. q Mark the installation height (lower edge of the beam...
Installation Instructions - Page 20
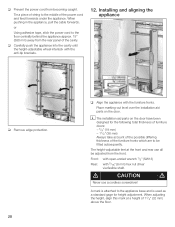
... appliance into the cavity until the heightĆadjustable wheel interlock with 5/16" (8 mm) hex nut driver via flexible shaft. The heightĆadjustable feet at a height of the cavity. d
CAUTION
d
Never...the appliance, pull the cable forwards. Place markingĆout level over the installation aid parts on the door have been
designed for height adjustment.
When adjusting the height...
Installation Instructions - Page 22

... water pipe to the attachment plate (top). q Attach the cover strip to the solenoid valve of the appliance, follow the instructions supplied by the manufacturer of the ice maker installation kit enclosed with the installation manual.
q Using the openĆended wrench, tighten the union nut.
q Push the union nut and seal onto the water pipe...
Installation Instructions - Page 24

...parts allow the furniture door to be adjusted precisely and attached securely to the base panel.
Only for appliances with a water connection:
! IMPORTANT NOTE ! Commissioning the Appliance
To guarantee the accuracy of the following working...which is always shorter than the thickness of the furniture doors during installation.
NOTE
! There are attached to the water pipe feeding the ...
Installation Instructions - Page 25
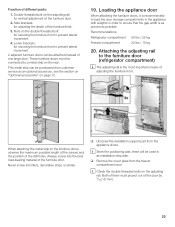
...refrigerator compartment)
i The adjusting rail is as precise as an optional accessory, see the section on Optional accessories" on page 12.
19. Never screw into the best loadĆbearing material of the furniture door.
2. q Unscrew the installation support part...position of different parts:
1.
i Store the positioning aids, there will be purchased from customer service as possible. ...
Bosch B36IB70NSP Reviews
We have not received any reviews for Bosch yet.