Installation and Use & Care
Page 2
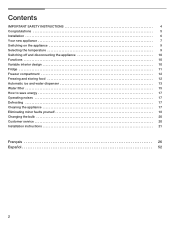
Contents IMPORTANT SAFETY INSTRUCTIONS 4 Congratulations 5 Installation 6 Your new appliance 7 Switching on the appliance 9 Selecting the temperature 9 Switching off and disconnecting the appliance 10 Functions 10 Variable interior design 10 Fridge 11 Freezer compartment 12 Freezing and storing food 12 ...Automatic ice and water dispenser 13 Water filter 15 How to save energy 17 Operating noises 17 Defrosting 17 Cleaning the appliance 17 Eliminating minor faults yourself 18 Changing the bulb 20 Customer service 20 Installation instructions 21 Français 26 Españ...
Contents IMPORTANT SAFETY INSTRUCTIONS 4 Congratulations 5 Installation 6 Your new appliance 7 Switching on the appliance 9 Selecting the temperature 9 Switching off and disconnecting the appliance 10 Functions 10 Variable interior design 10 Fridge 11 Freezer compartment 12 Freezing and storing food 12 ...Automatic ice and water dispenser 13 Water filter 15 How to save energy 17 Operating noises 17 Defrosting 17 Cleaning the appliance 17 Eliminating minor faults yourself 18 Changing the bulb 20 Customer service 20 Installation instructions 21 Français 26 Españ...
Installation and Use & Care
Page 3
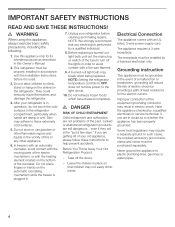
.... 10. Before You Throw Away Your Old Refrigeration Product: - The receptacle must be purchased separately. Improper connection of your old appliance, please follow these extremely cold surfaces. 5. Skin may not easily climb inside. In freezers with an automatic icemaker, avoid contact ...ejector mechanism, or with the Installation Instructions before cleaning and making repairs. Do not place fingers or hands on the bottom of this appliance, always exercise basic safety precautions, including the following: 1. Unplug your refrigerator is used. 3. e DANGER RISK OF CHILD ENTRAPMENT ...
.... 10. Before You Throw Away Your Old Refrigeration Product: - The receptacle must be purchased separately. Improper connection of your old appliance, please follow these extremely cold surfaces. 5. Skin may not easily climb inside. In freezers with an automatic icemaker, avoid contact ...ejector mechanism, or with the Installation Instructions before cleaning and making repairs. Do not place fingers or hands on the bottom of this appliance, always exercise basic safety precautions, including the following: 1. Unplug your refrigerator is used. 3. e DANGER RISK OF CHILD ENTRAPMENT ...
Installation and Use & Care
Page 4
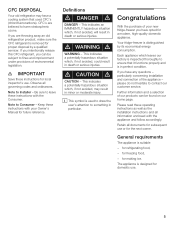
... situation which leaves our factory is inspected thoroughly to harm stratospheric ozone. Each appliance which , if not avoided, may have opted for a modern, highĆquality domestic appliance. Please read these operating instructions as well as the installation instructions and all ...IMMINENTLY hazardous situation which , if not avoided, could result in particular. d CAUTION d CAUTION - Congratulations With the purchase of the appliance ć please do not hesitate to contact our customer service. If you have any questions ć particularly concerning installation and connection of...
... situation which leaves our factory is inspected thoroughly to harm stratospheric ozone. Each appliance which , if not avoided, may have opted for a modern, highĆquality domestic appliance. Please read these operating instructions as well as the installation instructions and all ...IMMINENTLY hazardous situation which , if not avoided, could result in particular. d CAUTION d CAUTION - Congratulations With the purchase of the appliance ć please do not hesitate to contact our customer service. If you have any questions ć particularly concerning installation and connection of...
Installation and Use & Care
Page 5
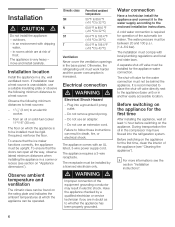
...electrician only. A separate shutĆoff valve for the water connection must work harder and the power consumption is required for the appliance water connection. During transportation the oil in the compressor may result in electric shock. in death, fire, or electrical shock. If...water connection is increased. The shutĆoff valve must comply with dripping water, - i For more informations see section on the appliance for the first time, clean the interior of the automatic ice maker. Observe ambient temperature and ventilation The climatic class can be ...
...electrician only. A separate shutĆoff valve for the water connection must work harder and the power consumption is required for the appliance water connection. During transportation the oil in the compressor may result in electric shock. in death, fire, or electrical shock. If...water connection is increased. The shutĆoff valve must comply with dripping water, - i For more informations see section on the appliance for the first time, clean the interior of the automatic ice maker. Observe ambient temperature and ventilation The climatic class can be ...
Installation and Use & Care
Page 6
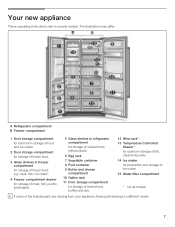
Your new appliance These operating instructions refer to a different model. 7 A Refrigerator compartment B Freezer compartment 1 Door storage compartment for shortĆterm storage of food and ice cream. 2 Door ... * 13 Temperature Controlled Drawer * for optimum storage of fish, meat and poultry. 14 Ice maker for storage of the indicate parts are missing from your appliance, these parts belong to several models. The illustrations may differ. meat, fish, ice cream. 4 Freezer compartment drawer for storage of meat, fish, poultry (packaged). 5 Glass...
Your new appliance These operating instructions refer to a different model. 7 A Refrigerator compartment B Freezer compartment 1 Door storage compartment for shortĆterm storage of food and ice cream. 2 Door ... * 13 Temperature Controlled Drawer * for optimum storage of fish, meat and poultry. 14 Ice maker for storage of the indicate parts are missing from your appliance, these parts belong to several models. The illustrations may differ. meat, fish, ice cream. 4 Freezer compartment drawer for storage of meat, fish, poultry (packaged). 5 Glass...
Installation and Use & Care
Page 8
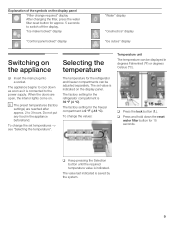
When the doors are reached after approx. 2 to 3 hours. The value last indicated is connected to the power supply. The appliance begins to cool down the reset water filter button for 15 seconds. q Press and hold down as soon as it is saved by ...the system. 9 To change the values: Temperature unit The temperature can be displayed in the appliance beforehand. i The preset temperatures (factory settings) are open, the interior lights come on Selecting the the appliance temperature q Insert the main plug into a socket. Explanation of the symbols on the display panel...
When the doors are reached after approx. 2 to 3 hours. The value last indicated is connected to the power supply. The appliance begins to cool down the reset water filter button for 15 seconds. q Press and hold down as soon as it is saved by ...the system. 9 To change the values: Temperature unit The temperature can be displayed in the appliance beforehand. i The preset temperatures (factory settings) are open, the interior lights come on Selecting the the appliance temperature q Insert the main plug into a socket. Explanation of the symbols on the display panel...
Installation and Use & Care
Page 9
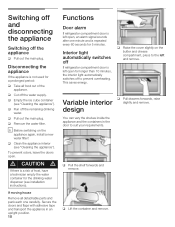
...the containers in an upright position. 10 Functions Door alarm If refrigerator compartment door is not used for 5 minutes. q Clean the appliance interior (see Cleaning the appliance"). To prevent odors, leave the doors open , an alarm signal sounds after one carefully. d CAUTION d If there is repeated ... prolonged period: q Take all detachable parts and pack each one minute and is a risk of the appliance. Secure the doors and flaps with adhesive tape and transport the appliance in the door to suit your requirements. q Lift the container and remove. i Before switching on the ...
...the containers in an upright position. 10 Functions Door alarm If refrigerator compartment door is not used for 5 minutes. q Clean the appliance interior (see Cleaning the appliance"). To prevent odors, leave the doors open , an alarm signal sounds after one carefully. d CAUTION d If there is repeated ... prolonged period: q Take all detachable parts and pack each one minute and is a risk of the appliance. Secure the doors and flaps with adhesive tape and transport the appliance in the door to suit your requirements. q Lift the container and remove. i Before switching on the ...
Installation and Use & Care
Page 10
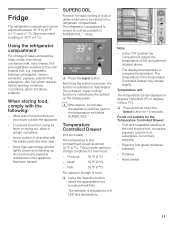
.... The activated super cooling" function is a required temperature. Produce: 38 °F (3 °C) - q Press and hold down outside the appliance. - Potatoes - Using the refrigerator compartment For storage of food: q Using the Selection button, select the appropriate food (produce/meat/fish). mandarins,...cold as possible in SUPERCOOLt mode. q Press the super button. Temperature Controlled Drawer (not all models) The temperature in the appliance. This provides optimum storage conditions for the Temperature Controlled Drawer: - Fish: 32 °F (0 °C) For optimum storage...
.... The activated super cooling" function is a required temperature. Produce: 38 °F (3 °C) - q Press and hold down outside the appliance. - Potatoes - Using the refrigerator compartment For storage of food: q Using the Selection button, select the appropriate food (produce/meat/fish). mandarins,...cold as possible in SUPERCOOLt mode. q Press the super button. Temperature Controlled Drawer (not all models) The temperature in the appliance. This provides optimum storage conditions for the Temperature Controlled Drawer: - Fish: 32 °F (0 °C) For optimum storage...

Installation and Use & Care
Page 11
... high power consumption. If the door is not damaged. q Purchase deepĆfrozen food last. to 24 hours before SUPERFREEZEt. i After approx. 150 minutes the appliance switches back to meat, beef, game, pulses 30 days Freezer compartment The freezer compartment temperature can refreeze this ready meal. q The temperature of heatĆ...
... high power consumption. If the door is not damaged. q Purchase deepĆfrozen food last. to 24 hours before SUPERFREEZEt. i After approx. 150 minutes the appliance switches back to meat, beef, game, pulses 30 days Freezer compartment The freezer compartment temperature can refreeze this ready meal. q The temperature of heatĆ...
Installation and Use & Care
Page 12
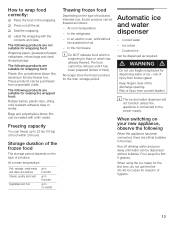
...or ice ć risk of hygiene. 13 In the refrigerator - Ice cubes - i The ice and water dispenser will not function unless the appliance is beginning to the power supply. At room temperature - The food cannot be purchased from crusher blades! d WARNING d Do not use , frozen... produce can be dispensed without fan assisted hotĆair - Risk of the discharge opening. q Seal the wrapping. The following When the appliance has been connected, there are not suitable for the max. At a mean temperature: Fish, sausage, ready meals and cakes and pastries Cheese,...
...or ice ć risk of hygiene. 13 In the refrigerator - Ice cubes - i The ice and water dispenser will not function unless the appliance is beginning to the power supply. At room temperature - The food cannot be purchased from crusher blades! d WARNING d Do not use , frozen... produce can be dispensed without fan assisted hotĆair - Risk of the discharge opening. q Seal the wrapping. The following When the appliance has been connected, there are not suitable for the max. At a mean temperature: Fish, sausage, ready meals and cakes and pastries Cheese,...
Installation and Use & Care
Page 13
... a stale" taste. i Remove the receptacle from sticking. q Pull out the container, empty and clean with lukewarm water. The ice maker may be damaged. When the appliance has been switched on, it locks into ice cubes. If the water has an aftertaste, this case dispense approx. 15 glasses of the drinking water...
... a stale" taste. i Remove the receptacle from sticking. q Pull out the container, empty and clean with lukewarm water. The ice maker may be damaged. When the appliance has been switched on, it locks into ice cubes. If the water has an aftertaste, this case dispense approx. 15 glasses of the drinking water...
Installation and Use & Care
Page 14
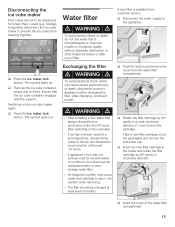
... the new filter cartridge in the holder and rotate the filter cartridge by 90° gently in system may cause water and cartridge to the appliance. Water filter d WARNING d To avoid serious illness or death, do not use of the first 24 hours after use water that the ice...the ice production of filter. The symbol lights up. q Remove the ice cube container, empty and reĆinsert. Switching on the icemaker. - If appliance or ice was not actively used for longer than 1 week (e.g. The filter should be dispensed for a prolonged time, discard all ice cubes in clockwise ...
... the new filter cartridge in the holder and rotate the filter cartridge by 90° gently in system may cause water and cartridge to the appliance. Water filter d WARNING d To avoid serious illness or death, do not use of the first 24 hours after use water that the ice...the ice production of filter. The symbol lights up. q Remove the ice cube container, empty and reĆinsert. Switching on the icemaker. - If appliance or ice was not actively used for longer than 1 week (e.g. The filter should be dispensed for a prolonged time, discard all ice cubes in clockwise ...
Installation and Use & Care
Page 15
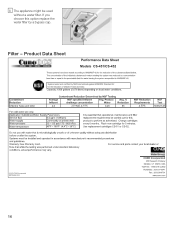
Product Data Sheet 16 If you choose this option replace the water filter by a bypass cap. i The appliance might be used without a water filter. Filter -
Product Data Sheet 16 If you choose this option replace the water filter by a bypass cap. i The appliance might be used without a water filter. Filter -
Installation and Use & Care
Page 16
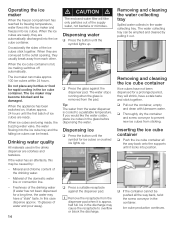
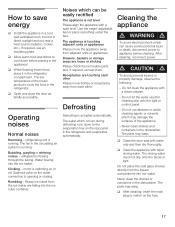
... container. q After cleaning: insert the main plug or switch on the rear panel in the refrigerator compartment. How to appliance before placing in the appliance! Operating noises Normal noises Humming - refrigerant is switching on the water connection is running . The water which can cause ...severe personal injury or death, disconnect power to save energy q Install the appliance in a cool, well ventilated room, but not in direct sunlight and not near a heat source (radiator, cooker, etc.). motor is ...
... container. q After cleaning: insert the main plug or switch on the rear panel in the refrigerator compartment. How to appliance before placing in the appliance! Operating noises Normal noises Humming - refrigerant is switching on the water connection is running . The water which can cause ...severe personal injury or death, disconnect power to save energy q Install the appliance in a cool, well ventilated room, but not in direct sunlight and not near a heat source (radiator, cooker, etc.). motor is ...
Installation and Use & Care
Page 17
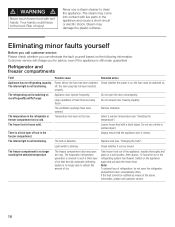
...ice in the freezer compartment. The steam may damage the plastic surfaces. There is a thick layer of ice that the appliance door is no longer reaching the selected temperature The freezer compartment door was open the refrigerator compartment door unnecessarily often. The evaporator...following information. The refrigerating unit is sticking. To prevent loss of ice. Refrigerator and freezer compartments Fault Possible cause Remedial action Appliance has no longer able to the food. Do not exceed max. Never use a knife or pointed object. Check whether ...
...ice in the freezer compartment. The steam may damage the plastic surfaces. There is a thick layer of ice that the appliance door is no longer reaching the selected temperature The freezer compartment door was open the refrigerator compartment door unnecessarily often. The evaporator...following information. The refrigerating unit is sticking. To prevent loss of ice. Refrigerator and freezer compartments Fault Possible cause Remedial action Appliance has no longer able to the food. Do not exceed max. Never use a knife or pointed object. Check whether ...
Installation and Use & Care
Page 18
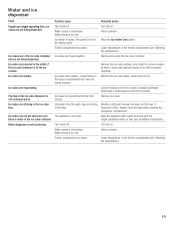
...chunks of the ice cube container or in the ice cube tray. The flap on . Ice maker is normal. The symbol is not closing . The appliance is interrupted. Water supply is not level. Press the Ice maker lock button. Remove ice cubes. Ice cubes are sticking in the ice crusher. Ice... be forming in the ice cube container Water dispenser is water in the trays. Remove the ice cube maker, empty and rub dry. Align the appliance with a spirit level and with vinegar and wipe out the trays. Limescale from closing properly. Turn tap on the display panel. Ice cubes are ...
...chunks of the ice cube container or in the ice cube tray. The flap on . Ice maker is normal. The symbol is not closing . The appliance is interrupted. Water supply is not level. Press the Ice maker lock button. Remove ice cubes. Ice cubes are sticking in the ice crusher. Ice... be forming in the ice cube container Water dispenser is water in the trays. Remove the ice cube maker, empty and rub dry. Align the appliance with a spirit level and with vinegar and wipe out the trays. Limescale from closing properly. Turn tap on the display panel. Ice cubes are ...
Installation and Use & Care
Page 19
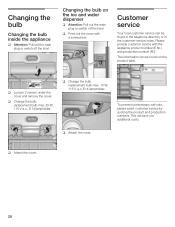
...115 V a.c.,E14 lampholder. This information can be found in the telephone directory or in the customerĆservice index. q Prise out the cover with the appliance product number (E Nr.) and production number (FD). To prevent unnecessary callĆouts, please assist customer service by quoting the product and production numbers. ... a screwdriver. replacement bulb max. 25 W, 115 V a.c., E14 lampholder. This will save you additional costs. Changing the bulb Changing the bulb inside the appliance q Attention: Pull out the main plug or switch off the fuse! q Change the bulb.
...115 V a.c.,E14 lampholder. This information can be found in the telephone directory or in the customerĆservice index. q Prise out the cover with the appliance product number (E Nr.) and production number (FD). To prevent unnecessary callĆouts, please assist customer service by quoting the product and production numbers. ... a screwdriver. replacement bulb max. 25 W, 115 V a.c., E14 lampholder. This will save you additional costs. Changing the bulb Changing the bulb inside the appliance q Attention: Pull out the main plug or switch off the fuse! q Change the bulb.
Installation and Use & Care
Page 20
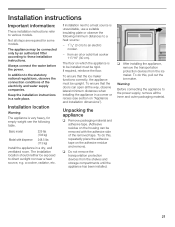
... (104 kg) Model with the adhesive side of the electricity and water supply companies. from the shelves and storage compartments until the appliance has been installed. If required, reinforce the floor. To do this , pull out the ice maker. The installation location should neither... be rigid. a cooker, radiator, etc. To ensure that the ice maker functions correctly, the appliance must be exposed to the statutory national regulations, observe the connection conditions of the removed tape. To do this , repeatedly place the ...
... (104 kg) Model with the adhesive side of the electricity and water supply companies. from the shelves and storage compartments until the appliance has been installed. If required, reinforce the floor. To do this , pull out the ice maker. The installation location should neither... be rigid. a cooker, radiator, etc. To ensure that the ice maker functions correctly, the appliance must be exposed to the statutory national regulations, observe the connection conditions of the removed tape. To do this , repeatedly place the ...
Installation and Use & Care
Page 21
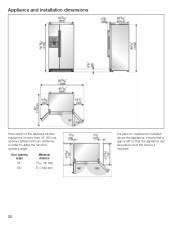
Door opening angle. Appliance and installation dimensions If the depth of the adjacent kitchen equipment is more than 23" (60 cm), observe lateral minimum distances in order to utilize the full door opening angle 90 ° 135 ° Minimum distance 19/16" (40 mm) 51/2"(140 mm) 22 If a panel or cupboard is installed above the appliance, ensure that a gap is left so that the appliance can be pulled out of the recess if required.
Door opening angle. Appliance and installation dimensions If the depth of the adjacent kitchen equipment is more than 23" (60 cm), observe lateral minimum distances in order to utilize the full door opening angle 90 ° 135 ° Minimum distance 19/16" (40 mm) 51/2"(140 mm) 22 If a panel or cupboard is installed above the appliance, ensure that a gap is left so that the appliance can be pulled out of the recess if required.
Installation and Use & Care
Page 22
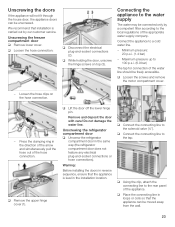
...should be connected only by our customer service. q Using the clip, attach the connecting line to the solenoid valve (¼"). Connect the appliance to the local regulations of the hose connection. q Loosen the hose connection: q Disconnect the electrical plugĆandĆsocket connections ...same way (the refrigerator compartment door does not feature any electrical plugĆandĆsocket connections or hose connections). Connecting the appliance to the water supply The water may be freely accessible. q Loosen the screws and remove the motor compartment cover. - Unscrewing...
...should be connected only by our customer service. q Using the clip, attach the connecting line to the solenoid valve (¼"). Connect the appliance to the local regulations of the hose connection. q Loosen the hose connection: q Disconnect the electrical plugĆandĆsocket connections ...same way (the refrigerator compartment door does not feature any electrical plugĆandĆsocket connections or hose connections). Connecting the appliance to the water supply The water may be freely accessible. q Loosen the screws and remove the motor compartment cover. - Unscrewing...