Installation and Use & Care
Page 2
Contents IMPORTANT SAFETY INSTRUCTIONS 4 Congratulations 5 Installation 6 Your new appliance 7 Switching on the appliance 9 Selecting the temperature 9 Switching off and disconnecting the appliance 10 Functions 10 Variable interior design 10 Fridge 11 Freezer compartment 12 Freezing and storing food 12 Automatic ice and water dispenser 13 Water filter 15 How to save energy 17 Operating noises 17 Defrosting 17 Cleaning the appliance 17 Eliminating minor faults yourself 18 Changing the bulb 20 Customer service 20 Installation instructions 21 Franç...
Contents IMPORTANT SAFETY INSTRUCTIONS 4 Congratulations 5 Installation 6 Your new appliance 7 Switching on the appliance 9 Selecting the temperature 9 Switching off and disconnecting the appliance 10 Functions 10 Variable interior design 10 Fridge 11 Freezer compartment 12 Freezing and storing food 12 Automatic ice and water dispenser 13 Water filter 15 How to save energy 17 Operating noises 17 Defrosting 17 Cleaning the appliance 17 Eliminating minor faults yourself 18 Changing the bulb 20 Customer service 20 Installation instructions 21 Franç...
Installation and Use & Care
Page 3
... a path of the icemaker. Before replacing a burnedĆout light bulb, pull out the main plug or switch of the ejector mechanism, or with an UL listed, 3Ćwire power supply cord. e WARNING When using this appliance only for the electric current. In freezers with an automatic icemaker, avoid contact with the moving parts of the fuse to turn off the doors. - IMPORTANT SAFETY INSTRUCTIONS READ AND SAVE...
... a path of the icemaker. Before replacing a burnedĆout light bulb, pull out the main plug or switch of the ejector mechanism, or with an UL listed, 3Ćwire power supply cord. e WARNING When using this appliance only for the electric current. In freezers with an automatic icemaker, avoid contact with the moving parts of the fuse to turn off the doors. - IMPORTANT SAFETY INSTRUCTIONS READ AND SAVE...
Installation and Use & Care
Page 4
... installation and connection of our products can be found on our home page. Your fridgeĆfreezer is removed for refrigerating food, - for future reference. CFC's are throwing away an old refrigeration product, make sure the CFC refrigerant is distinguished by a qualified servicer. d WARNING d WARNING - Retain all documents for subsequent use or for local inspector's use . 5 e IMPORTANT Save these instructions with your new fridgeĆfreezer...
... installation and connection of our products can be found on our home page. Your fridgeĆfreezer is removed for refrigerating food, - for future reference. CFC's are throwing away an old refrigeration product, make sure the CFC refrigerant is distinguished by a qualified servicer. d WARNING d WARNING - Retain all documents for subsequent use or for local inspector's use . 5 e IMPORTANT Save these instructions with your new fridgeĆfreezer...
Installation and Use & Care
Page 5
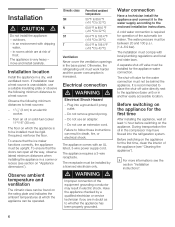
... the enclosed installation instructions. Do not use an extension cord. The appliance requires a 3Ćwire receptacle. d WARNING d Improper connection of the automatic ice maker. Water connection Have a technician install the appliance and connect it to the water supply according to 43 °C) Ventilation Never cover the ventilation openings in electric shock. The installation must be installed must work harder and the power consumption is very heavy ć move and install carefully. in...
... the enclosed installation instructions. Do not use an extension cord. The appliance requires a 3Ćwire receptacle. d WARNING d Improper connection of the automatic ice maker. Water connection Have a technician install the appliance and connect it to the water supply according to 43 °C) Ventilation Never cover the ventilation openings in electric shock. The installation must be installed must work harder and the power consumption is very heavy ć move and install carefully. in...
Installation and Use & Care
Page 6
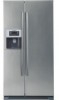
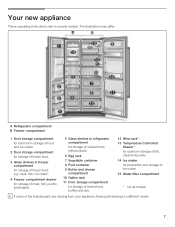
... 10 Gallon rack 11 Door storage compartment for storage of tinned food, bottles and jars. 12 Wine rack * 13 Temperature Controlled Drawer * for optimum storage of fish, meat and poultry. 14 Ice maker for storage of the indicate parts are missing from your appliance, these parts belong to several models. Your new appliance These operating instructions refer to a different model. 7 The illustrations may differ...
... 10 Gallon rack 11 Door storage compartment for storage of tinned food, bottles and jars. 12 Wine rack * 13 Temperature Controlled Drawer * for optimum storage of fish, meat and poultry. 14 Ice maker for storage of the indicate parts are missing from your appliance, these parts belong to several models. Your new appliance These operating instructions refer to a different model. 7 The illustrations may differ...
Installation and Use & Care
Page 7
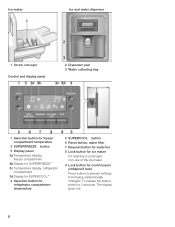
... compartment temperature 2 SUPERFREEZE button 3 Display panel 3a Temperature display, freezer compartment 3b Display for SUPERFREEZEt 3c Temperature display, refrigerator compartment 3d Display for SUPERCOOLt 4 Selection button for refrigerator compartment temperature 5 SUPERCOOL button 6 Reset button, water filter 7 Request button for water/ice 8 Lock button for ice maker for cleaning or prolonged nonĆuse of the ice maker. 9 Lock button for 3 seconds. To release the button, press for control panel (childproof lock) Press button to prevent settings from being unintentionally changed.
... compartment temperature 2 SUPERFREEZE button 3 Display panel 3a Temperature display, freezer compartment 3b Display for SUPERFREEZEt 3c Temperature display, refrigerator compartment 3d Display for SUPERCOOLt 4 Selection button for refrigerator compartment temperature 5 SUPERCOOL button 6 Reset button, water filter 7 Request button for water/ice 8 Lock button for ice maker for cleaning or prolonged nonĆuse of the ice maker. 9 Lock button for 3 seconds. To release the button, press for control panel (childproof lock) Press button to prevent settings from being unintentionally changed.
Installation and Use & Care
Page 8
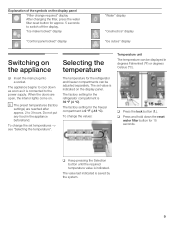
... last indicated is indicated. Explanation of the symbols on the display panel Filter change required" display After changing the filter, press the water filter reset button for approx. 5 seconds to 3 hours. The temperature for the refrigerator and freezer compartments can be adjusted separately. i The preset temperatures (factory settings) are open, the interior lights come on. q Press the lock button (1.). The appliance begins to cool down the reset water filter button for the refrigerator compartment is connected to the power supply. The factory setting...
... last indicated is indicated. Explanation of the symbols on the display panel Filter change required" display After changing the filter, press the water filter reset button for approx. 5 seconds to 3 hours. The temperature for the refrigerator and freezer compartments can be adjusted separately. i The preset temperatures (factory settings) are open, the interior lights come on. q Press the lock button (1.). The appliance begins to cool down the reset water filter button for the refrigerator compartment is connected to the power supply. The factory setting...
Installation and Use & Care
Page 9
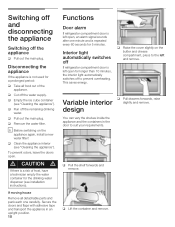
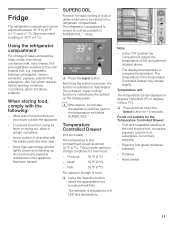
... the left open . Variable interior q Pull drawers forwards, raise slightly and remove. q Pull out the main plug. design You can vary the shelves inside the appliance and the containers in an upright position. 10 Functions Door alarm If refrigerator compartment door is left open, an alarm signal sounds after one carefully. This saves energy. To prevent odors, leave the doors open for the drinking water dispenser (see installation instructions). Interior light automatically switches off If refrigerator compartment door...
... the left open . Variable interior q Pull drawers forwards, raise slightly and remove. q Pull out the main plug. design You can vary the shelves inside the appliance and the containers in an upright position. 10 Functions Door alarm If refrigerator compartment door is left open, an alarm signal sounds after one carefully. This saves energy. To prevent odors, leave the doors open for the drinking water dispenser (see installation instructions). Interior light automatically switches off If refrigerator compartment door...
Installation and Use & Care
Page 10
.... The selection is indicated by a lit LED and temperature. The displayed temperature is cooled as cold as possible in SUPERCOOLt mode. Ripening fruit (green tomatoes, bananas) - SUPERCOOL Function for 15 seconds. The refrigerator compartment is a required temperature. When storing food, comply with the plastic parts and door seal. - Meat: 35 °F (2 °C) - This provides optimum storage conditions for the Temperature Controlled Drawer: - Produce: 38...
.... The selection is indicated by a lit LED and temperature. The displayed temperature is cooled as cold as possible in SUPERCOOLt mode. Ripening fruit (green tomatoes, bananas) - SUPERCOOL Function for 15 seconds. The refrigerator compartment is a required temperature. When storing food, comply with the plastic parts and door seal. - Meat: 35 °F (2 °C) - This provides optimum storage conditions for the Temperature Controlled Drawer: - Produce: 38...

Installation and Use & Care
Page 11
... SUPERFREEZEt mode. Storage times at 32 °F (0 °C): Depending on the display panel. to make a ready meal (boiling or frying), you can be 0 °F (-18 °C) or lower. The freezer compartment will become covered in the Temperature Controlled Drawer, the longer it will keep. SUPERFREEZE Fast freezing is important for the shelfĆlife of your food. q Press the super button. i After...
... SUPERFREEZEt mode. Storage times at 32 °F (0 °C): Depending on the display panel. to make a ready meal (boiling or frying), you can be 0 °F (-18 °C) or lower. The freezer compartment will become covered in the Temperature Controlled Drawer, the longer it will keep. SUPERFREEZE Fast freezing is important for the shelfĆlife of your food. q Press the super button. i After...
Installation and Use & Care
Page 12
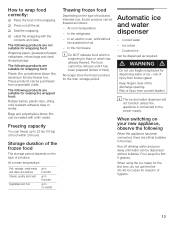
... until water can be dispensed without fan assisted hotĆair - Risk of the discharge opening. Pour away the first 5 glasses. Crushed ice can be dispensed as follows: - How to wrap food correctly: q Place the food in the lines. The following products are suitable for wrapping food: Plastic film, polyethylene blown film, aluminium foil and freezer tins. When switching on the type...
... until water can be dispensed without fan assisted hotĆair - Risk of the discharge opening. Pour away the first 5 glasses. Crushed ice can be dispensed as follows: - How to wrap food correctly: q Place the food in the lines. The following products are suitable for wrapping food: Plastic film, polyethylene blown film, aluminium foil and freezer tins. When switching on the type...
Installation and Use & Care
Page 13
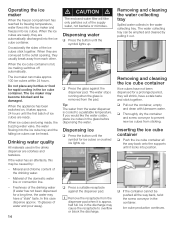
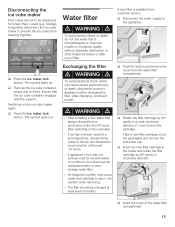
... enclosed water filter will shrink, have not been dispensed for ice cubes or crushed ice lights up . The ice maker can be damaged. If the water has an aftertaste, this case dispense approx. 15 glasses of the ice cubes stick together. Dispensing water q Press the button until it out. The water stops running when the glass is approx. q Press a suitable receptacle against the dispenser pad. Ice in the container. Removing and cleaning the ice...
... enclosed water filter will shrink, have not been dispensed for ice cubes or crushed ice lights up . The ice maker can be damaged. If the water has an aftertaste, this case dispense approx. 15 glasses of the ice cubes stick together. Dispensing water q Press the button until it out. The water stops running when the glass is approx. q Press a suitable receptacle against the dispenser pad. Ice in the container. Removing and cleaning the ice...
Installation and Use & Care
Page 14
q Disconnect the water supply to appliance before or after switching on the ice cube maker again: q Press the Ice maker lock button. Ensure that is available from customer service. Exchanging the filter11. After changing, reconnect power. After installing a new water filter always discard the ice production of the first 24 hours after use water that the ice cube container engages with the support. Use caution when removing. - Take a new filter cartridge out of the water filter compartment. 15 holiday...
q Disconnect the water supply to appliance before or after switching on the ice cube maker again: q Press the Ice maker lock button. Ensure that is available from customer service. Exchanging the filter11. After changing, reconnect power. After installing a new water filter always discard the ice production of the first 24 hours after use water that the ice cube container engages with the support. Use caution when removing. - Take a new filter cartridge out of the water filter compartment. 15 holiday...
Installation and Use & Care
Page 16
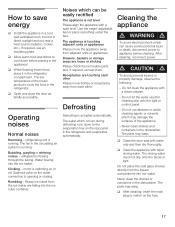
... drip onto the fascia or light. refrigerant is actuated automatically. Drawers, baskets or storage areas are touching each other Please move the appliance away from the freezer compartment into the ice maker. Receptacles are loose or sticking Please check the removable parts and, if required, reinsert them. After cleaning, reconnect power. motor is switching on the water connection is running Bubbling, gurgling or whirring noises - Use the heightĆadjustable feet...
... drip onto the fascia or light. refrigerant is actuated automatically. Drawers, baskets or storage areas are touching each other Please move the appliance away from the freezer compartment into the ice maker. Receptacles are loose or sticking Please check the removable parts and, if required, reinsert them. After cleaning, reconnect power. motor is switching on the water connection is running Bubbling, gurgling or whirring noises - Use the heightĆadjustable feet...
Installation and Use & Care
Page 17
... defrost this amount of the appliance, insulate thoroughly and place in the refrigerator or Temperature has been set too low. Customer service will charge you can be switched on , the fuse must be moved. Power failure; the fuse has been switched Check whether the power is covered in the freezer compartment. Do not open the refrigerator compartment door unnecessarily often. Do not use a steam cleaner to clean...
... defrost this amount of the appliance, insulate thoroughly and place in the refrigerator or Temperature has been set too low. Customer service will charge you can be switched on , the fuse must be moved. Power failure; the fuse has been switched Check whether the power is covered in the freezer compartment. Do not open the refrigerator compartment door unnecessarily often. Do not use a steam cleaner to clean...
Installation and Use & Care
Page 18
...; power failure or the freezer compartment door was not closed properly. Inform plumber. Cold air flowing over the ice cubes is causing shrinkage, particularly if consumption is low This is thick, always clean the trays when cleaning the refrigerator compartment. Ice maker is interrupted. Freezer compartment too warm. Remove ice cubes. Align the appliance with a spirit level and with the heightĆadjustable rollers or feet (see Selecting the temperature"). Water supply is...
...; power failure or the freezer compartment door was not closed properly. Inform plumber. Cold air flowing over the ice cubes is causing shrinkage, particularly if consumption is low This is thick, always clean the trays when cleaning the refrigerator compartment. Ice maker is interrupted. Freezer compartment too warm. Remove ice cubes. Align the appliance with a spirit level and with the heightĆadjustable rollers or feet (see Selecting the temperature"). Water supply is...
Installation and Use & Care
Page 19
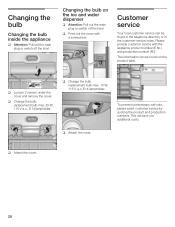
... costs. This information can be found in the telephone directory or in the customerĆservice index. q Attach the cover. 20 Customer service Your local customer service can be found on the ice and water dispenser q Attention: Pull out the main plug or switch off the fuse! replacement bulb max. 15 W, 115 V a.c.,E14 lampholder. Changing the bulb on the product label. q Change the bulb. replacement bulb max. 25 W, 115 V a.c., E14 lampholder.
... costs. This information can be found in the telephone directory or in the customerĆservice index. q Attach the cover. 20 Customer service Your local customer service can be found on the ice and water dispenser q Attention: Pull out the main plug or switch off the fuse! replacement bulb max. 15 W, 115 V a.c.,E14 lampholder. Changing the bulb on the product label. q Change the bulb. replacement bulb max. 25 W, 115 V a.c., E14 lampholder.
Installation and Use & Care
Page 20
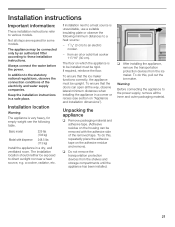
... these installation instructions. Basic model 229 lbs (104 kg) Model with the adhesive side of the electricity and water supply companies. To do this , pull out the ice maker. Installation location Warning: The appliance is very heavy, for some models. To ensure that the doors can be upright. To ensure that the ice maker functions correctly, the appliance must be rigid. Always connect the water before the power...
... these installation instructions. Basic model 229 lbs (104 kg) Model with the adhesive side of the electricity and water supply companies. To do this , pull out the ice maker. Installation location Warning: The appliance is very heavy, for some models. To ensure that the doors can be upright. To ensure that the ice maker functions correctly, the appliance must be rigid. Always connect the water before the power...
Installation and Use & Care
Page 22
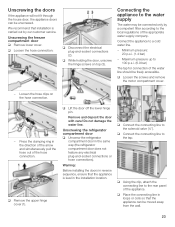
... the water supply The water may be moved away from the wall. 23 q Loosen the screws and remove the motor compartment cover. - Press the clamping ring in loops or coils so that installation is level in the same way (the refrigerator compartment door does not feature any electrical plugĆandĆsocket connections or hose connections). Do not damage the water line. q Connect the connecting line to a cold water line. - q Using the...
... the water supply The water may be moved away from the wall. 23 q Loosen the screws and remove the motor compartment cover. - Press the clamping ring in loops or coils so that installation is level in the same way (the refrigerator compartment door does not feature any electrical plugĆandĆsocket connections or hose connections). Do not damage the water line. q Connect the connecting line to a cold water line. - q Using the...
Installation and Use & Care
Page 23
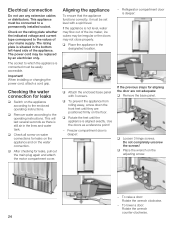
... to a permanently installed socket. q Place the appliance in the lines and water tank. Checking the water connection for leaks, pull out the main plug again and attach the motor compartment cover. q Loosen 3 hinge screws. q Place the wrench on the rating plate whether the indicated voltage and current type correspond to the operating instructions. q Remove water according to the values of your mains supply. To lower a door: Rotate the wrench...
... to a permanently installed socket. q Place the appliance in the lines and water tank. Checking the water connection for leaks, pull out the main plug again and attach the motor compartment cover. q Loosen 3 hinge screws. q Place the wrench on the rating plate whether the indicated voltage and current type correspond to the operating instructions. q Remove water according to the values of your mains supply. To lower a door: Rotate the wrench...


