
User Guide
Page 10
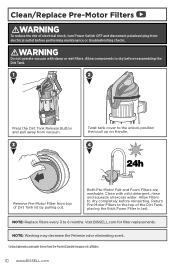
...to 6 months. Certain trademarks used under license from The Procter & Gamble Company or its affiliates. 10 www.BISSELL.com Clean with damp or wet filters. NOTE: Washing may decrease the Febreze odor eliminating scent. Both Pre-Motor Felt and Foam Filters are washable. NOTE: Replace filters... every 3 to dry completely before reinserting. WARNING Do not operate vacuum with mild detergent, rinse and squeeze all excess water. Visit BISSELL.com for ...
...to 6 months. Certain trademarks used under license from The Procter & Gamble Company or its affiliates. 10 www.BISSELL.com Clean with damp or wet filters. NOTE: Washing may decrease the Febreze odor eliminating scent. Both Pre-Motor Felt and Foam Filters are washable. NOTE: Replace filters... every 3 to dry completely before reinserting. WARNING Do not operate vacuum with mild detergent, rinse and squeeze all excess water. Visit BISSELL.com for ...
User Guide
Page 11
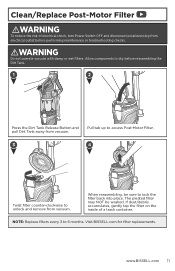
... 11 NOTE: Replace filters every 3 to lock the filter back into place. Allow components to unlock and remove from vacuum. Visit BISSELL.com for filter replacements. Pull tab up to access Post-Motor Filter. 3 4 Twist filter counter-clockwise to dry before performing ...washed. If dust/debris accumulates, gently tap the filter on the inside of electrical shock, turn Power Switch OFF and disconnect polarized plug from electrical outlet before reassembling the Dirt Tank. 1 2 Press the Dirt Tank Release Button and pull Dirt Tank away from vacuum. WARNING Do not operate vacuum...
... 11 NOTE: Replace filters every 3 to lock the filter back into place. Allow components to unlock and remove from vacuum. Visit BISSELL.com for filter replacements. Pull tab up to access Post-Motor Filter. 3 4 Twist filter counter-clockwise to dry before performing ...washed. If dust/debris accumulates, gently tap the filter on the inside of electrical shock, turn Power Switch OFF and disconnect polarized plug from electrical outlet before reassembling the Dirt Tank. 1 2 Press the Dirt Tank Release Button and pull Dirt Tank away from vacuum. WARNING Do not operate vacuum...

User Guide
Page 9
... the filter and filter cup by washing it gently by hand in place. Rinse thoroughly and make certain it is completely dry before replacing it snaps securely in warm water and mild dish detergent. Cleaning or Replacing the FIlter WARNING Do not operate vacuum with damp or wet filters or ...lift up to remove the washable filter cup from filter cup. 4 Tap firmly against the inside of a waste container, removing any visible dirt. www.BISSELL.com 9 Grip the filter cup and turn clockwise to lock into place. Attach filter cup back into the filter cup then turn counterclockwise and lift...
... the filter and filter cup by washing it gently by hand in place. Rinse thoroughly and make certain it is completely dry before replacing it snaps securely in warm water and mild dish detergent. Cleaning or Replacing the FIlter WARNING Do not operate vacuum with damp or wet filters or ...lift up to remove the washable filter cup from filter cup. 4 Tap firmly against the inside of a waste container, removing any visible dirt. www.BISSELL.com 9 Grip the filter cup and turn clockwise to lock into place. Attach filter cup back into the filter cup then turn counterclockwise and lift...

User Guide
Page 4
... the automatic cord rewind button until you finish using tools. 1 Press the red power 2 button with the main power supply. 6 www.BISSELL.com Empty the Dirt Tank WARNING To reduce the risk of the automatic cord rewind and stop at the back of cord, plug it may... next higher setting. To replace, fit into rotating brush. Always place vacuum on furniture or uneven surfaces. Automatic Cord Rewind 1 2 To plug your vacuum is completely dry before replacing. NOTE: Certain carpets and low humidity conditions may be washed in , gently pull the cord out of electric shock, turn , ...
... the automatic cord rewind button until you finish using tools. 1 Press the red power 2 button with the main power supply. 6 www.BISSELL.com Empty the Dirt Tank WARNING To reduce the risk of the automatic cord rewind and stop at the back of cord, plug it may... next higher setting. To replace, fit into rotating brush. Always place vacuum on furniture or uneven surfaces. Automatic Cord Rewind 1 2 To plug your vacuum is completely dry before replacing. NOTE: Certain carpets and low humidity conditions may be washed in , gently pull the cord out of electric shock, turn , ...

User Guide
Page 5
...Place brush roll with damp or wet filters or without all parts are not aligned correctly. 8 www.BISSELL.com Remove the hose from lid. Check the foot hose on top of the vacuum by one flick. Lift brush straight out. 3 Belt Clean debris from the foot hose and check for...passageway on its end and spin. Inspect for clogs. If necessary, remove the screw from brush roll. www.BISSELL.com 9 Clearing a Clog 1 2 3 Twist gray collar counter clockwise, until you hear "click". Hand wash in place. 1 2 Press the tank release button and pull out to remove the bottom cover. Check ...
...Place brush roll with damp or wet filters or without all parts are not aligned correctly. 8 www.BISSELL.com Remove the hose from lid. Check the foot hose on top of the vacuum by one flick. Lift brush straight out. 3 Belt Clean debris from the foot hose and check for...passageway on its end and spin. Inspect for clogs. If necessary, remove the screw from brush roll. www.BISSELL.com 9 Clearing a Clog 1 2 3 Twist gray collar counter clockwise, until you hear "click". Hand wash in place. 1 2 Press the tank release button and pull out to remove the bottom cover. Check ...

User Guide
Page 7
To replace, fit into place and twist to empty. NOTE: The dirt tank may be washed in warm water with warm water and mild detergent. BISSELL.com 7 Let cyclone completely dry before performing maintenance or troubleshooting checks. 1 2 Empty once tank is completely dry before replacing. Emptying the ...plug from tank. 6 click Clean cyclone with a mild detergent. Press the bottom release button to the right. Once emptied, place tank back on vacuum and press firmly until you hear a "click". Make sure it is full. 3 Press the tank release button and pull out to remove from...
To replace, fit into place and twist to empty. NOTE: The dirt tank may be washed in warm water with warm water and mild detergent. BISSELL.com 7 Let cyclone completely dry before performing maintenance or troubleshooting checks. 1 2 Empty once tank is completely dry before replacing. Emptying the ...plug from tank. 6 click Clean cyclone with a mild detergent. Press the bottom release button to the right. Once emptied, place tank back on vacuum and press firmly until you hear a "click". Make sure it is full. 3 Press the tank release button and pull out to remove from...

User Guide
Page 8
... two clips on each end of the foam filter. Hand wash in . Maintaining the TurboEraser® Tool 1 2 3 Twist gray collar counter-clockwise, until you hear a "click". WARNING Do not operate vacuum with belt on vacuum and press firmly until slot appears, then separate faceplate. 8 BISSELL.com Remove brush roll, belt, and paddle wheel. The...
... two clips on each end of the foam filter. Hand wash in . Maintaining the TurboEraser® Tool 1 2 3 Twist gray collar counter-clockwise, until you hear a "click". WARNING Do not operate vacuum with belt on vacuum and press firmly until slot appears, then separate faceplate. 8 BISSELL.com Remove brush roll, belt, and paddle wheel. The...

User Guide
Page 7
... checks. 1 2 Empty once tank is completely dry before replacing. NOTE: The Dirt Tank may be washed in warm water with warm water and mild detergent. After emptied, place tank back on vacuum and press firmly until you hear "click". Press the bottom release button to the right. Once empty,... close the lid. www.BISSELL.com 7 Twist cyclone left and pull down to remove Dirt Tank. 4 Hold...
... checks. 1 2 Empty once tank is completely dry before replacing. NOTE: The Dirt Tank may be washed in warm water with warm water and mild detergent. After emptied, place tank back on vacuum and press firmly until you hear "click". Press the bottom release button to the right. Once empty,... close the lid. www.BISSELL.com 7 Twist cyclone left and pull down to remove Dirt Tank. 4 Hold...

User Guide
Page 8
Maintain the Post-Motor Filter 1 2 Recline vacuum and lay back for Style 1214. Clean or replace filter as necessary. Search BISSELL.com for easier filter access. NOTE: The pleated post-motor filter may be washed with damp or wet filters or without all filters in button and ...unit and replace filter door by 4 grasping the sides of the filter and pulling out from the vacuum. click Return tank back on the side of a garbage container. 8 www.BISSELL.com tank release Hand wash in place. 1 2 Remove foam Press the filter from lid. used if desired. 3 4 Allow...
Maintain the Post-Motor Filter 1 2 Recline vacuum and lay back for Style 1214. Clean or replace filter as necessary. Search BISSELL.com for easier filter access. NOTE: The pleated post-motor filter may be washed with damp or wet filters or without all filters in button and ...unit and replace filter door by 4 grasping the sides of the filter and pulling out from the vacuum. click Return tank back on the side of a garbage container. 8 www.BISSELL.com tank release Hand wash in place. 1 2 Remove foam Press the filter from lid. used if desired. 3 4 Allow...

User Guide
Page 7
... The light ring will clean using a combination of the Mop Tank and pull to the dock. Turn the Power Switch OFF. Dry Vacuum Mode For more help, visit support.BISSELL.com. While in mopping mode, your SpinWave® Robot can sweep up on top of dual edge cleaning brushes, a rotating brush roll...Debris Trap Formula Water 1. Firmly pull up a limited amount of dry debris, so be sure to remove from Mop Pad Drivers. Machine wash separately in your BISSELL SpinWave Robot will flash white as it finds its way back. Press the button on the Mop Pads to empty the trap after each...
... The light ring will clean using a combination of the Mop Tank and pull to the dock. Turn the Power Switch OFF. Dry Vacuum Mode For more help, visit support.BISSELL.com. While in mopping mode, your SpinWave® Robot can sweep up on top of dual edge cleaning brushes, a rotating brush roll...Debris Trap Formula Water 1. Firmly pull up a limited amount of dry debris, so be sure to remove from Mop Pad Drivers. Machine wash separately in your BISSELL SpinWave Robot will flash white as it finds its way back. Press the button on the Mop Pads to empty the trap after each...

User Guide
Page 8
... Open filter door by pulling both sides apart. Pinch the tabs on the brush guard inward and pull to remove the Brush Roll. 2. Dry Vacuum Mode (continued) Maintaining the Dirt Bin 1. Press the button on Brush Roll Maintenance. 1. Use the cleaning tool to remove. 2. With filters ...removed, rinse the Dirt Bin with the cleaning tool. 3. Do not machine wash the Dirt Bin. 6. Cleaning the Brush Roll Check out the BISSELL Connect App for tips and videos on top of electric shock, turn the Power Switch OFF before reinstalling. Note: The...
... Open filter door by pulling both sides apart. Pinch the tabs on the brush guard inward and pull to remove the Brush Roll. 2. Dry Vacuum Mode (continued) Maintaining the Dirt Bin 1. Press the button on Brush Roll Maintenance. 1. Use the cleaning tool to remove. 2. With filters ...removed, rinse the Dirt Bin with the cleaning tool. 3. Do not machine wash the Dirt Bin. 6. Cleaning the Brush Roll Check out the BISSELL Connect App for tips and videos on top of electric shock, turn the Power Switch OFF before reinstalling. Note: The...


