Rewind Premier™ Pet User's Guide
Page 1
Register your product today! Earn BISSELL Rewards! See details on back page USER'S GUIDE 44M3, 67F8 SERIES 2 Thank You 3 Safety instructions 4 Product view 5 Assembly 6-9 Operations 10-15 Maintenance and care 16-17 Troubleshooting 17 Replacement parts 18 Accessories 19 Warranty 20 Product registration 20 Consumer services
Register your product today! Earn BISSELL Rewards! See details on back page USER'S GUIDE 44M3, 67F8 SERIES 2 Thank You 3 Safety instructions 4 Product view 5 Assembly 6-9 Operations 10-15 Maintenance and care 16-17 Troubleshooting 17 Replacement parts 18 Accessories 19 Warranty 20 Product registration 20 Consumer services
Rewind Premier™ Pet User's Guide
Page 4
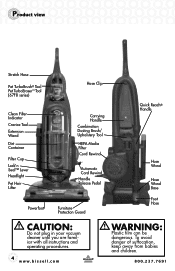
...Pet TurboBrush® Tool Pet TurboEraser™ Tool (67F8 series) Clean Filter Indicator Crevice Tool Extension Wand Dirt Container Filter Cup Lock'n Seal™ Lever Headlight Pet Hair Lifter Hose Clip Carrying Handle Combination Dusting Brush/ Upholstery Tool HEPA Media Filter Cord Rewind Automatic Cord Rewind... Handle Release Pedal Powerfoot Furniture Protection Guard Quick Reach® Handle Hose Wand Hose Wand Base Foot Hose caution: Do not plug in your vacuum cleaner until you are familiar with all instructions and operating procedures. 4 www.bissell....
...Pet TurboBrush® Tool Pet TurboEraser™ Tool (67F8 series) Clean Filter Indicator Crevice Tool Extension Wand Dirt Container Filter Cup Lock'n Seal™ Lever Headlight Pet Hair Lifter Hose Clip Carrying Handle Combination Dusting Brush/ Upholstery Tool HEPA Media Filter Cord Rewind Automatic Cord Rewind... Handle Release Pedal Powerfoot Furniture Protection Guard Quick Reach® Handle Hose Wand Hose Wand Base Foot Hose caution: Do not plug in your vacuum cleaner until you are familiar with all instructions and operating procedures. 4 www.bissell....
Rewind Premier™ Pet User's Guide
Page 5
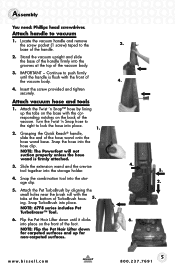
...provided and tighten securely. Snap the combination tool into place. ing. Snap TurboBrush into the stor- into place. 1. 2. NOTE: Flip the Pet Hair Lifter down until the handle is firmly attached. 3. IMPORTANT - Turn the Twist 'n Snap hose to the right to push firmly until it...the hose wand is flush with the tabs at the top of the vacuum body. 4. 4. www.bissell.com 5 800.237.7691 Attach vacuum hose and tools 1. NOTE: 67F8 series includes Pet TurboEraser™ Tool. 6. Assembly You need: Phillips head screwdriver. Attach handle to the 2. Snap...
...provided and tighten securely. Snap the combination tool into place. ing. Snap TurboBrush into the stor- into place. 1. 2. NOTE: Flip the Pet Hair Lifter down until the handle is firmly attached. 3. IMPORTANT - Turn the Twist 'n Snap hose to the right to push firmly until it...the hose wand is flush with the tabs at the top of the vacuum body. 4. 4. www.bissell.com 5 800.237.7691 Attach vacuum hose and tools 1. NOTE: 67F8 series includes Pet TurboEraser™ Tool. 6. Assembly You need: Phillips head screwdriver. Attach handle to the 2. Snap...
Rewind Premier™ Pet User's Guide
Page 9
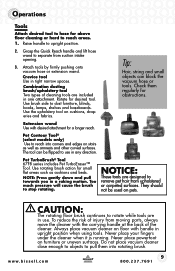
... vacuum hose or extension wand. Combination dusting brush/upholstery tool Two types of the cleaner. Rotate for a longer reach. Pet TurboBrush® Tool 67F8 series includes Pet TurboEraser™ Tool. Too much pressure will cause the brush to dust furniture, blinds, books, lamps, shelves and baseboards...other curved surfaces. Extension wand Use with desired attachment for desired tool. The tool can block the vacuum hose or tools. www.bissell.com 9 800.237.7691 Crevice tool Use in any direction. NOTE: Press gently down and pull towards you in upright position ...
... vacuum hose or extension wand. Combination dusting brush/upholstery tool Two types of the cleaner. Rotate for a longer reach. Pet TurboBrush® Tool 67F8 series includes Pet TurboEraser™ Tool. Too much pressure will cause the brush to dust furniture, blinds, books, lamps, shelves and baseboards...other curved surfaces. Extension wand Use with desired attachment for desired tool. The tool can block the vacuum hose or tools. www.bissell.com 9 800.237.7691 Crevice tool Use in any direction. NOTE: Press gently down and pull towards you in upright position ...
Rewind Premier™ Pet User's Guide
Page 14
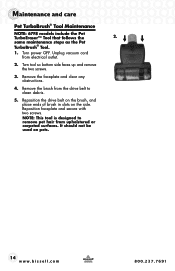
... electrical outlet. 2. Reposition the drive belt on the brush, and place ends of brush in slots on pets. 14 www.bissell.com 800.237.7691 Maintenance and care Pet TurboBrush® Tool Maintenance NOTE: 67F8 models include the Pet TurboEraser™ Tool that follows the 2. NOTE: This tool is designed to clean debris. 5. Reposition faceplate...
... electrical outlet. 2. Reposition the drive belt on the brush, and place ends of brush in slots on pets. 14 www.bissell.com 800.237.7691 Maintenance and care Pet TurboBrush® Tool Maintenance NOTE: 67F8 models include the Pet TurboEraser™ Tool that follows the 2. NOTE: This tool is designed to clean debris. 5. Reposition faceplate...
Rewind Premier™ Pet User's Guide
Page 18
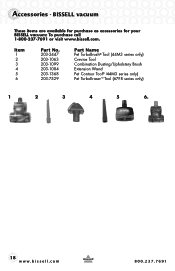
Item 1 2 3 4 5 6 Part No. 203-2447 203-1063 203-1099 203-1084 203-1368 203-7529 Part Name Pet TurboBrush® Tool (44M3 series only) Crevice Tool Combination Dusting/Upholstery Brush Extension Wand Pet Contour Tool® (44M3 series only) Pet TurboEraser™ Tool (67F8 series only) 1 2 3 4 5 6. 18 www.bissell.com 800.237.7691 BISSELL vacuum These items are available for purchase as accessories for your BISSELL vacuum: To purchase call 1-800-237-7691 or visit www.bissell.com. Accessories -
Item 1 2 3 4 5 6 Part No. 203-2447 203-1063 203-1099 203-1084 203-1368 203-7529 Part Name Pet TurboBrush® Tool (44M3 series only) Crevice Tool Combination Dusting/Upholstery Brush Extension Wand Pet Contour Tool® (44M3 series only) Pet TurboEraser™ Tool (67F8 series only) 1 2 3 4 5 6. 18 www.bissell.com 800.237.7691 BISSELL vacuum These items are available for purchase as accessories for your BISSELL vacuum: To purchase call 1-800-237-7691 or visit www.bissell.com. Accessories -