Rewind Premier™ Pet User's Guide
Page 1
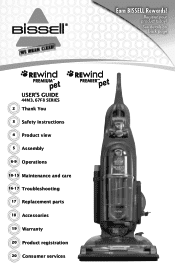
Earn BISSELL Rewards! See details on back page USER'S GUIDE 44M3, 67F8 SERIES 2 Thank You 3 Safety instructions 4 Product view 5 Assembly 6-9 Operations 10-15 Maintenance and care 16-17 Troubleshooting 17 Replacement parts 18 Accessories 19 Warranty 20 Product registration 20 Consumer services Register your product today!
Earn BISSELL Rewards! See details on back page USER'S GUIDE 44M3, 67F8 SERIES 2 Thank You 3 Safety instructions 4 Product view 5 Assembly 6-9 Operations 10-15 Maintenance and care 16-17 Troubleshooting 17 Replacement parts 18 Accessories 19 Warranty 20 Product registration 20 Consumer services Register your product today!
Rewind Premier™ Pet User's Guide
Page 2
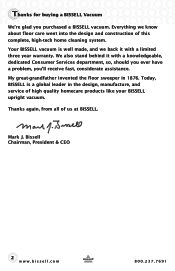
... a BISSELL vacuum. Thanks again, from all of high quality homecare products like your BISSELL upright vacuum. Thanks for buying a BISSELL Vacuum We're glad you 'll receive fast, considerate assistance. Your BISSELL vacuum is a global leader in 1876. Mark J. My great-grandfather invented the floor sweeper in the design, manufacture, and service of us at BISSELL. Everything we back it with a limited three year warranty. Bissell Chairman...
... a BISSELL vacuum. Thanks again, from all of high quality homecare products like your BISSELL upright vacuum. Thanks for buying a BISSELL Vacuum We're glad you 'll receive fast, considerate assistance. Your BISSELL vacuum is a global leader in 1876. Mark J. My great-grandfather invented the floor sweeper in the design, manufacture, and service of us at BISSELL. Everything we back it with a limited three year warranty. Bissell Chairman...
Rewind Premier™ Pet User's Guide
Page 3
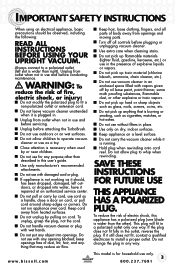
... air flow. To reduce the risk of electric shock, this user's guide. ■ Use only manufacturer's recommended attachments. ■ Do not use with damaged cord or plug. ■ If appliance is plugged in. ■ Unplug from openings and moving parts. ■ Turn off all instructions before conducting maintenance. IMPORTANT SAFETY INSTRUCTIONS When using your Upright VACUUM. Always connect to fit a non-polarized outlet or extension cord. ■ Do not leave vacuum cleaner...
... air flow. To reduce the risk of electric shock, this user's guide. ■ Use only manufacturer's recommended attachments. ■ Do not use with damaged cord or plug. ■ If appliance is plugged in. ■ Unplug from openings and moving parts. ■ Turn off all instructions before conducting maintenance. IMPORTANT SAFETY INSTRUCTIONS When using your Upright VACUUM. Always connect to fit a non-polarized outlet or extension cord. ■ Do not leave vacuum cleaner...
Rewind Premier™ Pet User's Guide
Page 4
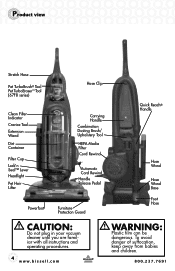
Product view Stretch Hose Pet TurboBrush® Tool Pet TurboEraser™ Tool (67F8 series) Clean Filter Indicator Crevice Tool Extension Wand Dirt Container Filter Cup Lock'n Seal™ Lever Headlight Pet Hair Lifter Hose Clip Carrying Handle Combination Dusting Brush/ Upholstery Tool HEPA Media Filter Cord Rewind Automatic Cord Rewind Handle Release Pedal Powerfoot Furniture Protection Guard Quick Reach® Handle Hose Wand Hose Wand Base Foot Hose caution: Do not plug in your vacuum cleaner until you are familiar with all instructions and operating procedures. 4 www.bissell.com...
Product view Stretch Hose Pet TurboBrush® Tool Pet TurboEraser™ Tool (67F8 series) Clean Filter Indicator Crevice Tool Extension Wand Dirt Container Filter Cup Lock'n Seal™ Lever Headlight Pet Hair Lifter Hose Clip Carrying Handle Combination Dusting Brush/ Upholstery Tool HEPA Media Filter Cord Rewind Automatic Cord Rewind Handle Release Pedal Powerfoot Furniture Protection Guard Quick Reach® Handle Hose Wand Hose Wand Base Foot Hose caution: Do not plug in your vacuum cleaner until you are familiar with all instructions and operating procedures. 4 www.bissell.com...
Rewind Premier™ Pet User's Guide
Page 5
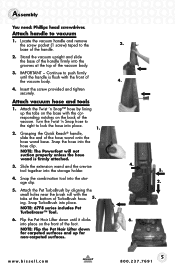
... Powerfoot will not suction properly unless the hose wand is flush with the front of the hose wand onto the hose wand base. www.bissell.com 5 800.237.7691 NOTE: 67F8 series includes Pet TurboEraser™ Tool. 6. Flip the Pet Hair Lifter down for carpeted surfaces and up the tabs on the front of TurboBrush hous- 5. Attach handle to the 2. Locate the vacuum handle and remove the screw packet...
... Powerfoot will not suction properly unless the hose wand is flush with the front of the hose wand onto the hose wand base. www.bissell.com 5 800.237.7691 NOTE: 67F8 series includes Pet TurboEraser™ Tool. 6. Flip the Pet Hair Lifter down for carpeted surfaces and up the tabs on the front of TurboBrush hous- 5. Attach handle to the 2. Locate the vacuum handle and remove the screw packet...
Rewind Premier™ Pet User's Guide
Page 6
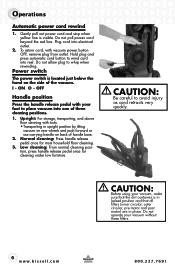
... not operate your foot to wind cord into electrical outlet. 2. Operations Automatic power cord rewind 1. Normal cleaning: Press handle release pedal once for cleaning under low furniture. CAUTION: Be careful to whip when rewinding. caution: Before using your vacuum, make sure that the dirt container is visible. Do not pull power cord beyond the red line. Upright: For storage, transporting, and above floor cleaning with vacuum power button OFF, remove plug from outlet. Gently pull out power cord and stop when...
... not operate your foot to wind cord into electrical outlet. 2. Operations Automatic power cord rewind 1. Normal cleaning: Press handle release pedal once for cleaning under low furniture. CAUTION: Be careful to whip when rewinding. caution: Before using your vacuum, make sure that the dirt container is visible. Do not pull power cord beyond the red line. Upright: For storage, transporting, and above floor cleaning with vacuum power button OFF, remove plug from outlet. Gently pull out power cord and stop when...
Rewind Premier™ Pet User's Guide
Page 7
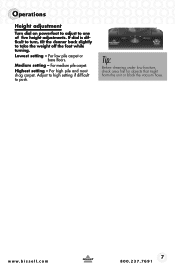
Operations Height adjustment Turn dial on powerfoot to adjust to take the weight off the foot while turning. Medium setting - For high pile and most shag carpet. If dial is difficult to turn, tilt the cleaner back slightly to one of five height adjustments. For medium pile carpet. Adjust to high setting if difficult to push. Tip: Before cleaning under low furniture, check area first for objects that might harm the unit or block the vacuum hose. Lowest setting - For low pile carpet or bare floors. www.bissell.com 7 800.237.7691 Highest setting -
Operations Height adjustment Turn dial on powerfoot to adjust to take the weight off the foot while turning. Medium setting - For high pile and most shag carpet. If dial is difficult to turn, tilt the cleaner back slightly to one of five height adjustments. For medium pile carpet. Adjust to high setting if difficult to push. Tip: Before cleaning under low furniture, check area first for objects that might harm the unit or block the vacuum hose. Lowest setting - For low pile carpet or bare floors. www.bissell.com 7 800.237.7691 Highest setting -
Rewind Premier™ Pet User's Guide
Page 8
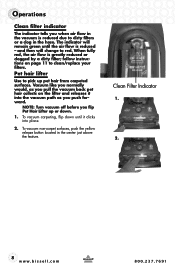
....bissell.com 800.237.7691 Pet hair lifter Use to pick up or down until the air flow is greatly reduced or clogged by a dirty filter; follow instructions on the lifter and releases it clicks into the vacuum path as you pull the vacuum back pet hair collects on page 11 to clean/replace your filters. To vacuum non-carpet surfaces, push the yellow release button located in the hose. NOTE: Turn vacuum...
....bissell.com 800.237.7691 Pet hair lifter Use to pick up or down until the air flow is greatly reduced or clogged by a dirty filter; follow instructions on the lifter and releases it clicks into the vacuum path as you pull the vacuum back pet hair collects on page 11 to clean/replace your filters. To vacuum non-carpet surfaces, push the yellow release button located in the hose. NOTE: Turn vacuum...
Rewind Premier™ Pet User's Guide
Page 9
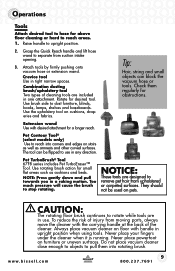
... dusting brush/upholstery tool Two types of the cleaner. Use the upholstery tool on furniture or uneven surfaces. Never place powerfoot on cushions, draperies and fabrics. Crevice tool Use in a raking motion. Check them into corners and edges on floor with the carrying handle at the back of cleaning tools are in use in any direction. They should not be flipped to remove pet hair from suction intake opening. 3. www.bissell...
... dusting brush/upholstery tool Two types of the cleaner. Use the upholstery tool on furniture or uneven surfaces. Never place powerfoot on cushions, draperies and fabrics. Crevice tool Use in a raking motion. Check them into corners and edges on floor with the carrying handle at the back of cleaning tools are in use in any direction. They should not be flipped to remove pet hair from suction intake opening. 3. www.bissell...

Rewind Premier™ Pet User's Guide
Page 10
Unlock Position 1. Turn power OFF. from vacuum and empty. 4. Grasp dirt cup handle and pull straight out to the "Lock" position. Make sure it is completely dry before performing maintenance or troubleshooting checks. 10 www.bissell.com 800.237.7691 Note: The dirt container may be washed in the vacuum and slide the lever to remove from electrical outlet. 2. WARNING: To reduce the risk of your vacuum it...
Unlock Position 1. Turn power OFF. from vacuum and empty. 4. Grasp dirt cup handle and pull straight out to the "Lock" position. Make sure it is completely dry before performing maintenance or troubleshooting checks. 10 www.bissell.com 800.237.7691 Note: The dirt container may be washed in the vacuum and slide the lever to remove from electrical outlet. 2. WARNING: To reduce the risk of your vacuum it...
Rewind Premier™ Pet User's Guide
Page 11
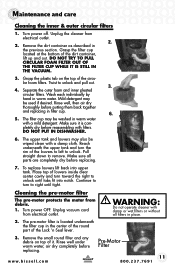
... upper tank and turn the rim of the louvers to left to pull circular foam filter out of the dirt container, lift up and out. Unplug vacuum cord from electrical outlet. DO NOT PUT IN DISHWASHER. 6. Rinse well under warm water, air dry completely before replacing. 7. Maintenance and care Cleaning the inner & outer circular filters 1. Remove the dirt container as described in filter cup. 6. 5. Do not try...
... upper tank and turn the rim of the louvers to left to pull circular foam filter out of the dirt container, lift up and out. Unplug vacuum cord from electrical outlet. DO NOT PUT IN DISHWASHER. 6. Rinse well under warm water, air dry completely before replacing. 7. Maintenance and care Cleaning the inner & outer circular filters 1. Remove the dirt container as described in filter cup. 6. 5. Do not try...

Rewind Premier™ Pet User's Guide
Page 12
.... 1. Turn power OFF. Place handle in the filtration process to return clean air to brush ends. 8. Remove the seven screws with a Phillips head screwdriver. Locate filter behind the door on the side of the vacuum. Air Passageway 12 www.bissell.com 800.237.7691 Clean strings, hair and other debris from electrical outlet. 2. Unplug vacuum cord from motor pulley and drive belt areas. 7. Remove debris from this area. Maintenance and care Replacing the...
.... 1. Turn power OFF. Place handle in the filtration process to return clean air to brush ends. 8. Remove the seven screws with a Phillips head screwdriver. Locate filter behind the door on the side of the vacuum. Air Passageway 12 www.bissell.com 800.237.7691 Clean strings, hair and other debris from electrical outlet. 2. Unplug vacuum cord from motor pulley and drive belt areas. 7. Remove debris from this area. Maintenance and care Replacing the...
Rewind Premier™ Pet User's Guide
Page 13
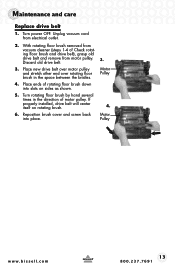
... installed, drive belt will center itself on sides as shown. 5. Turn power OFF. Reposition brush cover and screw back into slots on rotating brush. 6. Motor Pulley www.bissell.com 13 800.237.7691 Maintenance and care Replace drive belt 1. Motor Pulley 4. With rotating floor brush removed from vacuum cleaner (steps 1-4 of Check rotating floor brush and drive belt), grasp old drive belt and remove from electrical outlet. 2. Turn rotating floor brush by hand several times in the space between the bristles. 4. Place new drive belt...
... installed, drive belt will center itself on sides as shown. 5. Turn power OFF. Reposition brush cover and screw back into slots on rotating brush. 6. Motor Pulley www.bissell.com 13 800.237.7691 Maintenance and care Replace drive belt 1. Motor Pulley 4. With rotating floor brush removed from vacuum cleaner (steps 1-4 of Check rotating floor brush and drive belt), grasp old drive belt and remove from electrical outlet. 2. Turn rotating floor brush by hand several times in the space between the bristles. 4. Place new drive belt...
Rewind Premier™ Pet User's Guide
Page 14
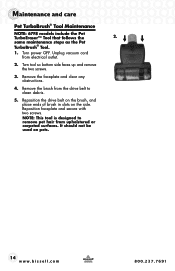
... models include the Pet TurboEraser™ Tool that follows the 2. same maintenance steps as the Pet TurboBrush® Tool. 1. Remove the faceplate and clear any obstructions. 4. Unplug vacuum cord from upholstered or carpeted surfaces. Turn tool so bottom side faces up and remove the two screws. 3. Remove the brush from the drive belt to remove pet hair from electrical outlet. 2. NOTE: This tool is designed to clean debris. 5. It should not be used...
... models include the Pet TurboEraser™ Tool that follows the 2. same maintenance steps as the Pet TurboBrush® Tool. 1. Remove the faceplate and clear any obstructions. 4. Unplug vacuum cord from upholstered or carpeted surfaces. Turn tool so bottom side faces up and remove the two screws. 3. Remove the brush from the drive belt to remove pet hair from electrical outlet. 2. NOTE: This tool is designed to clean debris. 5. It should not be used...
Rewind Premier™ Pet User's Guide
Page 15
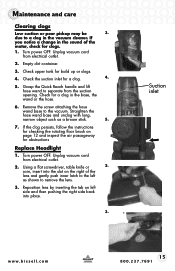
... dirt container. 3. Grasp the Quick Reach handle and lift hose wand to the vacuum. Check the suction inlet for a clog in the vacuum cleaner. Check for a clog. 4. 5. Remove the screw attaching the hose wand base to separate from the suction opening. If the clog persists, follow the instructions for checking the rotating floor brush on the right of the motor, check for clogs. 1. Unplug vacuum cord from electrical outlet. 2. coin, insert into place. 3. Using a flat screwdriver, table knife or 2. Suction inlet www.bissell...
... dirt container. 3. Grasp the Quick Reach handle and lift hose wand to the vacuum. Check the suction inlet for a clog in the vacuum cleaner. Check for a clog. 4. 5. Remove the screw attaching the hose wand base to separate from the suction opening. If the clog persists, follow the instructions for checking the rotating floor brush on the right of the motor, check for clogs. 1. Unplug vacuum cord from electrical outlet. 2. coin, insert into place. 3. Using a flat screwdriver, table knife or 2. Suction inlet www.bissell...

Rewind Premier™ Pet User's Guide
Page 16
... drive belt 4. Empty dirt container 9. Hose not attached to correct height setting 2. Dirt container or upper tank not installed properly 4. Check electrical plug 2. Follow instructions on page 15 for correct installation see pages 11 & 12 Tool won 't turn on page 6 16 www.bissell.com 800.237.7691 Position correctly and lock in vacuum 2. Dirt container full 3. Filters are dirty 10. Empty dirt container 2. Troubleshooting Vacuum cleaner won 't pick up dirt Possible causes Remedies 1. Grasp quick reach handle...
... drive belt 4. Empty dirt container 9. Hose not attached to correct height setting 2. Dirt container or upper tank not installed properly 4. Check electrical plug 2. Follow instructions on page 15 for correct installation see pages 11 & 12 Tool won 't turn on page 6 16 www.bissell.com 800.237.7691 Position correctly and lock in vacuum 2. Dirt container full 3. Filters are dirty 10. Empty dirt container 2. Troubleshooting Vacuum cleaner won 't pick up dirt Possible causes Remedies 1. Grasp quick reach handle...
Rewind Premier™ Pet User's Guide
Page 17
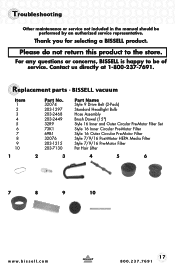
.... Replacement parts - BISSELL vacuum Item 1 2 3 4 5 6 7 8 9 10 1 Part No. 32074 203-1297 203-2468 203-2449 32R9 73K1 69B1 32076 203-1215 203-7130 2 3 Part Name Style 9 Drive Belt (2-Pack) Standard Headlight Bulb Hose Assembly Brush Dowel (15") Style 16 Inner and Outer Circular Pre-Motor Filter Set Style 16 Inner Circular Pre-Motor Filter Style 16 Outer Circular Pre-Motor Filter Style 7/9/16 Post-Motor HEPA Media Filter Style 7/9/16 Pre-Motor Filter Pet...
.... Replacement parts - BISSELL vacuum Item 1 2 3 4 5 6 7 8 9 10 1 Part No. 32074 203-1297 203-2468 203-2449 32R9 73K1 69B1 32076 203-1215 203-7130 2 3 Part Name Style 9 Drive Belt (2-Pack) Standard Headlight Bulb Hose Assembly Brush Dowel (15") Style 16 Inner and Outer Circular Pre-Motor Filter Set Style 16 Inner Circular Pre-Motor Filter Style 16 Outer Circular Pre-Motor Filter Style 7/9/16 Post-Motor HEPA Media Filter Style 7/9/16 Pre-Motor Filter Pet...
Rewind Premier™ Pet User's Guide
Page 18
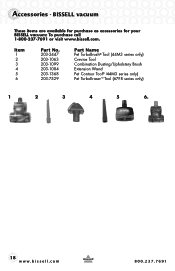
Accessories - Item 1 2 3 4 5 6 Part No. 203-2447 203-1063 203-1099 203-1084 203-1368 203-7529 Part Name Pet TurboBrush® Tool (44M3 series only) Crevice Tool Combination Dusting/Upholstery Brush Extension Wand Pet Contour Tool® (44M3 series only) Pet TurboEraser™ Tool (67F8 series only) 1 2 3 4 5 6. 18 www.bissell.com 800.237.7691 BISSELL vacuum These items are available for purchase as accessories for your BISSELL vacuum: To purchase call 1-800-237-7691 or visit www.bissell.com.
Accessories - Item 1 2 3 4 5 6 Part No. 203-2447 203-1063 203-1099 203-1084 203-1368 203-7529 Part Name Pet TurboBrush® Tool (44M3 series only) Crevice Tool Combination Dusting/Upholstery Brush Extension Wand Pet Contour Tool® (44M3 series only) Pet TurboEraser™ Tool (67F8 series only) 1 2 3 4 5 6. 18 www.bissell.com 800.237.7691 BISSELL vacuum These items are available for purchase as accessories for your BISSELL vacuum: To purchase call 1-800-237-7691 or visit www.bissell.com.
Rewind Premier™ Pet User's Guide
Page 19
... mail as filters, belts, or brushes. If your area. BISSELL Vacuum This warranty gives you specific legal rights, and you may also have questions about repairs or replacement parts, or if you . ET Or Write: BISSELL Homecare, Inc. Friday 8 a.m. - 10 p.m. IS NOT LIABLE FOR INCIDENTAL OR CONSEQUENTIAL DAMAGES OF ANY NATURE ASSOCIATED WITH THE USE OF THIS PRODUCT. Warranty - This warranty applies to product used for three...
... mail as filters, belts, or brushes. If your area. BISSELL Vacuum This warranty gives you specific legal rights, and you may also have questions about repairs or replacement parts, or if you . ET Or Write: BISSELL Homecare, Inc. Friday 8 a.m. - 10 p.m. IS NOT LIABLE FOR INCIDENTAL OR CONSEQUENTIAL DAMAGES OF ANY NATURE ASSOCIATED WITH THE USE OF THIS PRODUCT. Warranty - This warranty applies to product used for three...

Rewind Premier™ Pet User's Guide
Page 20
..., contests, cleaning tips and more! PO Box 3606 Grand Rapids MI 49501 8 p.m. Please record your Model Number Please record your Purchase Date NOTE: Please keep your product! Or write: BISSELL Homecare, Inc. ET ATTN: Consumer Services Or visit the BISSELL website - See Warranty on page 19 for discounts and free shipping on future purchases. It provides proof of cleaner available. ET...
..., contests, cleaning tips and more! PO Box 3606 Grand Rapids MI 49501 8 p.m. Please record your Model Number Please record your Purchase Date NOTE: Please keep your product! Or write: BISSELL Homecare, Inc. ET ATTN: Consumer Services Or visit the BISSELL website - See Warranty on page 19 for discounts and free shipping on future purchases. It provides proof of cleaner available. ET...


