User Guide
Page 3
SAVE THESE INSTRUCTIONS FOR FUTURE USE THIS APPLIANCE HAS A POLARIZED PLUG. IMPORTANT SAFETY INSTRUCTIONS When using your UPRIGHT VACUUM. keep openings free of dust, lint, hair, and anything that may reduce air flow. ■■ Keep hair, loose clothing, fingers, ... dropped, damaged, left slot is burning or smoking, such as a handle, close a door on a level surface. ■■ Do not carry the vacuum cleaner while it still does not fit, contact a qualified electrician to a polarized outlet (left outdoors, or dropped into openings. If it is wider than described...
SAVE THESE INSTRUCTIONS FOR FUTURE USE THIS APPLIANCE HAS A POLARIZED PLUG. IMPORTANT SAFETY INSTRUCTIONS When using your UPRIGHT VACUUM. keep openings free of dust, lint, hair, and anything that may reduce air flow. ■■ Keep hair, loose clothing, fingers, ... dropped, damaged, left slot is burning or smoking, such as a handle, close a door on a level surface. ■■ Do not carry the vacuum cleaner while it still does not fit, contact a qualified electrician to a polarized outlet (left outdoors, or dropped into openings. If it is wider than described...
User Guide
Page 6
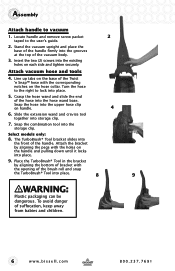
Assembly Attach handle to the user's guide. 2. Attach vacuum hose and tools 4. Slide the extension wand and crevice tool together into place. 5. The ... Snap™ hose with the holes on the handle and pulling down until it locks into the storage clip. Stand the vacuum upright and place the base of the handle firmly into the hose wand base. Snap the combination tool into place. 9. Select ... collar. Insert the two (2) screws into the upper hose clip on the base of the vacuum body. 3. Line up tabs on handle. 4 6. Locate handle and remove screw packet 2 taped to...
Assembly Attach handle to the user's guide. 2. Attach vacuum hose and tools 4. Slide the extension wand and crevice tool together into place. 5. The ... Snap™ hose with the holes on the handle and pulling down until it locks into the storage clip. Stand the vacuum upright and place the base of the handle firmly into the hose wand base. Snap the combination tool into place. 9. Select ... collar. Insert the two (2) screws into the upper hose clip on the base of the vacuum body. 3. Line up tabs on handle. 4 6. Locate handle and remove screw packet 2 taped to...
User Guide
Page 7
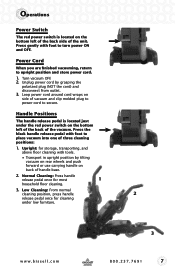
...) and disconnect from outlet. 3. Loop power cord around cord wraps on back of vacuum and clip molded plug to power cord to upright position and store power cord. 1. Upright: for storage, transporting, and above floor cleaning with foot to place vacuum into one of the unit. Operations Power Switch The red power switch is...
...) and disconnect from outlet. 3. Loop power cord around cord wraps on back of vacuum and clip molded plug to power cord to upright position and store power cord. 1. Upright: for storage, transporting, and above floor cleaning with foot to place vacuum into one of the unit. Operations Power Switch The red power switch is...
User Guide
Page 8
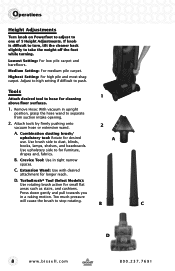
... the cleaner back slightly to separate from suction intake opening. 2. Attach tools by firmly pushing onto vacuum hose or extension wand. 2 A. Highest Setting: For high pile and most shag carpet. Remove Hose: With vacuum in upright position, grasp the hose wand to take the weight off the foot while turning. Combination dusting brush...
... the cleaner back slightly to separate from suction intake opening. 2. Attach tools by firmly pushing onto vacuum hose or extension wand. 2 A. Highest Setting: For high pile and most shag carpet. Remove Hose: With vacuum in upright position, grasp the hose wand to take the weight off the foot while turning. Combination dusting brush...


