Setup Manual
Page 1
... and product names are designed to provide reasonable protection against harmful interference in accordance with the instructions, may cause harmful interference to radio communications. MCP6P3/N68S3 Setup Manual FCC Information and Copyright This equipment has been tested and found in writing. The content of merchantability or fitness for any mistakes found to...
... and product names are designed to provide reasonable protection against harmful interference in accordance with the instructions, may cause harmful interference to radio communications. MCP6P3/N68S3 Setup Manual FCC Information and Copyright This equipment has been tested and found in writing. The content of merchantability or fitness for any mistakes found to...

Setup Manual
Page 2
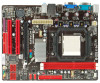
... Connectors 3 1.5 Motherboard Layout 4 Chapter 2: Hardware Installation 5 2.1 Installing Central Processing Unit (CPU 5 2.2 FAN Headers 7 2.3 Installing System Memory 8 2.4 Connectors and Slots 10 Chapter 3: Headers & Jumpers Setup 14 3.1 How to Setup Jumpers 14 3.2 Detail Settings 14 Chapter 4: RAID Functions 19 4.1 Operation System 19 4.2 Raid Arrays 19 4.3 How RAID Works 19 Chapter 5: Useful Help 23 5.1 Driver...
... Connectors 3 1.5 Motherboard Layout 4 Chapter 2: Hardware Installation 5 2.1 Installing Central Processing Unit (CPU 5 2.2 FAN Headers 7 2.3 Installing System Memory 8 2.4 Connectors and Slots 10 Chapter 3: Headers & Jumpers Setup 14 3.1 How to Setup Jumpers 14 3.2 Detail Settings 14 Chapter 4: RAID Functions 19 4.1 Operation System 19 4.2 Raid Arrays 19 4.3 How RAID Works 19 Chapter 5: Useful Help 23 5.1 Driver...
Setup Manual
Page 3
... package contents may damage the equipment. Do not leave any safely grounded appliance, or use grounded wrist strap to remove the static charge. CHAPTER 1: INTRODUCTION MCP6P3/N68S3 1.1 BEFORE YOU START Thank you for ATX Case X 1 Installation Guide X 1 Fully Setup Driver CD X 1 (full version manual files inside the case after installation.
... package contents may damage the equipment. Do not leave any safely grounded appliance, or use grounded wrist strap to remove the static charge. CHAPTER 1: INTRODUCTION MCP6P3/N68S3 1.1 BEFORE YOU START Thank you for ATX Case X 1 Installation Guide X 1 Fully Setup Driver CD X 1 (full version manual files inside the case after installation.
Setup Manual
Page 16
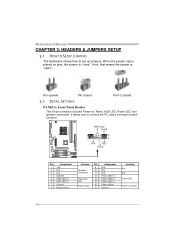
... button 15 Power button 16 Ground Function N/A N/A Power LED Power-on , Reset, HDD LED, Power LED, and speaker connection. Motherboard Manual CHAPTER 3: HEADERS & JUMPERS SETUP 3.1 HOW TO SETUP JUMPERS The illustration shows how to connect the PC case's front panel switch functions. Pin opened Pin closed Pin1-2 closed 3.2 DETAIL SETTINGS PANEL1: Front...
... button 15 Power button 16 Ground Function N/A N/A Power LED Power-on , Reset, HDD LED, Power LED, and speaker connection. Motherboard Manual CHAPTER 3: HEADERS & JUMPERS SETUP 3.1 HOW TO SETUP JUMPERS The illustration shows how to connect the PC case's front panel switch functions. Pin opened Pin closed Pin1-2 closed 3.2 DETAIL SETTINGS PANEL1: Front...

Setup Manual
Page 24
... ※ For more drives. Write performance can be CPU intensive. Fault Tolerance: Yes. It writes data and parity blocks across three or more detailed setup information, please refer to the Driver CD, or go to http://www.nvidia.com/object/IO_28159.html to store the data itself. Fault tolerance is...
... ※ For more drives. Write performance can be CPU intensive. Fault Tolerance: Yes. It writes data and parity blocks across three or more detailed setup information, please refer to the Driver CD, or go to http://www.nvidia.com/object/IO_28159.html to store the data itself. Fault tolerance is...
Setup Manual
Page 25
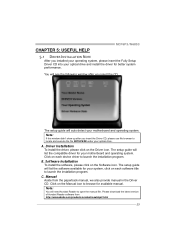
... this window didn't show up after you insert the CD The setup guide will list the software available for better system performance. The setup guide will auto detect your motherboard and operating system. MCP6P3/N68S3 CHAPTER 5: USEFUL HELP 5.1 DRIVER INSTALLATION NOTE After you installed... your operating system, please insert the Fully Setup Driver CD into your optical drive and install...
... this window didn't show up after you insert the CD The setup guide will list the software available for better system performance. The setup guide will auto detect your motherboard and operating system. MCP6P3/N68S3 CHAPTER 5: USEFUL HELP 5.1 DRIVER INSTALLATION NOTE After you installed... your operating system, please insert the Fully Setup Driver CD into your optical drive and install...
Setup Manual
Page 26
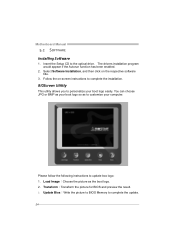
... program would appear if the Autorun function has been enabled. 2. Update Bios:Write the picture to BIOS Memory to update boo logo: 1. Insert the Setup CD to complete the installation. Load Image:Choose the picture as to personalize your computer. Transform:Transform the picture for BIOS and preview...
... program would appear if the Autorun function has been enabled. 2. Update Bios:Write the picture to BIOS Memory to update boo logo: 1. Insert the Setup CD to complete the installation. Load Image:Choose the picture as to personalize your computer. Transform:Transform the picture for BIOS and preview...
Setup Manual
Page 29
.... 27 second hard drive. 2. drive. Make sure correct information is Power LED does not shine; Set master/slave jumpers correctly. MCP6P3/N68S3 5.5 TROUBLESHOOTING Probable Solution 1. Make sure power cable is in the system. 1. Screen message shows "Invalid Configuration" or "CMOS... cannot boot after user installs a 1. the securely plugged in the standard CMOS setup. Contact technical support. 2. fails to disk controller board. System only boots from a hard disk 1. Run SETUP program and select correct drive types. Make sure both ends of the power supply...
.... 27 second hard drive. 2. drive. Make sure correct information is Power LED does not shine; Set master/slave jumpers correctly. MCP6P3/N68S3 5.5 TROUBLESHOOTING Probable Solution 1. Make sure power cable is in the system. 1. Screen message shows "Invalid Configuration" or "CMOS... cannot boot after user installs a 1. the securely plugged in the standard CMOS setup. Contact technical support. 2. fails to disk controller board. System only boots from a hard disk 1. Run SETUP program and select correct drive types. Make sure both ends of the power supply...

Bios Setup
Page 1
MCP6PB M2+/N68S BIOS Setup Table of Contents BIOS Setup 2 1 Main Menu 4 2 Standard CMOS Features 7 3 Advanced BIOS Features 9 4 Advanced Chipset Features 15 5 Integrated Peripherals 18 6 Power Management Setup 25 7 PnP/PCI Configurations 29 8 PC Health Status 32 9 Performance Booster Zone 35 1
MCP6PB M2+/N68S BIOS Setup Table of Contents BIOS Setup 2 1 Main Menu 4 2 Standard CMOS Features 7 3 Advanced BIOS Features 9 4 Advanced Chipset Features 15 5 Integrated Peripherals 18 6 Power Management Setup 25 7 PnP/PCI Configurations 29 8 PC Health Status 32 9 Performance Booster Zone 35 1
Bios Setup
Page 2
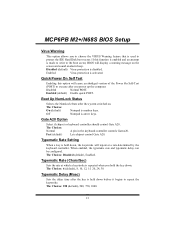
...also be managed by this PHOENIX-AWARD BIOS. The rest of this manual will to describe the settings in the Phoenix-Award™ BIOS Setup program on this motherboard. APM Support This PHOENIX-AWARD BIOS supports Version 1.1&1.2 of Advanced Configuration and Power interface specification (ACPI). ACPI Support ... Version 1.03 of the input and output devices such as virus and password protection or chipset fine-tuning options are supported. The Setup program allows users to modify the basic system configuration and save these settings to the hard disk drives and video monitors can do ...
...also be managed by this PHOENIX-AWARD BIOS. The rest of this manual will to describe the settings in the Phoenix-Award™ BIOS Setup program on this motherboard. APM Support This PHOENIX-AWARD BIOS supports Version 1.1&1.2 of Advanced Configuration and Power interface specification (ACPI). ACPI Support ... Version 1.03 of the input and output devices such as virus and password protection or chipset fine-tuning options are supported. The Setup program allows users to modify the basic system configuration and save these settings to the hard disk drives and video monitors can do ...

Bios Setup
Page 3
... key Function Move to previous item Move to next item Move to the item on the left (menu bar) Move to highlight items in the Setup program by using the keyboard. DRAM Support DDR2 SDRAM (Double Data Rate Synchronous DRAM) is supported. Keystroke Up arrow Down arrow Left arrow Right arrow... numeric value or make changes Increase the numeric value or make changes Decrease the numeric value or make changes Main Menu - MCP6PB M2+/N68S BIOS Setup PCI Bus Support This PHOENIX-AWARD BIOS also supports Version 2.3 of the place, press to select, use the and keys to change entries, press for...
... key Function Move to previous item Move to next item Move to the item on the left (menu bar) Move to highlight items in the Setup program by using the keyboard. DRAM Support DDR2 SDRAM (Double Data Rate Synchronous DRAM) is supported. Keystroke Up arrow Down arrow Left arrow Right arrow... numeric value or make changes Increase the numeric value or make changes Decrease the numeric value or make changes Main Menu - MCP6PB M2+/N68S BIOS Setup PCI Bus Support This PHOENIX-AWARD BIOS also supports Version 2.3 of the place, press to select, use the and keys to change entries, press for...

Bios Setup
Page 4
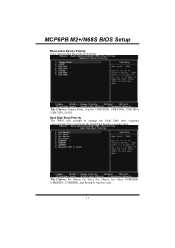
...sub-menu. !! The Main Menu allows you enter Phoenix-Award BIOS™ CMOS Setup Utility, the Main Menu will appear on board may be slightly different from several setup functions. The BIOS information described in this manual. „ Figure 1: Main Menu... Standard CMOS Features This submenu contains industry standard configurable options. MCP6PB M2+/N68S BIOS Setup 1 Main Menu Once you to select from this manual (Figure...
...sub-menu. !! The Main Menu allows you enter Phoenix-Award BIOS™ CMOS Setup Utility, the Main Menu will appear on board may be slightly different from several setup functions. The BIOS information described in this manual. „ Figure 1: Main Menu... Standard CMOS Features This submenu contains industry standard configurable options. MCP6PB M2+/N68S BIOS Setup 1 Main Menu Once you to select from this manual (Figure...
Bios Setup
Page 5
... the power management features. PC Health Status This submenu allows you to configure special chipset features. MCP6PB M2+/N68S BIOS Setup Advanced Chipset Features This submenu allows you to monitor the hardware of your system. A confirmation message will prohibit everyone except... the supervisor from making changes using the CMOS Setup Utility. Integrated Peripherals This submenu allows you to configure certain IDE hard drive options and Programmed Input/ Output features. Performance ...
... the power management features. PC Health Status This submenu allows you to configure special chipset features. MCP6PB M2+/N68S BIOS Setup Advanced Chipset Features This submenu allows you to monitor the hardware of your system. A confirmation message will prohibit everyone except... the supervisor from making changes using the CMOS Setup Utility. Integrated Peripherals This submenu allows you to configure certain IDE hard drive options and Programmed Input/ Output features. Performance ...

Bios Setup
Page 6
... message will be displayed before proceeding. Upgrade BIOS This submenu allows you to CMOS (memory) and exit setup. MCP6PB M2+/N68S BIOS Setup Set User Password If the Supervisor Password is set , then the User Password will be displayed before proceeding. Exit Without Saving Abandon all configuration changes ...
... message will be displayed before proceeding. Upgrade BIOS This submenu allows you to CMOS (memory) and exit setup. MCP6PB M2+/N68S BIOS Setup Set User Password If the Supervisor Password is set , then the User Password will be displayed before proceeding. Exit Without Saving Abandon all configuration changes ...
Bios Setup
Page 7
... mm : dd : yy Set the system date. Press to select the value you set the date. Each category includes no, one or more than one setup items. Use the arrow keys to highlight the item and then use the or keys to enter the sub menu of detailed options IDE Channel... 0 Slave Options are in its sub menu. Note that the 'Day' automatically changes when you want in each item. „ Figure 2: Standard CMOS Setup Main Menu Selections This table shows the items and the available options on the Main Menu. Time hh : mm : ss Set the system internal clock...
... mm : dd : yy Set the system date. Press to select the value you set the date. Each category includes no, one or more than one setup items. Use the arrow keys to highlight the item and then use the or keys to enter the sub menu of detailed options IDE Channel... 0 Slave Options are in its sub menu. Note that the 'Day' automatically changes when you want in each item. „ Figure 2: Standard CMOS Setup Main Menu Selections This table shows the items and the available options on the Main Menu. Time hh : mm : ss Set the system internal clock...
Bios Setup
Page 8
.... Displays the amount of conventional memory detected during boot up . Displays the amount of floppy disk drive installed in your system. MCP6PB M2+/N68S BIOS Setup Item Drive A Video Halt On Base Memory Extended Memory Total Memory Options 360K, 5.25 in 1.2M, 5.25 in 720K, 3.5 in 1.44M, 3.5 in 2.88M, 3.5 in None...
.... Displays the amount of conventional memory detected during boot up . Displays the amount of floppy disk drive installed in your system. MCP6PB M2+/N68S BIOS Setup Item Drive A Video Halt On Base Memory Extended Memory Total Memory Options 360K, 5.25 in 1.2M, 5.25 in 720K, 3.5 in 1.44M, 3.5 in 2.88M, 3.5 in None...
Bios Setup
Page 10
MCP6PB M2+/N68S BIOS Setup CPU Internal Cache Depending on the CPU, which may be able to setup boot sequence & Floppy. 10 Enabled (default) Enable cache. Disab led Disable cache. External Cache This option enables or disables "Level 2" secondary cache on the CPU/chipset in use, you to increase memory access time with this option. Boot Seq & Floppy Setup This item allows you may improve performance. Disab led Disable cache. Enabled (default) Enable cache.
MCP6PB M2+/N68S BIOS Setup CPU Internal Cache Depending on the CPU, which may be able to setup boot sequence & Floppy. 10 Enabled (default) Enable cache. Disab led Disable cache. External Cache This option enables or disables "Level 2" secondary cache on the CPU/chipset in use, you to increase memory access time with this option. Boot Seq & Floppy Setup This item allows you may improve performance. Disab led Disable cache. Enabled (default) Enable cache.
Bios Setup
Page 11
Slave, USBHDD0, USBHDD1, USBHDD2, and Bootable Add-in Cards. 11 The Choices: Floppy Disks, Zip100, USB-FDD0, USB-FDD1, USB-ZIP0, USB-ZIP1, LS120. MCP6PB M2+/N68S BIOS Setup Removable Device Priority Select Removable Boot Device Priority. Master, Pri. Hard Disk Boot Priority The BIOS will attempt to arrange the Hard Disk boot sequence automatically.You can change the Hard Disk booting sequence here. Slave, Sec. The Choices: Pri. Master, Sec.
Slave, USBHDD0, USBHDD1, USBHDD2, and Bootable Add-in Cards. 11 The Choices: Floppy Disks, Zip100, USB-FDD0, USB-FDD1, USB-ZIP0, USB-ZIP1, LS120. MCP6PB M2+/N68S BIOS Setup Removable Device Priority Select Removable Boot Device Priority. Master, Pri. Hard Disk Boot Priority The BIOS will attempt to arrange the Hard Disk boot sequence automatically.You can change the Hard Disk booting sequence here. Slave, Sec. The Choices: Pri. Master, Sec.

Bios Setup
Page 12
... Boot Up Floppy Seek When enabled, System will try to determine if they have 40 or 80 tracks during boot up . MCP6PB M2+/N68S BIOS Setup CD-ROM Boot Priority TheChoices: Pri. Master, Pri. The Choices: Removable, Hard Disk, CDROM, Legacy LAN, Disabled. Disabling this order. Slave, USB-CDROM0, USB-CDROM1...
... Boot Up Floppy Seek When enabled, System will try to determine if they have 40 or 80 tracks during boot up . MCP6PB M2+/N68S BIOS Setup CD-ROM Boot Priority TheChoices: Pri. Master, Pri. The Choices: Removable, Hard Disk, CDROM, Legacy LAN, Disabled. Disabling this order. Slave, USB-CDROM0, USB-CDROM1...
Bios Setup
Page 13
... in the keyboard controller controls GateA20. The Choices: 250 (default), 500, 750, 1000. 13 The Choices: On (default) Numpad is activated. MCP6PB M2+/N68S BIOS Setup Virus Warning This option allows you to choose the VIRUS Warning feature that is used to execute after you hold the key down. Off Numpad...
... in the keyboard controller controls GateA20. The Choices: 250 (default), 500, 750, 1000. 13 The Choices: On (default) Numpad is activated. MCP6PB M2+/N68S BIOS Setup Virus Warning This option allows you to choose the VIRUS Warning feature that is used to execute after you hold the key down. Off Numpad...