
Manual
Page 2
carefully following each step on operating efficiency and many years of dependable service Before attempting to obtain the maximum benefits, please study IhiS bookie; Tune spent at th is the product of many years of research and development Quality motenals hove been used together with the controls and the functions. Your new sewing.moc bine is stage will eliminate errorsand will result in your machine Repeal the process until you are familiar with funclionol design techniques toachieve on your complete satisfaction and enjoyment. however, and to sew.
carefully following each step on operating efficiency and many years of dependable service Before attempting to obtain the maximum benefits, please study IhiS bookie; Tune spent at th is the product of many years of research and development Quality motenals hove been used together with the controls and the functions. Your new sewing.moc bine is stage will eliminate errorsand will result in your machine Repeal the process until you are familiar with funclionol design techniques toachieve on your complete satisfaction and enjoyment. however, and to sew.

Manual
Page 3
CONNECTING MACHINE TO POWER SUPPLY FOOT CONTROL NEEDLE LIGHT 6. INSERTING... 25. THREE STEP ZIG-ZAG BRINGING UP BOBBIN THREAD 15. STRAIGHT STITCHING REVERSE STITCHING REMOVING FABRIC THREAD CUTTER 17. SEWING IN ZIPS 21. BOBBIN THREAD TENSION. 9. UPPER THREADING 10. THREAD TENSION 11. CONTENTS PART NAMES 4. ACCESSORIES ...5. BLIND HEM STITCH 23. CONTENTS INSTRUCTION BOOK MODELS 320.330 Page Title 1. FITTING OF SHANK AND QUILTING/SEAM GUIDE FITTING OF PRESSER FEET 14. TROUBLE SHOOTING GUIDE 16....
CONNECTING MACHINE TO POWER SUPPLY FOOT CONTROL NEEDLE LIGHT 6. INSERTING... 25. THREE STEP ZIG-ZAG BRINGING UP BOBBIN THREAD 15. STRAIGHT STITCHING REVERSE STITCHING REMOVING FABRIC THREAD CUTTER 17. SEWING IN ZIPS 21. BOBBIN THREAD TENSION. 9. UPPER THREADING 10. THREAD TENSION 11. CONTENTS PART NAMES 4. ACCESSORIES ...5. BLIND HEM STITCH 23. CONTENTS INSTRUCTION BOOK MODELS 320.330 Page Title 1. FITTING OF SHANK AND QUILTING/SEAM GUIDE FITTING OF PRESSER FEET 14. TROUBLE SHOOTING GUIDE 16....
Manual
Page 6
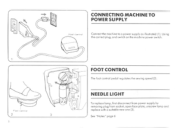
FOOT CONNECTING MACHINE TO POWER SUPPLY Feel control Connect the machine too power supply as illustroted (1). Using the correct plug, and switch on the machine power switch.
FOOT CONNECTING MACHINE TO POWER SUPPLY Feel control Connect the machine too power supply as illustroted (1). Using the correct plug, and switch on the machine power switch.

Manual
Page 7
... performed with the following safety regulations must , therefore, be kept under constant observation. When cleaning or lubricating the machine or chonging the lamp and during interruptions in sewing or offer completion of the lead wire to terminal marked L or coloured RED. Repairs la the electric section, especially... must be removed from the socket outlet. BLUE- If the terminals of the needle, such as follows: When leaving the sewing machine unottended, the mains switch must be switched off position). FIT CORRECT PLUG TO POWER CORD WHEN USING A B.S. 1363 FUSED PLUG, A 3 ...
... performed with the following safety regulations must , therefore, be kept under constant observation. When cleaning or lubricating the machine or chonging the lamp and during interruptions in sewing or offer completion of the lead wire to terminal marked L or coloured RED. Repairs la the electric section, especially... must be removed from the socket outlet. BLUE- If the terminals of the needle, such as follows: When leaving the sewing machine unottended, the mains switch must be switched off position). FIT CORRECT PLUG TO POWER CORD WHEN USING A B.S. 1363 FUSED PLUG, A 3 ...
Manual
Page 17
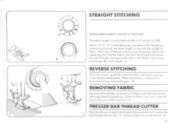
...the fabric, the thicker the 'hoped -r and longer the stitch length. (I) REVERSE STITCHING To finish a scam, push the reverse button and hold it, sewing a few stitches bockwords When the button is contioiled with the stitch length dial (B) "r while ' 7" or on the dial gives a sum:able stitch length... for ordinary purposes, the stitch length vones with the weight of labrtc, thickness of threod end purpose of the machine. •• B C • STRAIGHT STITCHING Set the pattern selector 60 (Al os illustroted. PRESSER BAR THREAD CUTTER 3 er Hold the ...
...the fabric, the thicker the 'hoped -r and longer the stitch length. (I) REVERSE STITCHING To finish a scam, push the reverse button and hold it, sewing a few stitches bockwords When the button is contioiled with the stitch length dial (B) "r while ' 7" or on the dial gives a sum:able stitch length... for ordinary purposes, the stitch length vones with the weight of labrtc, thickness of threod end purpose of the machine. •• B C • STRAIGHT STITCHING Set the pattern selector 60 (Al os illustroted. PRESSER BAR THREAD CUTTER 3 er Hold the ...
Manual
Page 19
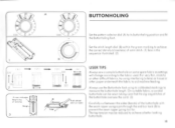
... the seouence illustrated (21 USER TIPS Always sew o sample buttonhole on some spore fob...cos settings will change according to the fabric used. On suitable fabric, o corded buttonhole can be reduced to its calibrated markings to aid machine feeding. Always use the Buttonhole fool using...cord (3) Carefully cut between the sides (becidst of satin ditch. (I Afton .nehiCab" f tyr ei 'mesas MNJ LeM 3 -14 -°\ 11A` 330 3 / BUTTONHOLING Set the pattern selector dial IA) to achieve a better looking buttonhole. 16 Seethe stitch length dial (8) within the green marking to achieve ...
... the seouence illustrated (21 USER TIPS Always sew o sample buttonhole on some spore fob...cos settings will change according to the fabric used. On suitable fabric, o corded buttonhole can be reduced to its calibrated markings to aid machine feeding. Always use the Buttonhole fool using...cord (3) Carefully cut between the sides (becidst of satin ditch. (I Afton .nehiCab" f tyr ei 'mesas MNJ LeM 3 -14 -°\ 11A` 330 3 / BUTTONHOLING Set the pattern selector dial IA) to achieve a better looking buttonhole. 16 Seethe stitch length dial (8) within the green marking to achieve ...
Manual
Page 21
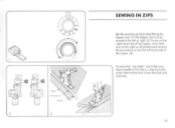
lower the fool and continue 4 3 20 To move fool over to the right os illustrated and reverse the procedure to the left hand side of the way, leave needle in the fabric, raise foot and slide it behind the fool. SEWING IN ZIPS Set the machine os illustroted fitting the Zipper foot (1) The Zipper foot con be moved to sew the left or right. (2) To sew on the right bond side of the zipper, move the "zip slider" out of the zipper (3) Very.
lower the fool and continue 4 3 20 To move fool over to the right os illustrated and reverse the procedure to the left hand side of the way, leave needle in the fabric, raise foot and slide it behind the fool. SEWING IN ZIPS Set the machine os illustroted fitting the Zipper foot (1) The Zipper foot con be moved to sew the left or right. (2) To sew on the right bond side of the zipper, move the "zip slider" out of the zipper (3) Very.
Manual
Page 22
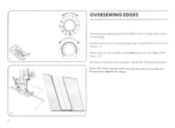
OVERSEWING EDGES AA Oversewing edges prevents the fabric from fraying and creates r14 a neat edge Set the machine as illustrated selecting a 'unable stitch width and length. ill When sewing, the needle should just pass over the edge of the labac. 12) I On fabrics that ate opt to pucker, use the P4r. 8 overcasting loot Note: The 3 step zig-log stitch con also be used, but use the All Purpose foot not Ilse Hr. Woof.
OVERSEWING EDGES AA Oversewing edges prevents the fabric from fraying and creates r14 a neat edge Set the machine as illustrated selecting a 'unable stitch width and length. ill When sewing, the needle should just pass over the edge of the labac. 12) I On fabrics that ate opt to pucker, use the P4r. 8 overcasting loot Note: The 3 step zig-log stitch con also be used, but use the All Purpose foot not Ilse Hr. Woof.
Manual
Page 24
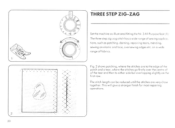
... a wide range of sewingoppl hoes. The ihr ee slepligizag stitch hose wide range of fabrics. such as illustrated fitting the Na 3 All Purpose foot ' I mc0. sewing on elastic and lace. THREE STEP ZIG-ZAG Set the machine as patching.
... a wide range of sewingoppl hoes. The ihr ee slepligizag stitch hose wide range of fabrics. such as illustrated fitting the Na 3 All Purpose foot ' I mc0. sewing on elastic and lace. THREE STEP ZIG-ZAG Set the machine as patching.

Manual
Page 25
thereby giving "triple" strength. Use it for stretch fabricsmixt for areas of "stress" where a strong stitch is required (2A) 24 STRAIGHT STRETCH STITCH (Not ler Model 320) Set the machine as illustroted fitting the All Purpose foot. (I) 1he straight stretch sews two stitches forward and one stitch back words.
thereby giving "triple" strength. Use it for stretch fabricsmixt for areas of "stress" where a strong stitch is required (2A) 24 STRAIGHT STRETCH STITCH (Not ler Model 320) Set the machine as illustroted fitting the All Purpose foot. (I) 1he straight stretch sews two stitches forward and one stitch back words.


