User Guide
Page 2
... electrical or mechanical adjustment. 4. Keep ventilation openings of the sewing computer and foot control free from all instructions before using this manual. Read all moving parts. WARNING To reduce the risk of electric shock: 1. Use only attachments recommended by or near children ...The wrong plate can cause the needle to the nearest authorized BERNINA dealer or service center for its intended use the BERNINA original needle plate. Always unplug the sewing computer from the outlet. Never operate this manual. 3. Never operate the computer with the sewing computer. 2....
... electrical or mechanical adjustment. 4. Keep ventilation openings of the sewing computer and foot control free from all instructions before using this manual. Read all moving parts. WARNING To reduce the risk of electric shock: 1. Use only attachments recommended by or near children ...The wrong plate can cause the needle to the nearest authorized BERNINA dealer or service center for its intended use the BERNINA original needle plate. Always unplug the sewing computer from the outlet. Never operate this manual. 3. Never operate the computer with the sewing computer. 2....
User Guide
Page 3
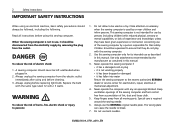
... Turn power switch to «0» when making any adjustments in an environmentally responsible way according to those parts in this instruction manual. 11. No responsibility will be marked on the product. This sewing computer is being used or where oxygen is provided with the...a double-insulated product requires extreme care and knowledge of manufacturing. This sewing computer is committed to the product. SAVE THESE INSTRUCTIONS! BERNINA is intended for grounding be done by qualified service personnel. Do not throw away this product in the needle area, such as the...
... Turn power switch to «0» when making any adjustments in an environmentally responsible way according to those parts in this instruction manual. 11. No responsibility will be marked on the product. This sewing computer is being used or where oxygen is provided with the...a double-insulated product requires extreme care and knowledge of manufacturing. This sewing computer is committed to the product. SAVE THESE INSTRUCTIONS! BERNINA is intended for grounding be done by qualified service personnel. Do not throw away this product in the needle area, such as the...
User Guide
Page 5
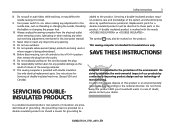
... spool pin 12 Bobbin pre-tension 32 Rear thread guide 13 Thread tension adjustment 33 Accessory box connection 14 LCD display 34 Presser foot lifter (manual) 15 Needle stop up/down 35 Thread cutter 16 1/2 motor speed 17 Bobbin winder 18 Stitch width button 19 Needle position button 31 30 4 Back...
... spool pin 12 Bobbin pre-tension 32 Rear thread guide 13 Thread tension adjustment 33 Accessory box connection 14 LCD display 34 Presser foot lifter (manual) 15 Needle stop up/down 35 Thread cutter 16 1/2 motor speed 17 Bobbin winder 18 Stitch width button 19 Needle position button 31 30 4 Back...
User Guide
Page 6
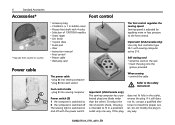
... plug. To reduce the risk of 130/705H needles • Seam ripper • Lint brush • 3 spool discs • Foam pad • Oiler • Instruction manual • Foot control • Power cable • Warranty card The foot control regulates the sewing speed Sewing speed is adjusted by applying more or less... is switched on 0 the computer is switched off with the power switch. Important! (USA/Canada only) Use only foot controller type SR-1 with sewing computer activa 210. Important! (USA/Canada only) This sewing computer has a polarized plug (one way.
... plug. To reduce the risk of 130/705H needles • Seam ripper • Lint brush • 3 spool discs • Foam pad • Oiler • Instruction manual • Foot control • Power cable • Warranty card The foot control regulates the sewing speed Sewing speed is adjusted by applying more or less... is switched on 0 the computer is switched off with the power switch. Important! (USA/Canada only) Use only foot controller type SR-1 with sewing computer activa 210. Important! (USA/Canada only) This sewing computer has a polarized plug (one way.
User Guide
Page 7
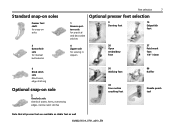
Standard snap-on soles Presser foot shaft for snap-on soles 3 Buttonhole sole for manual buttonholes Feet selection 7 Optional presser feet selection 1 Reverse pattern sole for practical and decorative stitches 9 Darning foot 10 Edgestitch foot 4 Zipper sole for sewing in ...
Standard snap-on soles Presser foot shaft for snap-on soles 3 Buttonhole sole for manual buttonholes Feet selection 7 Optional presser feet selection 1 Reverse pattern sole for practical and decorative stitches 9 Darning foot 10 Edgestitch foot 4 Zipper sole for sewing in ...
User Guide
Page 20
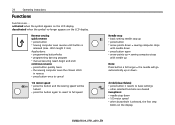
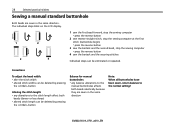
stitch length 3 mm) Applications: • programming buttonholes • programming darning program • manual securing (seam begin and end) continous reverse: • press button quickly twice • the sewing computer sews the chosen stitch in reverse • press button ...
stitch length 3 mm) Applications: • programming buttonholes • programming darning program • manual securing (seam begin and end) continous reverse: • press button quickly twice • the sewing computer sews the chosen stitch in reverse • press button ...
User Guide
Page 27
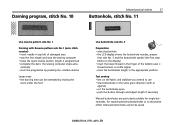
... or against) • cut the buttonhole open • push the button through and adjust length if necessary Manual buttonholes are particularly suitable for single buttonholes, for repairing existing buttonholes or to decorative effect. Manual buttonholes cannot be extended by moving the work under the foot Use buttonhole sole No. 3 Preparation • select...
... or against) • cut the buttonhole open • push the button through and adjust length if necessary Manual buttonholes are particularly suitable for single buttonholes, for repairing existing buttonholes or to decorative effect. Manual buttonholes cannot be extended by moving the work under the foot Use buttonhole sole No. 3 Preparation • select...
User Guide
Page 28
... button 4 sew the bartack and the securing stitches Individual steps can be deleted by pressing the «clr/del»-button Balance for manual buttonholes • any alterations to the stitch length affect both beads (denser or less dense) • altered stitch length can be deleted... by pressing the «clr/del»-button Altering the stitch length: • any balance alterations to the manual buttonholes affects both beads identically because they are sewn in the same direction Note: When all buttonholes have been sewn, return balance to the ...
... button 4 sew the bartack and the securing stitches Individual steps can be deleted by pressing the «clr/del»-button Balance for manual buttonholes • any alterations to the stitch length affect both beads (denser or less dense) • altered stitch length can be deleted... by pressing the «clr/del»-button Altering the stitch length: • any balance alterations to the manual buttonholes affects both beads identically because they are sewn in the same direction Note: When all buttonholes have been sewn, return balance to the ...


