User Guide
Page 3
... product in the needle area, such as the result of misuse of double-insulated machines. (Except USA and Canada). SAVE THESE INSTRUCTIONS! BERNINA is intended for a double-insulated product must be taken for Servicing of the sewing computer. 17. At end of life please dispose of...insulated product requires extreme care and knowledge of manufacturing. We strive to the national directive. Do not throw away this instruction manual. 11. Turn power switch to the off («0») position then remove the plug from the electrical outlet when removing covers, lubricating or when making ...
... product in the needle area, such as the result of misuse of double-insulated machines. (Except USA and Canada). SAVE THESE INSTRUCTIONS! BERNINA is intended for a double-insulated product must be taken for Servicing of the sewing computer. 17. At end of life please dispose of...insulated product requires extreme care and knowledge of manufacturing. We strive to the national directive. Do not throw away this instruction manual. 11. Turn power switch to the off («0») position then remove the plug from the electrical outlet when removing covers, lubricating or when making ...
User Guide
Page 10
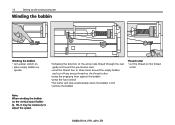
10 Setting up the sewing computer Winding the bobbin Winding the bobbin • turn power switch on • place empty bobbin on spindle • following the direction of the arrow take thread through the rear guide and round the ...
10 Setting up the sewing computer Winding the bobbin Winding the bobbin • turn power switch on • place empty bobbin on spindle • following the direction of the arrow take thread through the rear guide and round the ...
User Guide
Page 11
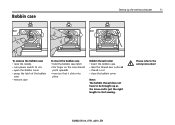
Bobbin case Setting up the sewing computer 11 A To remove the bobbin case • raise the needle • turn power switch to «0» • open the bobbin cover • grasp the latch of the bobbin case • remove case To insert the bobbin ...
Bobbin case Setting up the sewing computer 11 A To remove the bobbin case • raise the needle • turn power switch to «0» • open the bobbin cover • grasp the latch of the bobbin case • remove case To insert the bobbin ...
User Guide
Page 12
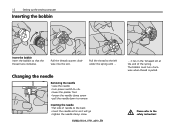
...to remove Inserting the needle • flat side of the spring. Changing the needle Removing the needle • raise the needle • turn clockwise when thread is pulled. Please refer to the left under the spring until ... 12 Setting up the sewing computer Inserting the bobbin Insert... the bobbin Insert the bobbin so that the thread runs clockwise. The bobbin must turn power switch to «0» • lower the presser foot • loosen the needle clamp screw • pull the needle down to...
...to remove Inserting the needle • flat side of the spring. Changing the needle Removing the needle • raise the needle • turn clockwise when thread is pulled. Please refer to the left under the spring until ... 12 Setting up the sewing computer Inserting the bobbin Insert... the bobbin Insert the bobbin so that the thread runs clockwise. The bobbin must turn power switch to «0» • lower the presser foot • loosen the needle clamp screw • pull the needle down to...

User Guide
Page 13
... the presser foot sole Setting up the sewing computer 13 3 Changing the presser foot sole • raise the needle and the presser foot shaft • turn power switch to «0» • press the button on the back of the shaft • lower the presser foot lifter and the foot sole...
... the presser foot sole Setting up the sewing computer 13 3 Changing the presser foot sole • raise the needle and the presser foot shaft • turn power switch to «0» • press the button on the back of the shaft • lower the presser foot lifter and the foot sole...
User Guide
Page 17
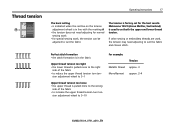
... thread tension too loose • the upper thread is pulled more to the right side of the fabric • to reduce the upper thread tension turn ten- Perfect stitch formation • the stitch formation is in line with the marking A • the tension does not need adjusting to 5-10... thread tension too tight • the lower thread is pulled more to the wrong side of the fabric • to increase the upper thread tension turn ten- Metrosene 100/2 (Arova Mettler, Switzerland) is used , the tension may need adjusting for normal sewing work • for special sewing work, the ...
... thread tension too loose • the upper thread is pulled more to the right side of the fabric • to reduce the upper thread tension turn ten- Perfect stitch formation • the stitch formation is in line with the marking A • the tension does not need adjusting to 5-10... thread tension too tight • the lower thread is pulled more to the wrong side of the fabric • to increase the upper thread tension turn ten- Metrosene 100/2 (Arova Mettler, Switzerland) is used , the tension may need adjusting for normal sewing work • for special sewing work, the ...
User Guide
Page 31
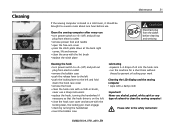
... computer is stored in a cold room, it should be brought to a warm room about one hour before cleaning and servicing Cleaning the hook • turn power switch to «0» (off ) and pull out plug from electric outlet • remove the bobbin case • push the release lever ... is on the left • close the hook race cover and secure with the locking lever, the locking pin must engage • check by turning the handwheel • insert the bobbin case Lubricating • squeeze 2-3 drops of solvent to the safety instruction! 032622.50.04_0701_a210_EN Please refer to ...
... computer is stored in a cold room, it should be brought to a warm room about one hour before cleaning and servicing Cleaning the hook • turn power switch to «0» (off ) and pull out plug from electric outlet • remove the bobbin case • push the release lever ... is on the left • close the hook race cover and secure with the locking lever, the locking pin must engage • check by turning the handwheel • insert the bobbin case Lubricating • squeeze 2-3 drops of solvent to the safety instruction! 032622.50.04_0701_a210_EN Please refer to ...
User Guide
Page 32
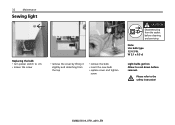
W 2.1 x 9.5 d. Allow to cool down before cleaning and servicing Note: Use bulb type 12 V 5 W. 32 Maintenance Sewing light Replacing the bulb • turn power switch to «0» • loosen the screw • remove the cover by lifting it slightliy and detaching from the top • remove the bulb • insert the new bulb • replace cover and tighten screw CAUTION Disconnect plug from the socket before removal. Light bulbs get hot. Please refer to the safety instruction! 032622.50.04_0701_a210_EN
W 2.1 x 9.5 d. Allow to cool down before cleaning and servicing Note: Use bulb type 12 V 5 W. 32 Maintenance Sewing light Replacing the bulb • turn power switch to «0» • loosen the screw • remove the cover by lifting it slightliy and detaching from the top • remove the bulb • insert the new bulb • replace cover and tighten screw CAUTION Disconnect plug from the socket before removal. Light bulbs get hot. Please refer to the safety instruction! 032622.50.04_0701_a210_EN


