
Manual
Page 4
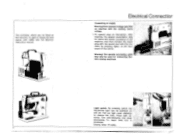
... special combination plug for connecting Bernina sewing machines. Press bulb upwards, turn it clockwise. By pressing switch the dazzle-free light can be fitted on the free-arm, is used for mains and starter connection in the machine, only then connect the mains plug with the existing mains ' voltage. Sewing lamp: 15 watts. The special...
... special combination plug for connecting Bernina sewing machines. Press bulb upwards, turn it clockwise. By pressing switch the dazzle-free light can be fitted on the free-arm, is used for mains and starter connection in the machine, only then connect the mains plug with the existing mains ' voltage. Sewing lamp: 15 watts. The special...
Manual
Page 5
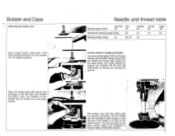
...needle and thread. sewing machine 800. The usual needles for darning are numbers 80, 90 and 100 . a I •ti f I and 80. Open the hinged latch with the handwheel high enough so that y y~ -,. The insertion of the bobbin case is tt thereby made considerably simpler. 5 while those for sewing are numbers 70...highest position. Turn hand wheel towards you until the needle is in the same ' manner. Use only needle system 705 B for Bernina . . . the needle and thread used conform to .. ' '' the table above. Bobbin and Case Removing the bobbin case Open hinged bobbin...
...needle and thread. sewing machine 800. The usual needles for darning are numbers 80, 90 and 100 . a I •ti f I and 80. Open the hinged latch with the handwheel high enough so that y y~ -,. The insertion of the bobbin case is tt thereby made considerably simpler. 5 while those for sewing are numbers 70...highest position. Turn hand wheel towards you until the needle is in the same ' manner. Use only needle system 705 B for Bernina . . . the needle and thread used conform to .. ' '' the table above. Bobbin and Case Removing the bobbin case Open hinged bobbin...

Manual
Page 7
.... Pull both threads under the presser boot and lay them there sideways. Turn control knob (20) to the slot of window. Threading the machine. Lead the thread with the flat side at the back and facing away. The tension centering wheel (12) can be altered. Hold needle...up through the thread guide (5) up lever is led from the front to be regulated for special purposes. Lowering the feed dog. BERNINA L4 I the zigzag and straight stitch sign. 7 For normal sewing turn . Tighten needle clamp screw. in center = Tighter tension. - Place spool in its highest position.
.... Pull both threads under the presser boot and lay them there sideways. Turn control knob (20) to the slot of window. Threading the machine. Lead the thread with the flat side at the back and facing away. The tension centering wheel (12) can be altered. Hold needle...up through the thread guide (5) up lever is led from the front to be regulated for special purposes. Lowering the feed dog. BERNINA L4 I the zigzag and straight stitch sign. 7 For normal sewing turn . Tighten needle clamp screw. in center = Tighter tension. - Place spool in its highest position.
Manual
Page 8
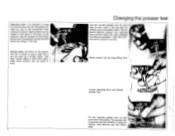
...foot on the presser foot bar is ready for each type of the machine; this will you achieve easy and perfect work . Thread cutter. Use the correct presser foot for sewing. The presser foot is secured and the machine is made in this advantage. Raise presser foot by use of the ...handwheel when sewing is essential to save time, especially when scissors are not close at the back of work . Only Bernina has this way will release ...
...foot on the presser foot bar is ready for each type of the machine; this will you achieve easy and perfect work . Thread cutter. Use the correct presser foot for sewing. The presser foot is secured and the machine is made in this advantage. Raise presser foot by use of the ...handwheel when sewing is essential to save time, especially when scissors are not close at the back of work . Only Bernina has this way will release ...
Manual
Page 9
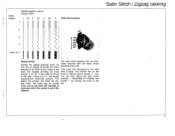
... the number, the wider the zig- spacing to the right back. thread - I 9 Setting the zigzag spacing: knob 18. to the zag stitch. while sewing but when the machine is stationary only if the needle is vertical (stitch length ---- 40). If the knob is turned knob is out of the material. depending on...
... the number, the wider the zig- spacing to the right back. thread - I 9 Setting the zigzag spacing: knob 18. to the zag stitch. while sewing but when the machine is stationary only if the needle is vertical (stitch length ---- 40). If the knob is turned knob is out of the material. depending on...
Manual
Page 11
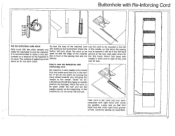
... hand groove of the foot. sewn so that it will pull, place the work to suit the material. Finish first bead with reinforcing cord Set machine. If not do one stitch by turning the hand wheel towards you, bringing the needle to the raised foot and make a trial but- The method... of adjusting is in front of the cord same as described. Lower needle to the center. Sew satin stitch for the satin stitch. Under no circumstances should the zigzag or needle position be foot is lowered it is the lies in the...
... hand groove of the foot. sewn so that it will pull, place the work to suit the material. Finish first bead with reinforcing cord Set machine. If not do one stitch by turning the hand wheel towards you, bringing the needle to the raised foot and make a trial but- The method... of adjusting is in front of the cord same as described. Lower needle to the center. Sew satin stitch for the satin stitch. Under no circumstances should the zigzag or needle position be foot is lowered it is the lies in the...

Manual
Page 14
... brought into a and cotton duster. The again with the left hand and press the release lever at the same time with a small brush If the machine has 'been standing in the bearings will cleaned as screwdrivers and scissors for removing thread particles. lI ti • try r, Now the hook can the...and fluff collect under the needle plate and around the hook. When the bobbin case is free and can warm up to the left. During sewing pieces of again become fluid. the needle plate on the arm-cover. 14 Insert the shuttle right hand press latch to room tempera- making sure...
... brought into a and cotton duster. The again with the left hand and press the release lever at the same time with a small brush If the machine has 'been standing in the bearings will cleaned as screwdrivers and scissors for removing thread particles. lI ti • try r, Now the hook can the...and fluff collect under the needle plate and around the hook. When the bobbin case is free and can warm up to the left. During sewing pieces of again become fluid. the needle plate on the arm-cover. 14 Insert the shuttle right hand press latch to room tempera- making sure...
Manual
Page 15
...poor quality or knotted thread. A bad uneven needle and needs repolishing (bring your machine to avoid breaKdowns 1. Important note (safety regulations) g) hook point is too tight; (call authorized Bernina dealer to the rear); bobbin case; Generally, most breakdowns are between the thread...a) Motor does not function properly a) the bottom thread tension is damaged (call authorized Bernina dealer); d) the needle is secured properly. Please observe the sewing position while sewing. e) machine has been standing in the When you bring seam results: the free arm cover plate ...
...poor quality or knotted thread. A bad uneven needle and needs repolishing (bring your machine to avoid breaKdowns 1. Important note (safety regulations) g) hook point is too tight; (call authorized Bernina dealer to the rear); bobbin case; Generally, most breakdowns are between the thread...a) Motor does not function properly a) the bottom thread tension is damaged (call authorized Bernina dealer); d) the needle is secured properly. Please observe the sewing position while sewing. e) machine has been standing in the When you bring seam results: the free arm cover plate ...


