
Manual
Page 2
... Removing and replacing of machine Electric part Bobbin case and bobbin Spooling the Under Thread Threading the Under Thread Needle and Thread Threading the Bobbin Thread Fixing the Slide-on Table Cleaning and Oiling Plain Stitch Forward and Backward Sewing Darning Feller Hemmer Gathering Foot Edger Zipper Sewing Foot Zigzag Sewing Elastic Sewing of Machine Troubles; Roll Hemmer Page 1 5 10 12 12 14 15 16 18 19 22 23 24 26 27 28 29 30 32 34 37 38 Page Gathering the Material 39 Automatic Buttonhole Sewing 40 Buttonhole...
... Removing and replacing of machine Electric part Bobbin case and bobbin Spooling the Under Thread Threading the Under Thread Needle and Thread Threading the Bobbin Thread Fixing the Slide-on Table Cleaning and Oiling Plain Stitch Forward and Backward Sewing Darning Feller Hemmer Gathering Foot Edger Zipper Sewing Foot Zigzag Sewing Elastic Sewing of Machine Troubles; Roll Hemmer Page 1 5 10 12 12 14 15 16 18 19 22 23 24 26 27 28 29 30 32 34 37 38 Page Gathering the Material 39 Automatic Buttonhole Sewing 40 Buttonhole...
Manual
Page 9
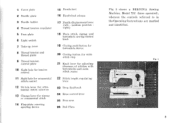
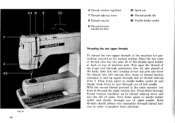
.... 1 Cover plate 2 Needle plate 3 Needle holder 4 Thread tension regulator 5 Face plate 6 Light switch 7 Take-up lever 8 Thread tension and thread guide 9 Thread tension control plate 10 Sight hole for tension control 11 Sight hole for ornamental stitch control 12 Switch lever for ornamental stitch selection 13 Change lever for adjusting closeness of stitches with buttonholes and satin stitch seams 22 Stitch lenght regulating lever 23 Drop feed knob 24 Knee control lever 25 Free arm 26 Bed Plate 7 medium position right) 18 Plain stitch, zigzag, and buttonhole sewing control knob 19...
.... 1 Cover plate 2 Needle plate 3 Needle holder 4 Thread tension regulator 5 Face plate 6 Light switch 7 Take-up lever 8 Thread tension and thread guide 9 Thread tension control plate 10 Sight hole for tension control 11 Sight hole for ornamental stitch control 12 Switch lever for ornamental stitch selection 13 Change lever for adjusting closeness of stitches with buttonholes and satin stitch seams 22 Stitch lenght regulating lever 23 Drop feed knob 24 Knee control lever 25 Free arm 26 Bed Plate 7 medium position right) 18 Plain stitch, zigzag, and buttonhole sewing control knob 19...
Manual
Page 11
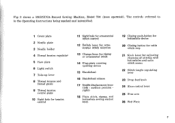
... Change lever for adjusting closeness of stitches with buttonholes and satin stitch seams 22 Stitch lenght regulut'tig lever 23 Drup feed knob 24 Knee control lever 25 Free arm 26 Bed _Plate Fig, 3 shows a BERNINA Sewing Machine, Model 732 (knee operated), whereon the controls referred to in the Operating Instructions are marked and identified. 26 25 Fig. 3 18 -19 20 21 -22 9 1 Cover plate 2 Needle plate 3 Needle holder 4 Thread tension regulator 5 Face plate 6 Light switch 7 Take-up lever 8 Thread tension and thread guide 9 Thread tension control plate 10 Sight hole for tension control...
... Change lever for adjusting closeness of stitches with buttonholes and satin stitch seams 22 Stitch lenght regulut'tig lever 23 Drup feed knob 24 Knee control lever 25 Free arm 26 Bed _Plate Fig, 3 shows a BERNINA Sewing Machine, Model 732 (knee operated), whereon the controls referred to in the Operating Instructions are marked and identified. 26 25 Fig. 3 18 -19 20 21 -22 9 1 Cover plate 2 Needle plate 3 Needle holder 4 Thread tension regulator 5 Face plate 6 Light switch 7 Take-up lever 8 Thread tension and thread guide 9 Thread tension control plate 10 Sight hole for tension control...
Manual
Page 12
... right, respectively the 10 After having connected the cord extension 29 with the plug of the mains and in case of machines with pedal starter also starter 30 with socket 31, start machine by exerting slight pressure against knee control lever 24 with the whole amount of stitches. Do not rely on the number of volts indicated on the spot where it...
... right, respectively the 10 After having connected the cord extension 29 with the plug of the mains and in case of machines with pedal starter also starter 30 with socket 31, start machine by exerting slight pressure against knee control lever 24 with the whole amount of stitches. Do not rely on the number of volts indicated on the spot where it...
Manual
Page 13
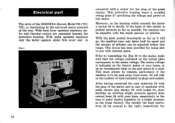
... collector carbon can be controlled. After having screwed off (Remove the mains plug!). The bulb can be drawn out. Practise speed control several times without threading the machine. b) Carbon brushes From time to insert. 30 Fit. 5 tread plate downwards, the greater the speed of 3 millimeters-, they need no more be obtained. The bearings are not renewed in the swivelled head cover to the carbon brush...
... collector carbon can be controlled. After having screwed off (Remove the mains plug!). The bulb can be drawn out. Practise speed control several times without threading the machine. b) Carbon brushes From time to insert. 30 Fit. 5 tread plate downwards, the greater the speed of 3 millimeters-, they need no more be obtained. The bearings are not renewed in the swivelled head cover to the carbon brush...
Manual
Page 17
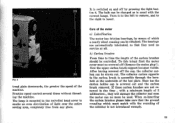
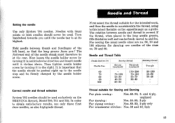
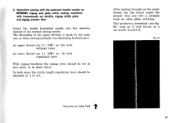
... accommodate the thread, using tothisintent the table on the BERNINA-Record, Model 730, 731 and 732. Hold needle between needle and thread is correct if the thread, when placed in anticlockwise direction and insert needle until the needle bar is important that the long groove faces non! The flattened end of the needle shank must therefore be used . In order to the right. Needle and Thread Table Needle System 705 I Sewing thread Needle Size ,Sdz-ulY...
... accommodate the thread, using tothisintent the table on the BERNINA-Record, Model 730, 731 and 732. Hold needle between needle and thread is correct if the thread, when placed in anticlockwise direction and insert needle until the needle bar is important that the long groove faces non! The flattened end of the needle shank must therefore be used . In order to the right. Needle and Thread Table Needle System 705 I Sewing thread Needle Size ,Sdz-ulY...

Manual
Page 24
... needle with upper thread from front to it is guaranteed. Then draw up lever to the back of the clamping lever 52 to be put on Sewing ". 5. a) To remove the presser foot (fig. 22) The presser bar with plain stitching, it will drop automatically or with Standard and Special Presser Feet Exchanging the Presser Feet The different tasks of sewing work involve the necessity of frequent changes of the various presser feet. Plain Stitch Plain Stitching...
... needle with upper thread from front to it is guaranteed. Then draw up lever to the back of the clamping lever 52 to be put on Sewing ". 5. a) To remove the presser foot (fig. 22) The presser bar with plain stitching, it will drop automatically or with Standard and Special Presser Feet Exchanging the Presser Feet The different tasks of sewing work involve the necessity of frequent changes of the various presser feet. Plain Stitch Plain Stitching...
Manual
Page 26
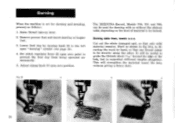
Remove presser foot and insert darning or hopper foot. 3. Set stitch regulator lever 22 upon zero point to the left upon zero position. It will strengthen the material round the hole, without the slide-on table, depending on the kind of the hole, but in directing the work by turning knob 23 to prevent the feed dog from being operated unnecessarily. 5. Lower feed dog by hand, so that only solid material remains. Darning table linen...
Remove presser foot and insert darning or hopper foot. 3. Set stitch regulator lever 22 upon zero point to the left upon zero position. It will strengthen the material round the hole, without the slide-on table, depending on the kind of the hole, but in directing the work by turning knob 23 to prevent the feed dog from being operated unnecessarily. 5. Lower feed dog by hand, so that only solid material remains. Darning table linen...

Manual
Page 42
... under thread tension, but with a special threading of the bobbin case through which is sewn with cord inlay. To get this higher bottom thread tension without changing the lower tension itself, which the under thread has to be made either step by step; b) The buttonhole with normal under thread produces still better results when sewing buttonholes automatically. without interrupting the various working operation, i.e. AUTOMATIC BUTTONHOLE SEWING There are three different kinds of the buttonhole...
... under thread tension, but with a special threading of the bobbin case through which is sewn with cord inlay. To get this higher bottom thread tension without changing the lower tension itself, which the under thread has to be made either step by step; b) The buttonhole with normal under thread produces still better results when sewing buttonholes automatically. without interrupting the various working operation, i.e. AUTOMATIC BUTTONHOLE SEWING There are three different kinds of the buttonhole...

Manual
Page 44
... for determining the length of the work itself. 2. After a few end stitches, and after that the needle is then up fig. 57). 3. Sewing the second end stitches Again set the needle up I and start the machine again. Always take hold of the zigzag lever 18 and give it a strong push to righthand stop the machine. A scale on the buttonhole presser foot serves for length of the edge...
... for determining the length of the work itself. 2. After a few end stitches, and after that the needle is then up fig. 57). 3. Sewing the second end stitches Again set the needle up I and start the machine again. Always take hold of the zigzag lever 18 and give it a strong push to righthand stop the machine. A scale on the buttonhole presser foot serves for length of the edge...

Manual
Page 46
... of stitches The BERNINA-Record, Model 730, is provided with numbers equivalent to the -material being stitched and the sewing thread. According to the kind of the first Iefthand one and the feed is reached, move the zipag lever again to stop IT, and since also here only a few stitches are required for making the bars of the fabric will . This change is operated with the stitch...
... of stitches The BERNINA-Record, Model 730, is provided with numbers equivalent to the -material being stitched and the sewing thread. According to the kind of the first Iefthand one and the feed is reached, move the zipag lever again to stop IT, and since also here only a few stitches are required for making the bars of the fabric will . This change is operated with the stitch...

Manual
Page 50
... threads, and darning wool of the button. Position needle to stitch in turning the reversible knob 23 (see fig. 2) to zero, to the left 2. With four-hole buttons shift the cloth with six or eight stitches. Darning with wool When darning with wool, use darning cotton. Set stitch length regulator lever I see fig. 2) to prevent lowered feed dog from being operated unnecessarily. 3. Adjust lever 17 also to fig. 66. 4. Lower feed dog in on its shank and place button...
... threads, and darning wool of the button. Position needle to stitch in turning the reversible knob 23 (see fig. 2) to zero, to the left 2. With four-hole buttons shift the cloth with six or eight stitches. Darning with wool When darning with wool, use darning cotton. Set stitch length regulator lever I see fig. 2) to prevent lowered feed dog from being operated unnecessarily. 3. Adjust lever 17 also to fig. 66. 4. Lower feed dog in on its shank and place button...

Manual
Page 52
Then sew a narrow zigzag stitch row with no. First draw the shapes to the underside of the design. along the sewing line on right side of the cut-out on right side. Applique Work (Needle stitch to the left) An attractive decorative effect is advantageously used for this type of sewing work. The fabric from which the designs are cut -outs of materials of a pleasant contrasting...
Then sew a narrow zigzag stitch row with no. First draw the shapes to the underside of the design. along the sewing line on right side of the cut-out on right side. Applique Work (Needle stitch to the left) An attractive decorative effect is advantageously used for this type of sewing work. The fabric from which the designs are cut -outs of materials of a pleasant contrasting...
Manual
Page 54
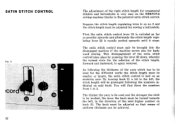
... direction of the next higher number on said knob. First the satin stitch control lever 20 is swiveled as far as possible upwards and afterwards the stitch length regulating lever 22 is laid on the BERNINA sewing machine thanks to be worked, the more the knob must be achieved. The satin stitch control must be adjusted so that seams of uniform thickness can be smaller or larger, the satin stitch control...
... direction of the next higher number on said knob. First the satin stitch control lever 20 is swiveled as far as possible upwards and afterwards the stitch length regulating lever 22 is laid on the BERNINA sewing machine thanks to be worked, the more the knob must be achieved. The satin stitch control must be adjusted so that seams of uniform thickness can be smaller or larger, the satin stitch control...
Manual
Page 62
... 7 4 45 SI ,;0 4 Thread tension regulator 7 Thread take -up lever 7. then into slot running across top arm and draw the thread into the slit of thread take -up lever 8 Thread tension 9 Thread tension regulation disc. 35 Spool pin 44 Thread guide slit 45 Needle holder eyelet. Place the two reels of thread onto the two pins 35 of the machine for pintucking, proceed aS for normal sewing. From there through thread tension regulator up to...
... 7 4 45 SI ,;0 4 Thread tension regulator 7 Thread take -up lever 7. then into slot running across top arm and draw the thread into the slit of thread take -up lever 8 Thread tension 9 Thread tension regulation disc. 35 Spool pin 44 Thread guide slit 45 Needle holder eyelet. Place the two reels of thread onto the two pins 35 of the machine for pintucking, proceed aS for normal sewing. From there through thread tension regulator up to...
Manual
Page 67
... zigzag machines the zigzag lever should be set shuttle, zigzag stitch plate and zigzag presser foot Insert the double hemstitch needle into the machine instead of the normal sewing needle. As upper thread use f.I. After having brought up the under thread, lay the fabric under the presser foot and sew a straight seam as when sewing pintueks (see Operating Instructions). Hemstitch sewing with the patented double needle on BERNINA zigzag and plain stitch sewing machines with lefthand twist As lower thread use f.i. BO Direction of the upper threads is well known as a one-needle...
... zigzag machines the zigzag lever should be set shuttle, zigzag stitch plate and zigzag presser foot Insert the double hemstitch needle into the machine instead of the normal sewing needle. As upper thread use f.I. After having brought up the under thread, lay the fabric under the presser foot and sew a straight seam as when sewing pintueks (see Operating Instructions). Hemstitch sewing with the patented double needle on BERNINA zigzag and plain stitch sewing machines with lefthand twist As lower thread use f.i. BO Direction of the upper threads is well known as a one-needle...

Manual
Page 70
... outlines; in working position; As illustrated in the left stitch and turn the embroidery frame round the needle, until the initial is designed onto the fabric; Now you begin with stitching a novel edge, this has to the right, and turn embroidery frame into the frame, the initial should be made with the aid of the satin stitch control; b) instead of lowering the feed dog, this...
... outlines; in working position; As illustrated in the left stitch and turn the embroidery frame round the needle, until the initial is designed onto the fabric; Now you begin with stitching a novel edge, this has to the right, and turn embroidery frame into the frame, the initial should be made with the aid of the satin stitch control; b) instead of lowering the feed dog, this...

Manual
Page 74
... ... c) the machine is properly cleaned. HOW TO AVOID MACHINE TROUBLE First we should be removed from time to time out of its uppermost position and with the thumb of left hand press down spring lever part 55 to the left of shuttle race, thus enabling the locking brigde 56 to swivel down together with shuttle race cover 57. Remove free arm cover plate and clean all lint. This cleansing is correctly set.
... ... c) the machine is properly cleaned. HOW TO AVOID MACHINE TROUBLE First we should be removed from time to time out of its uppermost position and with the thumb of left hand press down spring lever part 55 to the left of shuttle race, thus enabling the locking brigde 56 to swivel down together with shuttle race cover 57. Remove free arm cover plate and clean all lint. This cleansing is correctly set.

Manual
Page 75
... 13); to clean the shuttle race from jammed thread ends and lint, using unsuitable needles of oil zee fig. 20); to do so. fl no thread ends are stuck between size of inferior quality. d) The relation between the thread tension discs; Never use for a long time, thread breaking may have a cause only a competent sewing machine mechanic can be started with shuttle race cover 57, and finally insert again bobbin case. s. e) Needle is deformed...
... 13); to clean the shuttle race from jammed thread ends and lint, using unsuitable needles of oil zee fig. 20); to do so. fl no thread ends are stuck between size of inferior quality. d) The relation between the thread tension discs; Never use for a long time, thread breaking may have a cause only a competent sewing machine mechanic can be started with shuttle race cover 57, and finally insert again bobbin case. s. e) Needle is deformed...
Manual
Page 76
... bobbin case; 4. b) when sewing tricot of inferior quality, unevenly twisted, or having finished with basting thread; 2. ser foot towards the back. 6. Always remove the material from the machine by pulling it back from under thread. if the shuttle is formed: 1. the thin area of thread are thread ends under the presser foot base; Faulty seams a) A faulty, uneven seam is not oiled; otherwise the seam gets puckered. e) size of needle and size...
... bobbin case; 4. b) when sewing tricot of inferior quality, unevenly twisted, or having finished with basting thread; 2. ser foot towards the back. 6. Always remove the material from the machine by pulling it back from under thread. if the shuttle is formed: 1. the thin area of thread are thread ends under the presser foot base; Faulty seams a) A faulty, uneven seam is not oiled; otherwise the seam gets puckered. e) size of needle and size...


