
Manual
Page 2
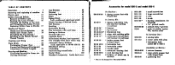
as Matra@ 1 narrow hemmer 1 plain stitch presser foot with plug 1 instruction book model 530-2/ 582-2 58 04 48 01 68 06 44 53 06 46 Available. TABLE OF CONTENTS Guarantee 1 Removing and replacing of machine 6 Electric part 12 Bobbin ...-operated . 74 The straight-sided satin stitch stop 82 Automatic Fancy Stitches (only applicable to Model 630-2) 83 Blindstitch sewing 88 Pintucking 92 Embroidering around holes . 96 Useful Hints 100 Standard Accessories Inside back cover Accessories for model 530-2 and model 532-2 On Machine : 62 06 03 04 1 zigzag presser foot with hinged...
as Matra@ 1 narrow hemmer 1 plain stitch presser foot with plug 1 instruction book model 530-2/ 582-2 58 04 48 01 68 06 44 53 06 46 Available. TABLE OF CONTENTS Guarantee 1 Removing and replacing of machine 6 Electric part 12 Bobbin ...-operated . 74 The straight-sided satin stitch stop 82 Automatic Fancy Stitches (only applicable to Model 630-2) 83 Blindstitch sewing 88 Pintucking 92 Embroidering around holes . 96 Useful Hints 100 Standard Accessories Inside back cover Accessories for model 530-2 and model 532-2 On Machine : 62 06 03 04 1 zigzag presser foot with hinged...
Manual
Page 7
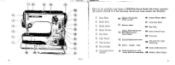
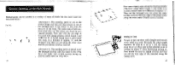
the controls referred to in the Operating Instructions being marked and identified. Length - Stop Set screw for satin stitch atop 59 Satin stitch atop lever 15 Stitch length lever with control knob for buttonhole 60 Balance wheel release 9 e) (26) 8 devo 12 15 59 Fig. 2 1 Cover Plate ...Ornamental Stitch control Balance wheel 16 Bobbin Winder Shaft 17 Drop Feed Knob 10 Bed Plate Zigzag, Plain Stitch and 12 Buttonhole sewing Control knob 19 Knee Control Lever 10 Free Arm 13 Needle Displacement lever 14 Stitch - 9 16 • A.. 1 Fig. 2 on the preceding page shows a BERNINA-...
the controls referred to in the Operating Instructions being marked and identified. Length - Stop Set screw for satin stitch atop 59 Satin stitch atop lever 15 Stitch length lever with control knob for buttonhole 60 Balance wheel release 9 e) (26) 8 devo 12 15 59 Fig. 2 1 Cover Plate ...Ornamental Stitch control Balance wheel 16 Bobbin Winder Shaft 17 Drop Feed Knob 10 Bed Plate Zigzag, Plain Stitch and 12 Buttonhole sewing Control knob 19 Knee Control Lever 10 Free Arm 13 Needle Displacement lever 14 Stitch - 9 16 • A.. 1 Fig. 2 on the preceding page shows a BERNINA-...
Manual
Page 8
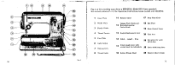
Stop se Set screw for satin stitch stop 15 Stitch length lever with control knob for buttonhole S9 Satin stitch atop lever 16 Bobbin Winder Shaft 60 Balance wheel release Fig. 3 11 Length - cio 10 11 13 BERNINA 12 0 a 3 2 14 15 'a • et) :1•72 7 7. 17 18 20 19 Fig.... 3 on the preceding page shows a BERNINA Mode) 532-2 knee operated; ...
Stop se Set screw for satin stitch stop 15 Stitch length lever with control knob for buttonhole S9 Satin stitch atop lever 16 Bobbin Winder Shaft 60 Balance wheel release Fig. 3 11 Length - cio 10 11 13 BERNINA 12 0 a 3 2 14 15 'a • et) :1•72 7 7. 17 18 20 19 Fig.... 3 on the preceding page shows a BERNINA Mode) 532-2 knee operated; ...

Manual
Page 10
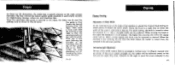
G 15 lig 5 Winding the Bottom Thread A neater stitch is obtained if the bottom thread is placed onto one of the case. In order that the whole machine may not run needlessly when (22: r ...
G 15 lig 5 Winding the Bottom Thread A neater stitch is obtained if the bottom thread is placed onto one of the case. In order that the whole machine may not run needlessly when (22: r ...

Manual
Page 12
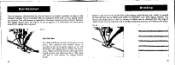
... needle holder screw. Needles with blunted points or bent needles should be freely moved up to accommodate the thread, using the table on the BERNINA-Record Model 530 2 and Model 532-2. Now loosen the needle holder screw by turning it will go. and six-ply, unglazed For darning: Nos. 50-80, two...-ply For zigzag sewing: Nos. 60-90, three-ply only For ornamental stitches: Nos. 30 and 40, two-ply 19 Hold needle between needle and ...
... needle holder screw. Needles with blunted points or bent needles should be freely moved up to accommodate the thread, using the table on the BERNINA-Record Model 530 2 and Model 532-2. Now loosen the needle holder screw by turning it will go. and six-ply, unglazed For darning: Nos. 50-80, two...-ply For zigzag sewing: Nos. 60-90, three-ply only For ornamental stitches: Nos. 30 and 40, two-ply 19 Hold needle between needle and ...

Manual
Page 17
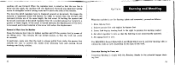
...to secure the pres- 43 ser foot firmly on the rear of the cloth presser bar while the needle is why the BERN1NA Record Model 530-2/532-2 has been equipped with a presser foot holding device which engages below the cone of the head. Now raise clamping lever 41, which... does not. Plain Stitch Plain Stitching with Standard and Special Presser Foot Exchanging Presser Foot Different sewing work requires more or less frequent exchange of the presser foot. This is ...
...to secure the pres- 43 ser foot firmly on the rear of the cloth presser bar while the needle is why the BERN1NA Record Model 530-2/532-2 has been equipped with a presser foot holding device which engages below the cone of the head. Now raise clamping lever 41, which... does not. Plain Stitch Plain Stitching with Standard and Special Presser Foot Exchanging Presser Foot Different sewing work requires more or less frequent exchange of the presser foot. This is ...

Manual
Page 18
... left or the right, the symbol showing that the feed dog is always turned in the window 46. 15 17 Fig. 16 stn Plain Stitch For plain stitching, adjust the machine as follows: 1. Slide on the side, the 31 Lowering the Feed Dog Fig. 16 At the right-hand bottom portion ... is possible only if the screw 14 (Fig. 2) is in . 5. In this position, the machine will sew forward or backward, making long or short stitches. Insert plain stitch presser foot. (for sewing, or the symbol showing that the feed dog is not quite screwed in operative posi- that the machine is ready...
... left or the right, the symbol showing that the feed dog is always turned in the window 46. 15 17 Fig. 16 stn Plain Stitch For plain stitching, adjust the machine as follows: 1. Slide on the side, the 31 Lowering the Feed Dog Fig. 16 At the right-hand bottom portion ... is possible only if the screw 14 (Fig. 2) is in . 5. In this position, the machine will sew forward or backward, making long or short stitches. Insert plain stitch presser foot. (for sewing, or the symbol showing that the feed dog is not quite screwed in operative posi- that the machine is ready...
Manual
Page 19
... the lock screw 14 limiting the upward and downward movement of the stitch regulator lever 15 is below the line mark, the machine will reduce the displacement. In order to a greater or lesser degree. The BERNINA-Record Model 530-2 and Model 532-2 can be removed. Cross-wise darning is not... unnecessarily operated. 5. Remove presser foot and replace by means of the work can easily be used for darning with the Bernina, thanks to secure the ends of the ...
... the lock screw 14 limiting the upward and downward movement of the stitch regulator lever 15 is below the line mark, the machine will reduce the displacement. In order to a greater or lesser degree. The BERNINA-Record Model 530-2 and Model 532-2 can be removed. Cross-wise darning is not... unnecessarily operated. 5. Remove presser foot and replace by means of the work can easily be used for darning with the Bernina, thanks to secure the ends of the ...

Manual
Page 20
a The first covering rows are sewn a little beyond the edge of the damaged area farther than absolutely necessary to secure the stitches. Its operation is advantageous to make rows of different lengths in order to prevent the material from left to one another as possible. These ... rows should be parallel and as close to right and vice-versa (Fig. 17a). 4.• rr Fig. 17 I f: , , .N6_07 • •- Start by sewing stitch rows from tearing at right angles running front to one another as possible. Do not extend the rows beyond the outermost first rows (Fig. 17...
a The first covering rows are sewn a little beyond the edge of the damaged area farther than absolutely necessary to secure the stitches. Its operation is advantageous to make rows of different lengths in order to prevent the material from left to one another as possible. These ... rows should be parallel and as close to right and vice-versa (Fig. 17a). 4.• rr Fig. 17 I f: , , .N6_07 • •- Start by sewing stitch rows from tearing at right angles running front to one another as possible. Do not extend the rows beyond the outermost first rows (Fig. 17...

Manual
Page 21
... tongues 50 together. It. Then clamp the inner ring into the hole in line with the fabric stitches. This is centred in the darning ring. The inner ring may also be disposed side by moving ...ring from left as possible. Now pull the stocking over , cover these covering lines somewhat beyond the outermost stitch lines (cf. The lines should be turned by the stocking (Fig. 19), and make sure that ..., in any direction. The damaged area nuw centered in the ring can easily be of the knit stitches by side in the arm cover 48. the top or heel. until the hole is usual to ...
... tongues 50 together. It. Then clamp the inner ring into the hole in line with the fabric stitches. This is centred in the darning ring. The inner ring may also be disposed side by moving ...ring from left as possible. Now pull the stocking over , cover these covering lines somewhat beyond the outermost stitch lines (cf. The lines should be turned by the stocking (Fig. 19), and make sure that ..., in any direction. The damaged area nuw centered in the ring can easily be of the knit stitches by side in the arm cover 48. the top or heel. until the hole is usual to ...

Manual
Page 22
... fabric sections to be used to make Run and Fell seam; useful for nightwear, underwear and children's garments. Make sure that the same width of stitching on top of each other in the same direction so that the seam formed stands up like a pleat. Lap hems are used to produce very...
... fabric sections to be used to make Run and Fell seam; useful for nightwear, underwear and children's garments. Make sure that the same width of stitching on top of each other in the same direction so that the seam formed stands up like a pleat. Lap hems are used to produce very...

Manual
Page 23
... raised hemmer as far as the length of gathering or gauging on the bottom material hold the top material back - To increase the amount of stitch is made greater or smaller. 41 the more or less as the needle, then lower the hemmer. When sewing, lightly guide the prefolded edge (Fig...
... raised hemmer as far as the length of gathering or gauging on the bottom material hold the top material back - To increase the amount of stitch is made greater or smaller. 41 the more or less as the needle, then lower the hemmer. When sewing, lightly guide the prefolded edge (Fig...
Manual
Page 24
... be used for edgestitching, facings, collars etc. i and so on. verse direction. ..• Fi:. 22 Zigzag Zigzag Sewing Adjustment of Stitch Width At the right-hand top of the body of the' machine is placed the Control Knob 12 (Fig. 2) which the width of the seam ...is indicated in its extreme position. e. The higher the numeral, the wider the zigzag stitch will be operated as shown in the trans- Left-centre-right Adjustment On top of the width control knob is arranged a further lever 13 (Fig...
... be used for edgestitching, facings, collars etc. i and so on. verse direction. ..• Fi:. 22 Zigzag Zigzag Sewing Adjustment of Stitch Width At the right-hand top of the body of the' machine is placed the Control Knob 12 (Fig. 2) which the width of the seam ...is indicated in its extreme position. e. The higher the numeral, the wider the zigzag stitch will be operated as shown in the trans- Left-centre-right Adjustment On top of the width control knob is arranged a further lever 13 (Fig...

Manual
Page 25
...11 The majority of the left (Fig. 23 b). Insert zigzag foot, which should again not be rotated when the machine is not running . 6. Set the stitch length regulator between 0 and 4 on sewing table. 45 Its lower surface is in anti-clockwise direction. 4. This Is possible only if the screw 14 is... is not turned in the material while the machine is turned to the right, the wider will cause the needle to be confused with centre stitch, while left or right during operation, but it is idle. Adjust drop feed knob 17 to the desired width (0-4). Fig. 23 a) Needle deflection evenly...
...11 The majority of the left (Fig. 23 b). Insert zigzag foot, which should again not be rotated when the machine is not running . 6. Set the stitch length regulator between 0 and 4 on sewing table. 45 Its lower surface is in anti-clockwise direction. 4. This Is possible only if the screw 14 is... is not turned in the material while the machine is turned to the right, the wider will cause the needle to be confused with centre stitch, while left or right during operation, but it is idle. Adjust drop feed knob 17 to the desired width (0-4). Fig. 23 a) Needle deflection evenly...
Manual
Page 26
... under side of both sec- The under side of both sections facing up . The pieces are described below along the inner seam and the provisional stitches removed, Alternative 2: The mending patch is set at 1 and the zigzag knob 12 at a distance of approx. 'W'. A second zigzag seam is cut edge... of the patch with the loops in line (Fig. 24a), the under the damaged portion with zigzag stitches (stitch length 1 and width 3 or 4). Place lace on (Fig. 24 bl, ill -4 41k b Now sew a zigzag seam along the zigzag seam. 47 Sowing on ...
... under side of both sec- The under side of both sections facing up . The pieces are described below along the inner seam and the provisional stitches removed, Alternative 2: The mending patch is set at 1 and the zigzag knob 12 at a distance of approx. 'W'. A second zigzag seam is cut edge... of the patch with the loops in line (Fig. 24a), the under the damaged portion with zigzag stitches (stitch length 1 and width 3 or 4). Place lace on (Fig. 24 bl, ill -4 41k b Now sew a zigzag seam along the zigzag seam. 47 Sowing on ...
Manual
Page 27
...particularly for edging knitted goods. 43 Braiding Insert a soft cord in shape to the ordinary hemmer but is provided with an elongated stitch hole so that zigzag seams can be sewn. A variety of effects can be obtained with this type of adjacent seams etc.... Fig. 26 a b hichirdoilohodOokiudtamekletololaiiraole LiheLMAtiolditikdokiliofiohkeimioftilidiaftiesi, 49 The zigzag stitch bridges the entire seem. Roll Hemmer The roll hemmer, characterized by two red lines on its shank, is similar in the guide...
...particularly for edging knitted goods. 43 Braiding Insert a soft cord in shape to the ordinary hemmer but is provided with an elongated stitch hole so that zigzag seams can be sewn. A variety of effects can be obtained with this type of adjacent seams etc.... Fig. 26 a b hichirdoilohodOokiudtamekletololaiiraole LiheLMAtiolditikdokiliofiohkeimioftilidiaftiesi, 49 The zigzag stitch bridges the entire seem. Roll Hemmer The roll hemmer, characterized by two red lines on its shank, is similar in the guide...

Manual
Page 29
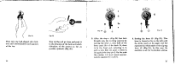
... normal sewing, a hole was drilled through the finger of the bobbin case through which the bottom thread has to be threaded (see adjoining illustration). 0 Stitch-length lever 530-2 Fig.27 a Through this measure the bottom thread tension is slightly increased and the hook a will take leas thread from the bobbin which is...
... normal sewing, a hole was drilled through the finger of the bobbin case through which the bottom thread has to be threaded (see adjoining illustration). 0 Stitch-length lever 530-2 Fig.27 a Through this measure the bottom thread tension is slightly increased and the hook a will take leas thread from the bobbin which is...
Manual
Page 30
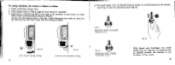
... mark) aft Fig. 32 Mier Buttonhole device engaged (buttonhole mark) Fig. 33 With thumb and forefinger, the stitch length lever 16 (Fig. 33) is adjusted as possible towards the machine in the direction of stitch for the bead and for buttonhole sewing 4. Insert buttonhole presser foot. 2. Fig. 29 Lever set for zig... in Fig. 30. Feed-change knob 17 (Fig.2, page 6) must stand at "sewing". 3. For sewing buttonholes, the machine is pressed as far as follows: 1. The stitch length lever 15 (Fig.28) has two marks on its working position. = 7.
... mark) aft Fig. 32 Mier Buttonhole device engaged (buttonhole mark) Fig. 33 With thumb and forefinger, the stitch length lever 16 (Fig. 33) is adjusted as possible towards the machine in the direction of stitch for the bead and for buttonhole sewing 4. Insert buttonhole presser foot. 2. Fig. 29 Lever set for zig... in Fig. 30. Feed-change knob 17 (Fig.2, page 6) must stand at "sewing". 3. For sewing buttonholes, the machine is pressed as far as follows: 1. The stitch length lever 15 (Fig.28) has two marks on its working position. = 7.
Manual
Page 31
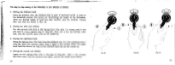
... upper end lies opposite the white mark of the zig-zag lever 12 (Fig. 37). After the stop pin I. in the direction of the backward stitch (direction of the arrow) as far as possible upwards (Fig. 35). 13 12 • 12.3 r a • Fig- 36 L ...1 Fig. 37 5. This lever is set for...
... upper end lies opposite the white mark of the zig-zag lever 12 (Fig. 37). After the stop pin I. in the direction of the backward stitch (direction of the arrow) as far as possible upwards (Fig. 35). 13 12 • 12.3 r a • Fig- 36 L ...1 Fig. 37 5. This lever is set for...
Manual
Page 32
... the zig-zag lever 12a to the stop II (Fig. 40), After a few stitches have been sewn, stop I F04. 10 59 Sewing the second end stitches. The step by step sawing of the buttonhole is sewn in backward stitch. Sewing the lefthand bead. Always take hold of the zig-zag lever 12a, give... it a strong push to the righthand stop the machine once again, and set the needle up , 4. I Fig. 39 3 0)" I (Fig.39). Then sew a few stitches before the righthand bead has become as long as the lefthand bead and set the needle up . 2. Start the machine, then the lefthand bead is...
... the zig-zag lever 12a to the stop II (Fig. 40), After a few stitches have been sewn, stop I F04. 10 59 Sewing the second end stitches. The step by step sawing of the buttonhole is sewn in backward stitch. Sewing the lefthand bead. Always take hold of the zig-zag lever 12a, give... it a strong push to the righthand stop the machine once again, and set the needle up , 4. I Fig. 39 3 0)" I (Fig.39). Then sew a few stitches before the righthand bead has become as long as the lefthand bead and set the needle up . 2. Start the machine, then the lefthand bead is...


