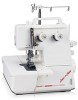
Owners Manual
Page 1
MASTERING YOUR BERNINA® BERNINA® 009DCC MASTERING YOUR BERNINA® 009DCC OWNER'S WORKBOOK Cover & Chain Stitch MASTERING YOUR BERNINA® 1/04/02 009DCC/1
MASTERING YOUR BERNINA® BERNINA® 009DCC MASTERING YOUR BERNINA® 009DCC OWNER'S WORKBOOK Cover & Chain Stitch MASTERING YOUR BERNINA® 1/04/02 009DCC/1
Owners Manual
Page 2
... - using the needle inserter • Loosening/re-tightening needle screws Threading Owner's manual pg.___ • Cone Holders and Spool Caps - Cover Stitch Looper (Purple) - MASTERING YOUR BERNINA® BERNINA® 009DCC SECTION A Cover & Chain Stitch Machine Set-Up • Identifying the serger parts - Owner's manual pg.___ • Power Switch - Owner's manual pg__ • Attaching the Foot...
... - using the needle inserter • Loosening/re-tightening needle screws Threading Owner's manual pg.___ • Cone Holders and Spool Caps - Cover Stitch Looper (Purple) - MASTERING YOUR BERNINA® BERNINA® 009DCC SECTION A Cover & Chain Stitch Machine Set-Up • Identifying the serger parts - Owner's manual pg.___ • Power Switch - Owner's manual pg__ • Attaching the Foot...
Owners Manual
Page 3
... remove all lint and fluff from the loopers and feed dog areas of the machine. • Following the oiling guide inside the looper cover, place a drop of oil on fabric. • Lift the entire presser foot by the handle at the thread guide support. •...Always start and end stitching on each of sewing. remove work. • Use the thread cutter to 1. • Gently pull threads from the looper. • Raise the presser foot; First - Continue sewing; MASTERING YOUR BERNINA® BERNINA® 009DCC • Chain Stitch Threading Order - - MASTERING YOUR BERNINA® 1/04/...
... remove all lint and fluff from the loopers and feed dog areas of the machine. • Following the oiling guide inside the looper cover, place a drop of oil on fabric. • Lift the entire presser foot by the handle at the thread guide support. •...Always start and end stitching on each of sewing. remove work. • Use the thread cutter to 1. • Gently pull threads from the looper. • Raise the presser foot; First - Continue sewing; MASTERING YOUR BERNINA® BERNINA® 009DCC • Chain Stitch Threading Order - - MASTERING YOUR BERNINA® 1/04/...
Owners Manual
Page 10
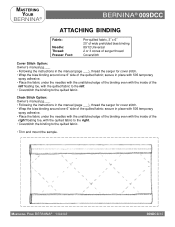
.... • Coverstitch the binding to the quilted fabric. Chain Stitch Option: Owner's manual pg.___ • Following the instructions in the manual (page ___), thread the serger for cover stitch. • Wrap the bias binding around one 6" side of the quilted fabric; MASTERING YOUR BERNINA® BERNINA® 009DCC ATTACHING BINDING Fabric: Needle: Thread: Presser Foot: Pre...
.... • Coverstitch the binding to the quilted fabric. Chain Stitch Option: Owner's manual pg.___ • Following the instructions in the manual (page ___), thread the serger for cover stitch. • Wrap the bias binding around one 6" side of the quilted fabric; MASTERING YOUR BERNINA® BERNINA® 009DCC ATTACHING BINDING Fabric: Needle: Thread: Presser Foot: Pre...
Owners Manual
Page 11
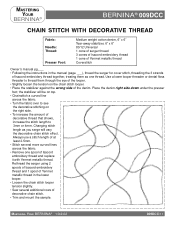
... ___), thread the serger for cover stitch, threading the 3 strands of the denim. the stabilizer will vary the decorative chain stitch effect. Always use a stitch length of at least 2.5mm. • Stitch several additional rows of decorative thread that shows, increase the stitch length to 3mm or 4mm. MASTERING YOUR BERNINA® BERNINA® 009DCC CHAIN STITCH WITH DECORATIVE THREAD Fabric: Needle...
... ___), thread the serger for cover stitch, threading the 3 strands of the denim. the stabilizer will vary the decorative chain stitch effect. Always use a stitch length of at least 2.5mm. • Stitch several additional rows of decorative thread that shows, increase the stitch length to 3mm or 4mm. MASTERING YOUR BERNINA® BERNINA® 009DCC CHAIN STITCH WITH DECORATIVE THREAD Fabric: Needle...


