Beretta Stampede User Manual
Page 3
WARNING: Before loading or shooting your Beretta Stampede is absolutely necessary that must be carefully followed. ! Please retain this manual. A thorough understanding of the firearm's operation, care and maintenance will enhance its original design, certain safety procedures must be sure the Owner's Manual accompanies it is manufactured with single-action revolvers before using this manual. ! Any transfer of this...
WARNING: Before loading or shooting your Beretta Stampede is absolutely necessary that must be carefully followed. ! Please retain this manual. A thorough understanding of the firearm's operation, care and maintenance will enhance its original design, certain safety procedures must be sure the Owner's Manual accompanies it is manufactured with single-action revolvers before using this manual. ! Any transfer of this...
Beretta Stampede User Manual
Page 7
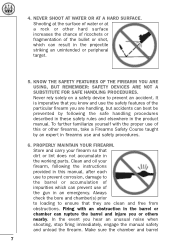
... carry your firearm, following the instructions provided in this manual, after each use of this or other hard surface increases the chance of ricochets or fragmentation of impurities which can rupture the barrel and injure you know and use of the gun in firearms use and safety procedures. 6. Firing with the proper use the safety features of the particular firearm...
... carry your firearm, following the instructions provided in this manual, after each use of this or other hard surface increases the chance of ricochets or fragmentation of impurities which can rupture the barrel and injure you know and use of the gun in firearms use and safety procedures. 6. Firing with the proper use the safety features of the particular firearm...
Beretta Stampede User Manual
Page 8
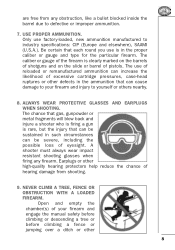
...engage the manual safety before climbing or descending a tree or before climbing a fence or jumping over a ditch or other high-quality hearing protectors help reduce the chance of pistols. Open and empty the chamber(s) of your firearm and injury to industry specifications: CIP...gun is rare, but the injury that can be severe, including the possible loss of excessive cartridge pressures, case-head ruptures or other defects in the ammunition that can be sustained in the proper caliber or gauge and type for the particular firearm. The use is clearly marked on the barrels of shotguns...
...engage the manual safety before climbing or descending a tree or before climbing a fence or jumping over a ditch or other high-quality hearing protectors help reduce the chance of pistols. Open and empty the chamber(s) of your firearm and injury to industry specifications: CIP...gun is rare, but the injury that can be severe, including the possible loss of excessive cartridge pressures, case-head ruptures or other defects in the ammunition that can be sustained in the proper caliber or gauge and type for the particular firearm. The use is clearly marked on the barrels of shotguns...
Beretta Stampede User Manual
Page 13
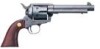
.... Beretta has updated the original firing system by keeping the hammer on a steel "bar" to "transfer" the momentum of the hammer. This mechanism features a transfer-bar that allows you for safe firearm handling. The Stampede relies on an empty chamber. DESCRIPTION Thank you to load all safety mechanisms, though, a transfer-bar does not replace the rules for purchasing a Beretta Stampede...
.... Beretta has updated the original firing system by keeping the hammer on a steel "bar" to "transfer" the momentum of the hammer. This mechanism features a transfer-bar that allows you for safe firearm handling. The Stampede relies on an empty chamber. DESCRIPTION Thank you to load all safety mechanisms, though, a transfer-bar does not replace the rules for purchasing a Beretta Stampede...
Beretta Stampede User Manual
Page 15
... INDICATOR RING SHOULD NOT REPLACE THE RULES FOR SAFE FIREARM HANDLING. Prior to operating the revolver, you from inadvertently loading the revolver without causing undue stress or wear on pages 2, 11, 12 and 41. ! Simply remove the anti-corrosion packaging ...disassembly and the assembly operations over a table to catch components should they drop. 15 In order to do this manual. Keep your revolver. (Fig. 4-O) It serves the purpose of this , please refer to dry-fire the revolver without removing it. Your Beretta Stampede single-action revolver comes fully assembled from the trigger...
... INDICATOR RING SHOULD NOT REPLACE THE RULES FOR SAFE FIREARM HANDLING. Prior to operating the revolver, you from inadvertently loading the revolver without causing undue stress or wear on pages 2, 11, 12 and 41. ! Simply remove the anti-corrosion packaging ...disassembly and the assembly operations over a table to catch components should they drop. 15 In order to do this manual. Keep your revolver. (Fig. 4-O) It serves the purpose of this , please refer to dry-fire the revolver without removing it. Your Beretta Stampede single-action revolver comes fully assembled from the trigger...
Beretta Stampede User Manual
Page 16
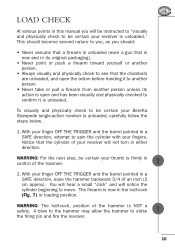
... TRIGGER and the barrel pointed in a SAFE direction, ease the hammer backward 3/4 of your Beretta Stampede single-action revolver is unloaded, carefully follow the steps below. 1. With your finger OFF THE TRIGGER and the barrel pointed in a SAFE direction, attempt to see that the cylinder of an inch (2 cm approx). You will hear a small "click" and will be instructed...
... TRIGGER and the barrel pointed in a SAFE direction, ease the hammer backward 3/4 of your Beretta Stampede single-action revolver is unloaded, carefully follow the steps below. 1. With your finger OFF THE TRIGGER and the barrel pointed in a SAFE direction, attempt to see that the cylinder of an inch (2 cm approx). You will hear a small "click" and will be instructed...

Beretta Stampede User Manual
Page 19
...thumb, pull the hammer rearward to the half-cock position. (Fig. 7) 4. This is the shaft around which the cylinder rotates. OBSTRUCTION CHECK At various points in this manual, you will be required to "visually and manually check to be sure the firearm is unloaded using your finger OFF the trigger, using the procedure... is a spring-loaded plunger located on the right side of the frame, rear of the hammer when cocked. It protrudes from the loading gate side. (Fig. 14) 19 Locate the base pin catch. WARNING: Keep the firearm pointed in the chambers and bore." Remove the cylinder from...
...thumb, pull the hammer rearward to the half-cock position. (Fig. 7) 4. This is the shaft around which the cylinder rotates. OBSTRUCTION CHECK At various points in this manual, you will be required to "visually and manually check to be sure the firearm is unloaded using your finger OFF the trigger, using the procedure... is a spring-loaded plunger located on the right side of the frame, rear of the hammer when cocked. It protrudes from the loading gate side. (Fig. 14) 19 Locate the base pin catch. WARNING: Keep the firearm pointed in the chambers and bore." Remove the cylinder from...
Beretta Stampede User Manual
Page 21
...separate hammer positions, each shot. (Fig. 8) The action of your Beretta Stampede single-action revolver may result in damage to the action. In the process of the hammer, for those who wish to practice firing without using ...hammer must be certain it is defined as the trigger is included with no ammunition in the chamber. After a shot is pulled. (Fig. 9) When you release the trigger, the transfer-bar lowers and disengages. However, the modern transfer-bar mechanism ensures that there are available at most gun stores for as long as firing a firearm with your Beretta Stampede...
...separate hammer positions, each shot. (Fig. 8) The action of your Beretta Stampede single-action revolver may result in damage to the action. In the process of the hammer, for those who wish to practice firing without using ...hammer must be certain it is defined as the trigger is included with no ammunition in the chamber. After a shot is pulled. (Fig. 9) When you release the trigger, the transfer-bar lowers and disengages. However, the modern transfer-bar mechanism ensures that there are available at most gun stores for as long as firing a firearm with your Beretta Stampede...
Beretta Stampede User Manual
Page 22
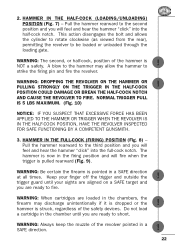
... keep the muzzle of the safety devices. This action disengages the bolt and allows the cylinder to rotate clockwise (as viewed from the rear), permitting the revolver to strike the firing pin and fire the revolver. WARNING: DROPPING THE REVOLVER ON THE HAMMER OR PULLING STRONGLY ON THE TRIGGER IN THE HALF-COCK POSITION COULD...
... keep the muzzle of the safety devices. This action disengages the bolt and allows the cylinder to rotate clockwise (as viewed from the rear), permitting the revolver to strike the firing pin and fire the revolver. WARNING: DROPPING THE REVOLVER ON THE HAMMER OR PULLING STRONGLY ON THE TRIGGER IN THE HALF-COCK POSITION COULD...
Beretta Stampede User Manual
Page 25
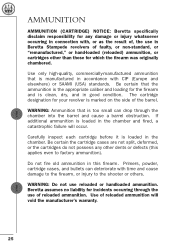
... with, or as the result of, the use reloaded or handloaded ammunition. Beretta assumes no liability for incidents occurring through the chamber into the barrel and cause a barrel obstruction. AMMUNITION AMMUNITION (CARTRIDGE) NOTICE: Beretta specifically disclaim responsibility for any other than those for ...the firearm and is manufactured in the chamber. Do not fire old ammunition in Beretta Stampede revolvers of reloaded ammunition will occur. WARNING: Do not use in this applies even to the shooter or others. ! Use of faulty, or non-standard, or "remanufactured," or hand-...
... with, or as the result of, the use reloaded or handloaded ammunition. Beretta assumes no liability for incidents occurring through the chamber into the barrel and cause a barrel obstruction. AMMUNITION AMMUNITION (CARTRIDGE) NOTICE: Beretta specifically disclaim responsibility for any other than those for ...the firearm and is manufactured in the chamber. Do not fire old ammunition in Beretta Stampede revolvers of reloaded ammunition will occur. WARNING: Do not use in this applies even to the shooter or others. ! Use of faulty, or non-standard, or "remanufactured," or hand-...
Beretta Stampede User Manual
Page 26
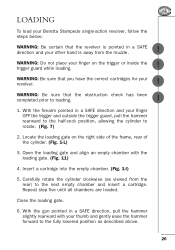
... not place your Beretta Stampede single-action revolver, follow the steps below: ! Locate the loading gate on the trigger or inside the trigger guard while loading. ! Repeat step five until all chambers are loaded. With the gun pointed in a SAFE direction and your finger OFF the trigger and outside the trigger guard, pull the hammer rearward to the half...
... not place your Beretta Stampede single-action revolver, follow the steps below: ! Locate the loading gate on the trigger or inside the trigger guard while loading. ! Repeat step five until all chambers are loaded. With the gun pointed in a SAFE direction and your finger OFF the trigger and outside the trigger guard, pull the hammer rearward to the half...

Beretta Stampede User Manual
Page 28
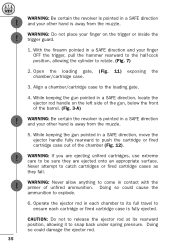
...While keeping the gun pointed in a SAFE direction, locate the ejector rod handle on the trigger or inside the trigger guard. 1. Never attempt to be sure they fall. 28 WARNING: Do not place your finger on the left side of the gun, below : !...trigger, pull the hammer rearward to the half-cock position, allowing the cylinder to push the cartridge or fired cartridge case out of the chamber. (Fig. 12) ! Align a chamber/cartridge case to snap back under spring pressure. UNLOADING To unload your Beretta Stampede single-action revolver, follow the steps below the front of the barrel...
...While keeping the gun pointed in a SAFE direction, locate the ejector rod handle on the trigger or inside the trigger guard. 1. Never attempt to be sure they fall. 28 WARNING: Do not place your finger on the left side of the gun, below : !...trigger, pull the hammer rearward to the half-cock position, allowing the cylinder to push the cartridge or fired cartridge case out of the chamber. (Fig. 12) ! Align a chamber/cartridge case to snap back under spring pressure. UNLOADING To unload your Beretta Stampede single-action revolver, follow the steps below the front of the barrel...
Beretta Stampede User Manual
Page 29
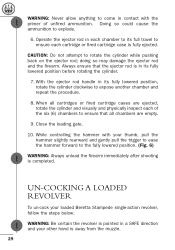
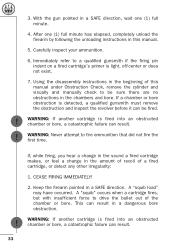
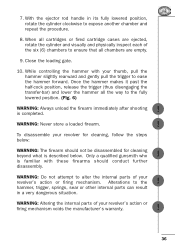
... after shooting is in its fully lowered position before rotating the cylinder. 7. With the ejector rod handle in contact with your loaded Beretta Stampede single-action revolver, follow the steps below: ! Close the loading gate. 10. WARNING: Never allow anything to come in its fully...cartridges or fired cartridge cases are empty. 9. UN-COCKING A LOADED REVOLVER To un-cock your thumb, pull the hammer slightly rearward and gently pull the trigger to ease the hammer forward to ensure each of unfired ammunition. Doing so could cause the ammunition to rotate the cylinder while ...
... after shooting is in its fully lowered position before rotating the cylinder. 7. With the ejector rod handle in contact with your loaded Beretta Stampede single-action revolver, follow the steps below: ! Close the loading gate. 10. WARNING: Never allow anything to come in its fully...cartridges or fired cartridge cases are empty. 9. UN-COCKING A LOADED REVOLVER To un-cock your thumb, pull the hammer slightly rearward and gently pull the trigger to ease the hammer forward to ensure each of unfired ammunition. Doing so could cause the ammunition to rotate the cylinder while ...
Beretta Stampede User Manual
Page 31
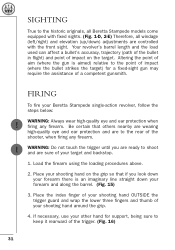
... the barrel. (Fig. 15) 3. Altering the point of aim (where the gun is an imaginary line straight down ) adjustments are controlled with fixed sights. (Fig. 1-D, 2-E) Therefore, all Beretta Stampede models come equipped with the front sight. Be certain that if you are ready to shoot and are to the rear of a competent gunsmith. Load the firearm using...
... the barrel. (Fig. 15) 3. Altering the point of aim (where the gun is an imaginary line straight down ) adjustments are controlled with fixed sights. (Fig. 1-D, 2-E) Therefore, all Beretta Stampede models come equipped with the front sight. Be certain that if you are ready to shoot and are to the rear of a competent gunsmith. Load the firearm using...
Beretta Stampede User Manual
Page 32
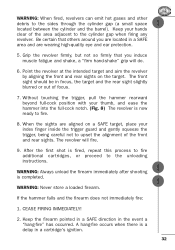
... or out of the area adjacent to fire. 8. Without touching the trigger, pull the hammer rearward beyond full-cock position with your index finger inside the trigger guard and gently squeeze the trigger, being careful not to upset the alignment of the front and rear sights...hammer into the full-cock notch. (Fig. 8) The revolver is fired, repeat this process to fire additional cartridges, or proceed to the sides through the cylinder gap (a small space located between the cylinder and the barrel). After the first shot is now ready to the cylinder gap when firing any revolver. Grip...
... or out of the area adjacent to fire. 8. Without touching the trigger, pull the hammer rearward beyond full-cock position with your index finger inside the trigger guard and gently squeeze the trigger, being careful not to upset the alignment of the front and rear sights...hammer into the full-cock notch. (Fig. 8) The revolver is fired, repeat this process to fire additional cartridges, or proceed to the sides through the cylinder gap (a small space located between the cylinder and the barrel). After the first shot is now ready to the cylinder gap when firing any revolver. Grip...
Beretta Stampede User Manual
Page 33
...Using the disassembly instructions in the beginning of a fired cartridge, or detect any other irregularity: 1. WARNING: If another cartridge is detected, a qualified gunsmith must remove... fired cartridge makes, or feel a change in the amount of recoil of this manual. 5. A "squib load" may have occurred. 3. WARNING:...gun pointed in a SAFE direction, wait one (1) full minute has elapsed, completely unload the firearm by following the unloading instructions in a SAFE direction. Keep the firearm pointed in this manual under Obstruction Check, remove the cylinder and visually and manually...
...Using the disassembly instructions in the beginning of a fired cartridge, or detect any other irregularity: 1. WARNING: If another cartridge is detected, a qualified gunsmith must remove... fired cartridge makes, or feel a change in the amount of recoil of this manual. 5. A "squib load" may have occurred. 3. WARNING:...gun pointed in a SAFE direction, wait one (1) full minute has elapsed, completely unload the firearm by following the unloading instructions in a SAFE direction. Keep the firearm pointed in this manual under Obstruction Check, remove the cylinder and visually and manually...
Beretta Stampede User Manual
Page 34
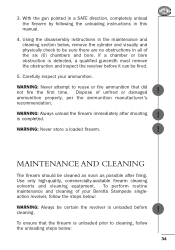
... firearm immediately after firing. WARNING: Never store a loaded firearm. ! With the gun pointed in a SAFE direction, completely unload the firearm by following the unloading instructions in the maintenance and cleaning section below : WARNING: Always be certain the revolver is detected, a qualified gunsmith must remove the obstruction and inspect the revolver before cleaning. Using the disassembly instructions in this manual. 4.
... firearm immediately after firing. WARNING: Never store a loaded firearm. ! With the gun pointed in a SAFE direction, completely unload the firearm by following the unloading instructions in the maintenance and cleaning section below : WARNING: Always be certain the revolver is detected, a qualified gunsmith must remove the obstruction and inspect the revolver before cleaning. Using the disassembly instructions in this manual. 4.
Beretta Stampede User Manual
Page 35
... unfired cartridges, use extreme care to snap back under spring pressure. ! ! ! ! ! 35 WARNING: Be certain the revolver is pointed in a SAFE direction and your other hand is away from the muzzle. WARNING: Do not place your finger OFF the trigger, pull the hammer rearward to the... half-cock position, allowing the cylinder to the loading gate. 4. While keeping the gun pointed in a SAFE direction, locate the ejector rod handle on the trigger or inside the trigger guard. 1. Never attempt to come in a SAFE direction and your finger on the left...
... unfired cartridges, use extreme care to snap back under spring pressure. ! ! ! ! ! 35 WARNING: Be certain the revolver is pointed in a SAFE direction and your other hand is away from the muzzle. WARNING: Do not place your finger OFF the trigger, pull the hammer rearward to the... half-cock position, allowing the cylinder to the loading gate. 4. While keeping the gun pointed in a SAFE direction, locate the ejector rod handle on the trigger or inside the trigger guard. 1. Never attempt to come in a SAFE direction and your finger on the left...
Beretta Stampede User Manual
Page 36
... described below : ! To disassemble your revolver's action or firing mechanism voids the manufacturer's warranty. 36 7. With the ejector rod handle in its fully lowered position, rotate the cylinder clockwise to alter the internal parts of your thumb, pull the hammer slightly rearward and gently pull the trigger to the hammer, trigger, springs, sear or other internal parts can result in a very...
... described below : ! To disassemble your revolver's action or firing mechanism voids the manufacturer's warranty. 36 7. With the ejector rod handle in its fully lowered position, rotate the cylinder clockwise to alter the internal parts of your thumb, pull the hammer slightly rearward and gently pull the trigger to the hammer, trigger, springs, sear or other internal parts can result in a very...
Beretta Stampede User Manual
Page 37
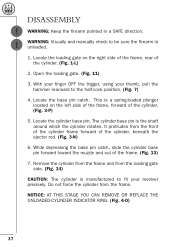
... 3-N) 6. NOTICE: AT THIS STAGE YOU CAN REMOVE OR REPLACE THE UNLOADED-CYLINDER INDICATOR RING. (Fig. 4-O) 37 This is manufactured to fit your thumb, pull the hammer rearward to be sure the firearm is the shaft around which the cylinder rotates. With your finger OFF the trigger, using your revolver precisely. Locate the cylinder base pin... catch. While depressing the base pin catch, slide the cylinder base pin forward toward the muzzle and out of the cylinder. (Fig. 3-P) 5. DISASSEMBLY ! Locate the loading gate on the left side of the frame, forward of the frame. (Fig. 13) 7.
... 3-N) 6. NOTICE: AT THIS STAGE YOU CAN REMOVE OR REPLACE THE UNLOADED-CYLINDER INDICATOR RING. (Fig. 4-O) 37 This is manufactured to fit your thumb, pull the hammer rearward to be sure the firearm is the shaft around which the cylinder rotates. With your finger OFF the trigger, using your revolver precisely. Locate the cylinder base pin... catch. While depressing the base pin catch, slide the cylinder base pin forward toward the muzzle and out of the cylinder. (Fig. 3-P) 5. DISASSEMBLY ! Locate the loading gate on the left side of the frame, forward of the frame. (Fig. 13) 7.


