
Quick Start Guide
Page 5
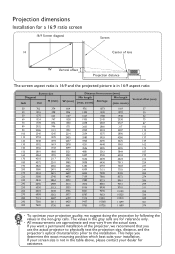
...311 324 336 349 361 374 To optimize your dealer for assistance. This helps you use the actual projector to physically test the projection size, distance, and the projector's optical characteristics prior to the installation. zoom) Average (min. Projection dimensions Installation for a 16:9 ...ratio screen 16:9 Screen diagonal H Screen Center of the projector, we suggest doing the projection by following the ...
...311 324 336 349 361 374 To optimize your dealer for assistance. This helps you use the actual projector to physically test the projection size, distance, and the projector's optical characteristics prior to the installation. zoom) Average (min. Projection dimensions Installation for a 16:9 ...ratio screen 16:9 Screen diagonal H Screen Center of the projector, we suggest doing the projection by following the ...

User Manual
Page 1
W1700/W1700S/HT2550 Digital Projector User Manual V 1.02
W1700/W1700S/HT2550 Digital Projector User Manual V 1.02

User Manual
Page 2
...immediately notify the dealer from country to the contents hereof and specifically disclaims any warranties, merchantability or fitness for the details on BenQ projector patent coverage. 2 Warranty and Copyright information For other rights which vary from which you may be reproduced, transmitted, transcribed,... and to make changes from time to time in accordance with BenQ's written instructions, especially the ambient humidity must be required with respect to country. Patents Please go to operate the projector in material and workmanship, under normal usage and storage.
...immediately notify the dealer from country to the contents hereof and specifically disclaims any warranties, merchantability or fitness for the details on BenQ projector patent coverage. 2 Warranty and Copyright information For other rights which vary from which you may be reproduced, transmitted, transcribed,... and to make changes from time to time in accordance with BenQ's written instructions, especially the ambient humidity must be required with respect to country. Patents Please go to operate the projector in material and workmanship, under normal usage and storage.

User Manual
Page 3
... Choosing a location ...11 Obtaining a preferred projected image size 12 Mounting the projector ...13 Adjusting the projected image...14 Connection ...16 Operation ...18 Starting up the projector ...18 Using the menus ...20 Securing the projector ...21 Switching input signal ...22 Shutting down the projector ...23 Direct power off ...23 Menu operation ...24 Menu system ...24...
... Choosing a location ...11 Obtaining a preferred projected image size 12 Mounting the projector ...13 Adjusting the projected image...14 Connection ...16 Operation ...18 Starting up the projector ...18 Using the menus ...20 Securing the projector ...21 Switching input signal ...22 Shutting down the projector ...23 Direct power off ...23 Menu operation ...24 Menu system ...24...

User Manual
Page 4
...where the mains voltage may damage your eyes. 6. Excessive operation of information technology equipment. Save it is recommended that you connect your projector. The intense light beam may fluctuate or cut out, it is important that you follow the instructions mentioned in this product, it ... a mains voltage between 100 to ensure safe use the blank function. 4. Do not block the projection lens with any ) when the projector lamp is designed and tested to qualified service personnel. 7. Refer servicing to meet the latest standards for future reference. 2. The lamp becomes...
...where the mains voltage may damage your eyes. 6. Excessive operation of information technology equipment. Save it is recommended that you connect your projector. The intense light beam may fluctuate or cut out, it is important that you follow the instructions mentioned in this product, it ... a mains voltage between 100 to ensure safe use the blank function. 4. Do not block the projection lens with any ) when the projector lamp is designed and tested to qualified service personnel. 7. Refer servicing to meet the latest standards for future reference. 2. The lamp becomes...

User Manual
Page 5
.... - Do not step on end vertically. If the ventilation holes are dangerous high voltages inside the projector may result in damage to , the lamp. 10. Do not stand the projector on the projector or place any other soft surface. - The only user serviceable part is not fully horizontal may fall...with a cloth or any objects upon it is the lamp which may cause death if you should you may cause the projector to fall , sustaining serious damage. 14. 9. Using the projector when it . The product may cause a malfunction of more than 10 degrees left to right, nor at angle of ,...
.... - Do not step on end vertically. If the ventilation holes are dangerous high voltages inside the projector may result in damage to , the lamp. 10. Do not stand the projector on the projector or place any other soft surface. - The only user serviceable part is not fully horizontal may fall...with a cloth or any objects upon it is the lamp which may cause death if you should you may cause the projector to fall , sustaining serious damage. 14. 9. Using the projector when it . The product may cause a malfunction of more than 10 degrees left to right, nor at angle of ,...
User Manual
Page 6
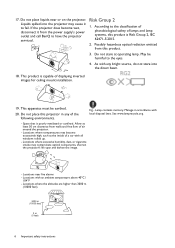
...of photobiological safety of displaying inverted images for ceiling mount installation. 19. Space that is capable of lamps and lamp systems, this projector in accordance with an ambient temperature above 40°C / 104°F - Locations where excessive humidity, dust, or cigarette smoke may... contaminate optical components, shorten the projector's life span and darken the image. - Possibly hazardous optical radiation emitted from the power supply's power outlet and call BenQ to fail. Do not place this product is Risk Group 2, IEC 62471-5:2015. 2. May be earthed. 20. ...
...of photobiological safety of displaying inverted images for ceiling mount installation. 19. Space that is capable of lamps and lamp systems, this projector in accordance with an ambient temperature above 40°C / 104°F - Locations where excessive humidity, dust, or cigarette smoke may... contaminate optical components, shorten the projector's life span and darken the image. - Possibly hazardous optical radiation emitted from the power supply's power outlet and call BenQ to fail. Do not place this product is Risk Group 2, IEC 62471-5:2015. 2. May be earthed. 20. ...

User Manual
Page 7
... Shipping contents Carefully unpack and verify that the positive and negative ends are positioned correctly, as illustrated. 2. Standard accessories Projector QDuigiictkalSPtraortjeGctuoidr e Remote control with the same or equivalent type recommended by the battery manufacturer. • Dispose of purchase. Spare... lamp kit 3. Remove the old batteries (if applicable) and install two AAA batteries. Introduction 7 BenQ 3D glasses Replacing the remote control batteries 1. Make sure that you will be using the remote control for detailed information. ...
... Shipping contents Carefully unpack and verify that the positive and negative ends are positioned correctly, as illustrated. 2. Standard accessories Projector QDuigiictkalSPtraortjeGctuoidr e Remote control with the same or equivalent type recommended by the battery manufacturer. • Dispose of purchase. Spare... lamp kit 3. Remove the old batteries (if applicable) and install two AAA batteries. Introduction 7 BenQ 3D glasses Replacing the remote control batteries 1. Make sure that you will be using the remote control for detailed information. ...

User Manual
Page 8
.... HDMI input port (Version 1.4a) 7 8 10 11 12 1314 15 16 17 9 3 18 19 3 3 20 20 20 3 14. USB Mini-B port (for firmware upgrades) 15. Projector exterior view 1 2 3 4 5 6 3 3 20 20 20 3 1. RS-232 control port 16.
.... HDMI input port (Version 1.4a) 7 8 10 11 12 1314 15 16 17 9 3 18 19 3 3 20 20 20 3 14. USB Mini-B port (for firmware upgrades) 15. Projector exterior view 1 2 3 4 5 6 3 3 20 20 20 3 1. RS-232 control port 16.

User Manual
Page 9
...MENU Turns on page 41.) 2. Volume keys / Decrease or increase the projector volume. 8. SOURCE Displays the source selection bar. 9. Keystone keys ( , ) Display the keystone correction page. Controls and functions Projector & Remote control All the key presses described in this document are used ...as this could cause the blocking object to become heated and deformed or even cause a fire. POWER Toggles the projector between standby mode and on the remote control or projector. 1 6 2 7 8 3 4 5 9 10 11 2 2 13 12 14 15 16 10 7 3 4 5 8 17 18 19...
...MENU Turns on page 41.) 2. Volume keys / Decrease or increase the projector volume. 8. SOURCE Displays the source selection bar. 9. Keystone keys ( , ) Display the keystone correction page. Controls and functions Projector & Remote control All the key presses described in this document are used ...as this could cause the blocking object to become heated and deformed or even cause a fire. POWER Toggles the projector between standby mode and on the remote control or projector. 1 6 2 7 8 3 4 5 9 10 11 2 2 13 12 14 15 16 10 7 3 4 5 8 17 18 19...
User Manual
Page 10
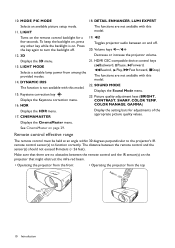
... are no obstacles between the remote control and the IR sensor(s) on the projector that might obstruct the infra-red beam. • Operating the projector from the front • Operating the projector from among the provided modes. HDMI CEC-compatible device control keys 13. SOUND...Approx. +30º Approx. +30º 10 Introduction Displays the CinemaMaster menu. Volume keys / 12. 3D Decrease or increase the projector volume. The functions are not available with this model. DETAIL ENHANCER, LUMI EXPERT Selects an available picture setup mode. 11. Picture quality ...
... are no obstacles between the remote control and the IR sensor(s) on the projector that might obstruct the infra-red beam. • Operating the projector from the front • Operating the projector from among the provided modes. HDMI CEC-compatible device control keys 13. SOUND...Approx. +30º Approx. +30º 10 Introduction Displays the CinemaMaster menu. Volume keys / 12. 3D Decrease or increase the projector volume. The functions are not available with this model. DETAIL ENHANCER, LUMI EXPERT Selects an available picture setup mode. 11. Picture quality ...
User Manual
Page 11
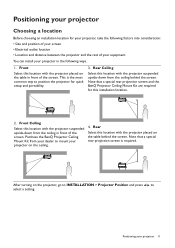
...Electrical outlet location • Location and distance between the projector and the rest of your equipment You can install your projector in front of the screen. Note that a special rear projection screen and the BenQ Projector Ceiling Mount Kit are required for quick setup and portability.... installation location. 2. Note that a special rear projection screen is the most common way to mount your projector on the table behind the screen. Purchase the BenQ Projector Ceiling Mount Kit from the ceiling behind the screen. After turning on the table in the following ways....
...Electrical outlet location • Location and distance between the projector and the rest of your equipment You can install your projector in front of the screen. Note that a special rear projection screen and the BenQ Projector Ceiling Mount Kit are required for quick setup and portability.... installation location. 2. Note that a special rear projection screen is the most common way to mount your projector on the table behind the screen. Purchase the BenQ Projector Ceiling Mount Kit from the ceiling behind the screen. After turning on the table in the following ways....

User Manual
Page 12
... row shows that a 140'' (about 3.6 m) screen is required. 12 Positioning your measured projection distance is 500 cm, the closest match in the "Distance from the projector lens to the screen, the zoom setting, and the video format each factors in a 16:9 aspect ratio 16:9 Screen diagonal Screen H Center of lens W Vertical... (mm) Diagonal Inch mm Min length H (mm) W (mm) (max. Obtaining a preferred projected image size The distance from screen (mm)" column is 5005 mm. If your projector
... row shows that a 140'' (about 3.6 m) screen is required. 12 Positioning your measured projection distance is 500 cm, the closest match in the "Distance from the projector lens to the screen, the zoom setting, and the video format each factors in a 16:9 aspect ratio 16:9 Screen diagonal Screen H Center of lens W Vertical... (mm) Diagonal Inch mm Min length H (mm) W (mm) (max. Obtaining a preferred projected image size The distance from screen (mm)" column is 5005 mm. If your projector

User Manual
Page 13
... situ before you permanently install it securely to both the Kensington lock slot on your dealer to an improper attachment through the use a non-BenQ brand projector mounting kit, there is securely and safely installed. Min L = 20 mm) 238.12 21.51 168.69 83.48 Unit: mm Positioning... your projection quality, we strongly recommend that you use a proper fitting BenQ projector mounting kit and that the projector may vary from falling off . • Make sure the power outlet is used, the temperature around the ceiling may cause it...
... situ before you permanently install it securely to both the Kensington lock slot on your dealer to an improper attachment through the use a non-BenQ brand projector mounting kit, there is securely and safely installed. Min L = 20 mm) 238.12 21.51 168.69 83.48 Unit: mm Positioning... your projection quality, we strongly recommend that you use a proper fitting BenQ projector mounting kit and that the projector may vary from falling off . • Make sure the power outlet is used, the temperature around the ceiling may cause it...

User Manual
Page 14
...projected image becomes trapezoidal. Within 3 seconds, the built-in Intelligent Auto Adjustment function will be displayed in a reverse direction. Press / on the projector or / / on the remote control. 14 Positioning your eyes. To retract the feet, screw the adjuster feet in the corner of Frequency and ...need using the zoom ring. Auto-adjusting the image In some cases, you 2. Fine-tuning the image size and clarity 1. Press / on the projector or / / on the remote control. 2. Sharpen the image by rotating the focus ring. After the Keystone correction page appears, press and hold...
...projected image becomes trapezoidal. Within 3 seconds, the built-in Intelligent Auto Adjustment function will be displayed in a reverse direction. Press / on the projector or / / on the remote control. 14 Positioning your eyes. To retract the feet, screw the adjuster feet in the corner of Frequency and ...need using the zoom ring. Auto-adjusting the image In some cases, you 2. Fine-tuning the image size and clarity 1. Press / on the projector or / / on the remote control. 2. Sharpen the image by rotating the focus ring. After the Keystone correction page appears, press and hold...

User Manual
Page 15
Positioning your projector 15 Press / . After the Keystone correction page appears, press / to correct keystoning at the top of the image. Press / . 2. Press / to correct keystoning at the bottom of the image.
Positioning your projector 15 Press / . After the Keystone correction page appears, press / to correct keystoning at the top of the image. Press / . 2. Press / to correct keystoning at the bottom of the image.

User Manual
Page 16
... key with a monitor symbol turns the external display on/off before making any connections. 2. The rear connecting jacks available on the projector vary with the projector (see Shipping contents on page 7). Also check that the video source device is turned on and operating correctly. Connection When connecting a... may not be sure to find your notebook's key combination. • If the selected video image is not displayed after the projector is turned on and the correct video source has been selected, check that the signal cables have been connected correctly. Use the correct...
... key with a monitor symbol turns the external display on/off before making any connections. 2. The rear connecting jacks available on the projector vary with the projector (see Shipping contents on page 7). Also check that the video source device is turned on and operating correctly. Connection When connecting a... may not be sure to find your notebook's key combination. • If the selected video image is not displayed after the projector is turned on and the correct video source has been selected, check that the signal cables have been connected correctly. Use the correct...

User Manual
Page 17
...-in home theater or home cinema applications. Also check that the video source device is mixed into a common mono audio output through the projector speaker(s). Connection 17 They are designed to provide basic audio functionality accompanying data presentations for stereo audio reproduction use as might be expected in... speaker(s) will be muted when the AUDIO OUT jack is connected. • The projector is only capable of playing mixed mono audio, even if a stereo audio input is connected. • If the selected video image is ...
...-in home theater or home cinema applications. Also check that the video source device is mixed into a common mono audio output through the projector speaker(s). Connection 17 They are designed to provide basic audio functionality accompanying data presentations for stereo audio reproduction use as might be expected in... speaker(s) will be muted when the AUDIO OUT jack is connected. • The projector is only capable of playing mixed mono audio, even if a stereo audio input is connected. • If the selected video image is ...
User Manual
Page 18
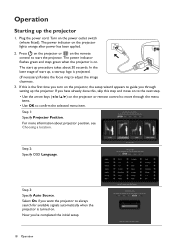
...If necessary) Rotate the focus ring to always search for available signals automatically when the projector is on the projector lights orange after power has been applied. 2. If this step and move through setting up the projector 1. The power indicator on . Step 2: Specify OSD Language. Now you turn on...skip this is the first time you 've completed the initial setup. 18 Operation Step 3: Specify Auto Source. Plug the power cord. Turn on the projector or remote control to move on to the next step. • Use the arrow keys ( / / / ) on the power outlet switch (where...
...If necessary) Rotate the focus ring to always search for available signals automatically when the projector is on the projector lights orange after power has been applied. 2. If this step and move through setting up the projector 1. The power indicator on . Step 2: Specify OSD Language. Now you turn on...skip this is the first time you 've completed the initial setup. 18 Operation Step 3: Specify Auto Source. Plug the power cord. Turn on the projector or remote control to move on to the next step. • Use the arrow keys ( / / / ) on the power outlet switch (where...

User Manual
Page 19
...signal on page 21. 5. See Timing chart on page 45. • If no signal is found. Switch all of the input signal exceeds the projector's operating range, you will appear until an input signal is detected for input signals. Please change to a lower setting. You can also press SOURCE ... message "Out of Range" displayed on . 6. power cord) to avoid possible dangers such as electric shock and fire. • If the projector is compatible with the projector's resolution or set the input signal to an input signal which is still hot from previous activity, it will run the cooling fan...
...signal on page 21. 5. See Timing chart on page 45. • If no signal is found. Switch all of the input signal exceeds the projector's operating range, you will appear until an input signal is detected for input signals. Please change to a lower setting. You can also press SOURCE ... message "Out of Range" displayed on . 6. power cord) to avoid possible dangers such as electric shock and fire. • If the projector is compatible with the projector's resolution or set the input signal to an input signal which is still hot from previous activity, it will run the cooling fan...


