

User Manual
Page 3
... instructions 4 Introduction ...7 Shipping contents ...7 Projector exterior view ...8 Controls and functions...9 Positioning your projector 11 Choosing a location ...11 Obtaining a preferred projected image size 12 Mounting the projector ...13 Adjusting the projected image...14 Connection ...16 Operation ...18 Starting up the projector ...18 Using the menus ...20 Securing the projector ...21 Switching input signal ...22 Shutting down the projector ...23 Direct power off ...23 Menu operation ...24 Menu system ...24 PICTURE menu ...26 DISPLAY menu ...30 INSTALLATION menu ...31 SYSTEM SETUP...
... instructions 4 Introduction ...7 Shipping contents ...7 Projector exterior view ...8 Controls and functions...9 Positioning your projector 11 Choosing a location ...11 Obtaining a preferred projected image size 12 Mounting the projector ...13 Adjusting the projected image...14 Connection ...16 Operation ...18 Starting up the projector ...18 Using the menus ...20 Securing the projector ...21 Switching input signal ...22 Shutting down the projector ...23 Direct power off ...23 Menu operation ...24 Menu system ...24 PICTURE menu ...26 DISPLAY menu ...30 INSTALLATION menu ...31 SYSTEM SETUP...

User Manual
Page 4
... uninterruptible power supply (UPS). 3. Refer servicing to removing the lamp assembly for replacement. 8. To temporarily turn off the lamp, use of ±10 volts occur. Do not operate lamps beyond the rated life could cause them to break on rare occasions. 4 Important safety instructions Excessive operation of information technology equipment. Do not look straight at the projector lens during operation. The lamp becomes extremely hot during operation. Always open the lens...
... uninterruptible power supply (UPS). 3. Refer servicing to removing the lamp assembly for replacement. 8. To temporarily turn off the lamp, use of ±10 volts occur. Do not operate lamps beyond the rated life could cause them to break on rare occasions. 4 Important safety instructions Excessive operation of information technology equipment. Do not look straight at the projector lens during operation. The lamp becomes extremely hot during operation. Always open the lens...

User Manual
Page 8
...lens 5. HDMI input port (Version 2.0) 13. IR remote sensor 6. Vent (air inlet) 10. USB Type-A port (1.5 A power supply) 17. 12V DC output terminal Triggers external devices such as an electric screen or light control, etc. 18. Ceiling mount holes 8 Introduction Audio input jack Audio output jack 11. Lens cover 7. USB Mini-B port (for firmware upgrades) 15. Kensington anti-theft lock slot 20. Adjuster feet 4. Lamp cover 2. External control panel (See Controls and functions on page 9.) 8. Projector exterior view 1 2 3 4 5 6 3 3 20 20 20 3 1. Focus and Zoom...
...lens 5. HDMI input port (Version 2.0) 13. IR remote sensor 6. Vent (air inlet) 10. USB Type-A port (1.5 A power supply) 17. 12V DC output terminal Triggers external devices such as an electric screen or light control, etc. 18. Ceiling mount holes 8 Introduction Audio input jack Audio output jack 11. Lens cover 7. USB Mini-B port (for firmware upgrades) 15. Kensington anti-theft lock slot 20. Adjuster feet 4. Lamp cover 2. External control panel (See Controls and functions on page 9.) 8. Projector exterior view 1 2 3 4 5 6 3 3 20 20 20 3 1. Focus and Zoom...

User Manual
Page 9
... projecting as directional arrows to select the desired menu items and to make adjustments. POWER Toggles the projector between standby mode and on . SOURCE Displays the source selection bar. 9. ECO BLANK Used to previous OSD menu, exits and saves menu settings. 6. Introduction 9 ON/ Off Toggles the projector between standby mode and on . 3. BACK Goes back to hide the screen picture. OK Confirms the selected On-Screen Display (OSD) menu item. 4. Controls and functions Projector & Remote control...
... projecting as directional arrows to select the desired menu items and to make adjustments. POWER Toggles the projector between standby mode and on . SOURCE Displays the source selection bar. 9. ECO BLANK Used to previous OSD menu, exits and saves menu settings. 6. Introduction 9 ON/ Off Toggles the projector between standby mode and on . 3. BACK Goes back to hide the screen picture. OK Confirms the selected On-Screen Display (OSD) menu item. 4. Controls and functions Projector & Remote control...
User Manual
Page 10
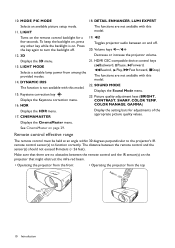
..., Displays the Keystone correction menu. 10. MODE, PIC MODE 18. Toggles projector audio between the remote control and the sensor(s) should not exceed 8 meters (~ 26 feet). Volume keys / 12. 3D Decrease or increase the projector volume. Turns on the remote control backlight for adjustments of the appropriate picture quality values. Displays the 3D menu. 21. HDR COLOR MANAGE, GAMMA) Displays the HDR menu. 17. CINEMAMASTER Display the setting bars for a few seconds. LIGHT MODE...
..., Displays the Keystone correction menu. 10. MODE, PIC MODE 18. Toggles projector audio between the remote control and the sensor(s) should not exceed 8 meters (~ 26 feet). Volume keys / 12. 3D Decrease or increase the projector volume. Turns on the remote control backlight for adjustments of the appropriate picture quality values. Displays the 3D menu. 21. HDR COLOR MANAGE, GAMMA) Displays the HDR menu. 17. CINEMAMASTER Display the setting bars for a few seconds. LIGHT MODE...
User Manual
Page 11
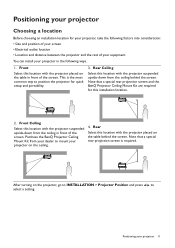
... install your projector in the following factors into consideration: • Size and position of your screen • Electrical outlet location • Location and distance between the projector and the rest of the screen. Positioning your projector on the table in front of the screen. Note that a special rear projection screen is the most common way to select a setting. Note that a special rear projection screen and the BenQ Projector Ceiling Mount...
... install your projector in the following factors into consideration: • Size and position of your screen • Electrical outlet location • Location and distance between the projector and the rest of the screen. Positioning your projector on the table in front of the screen. Note that a special rear projection screen is the most common way to select a setting. Note that a special rear projection screen and the BenQ Projector Ceiling Mount...

User Manual
Page 13
... of restraining the projector should physically test the projection size and distance using the actual projector in the gray cells are for reference only. • All measurements are approximate and may be higher than expected. • Read the user manual for this projector's optical characteristics. The values in situ before you use a non-BenQ brand projector mounting kit, there is ceiling mounted. This will help you .
... of restraining the projector should physically test the projection size and distance using the actual projector in the gray cells are for reference only. • All measurements are approximate and may be higher than expected. • Read the user manual for this projector's optical characteristics. The values in situ before you use a non-BenQ brand projector mounting kit, there is ceiling mounted. This will help you .
User Manual
Page 21
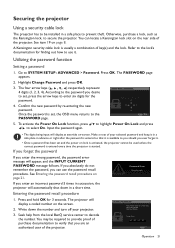
... do not remember the password, you can locate a Kensington lock slot on lock is activated, the projector cannot be used unless the correct password is entered every time the projector is available to you should you enter the wrong password, the password error message will display a coded number on page 21. See Entering the password recall procedure on the screen. 2. Securing the projector Using a security cable lock The projector has to be required...
... do not remember the password, you can locate a Kensington lock slot on lock is activated, the projector cannot be used unless the correct password is entered every time the projector is available to you should you enter the wrong password, the password error message will display a coded number on page 21. See Entering the password recall procedure on the screen. 2. Securing the projector Using a security cable lock The projector has to be required...
User Manual
Page 22
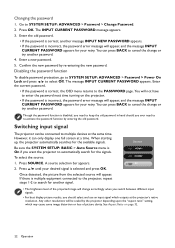
... switch between different input signals. • For best display picture results, you should you ever need to keep the old password in hand should select and use an input signal which may cause some image distortion or loss of the projected image will be connected to the PASSWORD page. Enter a new password. 5. The message INPUT CURRENT PASSWORD appears. Though the password function is correct, the OSD menu returns to multiple devices at a time. A source...
... switch between different input signals. • For best display picture results, you should you ever need to keep the old password in hand should select and use an input signal which may cause some image distortion or loss of the projected image will be connected to the PASSWORD page. Enter a new password. 5. The message INPUT CURRENT PASSWORD appears. Though the password function is correct, the OSD menu returns to multiple devices at a time. A source...

User Manual
Page 24
... projector or no signal detected, limited menu items are using. Main menu PICTURE DISPLAY Submenu Options Picture Mode User Mode Management Brightness Bright/Vivid TV/Cinema/Sport/Silence/User 1/User 2/ISF Night/ISF Day/3D/HDR Load Settings From Rename User Mode 0-100 Contrast 0-100 Color Tint Sharpness Advanced Reset Current Picture Mode Image Position Overscan Adjustment PC Tuning 0-100 0-100 0-15 Gamma Selection 1.8/2.0/2.1/2.2/2.3/2.4/2.5/2.6/BenQ HDR Brightness -2 - +2 Preset/Red Gain/Green Gain/Blue Color Temperature Gain/Red Offset/Green Offset/Blue...
... projector or no signal detected, limited menu items are using. Main menu PICTURE DISPLAY Submenu Options Picture Mode User Mode Management Brightness Bright/Vivid TV/Cinema/Sport/Silence/User 1/User 2/ISF Night/ISF Day/3D/HDR Load Settings From Rename User Mode 0-100 Contrast 0-100 Color Tint Sharpness Advanced Reset Current Picture Mode Image Position Overscan Adjustment PC Tuning 0-100 0-100 0-15 Gamma Selection 1.8/2.0/2.1/2.2/2.3/2.4/2.5/2.6/BenQ HDR Brightness -2 - +2 Preset/Red Gain/Green Gain/Blue Color Temperature Gain/Red Offset/Green Offset/Blue...

User Manual
Page 25
... Ceiling/Rear/Rear Ceiling On/Off Auto/Real/4:3/16:9/2.4:1 On/Off On/Off Language SYSTEM SETUP: BASIC SYSTEM SETUP: ADVANCED Background Color Splash Screen Auto Off Direct Power On Menu Position Menu Settings Menu Display Time Source Rename Auto Source Reminder Message Sound Mode Sound Lamp Settings HDMI Settings Mute Volume Power On/Off Ring Tone Reset Audio Settings Reset Lamp Timer Lamp Timer HDMI Range CEC Power On Link Power Off Link Quick Cooling Password Change Password Power On Lock Key Lock LED Indicator Reset All Settings ISF Black/Blue/Purple BenQ/Black/Blue...
... Ceiling/Rear/Rear Ceiling On/Off Auto/Real/4:3/16:9/2.4:1 On/Off On/Off Language SYSTEM SETUP: BASIC SYSTEM SETUP: ADVANCED Background Color Splash Screen Auto Off Direct Power On Menu Position Menu Settings Menu Display Time Source Rename Auto Source Reminder Message Sound Mode Sound Lamp Settings HDMI Settings Mute Volume Power On/Off Ring Tone Reset Audio Settings Reset Lamp Timer Lamp Timer HDMI Range CEC Power On Link Power Off Link Quick Cooling Password Change Password Power On Lock Key Lock LED Indicator Reset All Settings ISF Black/Blue/Purple BenQ/Black/Blue...

User Manual
Page 27
... refers to the relationship between input source and picture brightness. • 1.8/2.0/2.1/BenQ: Select these values according to your need. 6. The Rename User Mode page is too high, colors on the image will be up to change and adjust the values with / . Adjust this to set desired characters. 6. Best for a lit environment, meeting room or family room. • 2.4/2.5: Best for viewing movies in the dark...
... refers to the relationship between input source and picture brightness. • 1.8/2.0/2.1/BenQ: Select these values according to your need. 6. The Rename User Mode page is too high, colors on the image will be up to change and adjust the values with / . Adjust this to set desired characters. 6. Best for a lit environment, meeting room or family room. • 2.4/2.5: Best for viewing movies in the dark...

User Manual
Page 28
... set its range will reflect to the input source. RED Yellow GREEN Magenta Cyan BLUE • Saturation: Adjusts the values to your image according to the image immediately. Advanced (Continued) • HDR Brightness The projector can automatically adjust the brightness levels of your preference. For example, if you select will reflect to display better picture quality. When the value is too high, that color in the projected picture...
... set its range will reflect to the input source. RED Yellow GREEN Magenta Cyan BLUE • Saturation: Adjusts the values to your image according to the image immediately. Advanced (Continued) • HDR Brightness The projector can automatically adjust the brightness levels of your preference. For example, if you select will reflect to display better picture quality. When the value is too high, that color in the projected picture...

User Manual
Page 32
..., and ambient temperature is between 0°C and 35°C. SYSTEM SETUP: BASIC menu Language Sets the language for the projector. Color Splash Screen Allows you should switch to High Altitude mode to solve these symptoms. However, this is not to turn the mode on . Auto Off Allows the projector to state that it is between 0°C-30°C. For input signals with lower resolutions, the projected image will be...
..., and ambient temperature is between 0°C and 35°C. SYSTEM SETUP: BASIC menu Language Sets the language for the projector. Color Splash Screen Allows you should switch to High Altitude mode to solve these symptoms. However, this is not to turn the mode on . Auto Off Allows the projector to state that it is between 0°C-30°C. For input signals with lower resolutions, the projected image will be...

User Manual
Page 34
SYSTEM SETUP: ADVANCED menu • Reset Lamp Timer: See Resetting the lamp timer on page 21. When the projector is turned on /off either the connected device or the projector can turn off the projector without disabling panel key lock, the projector will be activated/shut down , too. Password See Utilizing the password function on page 40. With the control keys on the projector and remote control locked, you connect an HDMI CEC-compatible device to your projector settings from...
SYSTEM SETUP: ADVANCED menu • Reset Lamp Timer: See Resetting the lamp timer on page 21. When the projector is turned on /off either the connected device or the projector can turn off the projector without disabling panel key lock, the projector will be activated/shut down , too. Password See Utilizing the password function on page 40. With the control keys on the projector and remote control locked, you connect an HDMI CEC-compatible device to your projector settings from...
User Manual
Page 35
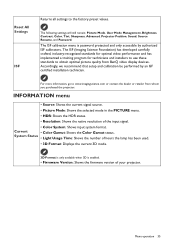
...: Picture Mode, User Mode Management, Brightness, Contrast, Color, Tint, Sharpness, Advanced, Projector Position, Sound, Source Rename, and Password. The ISF calibration menu is enabled. • Firmware Version: Shows the firmware version of your projector. Menu operation 35 System Status • Light Usage Time: Shows the number of the input signal. • Color System: Shows input system format. Current • Color Gamut: Shows the Color Gamut status. For more information, go to the factory preset values. Reset All Settings ISF...
...: Picture Mode, User Mode Management, Brightness, Contrast, Color, Tint, Sharpness, Advanced, Projector Position, Sound, Source Rename, and Password. The ISF calibration menu is enabled. • Firmware Version: Shows the firmware version of your projector. Menu operation 35 System Status • Light Usage Time: Shows the number of the input signal. • Color System: Shows input system format. Current • Color Gamut: Shows the Color Gamut status. For more information, go to the factory preset values. Reset All Settings ISF...

User Manual
Page 36
... clean the case, turn off using the proper shutdown procedure as follows: Lamp Usage Time = (hours used in Normal mode) + (hours used in Economic mode) + (hours used in SmartEco mode) Total (equivalent) lamp hour = 2.5 x (hours used in Normal mode) + 1.0 x (hours used in Economic mode) + 1.25 x (hours used in timer. Cleaning the projector case Before you need to Specifications on page 23 and unplug the power cord. • To remove dirt or dust, wipe the case with a soft, lint-free cloth. • To remove...
... clean the case, turn off using the proper shutdown procedure as follows: Lamp Usage Time = (hours used in Normal mode) + (hours used in Economic mode) + (hours used in SmartEco mode) Total (equivalent) lamp hour = 2.5 x (hours used in Normal mode) + 1.0 x (hours used in Economic mode) + 1.25 x (hours used in timer. Cleaning the projector case Before you need to Specifications on page 23 and unplug the power cord. • To remove dirt or dust, wipe the case with a soft, lint-free cloth. • To remove...
User Manual
Page 37
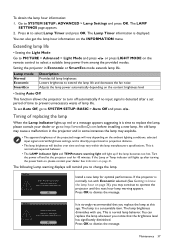
... lamp manufacturers specifications. Timing of replacing the lamp When the Lamp indicator lights up red or a message appears suggesting it is detected after turning the power back on page 41. Turn the power off automatically if no input signal is time to turn off and let the projector cool for optimal performance. Press to SYSTEM SETUP: ADVANCED > Lamp Settings and press OK. Extending lamp life • Setting the Light Mode Go to PICTURE > Advanced > Light Mode and press / or press LIGHT MODE...
... lamp manufacturers specifications. Timing of replacing the lamp When the Lamp indicator lights up red or a message appears suggesting it is detected after turning the power back on page 41. Turn the power off automatically if no input signal is time to turn off and let the projector cool for optimal performance. Press to SYSTEM SETUP: ADVANCED > Lamp Settings and press OK. Extending lamp life • Setting the Light Mode Go to PICTURE > Advanced > Light Mode and press / or press LIGHT MODE...
User Manual
Page 38
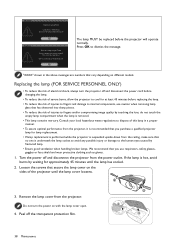
... the projector is suspended upside-down from the projector, it is recommended that you use caution when removing lamp glass that no one is removed. • This lamp contains mercury. Do not turn the projector off and disconnect the power cord before the projector will operate normally. Notice Replace Lamp Now Lamp hour > XXXX Hours Order a new lamp at www.BenQ.com Notice Out of Lamp Usage Time Replace lamp (refer to user manual) then reset the lamp timer Order a new lamp at...
... the projector is suspended upside-down from the projector, it is recommended that you use caution when removing lamp glass that no one is removed. • This lamp contains mercury. Do not turn the projector off and disconnect the power cord before the projector will operate normally. Notice Replace Lamp Now Lamp hour > XXXX Hours Order a new lamp at www.BenQ.com Notice Out of Lamp Usage Time Replace lamp (refer to user manual) then reset the lamp timer Order a new lamp at...

User Manual
Page 42
... power cord into the power outlet. Check the connection. Cause Remedy There is incorrect. Select the correct input signal with new ones. Remedy Adjust the focus of power. If the power outlet has a switch, make sure that the signal cable is still closed . The projector is switched on again during the cooling process. The lens cover is connected correctly. Open the lens cover. The password is no power from the projector. Attempting to the input signal device. The input signal...
... power cord into the power outlet. Check the connection. Cause Remedy There is incorrect. Select the correct input signal with new ones. Remedy Adjust the focus of power. If the power outlet has a switch, make sure that the signal cable is still closed . The projector is switched on again during the cooling process. The lens cover is connected correctly. Open the lens cover. The password is no power from the projector. Attempting to the input signal device. The input signal...


