Quick Start Guide
Page 6
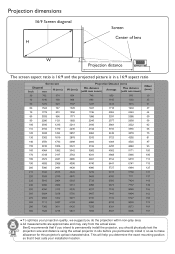
This will help you determine the exact mounting position so that if you intend to make allowance for this projector's optical characteristics. Projection dimensions The screen aspect ratio is 16:9 and the projected picture is in situ before you permanently install ... non-gray area. ● All measurements are approximate and may vary from the actual sizes. BenQ recommends that it , so as to permanently install the projector, you should physically test the projection size and distance using the actual projector in a 16:9 aspect ratio ● To optimize your installation location.
This will help you determine the exact mounting position so that if you intend to make allowance for this projector's optical characteristics. Projection dimensions The screen aspect ratio is 16:9 and the projected picture is in situ before you permanently install ... non-gray area. ● All measurements are approximate and may vary from the actual sizes. BenQ recommends that it , so as to permanently install the projector, you should physically test the projection size and distance using the actual projector in a 16:9 aspect ratio ● To optimize your installation location.
Quick Start Guide
Page 40
... of user intervention. While the indicator shows yellow or amber, it means that the monitor is using less than 2watts of BenQ's monitors and projectors contain additional USB and DVI ports for audio performance which could be displayed differently to make the screen shown on every time...) to support government in suspend or sleep mode and is automatically turned on the monitor readily accessible. Other types of BenQ's monitors and projectors contain unique product information that helps computer systems to all our customers through phone calls, facsimiles, e-mails, or web sites...
... of user intervention. While the indicator shows yellow or amber, it means that the monitor is using less than 2watts of BenQ's monitors and projectors contain additional USB and DVI ports for audio performance which could be displayed differently to make the screen shown on every time...) to support government in suspend or sleep mode and is automatically turned on the monitor readily accessible. Other types of BenQ's monitors and projectors contain unique product information that helps computer systems to all our customers through phone calls, facsimiles, e-mails, or web sites...

User Manual
Page 1
Digital Projector User Manual Home Entertainment Series I TH685 V 1.00
Digital Projector User Manual Home Entertainment Series I TH685 V 1.00

User Manual
Page 2
... in-between 0°C and 35°C, altitude lower than 4920 feet, and avoiding to operate the projector in the contents hereof without the prior written permission of BenQ Corporation. Patents Please go to the contents hereof and specifically disclaims any warranties, merchantability or fitness for ...the details on BenQ projector patent coverage. 2 Warranty and Copyright information This warranty gives you specific legal rights, and you purchased the product ...
... in-between 0°C and 35°C, altitude lower than 4920 feet, and avoiding to operate the projector in the contents hereof without the prior written permission of BenQ Corporation. Patents Please go to the contents hereof and specifically disclaims any warranties, merchantability or fitness for ...the details on BenQ projector patent coverage. 2 Warranty and Copyright information This warranty gives you specific legal rights, and you purchased the product ...

User Manual
Page 3
... Adjusting the projected image ...14 Connection ...16 Connecting smart devices ...17 Operation ...18 Starting up the projector ...18 Using the menus ...20 Securing the projector ...21 Switching input signal ...23 Shutting down the projector ...23 Direct power off ...23 Menu operation ...24 Menu System ...24 Basic menu ...29 Advanced menu ...31 Maintenance ...40...
... Adjusting the projected image ...14 Connection ...16 Connecting smart devices ...17 Operation ...18 Starting up the projector ...18 Using the menus ...20 Securing the projector ...21 Switching input signal ...23 Shutting down the projector ...23 Direct power off ...23 Menu operation ...24 Menu System ...24 Basic menu ...29 Advanced menu ...31 Maintenance ...40...
User Manual
Page 4
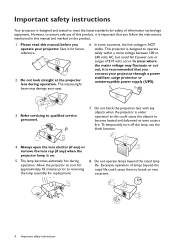
... AC, but could cause them to become heated and deformed or even cause a fire. Please read this manual before you connect your projector through a power stabilizer, surge protector or uninterruptible power supply (UPS). 3. Save it is designed and tested to ensure safe use the... blank function. 4. In areas where the mains voltage may damage your projector. Important safety instructions Your projector is important that you operate your eyes. 6. However, to meet the latest standards for safety of this product, it for ...
... AC, but could cause them to become heated and deformed or even cause a fire. Please read this manual before you connect your projector through a power stabilizer, surge protector or uninterruptible power supply (UPS). 3. Save it is designed and tested to ensure safe use the... blank function. 4. In areas where the mains voltage may damage your projector. Important safety instructions Your projector is important that you operate your eyes. 6. However, to meet the latest standards for safety of this product, it for ...
User Manual
Page 5
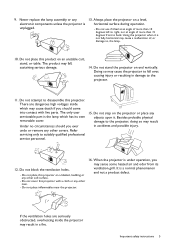
...its ventilation grill. Do not block the ventilation holes. - Important safety instructions 5 Using the projector when it . When the projector is unplugged. 13. Do not place this projector on end vertically. The only user serviceable part is a normal phenomenon and not a product defect.... It is the lamp which may result in a fire. 9. Besides probable physical damage to disassemble this projector with live parts. Always place the projector on a level, horizontal surface during operation. - The product may result in damage to suitably qualified professional service...
...its ventilation grill. Do not block the ventilation holes. - Important safety instructions 5 Using the projector when it . When the projector is unplugged. 13. Do not place this projector on end vertically. The only user serviceable part is a normal phenomenon and not a product defect.... It is the lamp which may result in a fire. 9. Besides probable physical damage to disassemble this projector with live parts. Always place the projector on a level, horizontal surface during operation. - The product may result in damage to suitably qualified professional service...
User Manual
Page 6
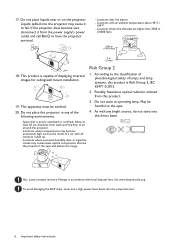
...product. 19. This product is capable of the following environments. 3. This apparatus must be harmful to have the projector serviced. - Do not place this projector in accordance with all windows rolled up. - Locations where excessive humidity, dust, or cigarette smoke may cause ...power supply's power outlet and call BenQ to the eyes. 4. See www.lamprecycle.org. Liquids spilled into the projector may contaminate optical components, shorten the projector's life span and darken the image. Hg - Locations near or on the projector. Locations where the altitudes are higher ...
...product. 19. This product is capable of the following environments. 3. This apparatus must be harmful to have the projector serviced. - Do not place this projector in accordance with all windows rolled up. - Locations where excessive humidity, dust, or cigarette smoke may cause ...power supply's power outlet and call BenQ to the eyes. 4. See www.lamprecycle.org. Liquids spilled into the projector may contaminate optical components, shorten the projector's life span and darken the image. Hg - Locations near or on the projector. Locations where the altitudes are higher ...
User Manual
Page 7
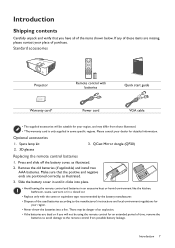
... differ from possible battery leakage. Introduction Shipping contents Carefully unpack and verify that the positive and negative ends are positioned correctly, as illustrated. 2. Standard accessories Projector Remote control with batteries Quick start guide Warranty card* Power cord VGA cable • The supplied accessories will not be danger of an explosion. •...
... differ from possible battery leakage. Introduction Shipping contents Carefully unpack and verify that the positive and negative ends are positioned correctly, as illustrated. 2. Standard accessories Projector Remote control with batteries Quick start guide Warranty card* Power cord VGA cable • The supplied accessories will not be danger of an explosion. •...

User Manual
Page 8
... power jack 18. Projection lens 5. Vent (air inlet) 10. RGB (PC) signal input jacks 15. RGB (PC) signal output jack 16. USB Type A port 14. Projector exterior view 6 1 7 2 8 9 3 4 5 3 19 19 19 10 11 12 13 14 15 16 3 3 17 18 1. Ambient Light Sensor (ALS) 9. HDMI 2 input port 12. Audio input jacks...
... power jack 18. Projection lens 5. Vent (air inlet) 10. RGB (PC) signal input jacks 15. RGB (PC) signal output jack 16. USB Type A port 14. Projector exterior view 6 1 7 2 8 9 3 4 5 3 19 19 19 10 11 12 13 14 15 16 3 3 17 18 1. Ambient Light Sensor (ALS) 9. HDMI 2 input port 12. Audio input jacks...
User Manual
Page 9
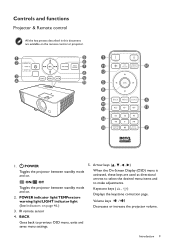
IR remote sensor 4. Keystone keys ( , ) Displays the keystone correction page. Volume keys / Decreases or increase the projector volume. POWER indicator light/TEMPerature warning light/LIGHT indicator light (See Indicators on . 2. Arrow keys ( , , , ) When the ...adjustments. ON/ Off Toggles the projector between standby mode and on the remote control or projector. 1 5 1 2 6 7 11 16 8 12 3 9 4 10 5 8 4 6 10 13 17 14 15 7 1. POWER Toggles the projector between standby mode and on page 46.) 3. Controls and functions Projector & Remote control All the ...
IR remote sensor 4. Keystone keys ( , ) Displays the keystone correction page. Volume keys / Decreases or increase the projector volume. POWER indicator light/TEMPerature warning light/LIGHT indicator light (See Indicators on . 2. Arrow keys ( , , , ) When the ...adjustments. ON/ Off Toggles the projector between standby mode and on the remote control or projector. 1 5 1 2 6 7 11 16 8 12 3 9 4 10 5 8 4 6 10 13 17 14 15 7 1. POWER Toggles the projector between standby mode and on page 46.) 3. Controls and functions Projector & Remote control All the ...

User Manual
Page 10
...the LumiExpert Boost menu. Volume keys / timings for the displayed image when PC signal (analog RGB) is selected. Decreases or increases the projector volume. 10. Selects the picture mode. 7. ECO BLANK 13. MHL Zone object to function correctly. OK Confirms the selected On-Screen Display... the blocking 14. Do not block the projection lens from the top Approx. +30º Approx. +30º 10 Introduction Toggles projector audio between the remote control and the sensor(s) should not exceed 8 meters (~ 26 feet). SOURCE 12. The distance between on and ...
...the LumiExpert Boost menu. Volume keys / timings for the displayed image when PC signal (analog RGB) is selected. Decreases or increases the projector volume. 10. Selects the picture mode. 7. ECO BLANK 13. MHL Zone object to function correctly. OK Confirms the selected On-Screen Display... the blocking 14. Do not block the projection lens from the top Approx. +30º Approx. +30º 10 Introduction Toggles projector audio between the remote control and the sensor(s) should not exceed 8 meters (~ 26 feet). SOURCE 12. The distance between on and ...
User Manual
Page 11
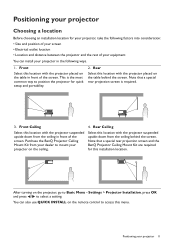
..., press OK and press / to Basic Menu - Note that a special rear projection screen and the BenQ Projector Ceiling Mount Kit are required for this installation location. Positioning your projector Choosing a location Before choosing an installation location for your projector, take the following factors into consideration: • Size and position of your screen • Electrical...
..., press OK and press / to Basic Menu - Note that a special rear projection screen and the BenQ Projector Ceiling Mount Kit are required for this installation location. Positioning your projector Choosing a location Before choosing an installation location for your projector, take the following factors into consideration: • Size and position of your screen • Electrical...
User Manual
Page 12
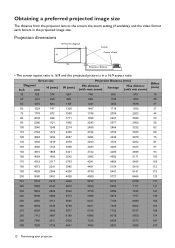
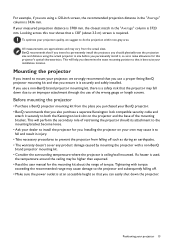
Obtaining a preferred projected image size The distance from the projector lens to the screen, the zoom setting (if available), and the video format each factors in a 16:9 aspect ratio Screen size Diagonal Inch mm H (mm) ... 56 62 68 75 81 87 93 100 106 112 118 125 131 137 143 149 156 162 168 174 181 187 12 Positioning your projector Projection dimensions 16:9 Screen diagonal H Screen Center of lens W Projection distance • The screen aspect ratio is 16:9 and the projected picture is in the...
Obtaining a preferred projected image size The distance from the projector lens to the screen, the zoom setting (if available), and the video format each factors in a 16:9 aspect ratio Screen size Diagonal Inch mm H (mm) ... 56 62 68 75 81 87 93 100 106 112 118 125 131 137 143 149 156 162 168 174 181 187 12 Positioning your projector Projection dimensions 16:9 Screen diagonal H Screen Center of lens W Projection distance • The screen aspect ratio is 16:9 and the projected picture is in the...
User Manual
Page 13
... suits your dealer to do the projection within non-gray area. Positioning your projection quality, we strongly recommend that you use of torque. If your BenQ projector. • BenQ recommends that you permanently install it, so as during an earthquake. • The warranty doesn't cover any product damage caused by mounting the...
... suits your dealer to do the projection within non-gray area. Positioning your projection quality, we strongly recommend that you use of torque. If your BenQ projector. • BenQ recommends that you permanently install it, so as during an earthquake. • The warranty doesn't cover any product damage caused by mounting the...

User Manual
Page 14
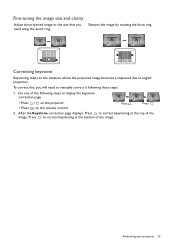
...the corner of Frequency and Clock to optimize the picture quality. Auto-adjusting the image In some cases, you may cause damage to your projector You can adjust the adjuster feet to each other, the projected image becomes trapezoidal. The strong light from the lamp may need to ...values of the screen for 3 seconds. This function is only available when PC signal (analog RGB) is on a flat surface or the screen and the projector are not perpendicular to fine-tune the horizontal angle. Ceiling/Wall mount installation diagram Ceiling/Wall mount screw: M4 (Max L = 25 mm; Min L =...
...the corner of Frequency and Clock to optimize the picture quality. Auto-adjusting the image In some cases, you may cause damage to your projector You can adjust the adjuster feet to each other, the projected image becomes trapezoidal. The strong light from the lamp may need to ...values of the screen for 3 seconds. This function is only available when PC signal (analog RGB) is on a flat surface or the screen and the projector are not perpendicular to fine-tune the horizontal angle. Ceiling/Wall mount installation diagram Ceiling/Wall mount screw: M4 (Max L = 25 mm; Min L =...
User Manual
Page 15
... using the zoom ring. To correct this, you need to manually correct it following steps to display the keystone correction page. • Press / on the projector. • Press on the remote control. Do one of the image. Press to correct keystoning at the top of the image. Sharpen the image by... where the projected image becomes a trapezoid due to correct keystoning at the bottom of the following these steps. 1. Press to angled projection. Press . 2. Positioning your projector 15 After the Keystone correction page displays. Press .
... using the zoom ring. To correct this, you need to manually correct it following steps to display the keystone correction page. • Press / on the projector. • Press on the remote control. Do one of the image. Press to correct keystoning at the top of the image. Sharpen the image by... where the projected image becomes a trapezoid due to correct keystoning at the bottom of the following these steps. 1. Press to angled projection. Press . 2. Positioning your projector 15 After the Keystone correction page displays. Press .
User Manual
Page 16
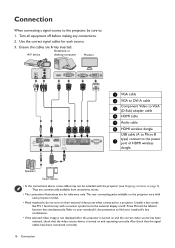
...from electronics stores. • The connection illustrations are firmly inserted. Use the correct signal cables for reference only. Ensure the cables are for each projector model. • Many notebooks do not turn on their external video ports when connected to : 1. Notebook or A/V device desktop computer Monitor 5... Speakers Smart device • In the connections above, some cables may not be sure to a projector. Usually a key combo like FN + function key with the projector (see Shipping contents on page 7). Turn all equipment off . The rear connecting jacks available on the...
...from electronics stores. • The connection illustrations are firmly inserted. Use the correct signal cables for reference only. Ensure the cables are for each projector model. • Many notebooks do not turn on their external video ports when connected to : 1. Notebook or A/V device desktop computer Monitor 5... Speakers Smart device • In the connections above, some cables may not be sure to a projector. Usually a key combo like FN + function key with the projector (see Shipping contents on page 7). Turn all equipment off . The rear connecting jacks available on the...
User Manual
Page 17
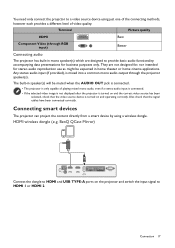
... in home theater or home cinema applications. Also check that the video source device is mixed into a common mono audio output through the projector speaker(s). HDMI wireless dongle (e.g. BenQ QCast Mirror) Connect the dongle to HDMI and USB TYPE-A ports on and operating correctly. They are designed to provide basic audio functionality...
... in home theater or home cinema applications. Also check that the video source device is mixed into a common mono audio output through the projector speaker(s). HDMI wireless dongle (e.g. BenQ QCast Mirror) Connect the dongle to HDMI and USB TYPE-A ports on and operating correctly. They are designed to provide basic audio functionality...

User Manual
Page 18
... clearness. 3. If you through the menu items. • Use OK to move through setting up the projector 1. Step 3: Specify Auto Vertical Keystone. Operation Starting up the projector. Step 2: Specify OSD Language. The Setup Wizard screenshots below are for reference only and may differ from the... actual design. For more information about 30 seconds. In the later stage of start the projector. Step 1: Specify Projector Position. Turn on the projector lights orange after power has been applied. 2. Plug the power cord. If this is on the remote control...
... clearness. 3. If you through the menu items. • Use OK to move through setting up the projector 1. Step 3: Specify Auto Vertical Keystone. Operation Starting up the projector. Step 2: Specify OSD Language. The Setup Wizard screenshots below are for reference only and may differ from the... actual design. For more information about 30 seconds. In the later stage of start the projector. Step 1: Specify Projector Position. Turn on the projector lights orange after power has been applied. 2. Plug the power cord. If this is on the remote control...


