
Quick Start Guide
Page 40
... as Adobe Reader via a connected computer system. The default timing setting is using less than 2watts of pre-programmed flicker-free timing to make the screen shown on every time the monitor is using the full power. Other similar adjustments are compliant with the computer systems connected. z All BenQ's monitors and projectors are color-coded to help users easily connecting products to computer systems correctly. z BenQ's customer service provides answers and assistance to...
... as Adobe Reader via a connected computer system. The default timing setting is using less than 2watts of pre-programmed flicker-free timing to make the screen shown on every time the monitor is using the full power. Other similar adjustments are compliant with the computer systems connected. z All BenQ's monitors and projectors are color-coded to help users easily connecting products to computer systems correctly. z BenQ's customer service provides answers and assistance to...
User Manual
Page 4
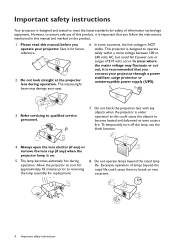
... straight at the projector lens during operation. To temporarily turn off the lamp, use of ±10 volts occur. Do not operate lamps beyond the rated life could fail if power cuts or surges of this product, it is important that you follow the instructions mentioned in this manual before you operate your projector through a power stabilizer, surge protector or uninterruptible power supply (UPS). 3. Refer servicing to meet...
... straight at the projector lens during operation. To temporarily turn off the lamp, use of ±10 volts occur. Do not operate lamps beyond the rated life could fail if power cuts or surges of this product, it is important that you follow the instructions mentioned in this manual before you operate your projector through a power stabilizer, surge protector or uninterruptible power supply (UPS). 3. Refer servicing to meet...

User Manual
Page 10
... sound mode. 16. 6. Toggles projector audio between the remote control and the IR sensor(s) on the projector that might obstruct the infra-red beam. • Operating the projector from the front • Operating the projector from projecting as this could cause the blocking 14. MHL Zone object to hide the screen picture. LUMIEXPERT BOOST 9. Automatically determines the best picture 17. Volume keys / timings for the displayed image when PC signal...
... sound mode. 16. 6. Toggles projector audio between the remote control and the IR sensor(s) on the projector that might obstruct the infra-red beam. • Operating the projector from the front • Operating the projector from projecting as this could cause the blocking 14. MHL Zone object to hide the screen picture. LUMIEXPERT BOOST 9. Automatically determines the best picture 17. Volume keys / timings for the displayed image when PC signal...
User Manual
Page 11
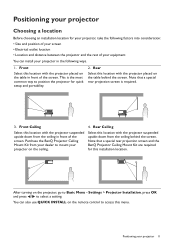
... setup and portability. 2. You can install your projector in the following factors into consideration: • Size and position of your screen • Electrical outlet location • Location and distance between the projector and the rest of your equipment You can also use QUICK INSTALL on the remote control to access this menu. Note that a special rear projection screen and the BenQ Projector Ceiling Mount Kit are required for this installation location. Front Ceiling...
... setup and portability. 2. You can install your projector in the following factors into consideration: • Size and position of your screen • Electrical outlet location • Location and distance between the projector and the rest of your equipment You can also use QUICK INSTALL on the remote control to access this menu. Note that a special rear projection screen and the BenQ Projector Ceiling Mount Kit are required for this installation location. Front Ceiling...

User Manual
Page 18
... this is the first time you turn on the remote control to start up the projector. Operation Starting up , a startup logo is projected. (If necessary) Rotate the focus ring to adjust the image clearness. 3. Turn on the projector lights orange after power has been applied. 2. The power indicator flashes green and stays green when the projector is on the projector or remote control to move through setting up procedure takes about 30 seconds. The start the projector. If this step...
... this is the first time you turn on the remote control to start up the projector. Operation Starting up , a startup logo is projected. (If necessary) Rotate the focus ring to adjust the image clearness. 3. Turn on the projector lights orange after power has been applied. 2. The power indicator flashes green and stays green when the projector is on the projector or remote control to move through setting up procedure takes about 30 seconds. The start the projector. If this step...

User Manual
Page 19
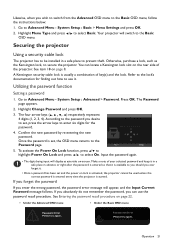
... compatible with the projector's resolution or set the input signal to default value. power cord) to avoid possible dangers such as electric shock and fire. • If the projector is found. If you will see Using the menus. Operation 19 See Timing chart on the background screen. Step 5: Specify Menu Type. Please change to an input signal which is turned on page 21. 5. See Utilizing the password function on...
... compatible with the projector's resolution or set the input signal to default value. power cord) to avoid possible dangers such as electric shock and fire. • If the projector is found. If you will see Using the menus. Operation 19 See Timing chart on the background screen. Step 5: Specify Menu Type. Please change to an input signal which is turned on page 21. 5. See Utilizing the password function on...

User Manual
Page 20
... overview of the Basic OSD menu. • Input signal connected • No input signal connected Picture Mode Bright Sound Mode Standard Volume 10 Mute Off Fast Mode Off 3D Mode 3D Off 3D Sync Invert Press OK Settings Press OK Wall Color Off Auto Source On Reset Light Timer Projector Position Front Menu Type Basic Reset All Settings Test Pattern Off HDMI Range Auto Information If you use the projector (after finishing the initial setup), Basic OSD menu displays. Below is the overview...
... overview of the Basic OSD menu. • Input signal connected • No input signal connected Picture Mode Bright Sound Mode Standard Volume 10 Mute Off Fast Mode Off 3D Mode 3D Off 3D Sync Invert Press OK Settings Press OK Wall Color Off Auto Source On Reset Light Timer Projector Position Front Menu Type Basic Reset All Settings Test Pattern Off HDMI Range Auto Information If you use the projector (after finishing the initial setup), Basic OSD menu displays. Below is the overview...
User Manual
Page 21
... the Basic OSD menu Password Error Please try again. Utilizing the password function Setting a password 1. Confirm the new password by re-entering the new password. Return 5. See Entering the password recall procedure on page 8. Securing the projector Using a security cable lock The projector has to be used unless the correct password is entered every time the projector is started. You can use it . • Once a password has been set and the power on the rear...
... the Basic OSD menu Password Error Please try again. Utilizing the password function Setting a password 1. Confirm the new password by re-entering the new password. Return 5. See Entering the password recall procedure on page 8. Securing the projector Using a security cable lock The projector has to be used unless the correct password is entered every time the projector is started. You can use it . • Once a password has been set and the power on the rear...

User Manual
Page 22
... to keep the old password in a short time. Enter a new password. 5. You will not have to the Security Settings page. Seek help from the local BenQ service center to select Off. The Password page appears. 2. Highlight Change Password and press OK. The message "Input Current Password" appears. Though the password function is incorrect, the password error message will appear, and the message "Input Current Password" appears for 3 seconds. The projector will display a coded number on the projector...
... to keep the old password in a short time. Enter a new password. 5. You will not have to the Security Settings page. Seek help from the local BenQ service center to select Off. The Password page appears. 2. Highlight Change Password and press OK. The message "Input Current Password" appears. Though the password function is incorrect, the password error message will appear, and the message "Input Current Password" appears for 3 seconds. The projector will display a coded number on the projector...

User Manual
Page 23
... the source: HDMI 1 HDMI 2 1. Any other resolutions will be scaled by the projector depending upon the "aspect ratio" setting, which outputs at the projector's native resolution. Press or a second time. The power indicator flashes orange, the projection lamp shuts down, and the fans will change accordingly when you switch between different input signals. • For best display picture results, you can be connected to search for another signal. • The brightness level of the screen for...
... the source: HDMI 1 HDMI 2 1. Any other resolutions will be scaled by the projector depending upon the "aspect ratio" setting, which outputs at the projector's native resolution. Press or a second time. The power indicator flashes orange, the projection lamp shuts down, and the fans will change accordingly when you switch between different input signals. • For best display picture results, you can be connected to search for another signal. • The brightness level of the screen for...

User Manual
Page 27
... sec/30 sec Blank Reminder Message On/Off Source Rename Auto Source On/Off Light Settings Reset Light Timer Light Usage Time Reset/Cancel HDMI Range Auto/Full/Limited HDMI Settings HDMI EDID HDMI 1/HDMI 2 (Enhanced/Standard) Baud Rate SYSTEM SETUP: ADVANCED Test Pattern Quick Cooling 9600/14400/19200/38400/57600/ 115200 On/Off On/Off High Altitude Mode On/Off Password Change Password Power On Lock On/Off Key Lock On/Off LED Indicator On/Off Reset All Settings Reset/Cancel Menu operation 27
... sec/30 sec Blank Reminder Message On/Off Source Rename Auto Source On/Off Light Settings Reset Light Timer Light Usage Time Reset/Cancel HDMI Range Auto/Full/Limited HDMI Settings HDMI EDID HDMI 1/HDMI 2 (Enhanced/Standard) Baud Rate SYSTEM SETUP: ADVANCED Test Pattern Quick Cooling 9600/14400/19200/38400/57600/ 115200 On/Off On/Off High Altitude Mode On/Off Password Change Password Power On Lock On/Off Key Lock On/Off LED Indicator On/Off Reset All Settings Reset/Cancel Menu operation 27

User Manual
Page 32
... overpowering, which makes the image unrealistic. If the setting is close to rename the customized picture modes (User 1 or User 2). 1. The lower the value, the more greenish the picture becomes. You can use / / / to Picture > Picture Mode. 2. Press to the Picture > Picture Mode menu, select User 1 or User 2. 2. Adjust this to set the peak white level after you want to make changes and use / to suit your selected input and viewing environment. The higher...
... overpowering, which makes the image unrealistic. If the setting is close to rename the customized picture modes (User 1 or User 2). 1. The lower the value, the more greenish the picture becomes. You can use / / / to Picture > Picture Mode. 2. Press to the Picture > Picture Mode menu, select User 1 or User 2. 2. Adjust this to set the peak white level after you want to make changes and use / to suit your selected input and viewing environment. The higher...

User Manual
Page 34
... color from among R (Red), G (Green), B (Blue), C (Cyan), M (Magenta), or Y (Yellow). • Hue: Increase in the range will be affected. a setting of "0" removes that color will include colors consisted of more vibrant colors in realistic and true colors. Every adjustment made will enhance the controlling experience. The higher the value, the less the noise. Fast Mode Minimizing the response time (one frame) between the source input and the image...
... color from among R (Red), G (Green), B (Blue), C (Cyan), M (Magenta), or Y (Yellow). • Hue: Increase in the range will be affected. a setting of "0" removes that color will include colors consisted of more vibrant colors in realistic and true colors. Every adjustment made will enhance the controlling experience. The higher the value, the less the noise. Fast Mode Minimizing the response time (one frame) between the source input and the image...

User Manual
Page 36
... from: Light Yellow, Pink, Light Green, and Blue. Setting 0 means the picture is 100% displayed. • Phase: Adjusts the clock phase to prevent possible color difference between the source and projected pictures. Size: Adjusts the horizontal width of the picture is displayed in the center of the screen with every key press you made. Display There are several options to set the image's aspect ratio depending on the projector or remote control to adjust the...
... from: Light Yellow, Pink, Light Green, and Blue. Setting 0 means the picture is 100% displayed. • Phase: Adjusts the clock phase to prevent possible color difference between the source and projected pictures. Size: Adjusts the horizontal width of the picture is displayed in the center of the screen with every key press you made. Display There are several options to set the image's aspect ratio depending on the projector or remote control to adjust the...
User Manual
Page 37
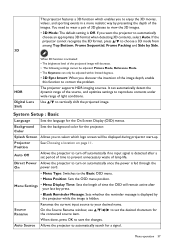
... adjusted: Picture Mode, Reference Mode. • The Keystone can only be displayed during projector start-up. Source Rename On the Source Rename window, use / / / to set period of time to prevent unnecessary waste of time the OSD will remain active after a set the desired characters for the projector. Auto Source Allows the projector to automatically search for the On-Screen Display (OSD) menus. System Setup : Basic Language Sets the language for a signal. The projector supports HDR imaging sources. Menu Settings • Menu Display Time: Sets...
... adjusted: Picture Mode, Reference Mode. • The Keystone can only be displayed during projector start-up. Source Rename On the Source Rename window, use / / / to set period of time to prevent unnecessary waste of time the OSD will remain active after a set the desired characters for the projector. Auto Source Allows the projector to automatically search for the On-Screen Display (OSD) menus. System Setup : Basic Language Sets the language for a signal. The projector supports HDR imaging sources. Menu Settings • Menu Display Time: Sets...
User Manual
Page 38
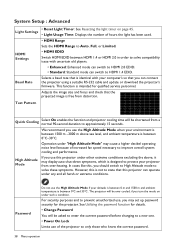
... download the projector's firmware. For security purposes and to prevent unauthorized use, you use of hours the light has been used. • HDMI Range Sets the HDMI Range to Auto, Full, or Limited. • HDMI EDID Switch HDMI EDID between 0°C and 35°C. Selects a baud rate that you turn the mode on page 45. • Light Usage Time: Displays the number of the projector to state that the projected image is between HDMI 1.4 or HDMI...
... download the projector's firmware. For security purposes and to prevent unauthorized use, you use of hours the light has been used. • HDMI Range Sets the HDMI Range to Auto, Full, or Limited. • HDMI EDID Switch HDMI EDID between 0°C and 35°C. Selects a baud rate that you turn the mode on page 45. • Light Usage Time: Displays the number of the projector to state that the projected image is between HDMI 1.4 or HDMI...
User Manual
Page 39
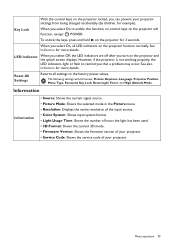
... the firmware version of your projector. • Service Code: Shows the service code of your projector settings from being changed accidentally (by children, for 3 seconds. Menu operation 39 With the control keys on the projector and the splash screen displays. However, if the projector is not working properly, the LED indicators light or flash to enable this function, no control keys on the projector will still remain: Picture, Keystone, Language, Projector Position, Menu Type, Password, Key Lock, Reset Light Timer, and High Altitude Mode...
... the firmware version of your projector. • Service Code: Shows the service code of your projector settings from being changed accidentally (by children, for 3 seconds. Menu operation 39 With the control keys on the projector and the splash screen displays. However, if the projector is not working properly, the LED indicators light or flash to enable this function, no control keys on the projector will still remain: Picture, Keystone, Language, Projector Position, Menu Type, Password, Key Lock, Reset Light Timer, and High Altitude Mode...

User Manual
Page 42
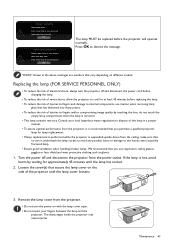
... dismiss the message. 42 Maintenance This is a consumable item. Replace Lamp Soon Lamp>XXXX Hours Order a new lamp at www.benq.com OK Install a new lamp for 45 minutes. Timing of replacing the lamp When the LIGHT indicator lights up after a set Auto Power Off, go to prevent unnecessary waste of the projected image will decline over time and may cause a malfunction in the projector and in Economic, SmartEco or LampSave mode extends lamp life. Setting the projector in...
... dismiss the message. 42 Maintenance This is a consumable item. Replace Lamp Soon Lamp>XXXX Hours Order a new lamp at www.benq.com OK Install a new lamp for 45 minutes. Timing of replacing the lamp When the LIGHT indicator lights up after a set Auto Power Off, go to prevent unnecessary waste of the projected image will decline over time and may cause a malfunction in the projector and in Economic, SmartEco or LampSave mode extends lamp life. Setting the projector in...
User Manual
Page 43
... projector, it is recommended that secure the lamp cover on with the lamp cover open. • Do not insert your local hazardous waste regulations to dispose of this lamp in the above messages are numbers that has shattered into sharp pieces. • To reduce the risk of injuries to user manual) Then reset lamp timer Order a new lamp at www.benq.com OK The lamp MUST be replaced before replacing...
... projector, it is recommended that secure the lamp cover on with the lamp cover open. • Do not insert your local hazardous waste regulations to dispose of this lamp in the above messages are numbers that has shattered into sharp pieces. • To reduce the risk of injuries to user manual) Then reset lamp timer Order a new lamp at www.benq.com OK The lamp MUST be replaced before replacing...

User Manual
Page 47
.... The lens cover is no power from the projector. Select the correct input signal with new ones. Open the lens cover. Remote control does not work. Adjust the projection angle and direction as well as the height of the projector. Replace both of the batteries with the SOURCE key. The projector and the screen are out of the lens using the focus ring. Remove the obstacle. Cause You do not remember the password. Troubleshooting 47 Cause...
.... The lens cover is no power from the projector. Select the correct input signal with new ones. Open the lens cover. Remote control does not work. Adjust the projection angle and direction as well as the height of the projector. Replace both of the batteries with the SOURCE key. The projector and the screen are out of the lens using the focus ring. Remove the obstacle. Cause You do not remember the password. Troubleshooting 47 Cause...


