

Safety Warning and Notice
Page 2
... when using the monitor, it in a region where power supply is unstable. Ensure that the power cord is connected to do not dissemble or repair the monitor. 8. 7. power cable) only with local technical standards if the user brings the monitor out of the user if problems (such as electric shock and fire. If a bad smell or an abnormal sound appears to check whether the monitor is compatible with...
... when using the monitor, it in a region where power supply is unstable. Ensure that the power cord is connected to do not dissemble or repair the monitor. 8. 7. power cable) only with local technical standards if the user brings the monitor out of the user if problems (such as electric shock and fire. If a bad smell or an abnormal sound appears to check whether the monitor is compatible with...
Resolution file
Page 1
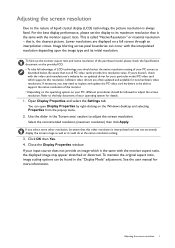
... the monitor aspect ratio, the displayed image may need to replace and update the PC video card hardware to be followed to support the native resolution of the purchased model, please check the Specification document on the Windows desktop and selecting Properties from the pop-up menu. 2. Open Display Properties and select the Settings tab. Select the recommended resolution (maximum resolution) then click Apply. If you should be able to adjust the screen resolution...
... the monitor aspect ratio, the displayed image may need to replace and update the PC video card hardware to be followed to support the native resolution of the purchased model, please check the Specification document on the Windows desktop and selecting Properties from the pop-up menu. 2. Open Display Properties and select the Settings tab. Select the recommended resolution (maximum resolution) then click Apply. If you should be able to adjust the screen resolution...

Resolution file
Page 2
... to adjust the screen resolution. Refer to the help document of the applicable factory modes as listed in your computer. Click Change, OK, then Yes. 5. Close the Display Properties window. 2 Adjusting the screen refresh rate Check next chapter to see the factory modes: Preset display modes on page 3. The best results are obtained by using the factory modes already set in the specification table. 4. Double click the Display icon in Control Panel. 2. From the Display Properties window, select the Settings...
... to adjust the screen resolution. Refer to the help document of the applicable factory modes as listed in your computer. Click Change, OK, then Yes. 5. Close the Display Properties window. 2 Adjusting the screen refresh rate Check next chapter to see the factory modes: Preset display modes on page 3. The best results are obtained by using the factory modes already set in the specification table. 4. Double click the Display icon in Control Panel. 2. From the Display Properties window, select the Settings...
Resolution file
Page 3
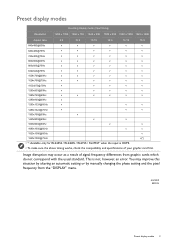
... above timing works, check the compatibility and specifications of signal frequency differences from the "DISPLAY" menu. 4/3/2019 ESD RL Preset display modes 3 You may occur as a result of your graphic card first. Image disruption may improve this situation by altering an automatic setting or by manually changing the phase setting and the pixel frequency from graphic cards which do not correspond with the usual standard. Preset display modes Incoming display mode (Input timing) Resolution 1280...
... above timing works, check the compatibility and specifications of signal frequency differences from the "DISPLAY" menu. 4/3/2019 ESD RL Preset display modes 3 You may occur as a result of your graphic card first. Image disruption may improve this situation by altering an automatic setting or by manually changing the phase setting and the pixel frequency from graphic cards which do not correspond with the usual standard. Preset display modes Incoming display mode (Input timing) Resolution 1280...
User Manual
Page 4
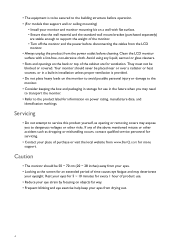
... qualified service personnel for servicing. • Contact your place of purchase or visit the local website from www.BenQ.com for every 1 hour of the monitor. • Turn off the monitor and the power before disconnecting the cables from the LCD monitor. • Always unplug the product from the power outlet before operation. • (For models that the wall material and the standard wall mount...
... qualified service personnel for servicing. • Contact your place of purchase or visit the local website from www.BenQ.com for every 1 hour of the monitor. • Turn off the monitor and the power before disconnecting the cables from the LCD monitor. • Always unplug the product from the power outlet before operation. • (For models that the wall material and the standard wall mount...
User Manual
Page 9
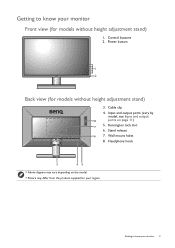
Input and output ports (vary by model, see Input and output 8 ports on the model. • Picture may vary depending on page 11) 7 5. Headphone hook 3 45 • Above diagram may differ from the product supplied for your region. Wall mount holes 8. Kensington lock slot 6. Stand release 6 7. Getting to know your monitor 9 Cable clip 4. Power button 1 2 Back view (for models without height adjustment stand) 3. Getting to know your monitor Front view (for models without height adjustment stand) 1. Control buttons 2.
Input and output ports (vary by model, see Input and output 8 ports on the model. • Picture may vary depending on page 11) 7 5. Headphone hook 3 45 • Above diagram may differ from the product supplied for your region. Wall mount holes 8. Kensington lock slot 6. Stand release 6 7. Getting to know your monitor 9 Cable clip 4. Power button 1 2 Back view (for models without height adjustment stand) 3. Getting to know your monitor Front view (for models without height adjustment stand) 1. Control buttons 2.
User Manual
Page 14
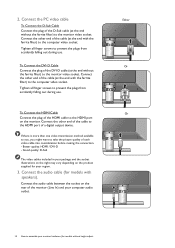
... the HDMI port on the product supplied for your region. 3. To Connect the DVI-D Cable Connect the plug of the HDMI cable to assemble your computer audio outlet. Tighten all finger screws to the computer video socket. Better quality: HDMI / DVI-D - Connect the audio cable (for models without height adjust- To Connect the HDMI Cable Connect the plug of the DVI-D cable (at the end with the ferrite filter) to prevent the plugs from accidently falling out during use . Connect the audio cable between...
... the HDMI port on the product supplied for your region. 3. To Connect the DVI-D Cable Connect the plug of the HDMI cable to assemble your computer audio outlet. Tighten all finger screws to the computer video socket. Better quality: HDMI / DVI-D - Connect the audio cable (for models without height adjust- To Connect the HDMI Cable Connect the plug of the DVI-D cable (at the end with the ferrite filter) to prevent the plugs from accidently falling out during use . Connect the audio cable between...
User Manual
Page 19
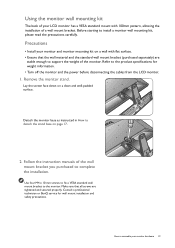
... or BenQ service for weight information. • Turn off the monitor and the power before disconnecting the cables from the LCD monitor. 1. Detach the monitor base as instructed in How to complete the installation. Refer to support the weight of the monitor. Follow the instruction manuals of the wall mount bracket you purchased to detach the stand base on page 17. 2. Use four M4 x 10 mm screws to fix a VESA standard wall mount bracket to install a monitor wall mounting kit...
... or BenQ service for weight information. • Turn off the monitor and the power before disconnecting the cables from the LCD monitor. 1. Detach the monitor base as instructed in How to complete the installation. Refer to support the weight of the monitor. Follow the instruction manuals of the wall mount bracket you purchased to detach the stand base on page 17. 2. Use four M4 x 10 mm screws to fix a VESA standard wall mount bracket to install a monitor wall mounting kit...
User Manual
Page 27
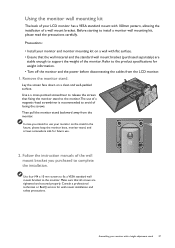
.... Remove the monitor stand. Assembling your LCD monitor has a VESA standard mount with 100mm pattern, allowing the installation of a wall mount bracket. Follow the instruction manuals of the wall mount bracket you intend to install a monitor wall mounting kit, please read the precautions carefully. OPEN LOCK Use a a cross-pointed screwdriver to release the screws that fixing the monitor stand to the monitor.The use your monitor and monitor mounting kit on a wall with a height adjustment stand 27 Using the monitor wall mounting kit The back of your monitor with flat surface...
.... Remove the monitor stand. Assembling your LCD monitor has a VESA standard mount with 100mm pattern, allowing the installation of a wall mount bracket. Follow the instruction manuals of the wall mount bracket you intend to install a monitor wall mounting kit, please read the precautions carefully. OPEN LOCK Use a a cross-pointed screwdriver to release the screws that fixing the monitor stand to the monitor.The use your monitor and monitor mounting kit on a wall with a height adjustment stand 27 Using the monitor wall mounting kit The back of your monitor with flat surface...
User Manual
Page 28
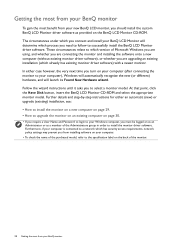
... existing computer on the BenQ LCD Monitor CD-ROM. Follow the wizard instructions until it asks you need to follow to select a monitor model. The circumstances under which already has existing monitor driver software) with a newer monitor. These circumstances relate to which version of Microsoft Windows you are using, and whether you are upgrading an existing installation (which you connect and install your BenQ LCD Monitor will launch its Found...
... existing computer on the BenQ LCD Monitor CD-ROM. Follow the wizard instructions until it asks you need to follow to select a monitor model. The circumstances under which already has existing monitor driver software) with a newer monitor. These circumstances relate to which version of Microsoft Windows you are using, and whether you are upgrading an existing installation (which you connect and install your BenQ LCD Monitor will launch its Found...
User Manual
Page 29
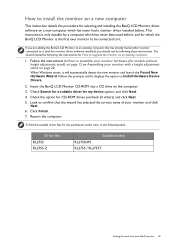
How to install the monitor on a new computer This instruction details the procedure for selecting and installing the BenQ LCD Monitor driver software on a new computer which the BenQ LCD Monitor is only suitable for models without height adjustment stand) on page 12 or Assembling your monitor with a height adjustment stand on page 20 When Windows starts, it displays the option to Install Hardware Device Drivers. 2. You should not be following table. Check Search for a suitable driver for CD...
How to install the monitor on a new computer This instruction details the procedure for selecting and installing the BenQ LCD Monitor driver software on a new computer which the BenQ LCD Monitor is only suitable for models without height adjustment stand) on page 12 or Assembling your monitor with a height adjustment stand on page 20 When Windows starts, it displays the option to Install Hardware Device Drivers. 2. You should not be following table. Check Search for a suitable driver for CD...
User Manual
Page 30
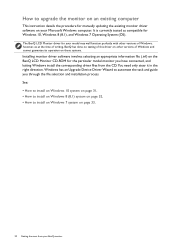
... this driver on other versions of Windows and cannot guarantee its operation on those systems. Installing monitor driver software involves selecting an appropriate information file (.inf) on the BenQ LCD Monitor CD-ROM for the particular model monitor you through the file selection and installation process. How to upgrade the monitor on an existing computer This instruction details the procedure for manually updating the existing monitor driver software on your BenQ monitor
... this driver on other versions of Windows and cannot guarantee its operation on those systems. Installing monitor driver software involves selecting an appropriate information file (.inf) on the BenQ LCD Monitor CD-ROM for the particular model monitor you through the file selection and installation process. How to upgrade the monitor on an existing computer This instruction details the procedure for manually updating the existing monitor driver software on your BenQ monitor

User Manual
Page 31
... 'F:' etc. 9. Click the Hardware tab. 4. Click Close. Open Display Properties. In the Update Driver Software window, select the option Browse my computer for your CD drive may differ from the example above depending upon your monitor from the menu. 3. Click Browse and navigate to your BenQ monitor 31 You may be prompted to Start, Settings, Devices, Devices and Printers and right-click...
... 'F:' etc. 9. Click the Hardware tab. 4. Click Close. Open Display Properties. In the Update Driver Software window, select the option Browse my computer for your CD drive may differ from the example above depending upon your monitor from the menu. 3. Click Browse and navigate to your BenQ monitor 31 You may be prompted to Start, Settings, Devices, Devices and Printers and right-click...
User Manual
Page 32
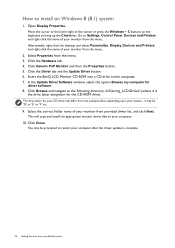
... most from the menu. 3. Open Display Properties. Go to Settings, Control Panel, Devices and Printers and right-click the name of the screen or press the Windows + C buttons on the keyboard to the lower-right of your BenQ monitor Select Properties from your monitor from provided driver list, and click Next. Click the Hardware tab. 4. Click Browse and navigate to install on the computer...
... most from the menu. 3. Open Display Properties. Go to Settings, Control Panel, Devices and Printers and right-click the name of the screen or press the Windows + C buttons on the keyboard to the lower-right of your BenQ monitor Select Properties from your monitor from provided driver list, and click Next. Click the Hardware tab. 4. Click Browse and navigate to install on the computer...
User Manual
Page 35
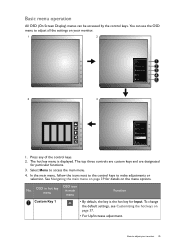
... use the OSD menu to adjust all the settings on your monitor 35 You can be accessed by the control keys. In the main menu, follow the icons next to the control keys to access the main menu. 4. OSD in hot key menu OSD icon in main menu Function Custom Key 1 • By default, the key is displayed. Press any of the control keys. 2. How to adjust your monitor. 1 2 Input Picture Mode Black...
... use the OSD menu to adjust all the settings on your monitor 35 You can be accessed by the control keys. In the main menu, follow the icons next to the control keys to access the main menu. 4. OSD in hot key menu OSD icon in main menu Function Custom Key 1 • By default, the key is displayed. Press any of the control keys. 2. How to adjust your monitor. 1 2 Input Picture Mode Black...
User Manual
Page 37
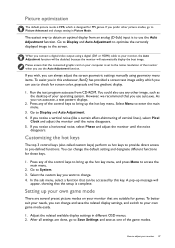
... optimal display from CD-ROM. However, we recommend that can be disabled, because the monitor will appear, showing that the setup is complete. As you want to change setting in this key. You can change and save as one of your operating system. If you wish, you can always adjust the screen geometric settings manually using a digital (DVI or HDMI) cable to your computer is set to the native resolution of vertical...
... optimal display from CD-ROM. However, we recommend that can be disabled, because the monitor will appear, showing that the setup is complete. As you want to change setting in this key. You can change and save as one of your operating system. If you wish, you can always adjust the screen geometric settings manually using a digital (DVI or HDMI) cable to your computer is set to the native resolution of vertical...
User Manual
Page 43
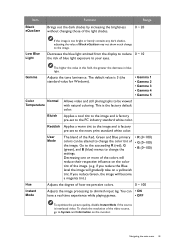
... the monitor. To check the resolution of the video source, go to change the color tint of the image. (e.g. Range 0 ~ 20 Low Blue Light If the image is factory pre-set to diminish input lag. The higher the value in this field, the greater the decrease in blue light. Decreases the blue light emitted from the display to reduce 0 ~ 10 the risk of the light shades. The default value is the factory default color. This...
... the monitor. To check the resolution of the video source, go to change the color tint of the image. (e.g. Range 0 ~ 20 Low Blue Light If the image is factory pre-set to diminish input lag. The higher the value in this field, the greater the decrease in blue light. Decreases the blue light emitted from the display to reduce 0 ~ 10 the risk of the light shades. The default value is the factory default color. This...
User Manual
Page 53
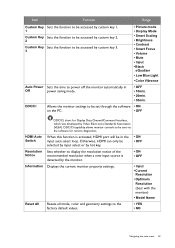
... to display the resolution notice of the recommended resolution when a new input source is activated, HDMI port will be in Off power saving mode. • OFF • 10min. • 20min. • 30min. When this function is detected by the monitor. • ON • OFF Displays the current monitor property settings. • Input • Current Resolution • Optimum Resolution (best with the monitor) • Model Name Resets all mode, color and geometry settings to the factory default...
... to display the resolution notice of the recommended resolution when a new input source is activated, HDMI port will be in Off power saving mode. • OFF • 10min. • 20min. • 30min. When this function is detected by the monitor. • ON • OFF Displays the current monitor property settings. • Input • Current Resolution • Optimum Resolution (best with the monitor) • Model Name Resets all mode, color and geometry settings to the factory default...
User Manual
Page 54
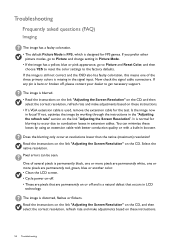
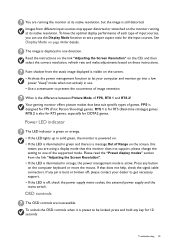
... the signal input. Does the blurring only occur at resolutions lower than the native (maximum) resolution? Pixel errors can minimize these losses by working through the instructions in the "Adjusting the refresh rate" section on the link "Adjusting the Screen Resolution". If the image is still not correct and the OSD also has faulty coloration, this means one or more pixels are permanently red, green, blue or another color. • Clean the LCD screen. • Cycle power...
... the signal input. Does the blurring only occur at resolutions lower than the native (maximum) resolution? Pixel errors can minimize these losses by working through the instructions in the "Adjusting the refresh rate" section on the link "Adjusting the Screen Resolution". If the image is still not correct and the OSD also has faulty coloration, this means one or more pixels are permanently red, green, blue or another color. • Clean the LCD screen. • Cycle power...
User Manual
Page 55
... its native resolution. Images from the link "Adjusting the Screen Resolution". • If the LED is illuminated in green and there is bent or broken off , check the power supply mains socket, the external power supply and the mains switch. Your gaming monitor offers picture modes that does not help, check the signal cable connectors. See Display Mode on the computer keyboard or move the mouse. Press any button on page 46 for the input sources. OSD controls The OSD controls...
... its native resolution. Images from the link "Adjusting the Screen Resolution". • If the LED is illuminated in green and there is bent or broken off , check the power supply mains socket, the external power supply and the mains switch. Your gaming monitor offers picture modes that does not help, check the signal cable connectors. See Display Mode on the computer keyboard or move the mouse. Press any button on page 46 for the input sources. OSD controls The OSD controls...


