
RL60 Series User Manual
Page 6
... you can purchase them separately. • Consider keeping the box and packaging in storage for protecting the monitor during transport. Video Cable: DVI-D Video Cable: HDMI (Optional accessory, sold separately) Audio Cable (Optional accessory, sold separately) • Available accessories and the pictures shown here may need to transport the monitor.
... you can purchase them separately. • Consider keeping the box and packaging in storage for protecting the monitor during transport. Video Cable: DVI-D Video Cable: HDMI (Optional accessory, sold separately) Audio Cable (Optional accessory, sold separately) • Available accessories and the pictures shown here may need to transport the monitor.

RL60 Series User Manual
Page 7
Getting to know your monitor 7 Headphone jack 6. HDMI socket 9. D-Sub socket 11. Audio Line In 5. Getting to know your monitor Front view 1. HDMI out socket 8. Power button 1 2 Back view 3. DVI-D socket 10. AC power input jack 4. Kensington lock slot 3 4 5 6 7 8 9 10 11 • Above diagram may vary depending on the model. • Picture may differ from the product supplied for your region. Control buttons 2. Cable clip 7.
Getting to know your monitor 7 Headphone jack 6. HDMI socket 9. D-Sub socket 11. Audio Line In 5. Getting to know your monitor Front view 1. HDMI out socket 8. Power button 1 2 Back view 3. DVI-D socket 10. AC power input jack 4. Kensington lock slot 3 4 5 6 7 8 9 10 11 • Above diagram may vary depending on the model. • Picture may differ from the product supplied for your region. Control buttons 2. Cable clip 7.

RL60 Series User Manual
Page 10
... on the same PC. Connect the other end of the cable (at the end without the ferrite filter) to the HDMI port of the D-Sub cable (at the end with the ferrite filter) to the computer video socket. Do not use both cables can be used ...
... on the same PC. Connect the other end of the cable (at the end without the ferrite filter) to the HDMI port of the D-Sub cable (at the end with the ferrite filter) to the computer video socket. Do not use both cables can be used ...

RL60 Series User Manual
Page 11
... vary depending on the right may connect headphones to a power outlet just yet. Do not connect the other end of the cable to the HDMI out port on the rear of the monitor. How to assemble your region. 3. To output signal from your computer audio outlet. Connect the... power cable to take the picture quality of the power cord into consideration before making the connection. - Better quality: HDMI / DVI-D - If there is more than one end of each video cable into the socket labelled on the monitor. Plug one video transmission ...
... vary depending on the right may connect headphones to a power outlet just yet. Do not connect the other end of the cable to the HDMI out port on the rear of the monitor. How to assemble your region. 3. To output signal from your computer audio outlet. Connect the... power cable to take the picture quality of the power cord into consideration before making the connection. - Better quality: HDMI / DVI-D - If there is more than one end of each video cable into the socket labelled on the monitor. Plug one video transmission ...
RL60 Series User Manual
Page 26
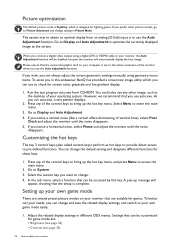
...key. Press any of your operating system. Select the custom key you can always adjust the screen geometric settings manually using a digital (DVI or HDMI) cable to bring up the hot key menu, and press Menu to use the Auto Adjustment function. Setting up message will automatically display the ... is to access the main menu. 2. Press any other picture modes, go to check for these keys. 1. You can be accessed by this endeavour, BenQ has provided a screen test image utility which is designed for games. Go to Display and Auto Adjustment. 4. A pop-up your own game mode There ...
...key. Press any of your operating system. Select the custom key you can always adjust the screen geometric settings manually using a digital (DVI or HDMI) cable to bring up the hot key menu, and press Menu to use the Auto Adjustment function. Setting up message will automatically display the ... is to access the main menu. 2. Press any other picture modes, go to check for these keys. 1. You can be accessed by this endeavour, BenQ has provided a screen test image utility which is designed for games. Go to Display and Auto Adjustment. 4. A pop-up your own game mode There ...

RL60 Series User Manual
Page 34
Display Picture Picture Advanced Save Settings Audio System Picture Mode Senseye Demo Dynamic Contrast Over-scan Display Mode Smart Scaling Color Format HDMI RGB PC Range Standard Movie Photo sRGB Eco RTS 1 RTS 2 Fighting Mode: RTS 1. Change the setting if needed. Photo For viewing still images. To exit ...
Display Picture Picture Advanced Save Settings Audio System Picture Mode Senseye Demo Dynamic Contrast Over-scan Display Mode Smart Scaling Color Format HDMI RGB PC Range Standard Movie Photo sRGB Eco RTS 1 RTS 2 Fighting Mode: RTS 1. Change the setting if needed. Photo For viewing still images. To exit ...

RL60 Series User Manual
Page 35
... an input visual signal, and then to automatically detect the distribution of screen images under the specified mode. • ON • OFF The function is HDMI or D-Sub (VGA converted from Picture Mode. FPS For playing FPS (First Person Shooting) games. Item Senseye Demo Dynamic Contrast Overscan Function Range RTS 1 RTS...
... an input visual signal, and then to automatically detect the distribution of screen images under the specified mode. • ON • OFF The function is HDMI or D-Sub (VGA converted from Picture Mode. FPS For playing FPS (First Person Shooting) games. Item Senseye Demo Dynamic Contrast Overscan Function Range RTS 1 RTS...

RL60 Series User Manual
Page 37
... of the highlight area. Position Adjusts the vertical position of the highlight area. HDMI RGB PC Range Smart Focus If the input source is HDMI, color format is automatically set the Color Format if colors shown on the connected HDMI device. YUV For D-Sub (Component converted from VGA) input source from PC. •...
... of the highlight area. Position Adjusts the vertical position of the highlight area. HDMI RGB PC Range Smart Focus If the input source is HDMI, color format is automatically set the Color Format if colors shown on the connected HDMI device. YUV For D-Sub (Component converted from VGA) input source from PC. •...

RL60 Series User Manual
Page 39
... are not available will be disabled and the corresponding OSD icons will become grayed out. Range 0 ~ 100 • ON • OFF • PC Audio • HDMI Audio • Auto Detect Navigating the main menu 39 or to make selection. Item Volume Mute Function Adjusts the audio volume. Use or to select...
... are not available will be disabled and the corresponding OSD icons will become grayed out. Range 0 ~ 100 • ON • OFF • PC Audio • HDMI Audio • Auto Detect Navigating the main menu 39 or to make selection. Item Volume Mute Function Adjusts the audio volume. Use or to select...

RL60 Series User Manual
Page 40
..., functions and settings. Display Picture Picture Advanced Save Settings Audio System Input OSD Settings Custom Key 1 Custom Key 2 Custom Key 3 Auto Power Off DDC/CI HDMI Auto Switch D-Sub DVI HDMI1 HDMI2 Mode: Standard 1. Item Input Function Use this to change the input to that are not available will disappear.
..., functions and settings. Display Picture Picture Advanced Save Settings Audio System Input OSD Settings Custom Key 1 Custom Key 2 Custom Key 3 Auto Power Off DDC/CI HDMI Auto Switch D-Sub DVI HDMI1 HDMI2 Mode: Standard 1. Item Input Function Use this to change the input to that are not available will disappear.
RL60 Series User Manual
Page 42
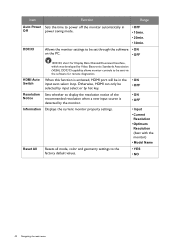
... the PC. • OFF • 10min. • 20min. • 30min. • ON • OFF HDMI Auto Switch Resolution Notice Information Reset All DDC/CI, short for remote diagnostics. Otherwise, HDMI can only be selected by input select or by hot key. • ON • OFF Sets whether to... display the resolution notice of the recommended resolution when a new input source is activated, HDMI port will be sent via the software for Display Data Channel/Command Interface, which was developed by the monitor. • ON • OFF ...
... the PC. • OFF • 10min. • 20min. • 30min. • ON • OFF HDMI Auto Switch Resolution Notice Information Reset All DDC/CI, short for remote diagnostics. Otherwise, HDMI can only be selected by input select or by hot key. • ON • OFF Sets whether to... display the resolution notice of the recommended resolution when a new input source is activated, HDMI port will be sent via the software for Display Data Channel/Command Interface, which was developed by the monitor. • ON • OFF ...
RLx60 Series Quick Start Guide
Page 2
... audio ou le casque. (en option) 4. Connectez le câble d'alimentation au moniteur. 5. Préparer le moniteur et la zone. 2. or D-Sub or DVI 2 HDMI or HDMI out 2 or Line In 3 Headphone 4 5 How to detach the stand and the base 1 2 3 1 2 English Before installing and using the monitor, please carefully read through...
... audio ou le casque. (en option) 4. Connectez le câble d'alimentation au moniteur. 5. Préparer le moniteur et la zone. 2. or D-Sub or DVI 2 HDMI or HDMI out 2 or Line In 3 Headphone 4 5 How to detach the stand and the base 1 2 3 1 2 English Before installing and using the monitor, please carefully read through...

Rl2460HT Data Sheet
Page 1
...m2 1000:1 12M:1 170/160 2ms GTG 16.7million 72% 30~83 50~76 205MHz D-sub / DVI-D / HDMI*2 / headphone jack Built-in 27W Display Colors Color Gamut Hor. RL2460HT Features 24" Widescreen LED Monitor Native Full HD 1920 x 1080 Resolution RTS Gaming Monitor 2 MS (GTG) Response ...Time 12M:1 Ultra High Dynamic Contrast Ratio Stream Ready (HDMI Out) ZeroFlicker™ Black eQualizer Display Mode, Smart Scaling Windows® 8 Compatible RL2460HT Images RTS Smart Scaling Display Mode Black eQualizer Specifications Product Color Back Light Unit Panel Type LCD ...
...m2 1000:1 12M:1 170/160 2ms GTG 16.7million 72% 30~83 50~76 205MHz D-sub / DVI-D / HDMI*2 / headphone jack Built-in 27W Display Colors Color Gamut Hor. RL2460HT Features 24" Widescreen LED Monitor Native Full HD 1920 x 1080 Resolution RTS Gaming Monitor 2 MS (GTG) Response ...Time 12M:1 Ultra High Dynamic Contrast Ratio Stream Ready (HDMI Out) ZeroFlicker™ Black eQualizer Display Mode, Smart Scaling Windows® 8 Compatible RL2460HT Images RTS Smart Scaling Display Mode Black eQualizer Specifications Product Color Back Light Unit Panel Type LCD ...