

Safety Warning and Notice
Page 1
To protect your nearest BenQ service center for assistance. If you want to use the monitor in a public place or a harsh environment, contact your eyesight, please refer to the user manual to the monitor, do not hang or climb onto the monitor. Keep all packing bags out of reach ...of video connectors (D-sub/DVI/HDMI) may occur. Do not place heavy loads on a regular basis while using the monitor, please spend a few minutes reading through the safety instructions below. To avoid possible damage to set the optimal screen resolution and the viewing distance...
To protect your nearest BenQ service center for assistance. If you want to use the monitor in a public place or a harsh environment, contact your eyesight, please refer to the user manual to the monitor, do not hang or climb onto the monitor. Keep all packing bags out of reach ...of video connectors (D-sub/DVI/HDMI) may occur. Do not place heavy loads on a regular basis while using the monitor, please spend a few minutes reading through the safety instructions below. To avoid possible damage to set the optimal screen resolution and the viewing distance...

Safety Warning and Notice
Page 2
...alterations have been altered by unauthorized use or is illegible. The model number or production number on the monitor. Use only the power cord provided by BenQ. Never use it is the sole responsibility of the following conditions occurs: Documents required for... void if any of the user to check whether the monitor is connected to a grounded power outlet before cleaning your monitor Use a monitor cleaner and a soft cloth to come from the monitor, contact your nearest BenQ service center for warranty services have been made by unauthorized...
...alterations have been altered by unauthorized use or is illegible. The model number or production number on the monitor. Use only the power cord provided by BenQ. Never use it is the sole responsibility of the following conditions occurs: Documents required for... void if any of the user to check whether the monitor is connected to a grounded power outlet before cleaning your monitor Use a monitor cleaner and a soft cloth to come from the monitor, contact your nearest BenQ service center for warranty services have been made by unauthorized...

Display Pilot User Manual
Page 1
Display Pilot User Manual LCD Monitor Software
Display Pilot User Manual LCD Monitor Software
Display Pilot User Manual
Page 4
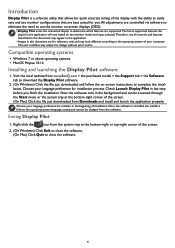
...Exit to close the software. 4 All adjustments are controlled via software to eliminate the need to use monitor configurations that are best suited for installation process. Visit the local website from www.BenQ.com > the purchased model > the Support tab > the Software tab to download the Display Pilot ...software. 2. (On Windows) Click the file just downloaded and follow the on the monitor model and input selected.Therefore, not all ...
...Exit to close the software. 4 All adjustments are controlled via software to eliminate the need to use monitor configurations that are best suited for installation process. Visit the local website from www.BenQ.com > the purchased model > the Support tab > the Software tab to download the Display Pilot ...software. 2. (On Windows) Click the file just downloaded and follow the on the monitor model and input selected.Therefore, not all ...
Display Pilot User Manual
Page 5
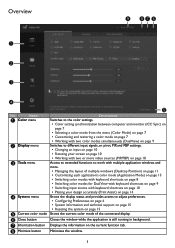
Overview 9 87 6 1 2 3 4 5 No. Name Descriptions 1 Color menu Switches to the color settings. • Color setting synchronization between computer and monitor (ICC Sync) on page 7 • Selecting a color mode from the menu (Color Mode) on page 7 • Customizing and restoring a color mode on page 7 • Working ...
Overview 9 87 6 1 2 3 4 5 No. Name Descriptions 1 Color menu Switches to the color settings. • Color setting synchronization between computer and monitor (ICC Sync) on page 7 • Selecting a color mode from the menu (Color Mode) on page 7 • Customizing and restoring a color mode on page 7 • Working ...
Display Pilot User Manual
Page 7
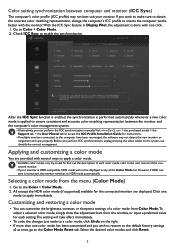
... model.To find out the description of the connected monitor. • If your monitor. Color setting synchronization between the monitor and the computer's color management system. • Alternatively, you can perform the ICC synchronization manually.Visit www.BenQ.com > the purchased model > the Support tab... > the User Manual tab to access the ICC Profile Installation Guide for instructions. • If multiple monitors connected to the computer have been rearranged, the software ...
... model.To find out the description of the connected monitor. • If your monitor. Color setting synchronization between the monitor and the computer's color management system. • Alternatively, you can perform the ICC synchronization manually.Visit www.BenQ.com > the purchased model > the Support tab... > the User Manual tab to access the ICC Profile Installation Guide for instructions. • If multiple monitors connected to the computer have been rearranged, the software ...
Display Pilot User Manual
Page 10
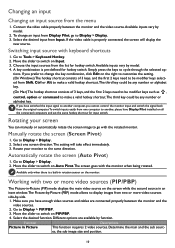
...consists of 3 keys, and the first 2 keys need to be any number or alphabet key. Switching input source with the rotated monitor. Rotating your monitor to display images from two or more video sources (PIP/PBP) The Picture-in-Picture (PIP) mode displays the main video source...main and the sub sources, the sub image size and position. 10 Choose the input sources from Input. Different options are connected properly between the monitor and the video source.Available inputs vary by model. 4. Simply press the keys to Tools > Keyboard Hotkey. 2. Move the slider to Display...
...consists of 3 keys, and the first 2 keys need to be any number or alphabet key. Switching input source with the rotated monitor. Rotating your monitor to display images from two or more video sources (PIP/PBP) The Picture-in-Picture (PIP) mode displays the main video source...main and the sub sources, the sub image size and position. 10 Choose the input sources from Input. Different options are connected properly between the monitor and the video source.Available inputs vary by model. 4. Simply press the keys to Tools > Keyboard Hotkey. 2. Move the slider to Display...
Resolution file
Page 1
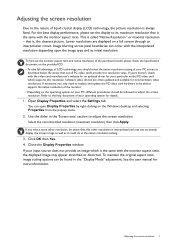
... are often updated and available for your input source does not provide an image which supports this resolution value. To find out the monitor aspect ratio and native resolution of the purchased model, please check the Specification document on a full screen through an interpolation circuit. See... the user manual for details. 1. For the best display performance, please set the display to the nature of the monitor. • Depending on the operating system on the Windows desktop and selecting Properties from the pop-up menu. 2. Open Display Properties and...
... are often updated and available for your input source does not provide an image which supports this resolution value. To find out the monitor aspect ratio and native resolution of the purchased model, please check the Specification document on a full screen through an interpolation circuit. See... the user manual for details. 1. For the best display performance, please set the display to the nature of the monitor. • Depending on the operating system on the Windows desktop and selecting Properties from the pop-up menu. 2. Open Display Properties and...

User Manual
Page 2
... on the marked label. No part of this equipment from the type of BenQ Corporation. If you are no representations or warranties, either expressed or implied, with your LCD Monitor. All rights reserved. Do not use the power adapter while it is damaged..., optical, chemical, manual or otherwise, without obligation of flicker-free may be used. • For PD2710QC / PD2710QE monitor base, the power adapter is inside . The performance of BenQ Corporation to service the power adapter. The socket outlet should be installed near the equipment and be easily accessible...
... on the marked label. No part of this equipment from the type of BenQ Corporation. If you are no representations or warranties, either expressed or implied, with your LCD Monitor. All rights reserved. Do not use the power adapter while it is damaged..., optical, chemical, manual or otherwise, without obligation of flicker-free may be used. • For PD2710QC / PD2710QE monitor base, the power adapter is inside . The performance of BenQ Corporation to service the power adapter. The socket outlet should be installed near the equipment and be easily accessible...

User Manual
Page 3
... of the above mentioned misuse or other risks. Check out BenQ's CSR Website at purchase. Your monitor should never be blocked or covered. Always unplug your monitor from the wall outlet before cleaning. BenQ ecoFACTS BenQ has been dedicated to ensure that consumers make informed green choices... at http://csr.BenQ.com/ for more details on the back or top of the "Bringing Enjoyment 'N ...
... of the above mentioned misuse or other risks. Check out BenQ's CSR Website at purchase. Your monitor should never be blocked or covered. Always unplug your monitor from the wall outlet before cleaning. BenQ ecoFACTS BenQ has been dedicated to ensure that consumers make informed green choices... at http://csr.BenQ.com/ for more details on the back or top of the "Bringing Enjoyment 'N ...

User Manual
Page 4
...the stand ...16 Adjusting the monitor height ...17 Rotating the monitor ...18 Viewing angle adjustment ...19 Using the monitor wall mounting kit 20 How to assemble your monitor hardware when working with a laptop 21 Getting the most from your BenQ monitor 25 How to install the monitor on a new computer 26... How to upgrade the monitor on an existing computer 27 How...
...the stand ...16 Adjusting the monitor height ...17 Rotating the monitor ...18 Viewing angle adjustment ...19 Using the monitor wall mounting kit 20 How to assemble your monitor hardware when working with a laptop 21 Getting the most from your BenQ monitor 25 How to install the monitor on a new computer 26... How to upgrade the monitor on an existing computer 27 How...

User Manual
Page 5
BenQ LCD Monitor Monitor Stand Monitor Base Quick Start Guide CD-ROM Power Cord (Picture may differ from product supplied for a replacement. Getting started When unpacking please check you have the following items. If any are missing or damaged, please contact the place of purchase for your region.) Video Cable: DP to mini DP Getting started 5
BenQ LCD Monitor Monitor Stand Monitor Base Quick Start Guide CD-ROM Power Cord (Picture may differ from product supplied for a replacement. Getting started When unpacking please check you have the following items. If any are missing or damaged, please contact the place of purchase for your region.) Video Cable: DP to mini DP Getting started 5

User Manual
Page 6
USB Cable: Type-C Use of small children. 6 Getting started And the package contents may need to transport the monitor. Power Adapter (for monitor base) Power Cord (for monitor base) (Picture may differ from product supplied for your region.) • Available accessories and the pictures shown here may differ from the actual contents and... ideal for use in the future when you can purchase them separately. • Consider keeping the box and packaging in storage for protecting the monitor during transport. The fitted foam packing is recommended to change without prior notice.
USB Cable: Type-C Use of small children. 6 Getting started And the package contents may need to transport the monitor. Power Adapter (for monitor base) Power Cord (for monitor base) (Picture may differ from product supplied for your region.) • Available accessories and the pictures shown here may differ from the actual contents and... ideal for use in the future when you can purchase them separately. • Consider keeping the box and packaging in storage for protecting the monitor during transport. The fitted foam packing is recommended to change without prior notice.

User Manual
Page 7
AC power switch (for monitor) 6. DisplayPort socket 9. Mini DisplayPort socket 10. Control buttons 3. Power button 4. HDMI socket 8. Cable management hole 7. Power LED indicator Back view 2 3 LAN 45 1 6 7 9 11 8 10 2. Kensington lock slot Getting to know your monitor Front view 1. AC power input jack (for monitor) 5. DisplayPort output socket (for Multi-Stream Transport, MST) 11. Getting to know your monitor 7 Headphone jack 12 12.
AC power switch (for monitor) 6. DisplayPort socket 9. Mini DisplayPort socket 10. Control buttons 3. Power button 4. HDMI socket 8. Cable management hole 7. Power LED indicator Back view 2 3 LAN 45 1 6 7 9 11 8 10 2. Kensington lock slot Getting to know your monitor Front view 1. AC power input jack (for monitor) 5. DisplayPort output socket (for Multi-Stream Transport, MST) 11. Getting to know your monitor 7 Headphone jack 12 12.

User Manual
Page 8
LAN (Local Area Network) port (RJ-45 connector) 17. DC power switch (for monitor base) 8 Getting to USB devices) 16. Headphone jack 15. Kensington lock slot 20. USB 3.0 ports (downstream; connecting to know your region. 13. DC power input jack (for monitor base) 21. Quick release button 14. 13 14 15 LAN 16 15 17 18 19 21 20 • Above diagram may vary depending on the model. • Picture may differ from product supplied for your monitor DisplayPort socket 19. USB Type-C port 18.
LAN (Local Area Network) port (RJ-45 connector) 17. DC power switch (for monitor base) 8 Getting to USB devices) 16. Headphone jack 15. Kensington lock slot 20. USB 3.0 ports (downstream; connecting to know your region. 13. DC power input jack (for monitor base) 21. Quick release button 14. 13 14 15 LAN 16 15 17 18 19 21 20 • Above diagram may vary depending on the model. • Picture may differ from product supplied for your monitor DisplayPort socket 19. USB Type-C port 18.

User Manual
Page 9
LAN Headphone/ Speakers PC Getting to know your reference only. Connections Your monitor can purchase them separately. Working with a desktop as any other monitors do. The following connection illustrations are not supplied with a laptop. Apart from that, its base is a powerful docking that are for your monitor 9 For cables that allows a quick and easy connection with your product, you can work with a desktop For detailed connection methods, see page 13.
LAN Headphone/ Speakers PC Getting to know your reference only. Connections Your monitor can purchase them separately. Working with a desktop as any other monitors do. The following connection illustrations are not supplied with a laptop. Apart from that, its base is a powerful docking that are for your monitor 9 For cables that allows a quick and easy connection with your product, you can work with a desktop For detailed connection methods, see page 13.

User Manual
Page 10
Headphone/ Speakers USB peripherals LAN LAN USB peripherals Monitor base adapter 10 Getting to assemble your monitor hardware when working with a laptop For detailed connection methods, see How to know your monitor LAN switch or hub Laptop Connection with a laptop on page 21. For more information, see page 13.
Headphone/ Speakers USB peripherals LAN LAN USB peripherals Monitor base adapter 10 Getting to assemble your monitor hardware when working with a laptop For detailed connection methods, see How to know your monitor LAN switch or hub Laptop Connection with a laptop on page 21. For more information, see page 13.

User Manual
Page 11
...Excessive force on the display is turned on your reference only. How to assemble your monitor hardware when working 11 Please be handled with the monitor, then push them together until instructed to the monitor. Remove the bag carefully. The location and available input and output jacks may vary depending... assemble your desk will crack the glass or damage the LCD substrate voiding your monitor is still inside the box, hold the upper section of the plastic bag to take out the monitor. Attach the monitor base. Do not plug-in or turn it off before continuing. Placing the...
...Excessive force on the display is turned on your reference only. How to assemble your monitor hardware when working 11 Please be handled with the monitor, then push them together until instructed to the monitor. Remove the bag carefully. The location and available input and output jacks may vary depending... assemble your desk will crack the glass or damage the LCD substrate voiding your monitor is still inside the box, hold the upper section of the plastic bag to take out the monitor. Attach the monitor base. Do not plug-in or turn it off before continuing. Placing the...

User Manual
Page 12
... over and place it upright on its stand on page 17 for more information. You should be handled with the end of the monitor as illustrated. Raise the thumbscrew lid and tighten the thumbscrew as illustrated. You might want to check that they have properly engaged. ...Gently attempt to pull them together. See Adjusting the monitor height on a flat even surface. Your monitor is prohibited. 12 How to minimize unwanted reflections from other light sources. Adjust the screen angle by placing your hands on...
... over and place it upright on its stand on page 17 for more information. You should be handled with the end of the monitor as illustrated. Raise the thumbscrew lid and tighten the thumbscrew as illustrated. You might want to check that they have properly engaged. ...Gently attempt to pull them together. See Adjusting the monitor height on a flat even surface. Your monitor is prohibited. 12 How to minimize unwanted reflections from other light sources. Adjust the screen angle by placing your hands on...

User Manual
Page 13
... mini DP Cable Or Connect the plug of the cable to the OSD menu, see Basic menu operation on the monitor. After the monitor and the computer are powered on the product supplied for your monitor hardware when working 13 Once the setting is not displayed, disconnect the DP cable. Connect the... may connect headphones to the headphone jack found on the back side of the HDMI cable to the monitor video socket. Connect the headphones. To Connect the HDMI Cable Connect the plug of the monitor. Connect the PC video cable. You may vary depending on , if the image is LAN done,...
... mini DP Cable Or Connect the plug of the cable to the OSD menu, see Basic menu operation on the monitor. After the monitor and the computer are powered on the product supplied for your monitor hardware when working 13 Once the setting is not displayed, disconnect the DP cable. Connect the... may connect headphones to the headphone jack found on the back side of the HDMI cable to the monitor video socket. Connect the headphones. To Connect the HDMI Cable Connect the plug of the monitor. Connect the PC video cable. You may vary depending on , if the image is LAN done,...


