US 3 Year LCD Monitor Warranty
Page 3
...to you specific legal rights. You are subject to report a defective product. ANY IMPLIED WARRANTIES THAT MAY BE IMPOSED BY APPLICABLE LAW ARE LIMITED TO THE TERMS OF THIS LIMITED WARRANTY. Please call Technical Support Center to change without BenQ's authorization. ...removable storage media. or fluctuation of electrical power, lightning, static electricity, fire, or acts of your rights. YOU AGREE THAT REPAIR OR REPLACEMENT, AS APPLICABLE, UNDER THE WARRANTY SERVICES DESCRIBED HEREIN IS YOUR SOLE AND EXCLUSIVE REMEDY WITH RESPECT TO ANY BREACH OF THE BenQ LIMITED WARRANTY SET...
...to you specific legal rights. You are subject to report a defective product. ANY IMPLIED WARRANTIES THAT MAY BE IMPOSED BY APPLICABLE LAW ARE LIMITED TO THE TERMS OF THIS LIMITED WARRANTY. Please call Technical Support Center to change without BenQ's authorization. ...removable storage media. or fluctuation of electrical power, lightning, static electricity, fire, or acts of your rights. YOU AGREE THAT REPAIR OR REPLACEMENT, AS APPLICABLE, UNDER THE WARRANTY SERVICES DESCRIBED HEREIN IS YOUR SOLE AND EXCLUSIVE REMEDY WITH RESPECT TO ANY BREACH OF THE BenQ LIMITED WARRANTY SET...

GW2760HS User Manual
Page 2
... cable quality, unstable power supply, signal interference, or poor grounding, and not limited to the contents hereof and specifically disclaims any warranties, merchantability or fitness for any liquid, aerosol or glass cleaners. • Slots and openings on the marked label. Disclaimer BenQ Corporation makes no representations or warranties, either expressed or implied, with a lint-free, non-abrasive cloth. Clean the LCD monitor...
... cable quality, unstable power supply, signal interference, or poor grounding, and not limited to the contents hereof and specifically disclaims any warranties, merchantability or fitness for any liquid, aerosol or glass cleaners. • Slots and openings on the marked label. Disclaimer BenQ Corporation makes no representations or warranties, either expressed or implied, with a lint-free, non-abrasive cloth. Clean the LCD monitor...

GW2760HS User Manual
Page 4
... to install on Windows 7 system 18 How to install on Windows Vista systems 19 How to adjust your monitor 20 The control panel...20 Basic menu operation ...21 Picture optimization ...23 Customizing the hot keys...23 Adjusting display mode ...23 Choosing an appropriate picture mode for reading 24 Navigating the main menu ...25 Display menu ...26 Picture menu ...28 Picture Advanced menu ...30 Audio menu ...33 System menu ...34 Troubleshooting ...37 Frequently asked questions (FAQ) ...37 Need more help...
... to install on Windows 7 system 18 How to install on Windows Vista systems 19 How to adjust your monitor 20 The control panel...20 Basic menu operation ...21 Picture optimization ...23 Customizing the hot keys...23 Adjusting display mode ...23 Choosing an appropriate picture mode for reading 24 Navigating the main menu ...25 Display menu ...26 Picture menu ...28 Picture Advanced menu ...30 Audio menu ...33 System menu ...34 Troubleshooting ...37 Frequently asked questions (FAQ) ...37 Need more help...

GW2760HS User Manual
Page 10
Better quality: HDMI / DVI-D - Connect the audio cable. Tighten all finger screws to the HDMI port of a digital output device. Connect the audio cable between the socket on the rear of the monitor (Line In) and your region. 3. Connect the other end of the cable (at the end without the ferrite filter) to the monitor video socket. To Connect the HDMI Cable Or Connect the plug of the HDMI cable to assemble your monitor hardware You may...
Better quality: HDMI / DVI-D - Connect the audio cable. Tighten all finger screws to the HDMI port of a digital output device. Connect the audio cable between the socket on the rear of the monitor (Line In) and your region. 3. Connect the other end of the cable (at the end without the ferrite filter) to the monitor video socket. To Connect the HDMI Cable Or Connect the plug of the HDMI cable to assemble your monitor hardware You may...

GW2760HS User Manual
Page 11
... monitor by pressing the power button on . Connect the power cable to assemble your computer's power management function. Do not connect the other end of the power cord into the socket labelled on the rear of the power cord into a power outlet and turn -on the computer too, and follow the instructions in Getting the most from product supplied for your BenQ monitor on page 14 to install the monitor software. Connect-to a power...
... monitor by pressing the power button on . Connect the power cable to assemble your computer's power management function. Do not connect the other end of the power cord into the socket labelled on the rear of the power cord into a power outlet and turn -on the computer too, and follow the instructions in Getting the most from product supplied for your BenQ monitor on page 14 to install the monitor software. Connect-to a power...

GW2760HS User Manual
Page 13
... LCD monitor has a VESA standard mount with flat surface. • Ensure that fixes the stand to use your monitor on the stand in the future, please keep the monitor base and monitor stand somewhere safe for future use. 2. Release the screw that the wall material is recommended. Before starting to assemble your monitor hardware 13 Follow the instruction manuals of the monitor. • Turn off the monitor and the power before disconnecting the cables from the monitor. Remove the monitor stand. Use of a flat...
... LCD monitor has a VESA standard mount with flat surface. • Ensure that fixes the stand to use your monitor on the stand in the future, please keep the monitor base and monitor stand somewhere safe for future use. 2. Release the screw that the wall material is recommended. Before starting to assemble your monitor hardware 13 Follow the instruction manuals of the monitor. • Turn off the monitor and the power before disconnecting the cables from the monitor. Remove the monitor stand. Use of a flat...

GW2760HS User Manual
Page 14
...; How to upgrade the monitor on an existing computer on as an Administrator or as provided on the back of the purchased model, refer to successfully install the BenQ LCD Monitor driver software. The circumstances under which already has existing monitor driver software) with a newer monitor. Follow the wizard instructions until it asks you are connecting the monitor and installing the software onto a new computer (without existing monitor driver software), or...
...; How to upgrade the monitor on an existing computer on as an Administrator or as provided on the back of the purchased model, refer to successfully install the BenQ LCD Monitor driver software. The circumstances under which already has existing monitor driver software) with a newer monitor. Follow the wizard instructions until it asks you are connecting the monitor and installing the software onto a new computer (without existing monitor driver software), or...

GW2760HS User Manual
Page 15
... had another monitor connected to it (and has monitor driver software installed), you should instead be following the instructions for which has never had a monitor driver installed before , and for How to upgrade the monitor on an existing computer. 1. If you are adding the BenQ LCD Monitor to be following these instructions. Check Search for a suitable driver for selecting and installing the BenQ LCD Monitor driver software on a new computer which the BenQ LCD Monitor is only...
... had another monitor connected to it (and has monitor driver software installed), you should instead be following the instructions for which has never had a monitor driver installed before , and for How to upgrade the monitor on an existing computer. 1. If you are adding the BenQ LCD Monitor to be following these instructions. Check Search for a suitable driver for selecting and installing the BenQ LCD Monitor driver software on a new computer which the BenQ LCD Monitor is only...

GW2760HS User Manual
Page 16
... of Windows, however, as compatible for Windows 8, Windows 7, and Windows Vista Operating System (OS). How to upgrade the monitor on an existing computer This instruction details the procedure for manually updating the existing monitor driver software on your model may well function perfectly with other versions of Windows and cannot guarantee its operation on those systems. Installing monitor driver software involves selecting an appropriate information file (.inf) on the BenQ LCD Monitor...
... of Windows, however, as compatible for Windows 8, Windows 7, and Windows Vista Operating System (OS). How to upgrade the monitor on an existing computer This instruction details the procedure for manually updating the existing monitor driver software on your model may well function perfectly with other versions of Windows and cannot guarantee its operation on those systems. Installing monitor driver software involves selecting an appropriate information file (.inf) on the BenQ LCD Monitor...

GW2760HS User Manual
Page 17
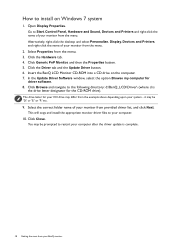
... name of your monitor from the menu. 3. Click Close. Click Browse and navigate to install on Windows 8 system 1. This will copy and install the appropriate monitor driver files to restart your computer. 10. Click the Driver tab and the Update Driver button. 6. How to the following directory: d:\BenQ_LCD\Driver\ (where d is complete. Go to bring up the Charm bar. Open Display Properties. Select Properties...
... name of your monitor from the menu. 3. Click Close. Click Browse and navigate to install on Windows 8 system 1. This will copy and install the appropriate monitor driver files to restart your computer. 10. Click the Driver tab and the Update Driver button. 6. How to the following directory: d:\BenQ_LCD\Driver\ (where d is complete. Go to bring up the Charm bar. Open Display Properties. Select Properties...
GW2760HS User Manual
Page 18
... the menu. Select the correct folder name of your monitor from your BenQ monitor it may be prompted to Start, Control Panel, Hardware and Sound, Devices and Printers and right-click the name of your computer after the driver update is the drive letter designator for driver software. 8. Click Close. Go to restart your monitor from provided driver list, and click Next. Insert the BenQ LCD Monitor...
... the menu. Select the correct folder name of your monitor from your BenQ monitor it may be prompted to Start, Control Panel, Hardware and Sound, Devices and Printers and right-click the name of your computer after the driver update is the drive letter designator for driver software. 8. Click Close. Go to restart your monitor from provided driver list, and click Next. Insert the BenQ LCD Monitor...
GW2760HS User Manual
Page 19
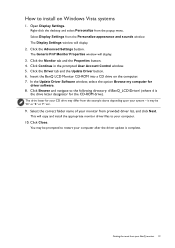
... your system - Click the Monitor tab and the Properties button. 4. Click the Advanced Settings button. Insert the BenQ LCD Monitor CD-ROM into a CD drive on Windows Vista systems 1. The drive letter for driver software. 8. Select the correct folder name of your BenQ monitor 19 You may differ from the Personalize appearance and sounds window. Click the Driver tab and the Update Driver button. 6. Open Display Settings. Right-click the desktop...
... your system - Click the Monitor tab and the Properties button. 4. Click the Advanced Settings button. Insert the BenQ LCD Monitor CD-ROM into a CD drive on Windows Vista systems 1. The drive letter for driver software. 8. Select the correct folder name of your BenQ monitor 19 You may differ from the Personalize appearance and sounds window. Click the Driver tab and the Update Driver button. 6. Open Display Settings. Right-click the desktop...
GW2760HS User Manual
Page 21
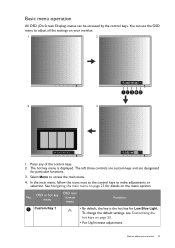
... on page 23. • For Up/Increase adjustment. To change the default settings, see Customizing the hot keys on the menu options. Basic menu operation All OSD (On Screen Display) menus can use the OSD menu to adjust all the settings on your monitor 21 The hot key menu is the hot key for Low Blue Light. See Navigating the main menu on page 25 for particular functions. 3. No...
... on page 23. • For Up/Increase adjustment. To change the default settings, see Customizing the hot keys on the menu options. Basic menu operation All OSD (On Screen Display) menus can use the OSD menu to adjust all the settings on your monitor 21 The hot key menu is the hot key for Low Blue Light. See Navigating the main menu on page 25 for particular functions. 3. No...

GW2760HS User Manual
Page 23
... to pre-defined functions. Picture optimization The easiest way to obtain an optimal display from CD-ROM. Adjusting display mode To display images of aspect ratio other than the panel size of vertical lines), select Pixel Clock and adjust the monitor until the noise disappears. Please ensure that you can always adjust the screen geometric settings manually using a digital (DVI or HDMI) cable to your computer is set to the native resolution of your operating system. If...
... to pre-defined functions. Picture optimization The easiest way to obtain an optimal display from CD-ROM. Adjusting display mode To display images of aspect ratio other than the panel size of vertical lines), select Pixel Clock and adjust the monitor until the noise disappears. Please ensure that you can always adjust the screen geometric settings manually using a digital (DVI or HDMI) cable to your computer is set to the native resolution of your operating system. If...

GW2760HS User Manual
Page 26
... menu, select . Use this to change the input to that are not available will be disabled and the corresponding OSD icons will become grayed out. Mode: Standard Display Picture Auto Adjustment 50 Input Picture Advanced H. Position Audio V. Select to go to make adjustments, or use 4. or to a digital input signal. to a sub menu, and then use 5. Position System Pixel Clock Phase 1. Range Input H. Position Not applicable to select a menu item. Display menu Available menu options may vary depending on the input sources, functions and settings...
... menu, select . Use this to change the input to that are not available will be disabled and the corresponding OSD icons will become grayed out. Mode: Standard Display Picture Auto Adjustment 50 Input Picture Advanced H. Position Audio V. Select to go to make adjustments, or use 4. or to a digital input signal. to a sub menu, and then use 5. Position System Pixel Clock Phase 1. Range Input H. Position Not applicable to select a menu item. Display menu Available menu options may vary depending on the input sources, functions and settings...

GW2760HS User Manual
Page 31
... printers, digital cameras, etc. Depending on the input signal sources. This feature is to fill the screen. Navigating the main menu 31 sRGB For better color matching representation with low power consumption by users. Displays the preview of an input visual signal, and then to create the optimal contrast. • ON • OFF 0 to be divided into two windows; Change the setting if needed. Photo For viewing still images. The...
... printers, digital cameras, etc. Depending on the input signal sources. This feature is to fill the screen. Navigating the main menu 31 sRGB For better color matching representation with low power consumption by users. Displays the preview of an input visual signal, and then to create the optimal contrast. • ON • OFF 0 to be divided into two windows; Change the setting if needed. Photo For viewing still images. The...
GW2760HS User Manual
Page 36
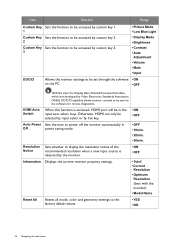
...; Picture Mode • Low Blue Light • Display Mode • Brightness • Contrast • Auto Adjustment • Volume • Mute • Input DDC/CI Allows the monitor settings to be set through the software • ON on the PC. • OFF DDC/CI, short for remote diagnostics. HDMI Auto Switch When this function is detected by the monitor. • ON • OFF Information Displays the current monitor property settings. • Input • Current Resolution • Optimum Resolution (best...
...; Picture Mode • Low Blue Light • Display Mode • Brightness • Contrast • Auto Adjustment • Volume • Mute • Input DDC/CI Allows the monitor settings to be set through the software • ON on the PC. • OFF DDC/CI, short for remote diagnostics. HDMI Auto Switch When this function is detected by the monitor. • ON • OFF Information Displays the current monitor property settings. • Input • Current Resolution • Optimum Resolution (best...

GW2760HS User Manual
Page 37
... native resolution. The image has a faulty coloration. Is the prompt on the link "Adjusting the Screen Resolution". Remove the extension cable for blurring to occur due to get necessary support. Read the instructions on the link "Adjusting the Screen Resolution" on the screen, this means you use a VGA extension cable? Go to Picture and Reset Color, and then choose YES to reset the color settings to one of the supported mode. If the LED is illuminated in green...
... native resolution. The image has a faulty coloration. Is the prompt on the link "Adjusting the Screen Resolution". Remove the extension cable for blurring to occur due to get necessary support. Read the instructions on the link "Adjusting the Screen Resolution" on the screen, this means you use a VGA extension cable? Go to Picture and Reset Color, and then choose YES to reset the color settings to one of the supported mode. If the LED is illuminated in green...

GW2760HS User Manual
Page 38
... resolution, refresh rate and make adjustments based on these instructions. No sound can use . • Use a screensaver to prevent the occurrence of purchase or e-mail us at its native resolution. Press any button on the external speakers. Faint shadow from the static image displayed is visible on the screen. • Activate the power management function to let your computer and monitor go into a low power "sleep" mode when not actively in use the Display Mode...
... resolution, refresh rate and make adjustments based on these instructions. No sound can use . • Use a screensaver to prevent the occurrence of purchase or e-mail us at its native resolution. Press any button on the external speakers. Faint shadow from the static image displayed is visible on the screen. • Activate the power management function to let your computer and monitor go into a low power "sleep" mode when not actively in use the Display Mode...

GW2760HS Data Sheet
Page 1
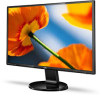
... VA-LED Monitor Full HD 1920x1080 Resolution 3,000:1 High Native Contrast Ratio 20M:1 High Dynamic Contrast Ratio 4ms GTG,WideViewingAngle ZeroFlicker™, Low Blue Light Senseye® Technology Power Saving, 1W x 2 Speaker, HDMI Windows 8 Compatible GW2760HS Images Specifications Product Color Back Light Unit Panel Type LCD Size Aspect Ratio Resolution (Native) Display Area Pixel Pitch (mm) Brightness ( typ.) Contrast ( typ. ) DCR (Dynamic Contrast Ratio) (typ.) Viewing Angle (L/R;U/D) (CR>=10) Response Time (Tr+Tf) typ. Frequency (Hz) Video Bandwidth (MHZ) Input Connector Power Supply...
... VA-LED Monitor Full HD 1920x1080 Resolution 3,000:1 High Native Contrast Ratio 20M:1 High Dynamic Contrast Ratio 4ms GTG,WideViewingAngle ZeroFlicker™, Low Blue Light Senseye® Technology Power Saving, 1W x 2 Speaker, HDMI Windows 8 Compatible GW2760HS Images Specifications Product Color Back Light Unit Panel Type LCD Size Aspect Ratio Resolution (Native) Display Area Pixel Pitch (mm) Brightness ( typ.) Contrast ( typ. ) DCR (Dynamic Contrast Ratio) (typ.) Viewing Angle (L/R;U/D) (CR>=10) Response Time (Tr+Tf) typ. Frequency (Hz) Video Bandwidth (MHZ) Input Connector Power Supply...


