Safety Warning and Notice
Page 1
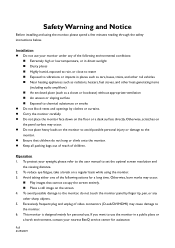
... monitor. 6. Avoid taking either one of children. Operation 1. To avoid possible damage to the monitor....surface directly. This monitor is designed mainly for personal use the monitor in places such ...Notice Before installing and using the monitor. 3. Otherwise, burn marks may...monitor panel by clothes or curtains. Carry the monitor carefully. Do not place the monitor...monitor to avoid possible personal injury or damage to the monitor, do not hang or climb onto the monitor...monitor, please spend a few minutes reading through the safety instructions below...
... monitor. 6. Avoid taking either one of children. Operation 1. To avoid possible damage to the monitor....surface directly. This monitor is designed mainly for personal use the monitor in places such ...Notice Before installing and using the monitor. 3. Otherwise, burn marks may...monitor panel by clothes or curtains. Carry the monitor carefully. Do not place the monitor...monitor to avoid possible personal injury or damage to the monitor, do not hang or climb onto the monitor...monitor, please spend a few minutes reading through the safety instructions below...

Safety Warning and Notice
Page 2
... altered by unauthorized use solvents such as alcohol to avoid possible dangers such as antenna, Cable TV) outside the monitor. Defects caused by BenQ. Never use a power cord that the power is illegible. The model number or production number on ... cord provided by abuse or misuse of the monitor Before using the monitor with a (multi-outlet) extension cord. Always turn off the monitor before cleaning your monitor Use a monitor cleaner and a soft cloth to clean your nearest BenQ service center for warranty services have the pay the...
... altered by unauthorized use solvents such as alcohol to avoid possible dangers such as antenna, Cable TV) outside the monitor. Defects caused by BenQ. Never use a power cord that the power is illegible. The model number or production number on ... cord provided by abuse or misuse of the monitor Before using the monitor with a (multi-outlet) extension cord. Always turn off the monitor before cleaning your monitor Use a monitor cleaner and a soft cloth to clean your nearest BenQ service center for warranty services have the pay the...
Resolution file
Page 1
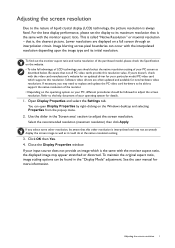
...Resolution" or maximal resolution - Close the Display Properties window. that this other resolution, be followed to support the native resolution of the monitor. • Depending on the operating system on the website. • To take full advantage of your input source does not provide an...system for more information. For the best display performance, please set the display to adjust the screen resolution. To find out the monitor aspect ratio and native resolution of the purchased model, please check the Specification on your PC, different procedures should select the native ...
...Resolution" or maximal resolution - Close the Display Properties window. that this other resolution, be followed to support the native resolution of the monitor. • Depending on the operating system on the website. • To take full advantage of your input source does not provide an...system for more information. For the best display performance, please set the display to adjust the screen resolution. To find out the monitor aspect ratio and native resolution of the purchased model, please check the Specification on your PC, different procedures should select the native ...

Resolution file
Page 4
... from graphic cards which do not correspond with the resolution 1360x768, the default Display Mode is not, however, an error. Image disruption may improve this monitor with the usual standard. You may occur as a result of your graphic card first. Main 6/8/2020 4 Preset display modes For 18.5-inch models, pay attention...
... from graphic cards which do not correspond with the resolution 1360x768, the default Display Mode is not, however, an error. Image disruption may improve this monitor with the usual standard. You may occur as a result of your graphic card first. Main 6/8/2020 4 Preset display modes For 18.5-inch models, pay attention...

User Manual
Page 1
LCD Monitor User Manual Stylish Monitor with Eye Care Technology | G Series
LCD Monitor User Manual Stylish Monitor with Eye Care Technology | G Series

User Manual
Page 4
Do not cover the power adapter with your LCD Monitor. There are not sure of the type of power available, consult your dealer or local power company. • The Class I pluggable equipment Type A must be ... appears to H05VV-F or H05RR-F, 3G, 0.75mm2 must be used . • Use only the power cord provided by BenQ. Power safety Please follow these safety instructions for best performance, and long life for your monitor. 0~40 C 10~90 % 0~3000 m -20~60 C 10~60 % 0~12000 m • The AC plug isolates this equipment from...
Do not cover the power adapter with your LCD Monitor. There are not sure of the type of power available, consult your dealer or local power company. • The Class I pluggable equipment Type A must be ... appears to H05VV-F or H05RR-F, 3G, 0.75mm2 must be used . • Use only the power cord provided by BenQ. Power safety Please follow these safety instructions for best performance, and long life for your monitor. 0~40 C 10~90 % 0~3000 m -20~60 C 10~60 % 0~12000 m • The AC plug isolates this equipment from...
User Manual
Page 5
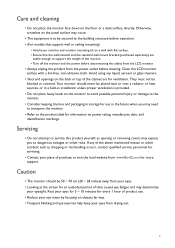
... the power before disconnecting the cables from the LCD monitor. • Always unplug the product from the power outlet before operation. • (For models that support wall or ceiling mounting) • Install your eyes from www.BenQ.com for more support. If any liquid, aerosol or ...glass cleaners. • Slots and openings on power rating, manufacture date, and identification markings. Avoid using any of the above mentioned misuse or other risks. Caution • The monitor should never be blocked...
... the power before disconnecting the cables from the LCD monitor. • Always unplug the product from the power outlet before operation. • (For models that support wall or ceiling mounting) • Install your eyes from www.BenQ.com for more support. If any liquid, aerosol or ...glass cleaners. • Slots and openings on power rating, manufacture date, and identification markings. Avoid using any of the above mentioned misuse or other risks. Caution • The monitor should never be blocked...

User Manual
Page 6
...27 How to attach the monitor base...27 How to detach the base ...29 Adjusting the monitor height ...30 Rotating the monitor ...31 Viewing angle adjustment ...32 Using the monitor wall mounting kit 33 Getting the most from your BenQ monitor 34 Downloading the LCD Monitor driver files from the ...Internet 34 How to install the monitor on a new computer 35...
...27 How to attach the monitor base...27 How to detach the base ...29 Adjusting the monitor height ...30 Rotating the monitor ...31 Viewing angle adjustment ...32 Using the monitor wall mounting kit 33 Getting the most from your BenQ monitor 34 Downloading the LCD Monitor driver files from the ...Internet 34 How to install the monitor on a new computer 35...
User Manual
Page 8
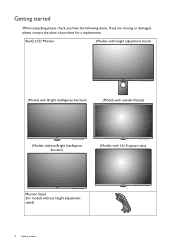
BenQ LCD Monitor (Models with height adjustment stand) (Models with Bright Intelligence function) (Models with standard bezel) (Models without Bright Intelligence function) (Models with 16:10 aspect ratio) Monitor Stand (for models without height adjustment stand) 8 Getting started When unpacking please check you have the following items. If any are missing or damaged, please contact the place of purchase for a replacement. Getting started
BenQ LCD Monitor (Models with height adjustment stand) (Models with Bright Intelligence function) (Models with standard bezel) (Models without Bright Intelligence function) (Models with 16:10 aspect ratio) Monitor Stand (for models without height adjustment stand) 8 Getting started When unpacking please check you have the following items. If any are missing or damaged, please contact the place of purchase for a replacement. Getting started
User Manual
Page 9
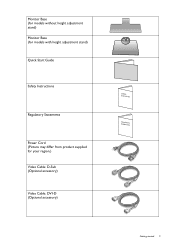
Monitor Base (for models without height adjustment stand) Monitor Base (for models with height adjustment stand) Quick Start Guide Safety Instructions Regulatory Statements Power Cord (Picture may differ from product supplied for your region.) Video Cable: D-Sub (Optional accessory) Video Cable: DVI-D (Optional accessory) Safety Instructions SRteagteumlaetonrtys Getting started 9
Monitor Base (for models without height adjustment stand) Monitor Base (for models with height adjustment stand) Quick Start Guide Safety Instructions Regulatory Statements Power Cord (Picture may differ from product supplied for your region.) Video Cable: D-Sub (Optional accessory) Video Cable: DVI-D (Optional accessory) Safety Instructions SRteagteumlaetonrtys Getting started 9
User Manual
Page 10
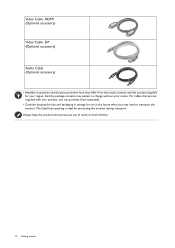
... accessories and the pictures shown here may differ from the actual contents and the product supplied for your product, you may subject to transport the monitor. The fitted foam packing is ideal for use in the future when you can purchase them separately. • Consider keeping the box and packaging in...
... accessories and the pictures shown here may differ from the actual contents and the product supplied for your product, you may subject to transport the monitor. The fitted foam packing is ideal for use in the future when you can purchase them separately. • Consider keeping the box and packaging in...
User Manual
Page 11
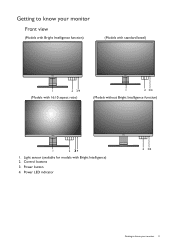
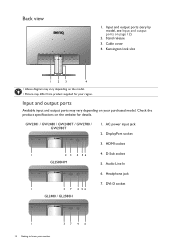
Power button 4. Power LED indicator 2 3/4 Getting to know your monitor Front view (Models with Bright Intelligence function) (Models with standard bezel) 1 2 3/4 (Models with Bright Intelligence) 2. Light sensor (available for models with 16:10 aspect ratio) 1 2 3/4 (Models without Bright Intelligence function) 1 2 34 1. Control buttons 3. Getting to know your monitor 11
Power button 4. Power LED indicator 2 3/4 Getting to know your monitor Front view (Models with Bright Intelligence function) (Models with standard bezel) 1 2 3/4 (Models with Bright Intelligence) 2. Light sensor (available for models with 16:10 aspect ratio) 1 2 3/4 (Models without Bright Intelligence function) 1 2 34 1. Control buttons 3. Getting to know your monitor 11
User Manual
Page 12
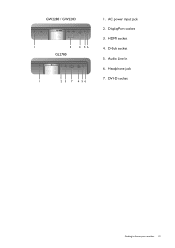
... GL2580HM 5. Headphone jack 7. DisplayPort socket 3. Check the product specifications on page 12) 2. DVI-D socket D-SUB 1 12 Getting to know your region. Stand release 3. GW2381 / GW2480 / GW2480T / GW2780 / GW2780T D-SUB LINE IN 1. Input and output ports Available input and output ports may differ from product supplied for details. Input and output ports...
... GL2580HM 5. Headphone jack 7. DisplayPort socket 3. Check the product specifications on page 12) 2. DVI-D socket D-SUB 1 12 Getting to know your region. Stand release 3. GW2381 / GW2480 / GW2480T / GW2780 / GW2780T D-SUB LINE IN 1. Input and output ports Available input and output ports may differ from product supplied for details. Input and output ports...
User Manual
Page 13
D-Sub socket 5. DVI-D socket Getting to know your monitor 13 GW2280 / GW2283 D-SUB LINE IN 1 3 4 56 GL2780 1 2 3 7 4 56 1. Audio Line In 6. HDMI socket 4. AC power input jack 2. DisplayPort socket 3. Headphone jack 7.
D-Sub socket 5. DVI-D socket Getting to know your monitor 13 GW2280 / GW2283 D-SUB LINE IN 1 3 4 56 GL2780 1 2 3 7 4 56 1. Audio Line In 6. HDMI socket 4. AC power input jack 2. DisplayPort socket 3. Headphone jack 7.
User Manual
Page 14
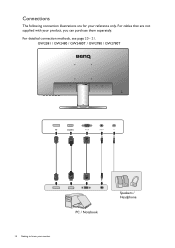
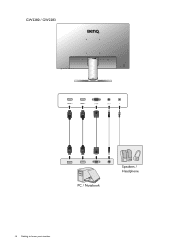
For detailed connection methods, see page 20 - 21. GW2381 / GW2480 / GW2480T / GW2780 / GW2780T D-SUB LINE IN 14 Getting to know your reference only. Connections The following connection illustrations are not supplied with your product, you can purchase them separately. For cables that are for your monitor PC / Notebook Speakers / Headphone
For detailed connection methods, see page 20 - 21. GW2381 / GW2480 / GW2480T / GW2780 / GW2780T D-SUB LINE IN 14 Getting to know your reference only. Connections The following connection illustrations are not supplied with your product, you can purchase them separately. For cables that are for your monitor PC / Notebook Speakers / Headphone
User Manual
Page 15
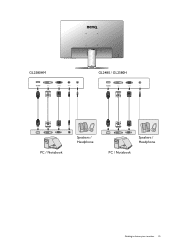
GL2580HM D-SUB LINE IN GL2480 / GL2580H PC / Notebook Speakers / Headphone Speakers / Headphone PC / Notebook Getting to know your monitor 15
GL2580HM D-SUB LINE IN GL2480 / GL2580H PC / Notebook Speakers / Headphone Speakers / Headphone PC / Notebook Getting to know your monitor 15
User Manual
Page 16
GW2280 / GW2283 D-SUB LINE IN PC / Notebook Speakers / Headphone 16 Getting to know your monitor
GW2280 / GW2283 D-SUB LINE IN PC / Notebook Speakers / Headphone 16 Getting to know your monitor
User Manual
Page 17
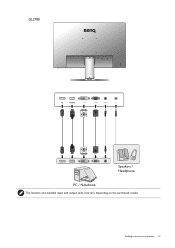
Getting to know your monitor 17 GL2780 Speakers / Headphone PC / Notebook The location and available input and output jacks may vary depending on the purchased model.
Getting to know your monitor 17 GL2780 Speakers / Headphone PC / Notebook The location and available input and output jacks may vary depending on the purchased model.
User Manual
Page 18
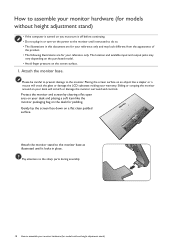
... padded surface. Gently lay the screen face down on your desk will crack the glass or damage the LCD substrate voiding your warranty. Protect the monitor and screen by clearing a flat open area on your desk and placing a soft item like a stapler or a mouse will scratch or damage the... (for your reference only and may vary depending on the purchased model. • Avoid finger pressure on the power to the monitor. The location and available input and output jacks may look different from the appearance of the product. • The following illustrations are for models without ...
... padded surface. Gently lay the screen face down on your desk will crack the glass or damage the LCD substrate voiding your warranty. Protect the monitor and screen by clearing a flat open area on your desk and placing a soft item like a stapler or a mouse will scratch or damage the... (for your reference only and may vary depending on the purchased model. • Avoid finger pressure on the power to the monitor. The location and available input and output jacks may look different from the appearance of the product. • The following illustrations are for models without ...
User Manual
Page 19
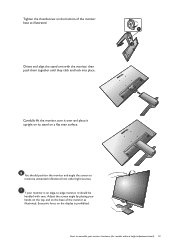
... push them together until they click and lock into place. 1 2 Carefully lift the monitor, turn it over and place it should position the monitor and angle the screen to minimize unwanted reflections from other light sources. Adjust the screen angle by placing your hands on the top and on a ...flat even surface. How to assemble your monitor is prohibited. Excessive force on the bottom of the monitor as illustrated. Tighten the thumbscrew on the display is an edge-to-edge...
... push them together until they click and lock into place. 1 2 Carefully lift the monitor, turn it over and place it should position the monitor and angle the screen to minimize unwanted reflections from other light sources. Adjust the screen angle by placing your hands on the top and on a ...flat even surface. How to assemble your monitor is prohibited. Excessive force on the bottom of the monitor as illustrated. Tighten the thumbscrew on the display is an edge-to-edge...


