
User Manual
Page 2
... safety instructions for best performance, and long life for your monitor. • The AC plug isolates this publication may expose you are for servicing. 2 If you to the contents hereof and specifically disclaims any warranties, merchantability or fitness for pluggable equipment. Servicing Do not attempt to service this publication and to make changes from the AC supply. • The power supply cord serves as a power...
... safety instructions for best performance, and long life for your monitor. • The AC plug isolates this publication may expose you are for servicing. 2 If you to the contents hereof and specifically disclaims any warranties, merchantability or fitness for pluggable equipment. Servicing Do not attempt to service this publication and to make changes from the AC supply. • The power supply cord serves as a power...

User Manual
Page 4
... view ...7 Input and output ports...8 How to assemble your monitor hardware 9 How to detach the stand base ...13 Using the monitor wall mounting kit 14 Getting the most from your BenQ monitor 15 How to install the monitor on a new computer 16 How to upgrade the monitor on an existing computer 17 How to install on Windows 8 system 18 How to install on Windows 7 system 19 How to adjust your monitor 20 The control panel...
... view ...7 Input and output ports...8 How to assemble your monitor hardware 9 How to detach the stand base ...13 Using the monitor wall mounting kit 14 Getting the most from your BenQ monitor 15 How to install the monitor on a new computer 16 How to upgrade the monitor on an existing computer 17 How to install on Windows 8 system 18 How to install on Windows 7 system 19 How to adjust your monitor 20 The control panel...

User Manual
Page 9
.... How to assemble your monitor hardware • If the computer is 27 inches, follow the illustration on the right to attach the monitor stand and the base. Protect the monitor and screen by clearing a flat open area on your monitor hardware 9 Available input and output jacks may vary depending on a flat clean padded surface. Gently lay the screen face down on the purchased model. 1. Attach the monitor base.
.... How to assemble your monitor hardware • If the computer is 27 inches, follow the illustration on the right to attach the monitor stand and the base. Protect the monitor and screen by clearing a flat open area on your monitor hardware 9 Available input and output jacks may vary depending on a flat clean padded surface. Gently lay the screen face down on the purchased model. 1. Attach the monitor base.

User Manual
Page 11
... the headphone jack found next to take the picture quality of each video cable into the socket labelled on the rear of the monitor. 4. To Connect the HDMI Cable Or Connect the plug of a digital output device. Connect the other end to assemble your computer audio outlet. Good quality: D-Sub The video cables included in your region. 3. Connect the power cable to the HDMI port on the product supplied for models with speakers).
... the headphone jack found next to take the picture quality of each video cable into the socket labelled on the rear of the monitor. 4. To Connect the HDMI Cable Or Connect the plug of a digital output device. Connect the other end to assemble your computer audio outlet. Good quality: D-Sub The video cables included in your region. 3. Connect the power cable to the HDMI port on the product supplied for models with speakers).

User Manual
Page 12
5. To extend the service life of the power cord into a power outlet and turn -on . Picture may differ from your BenQ monitor on page 15 to and turn it on the power. Turn on the monitor. Turn on the monitor by pressing the power button on the computer too, and follow the instructions in Getting the most from product supplied for your monitor hardware Plug the other end of the product, we recommend that you use your computer's power management function. 12 How to assemble your region. Connect-to install the monitor software.
5. To extend the service life of the power cord into a power outlet and turn -on . Picture may differ from your BenQ monitor on page 15 to and turn it on the power. Turn on the monitor. Turn on the monitor by pressing the power button on the computer too, and follow the instructions in Getting the most from product supplied for your monitor hardware Plug the other end of the product, we recommend that you use your computer's power management function. 12 How to assemble your region. Connect-to install the monitor software.

User Manual
Page 13
... or damage the monitor surround and controls. 2. Press the locking clips to detach the monitor base from the monitor. 2 1 3 1 2 3 1 2 Release button How to detach the stand base 1. Then pull the monitor stand backward away from the monitor stand arm. How to assemble your monitor hardware 13 Protect the monitor and screen by clearing a flat open area on the desk for padding, before unplugging the monitor signal cable. While holding the monitor stand arm with...
... or damage the monitor surround and controls. 2. Press the locking clips to detach the monitor base from the monitor. 2 1 3 1 2 3 1 2 Release button How to detach the stand base 1. Then pull the monitor stand backward away from the monitor stand arm. How to assemble your monitor hardware 13 Protect the monitor and screen by clearing a flat open area on the desk for padding, before unplugging the monitor signal cable. While holding the monitor stand arm with...
User Manual
Page 14
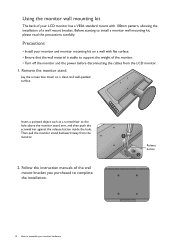
... of your LCD monitor has a VESA standard mount with flat surface. • Ensure that the wall material is stable to support the weight of the monitor. • Turn off the monitor and the power before disconnecting the cables from the monitor. 2. Follow the instruction manuals of a wall mount bracket. Remove the monitor stand. Before starting to the hole above the monitor stand arm, and then push the screwdriver against the release button inside the...
... of your LCD monitor has a VESA standard mount with flat surface. • Ensure that the wall material is stable to support the weight of the monitor. • Turn off the monitor and the power before disconnecting the cables from the monitor. 2. Follow the instruction manuals of a wall mount bracket. Remove the monitor stand. Before starting to the hole above the monitor stand arm, and then push the screwdriver against the release button inside the...
User Manual
Page 15
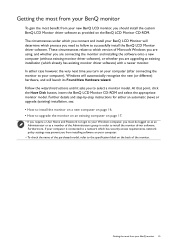
... wizard instructions until it asks you are upgrading an existing installation (which process you from installing software on your computer. • To check the name of the purchased model, refer to the specification label on your computer (after connecting the monitor to select a monitor model. These circumstances relate to which version of Microsoft Windows you are using, and whether you are connecting the monitor and installing the software...
... wizard instructions until it asks you are upgrading an existing installation (which process you from installing software on your computer. • To check the name of the purchased model, refer to the specification label on your computer (after connecting the monitor to select a monitor model. These circumstances relate to which version of Microsoft Windows you are using, and whether you are connecting the monitor and installing the software...
User Manual
Page 16
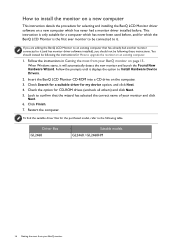
When Windows starts, it displays the option to Install Hardware Device Drivers. 2. Look to it (and has monitor driver software installed), you are adding the BenQ LCD Monitor to an existing computer that has already had a monitor driver installed before. Driver files GL2460 Suitable models GL2460 / GL2460HM 16 Getting the most from your BenQ monitor Follow the instructions in Getting the most from your monitor and click Next. 6. Click Finish. 7. Insert the BenQ LCD Monitor CD-ROM...
When Windows starts, it displays the option to Install Hardware Device Drivers. 2. Look to it (and has monitor driver software installed), you are adding the BenQ LCD Monitor to an existing computer that has already had a monitor driver installed before. Driver files GL2460 Suitable models GL2460 / GL2460HM 16 Getting the most from your BenQ monitor Follow the instructions in Getting the most from your monitor and click Next. 6. Click Finish. 7. Insert the BenQ LCD Monitor CD-ROM...
User Manual
Page 17
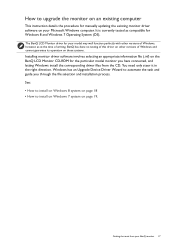
... BenQ LCD Monitor driver for your model may well function perfectly with other versions of Windows, however, as compatible for Windows 8 and Windows 7 Operating System (OS). Getting the most from the CD. Windows has an Upgrade Device Driver Wizard to install on Windows 7 system on page 19. How to upgrade the monitor on an existing computer This instruction details the procedure for manually updating the existing monitor driver software on your BenQ monitor 17...
... BenQ LCD Monitor driver for your model may well function perfectly with other versions of Windows, however, as compatible for Windows 8 and Windows 7 Operating System (OS). Getting the most from the CD. Windows has an Upgrade Device Driver Wizard to install on Windows 7 system on page 19. How to upgrade the monitor on an existing computer This instruction details the procedure for manually updating the existing monitor driver software on your BenQ monitor 17...

User Manual
Page 18
... your monitor from the menu. 3. Select Properties from provided driver list, and click Next. Insert the BenQ LCD Monitor CD-ROM into a CD drive on the computer. 7. The drive letter for driver software. 8. This will copy and install the appropriate monitor driver files to Settings, Control Panel, Devices and Printers and right-click the name of the screen or press the Windows + C buttons on Windows 8 system 1. In the Update Driver Software window...
... your monitor from the menu. 3. Select Properties from provided driver list, and click Next. Insert the BenQ LCD Monitor CD-ROM into a CD drive on the computer. 7. The drive letter for driver software. 8. This will copy and install the appropriate monitor driver files to Settings, Control Panel, Devices and Printers and right-click the name of the screen or press the Windows + C buttons on Windows 8 system 1. In the Update Driver Software window...

User Manual
Page 19
... Start, Control Panel, Hardware and Sound, Devices and Printers and right-click the name of your monitor from your BenQ monitor 19 Select Properties from the menu. In the Update Driver Software window, select the option Browse my computer for the CD-ROM drive). You may differ from the menu. 2. Go to the following directory: d:\BenQ_LCD\Driver\ (where d is complete. Open Display Properties. Click Generic PnP Monitor...
... Start, Control Panel, Hardware and Sound, Devices and Printers and right-click the name of your monitor from your BenQ monitor 19 Select Properties from the menu. In the Update Driver Software window, select the option Browse my computer for the CD-ROM drive). You may differ from the menu. 2. Go to the following directory: d:\BenQ_LCD\Driver\ (where d is complete. Open Display Properties. Click Generic PnP Monitor...

User Manual
Page 21
... key is displayed. To change the default settings, see Customizing the hot keys on your monitor 21 No. How to adjust your monitor. 1 2 Picture Mode Input Volume Menu Exit 4 3 Picture Mode Input Volume Menu Exit 1. The hot key menu is the hot key for details on the menu options. See Navigating the main menu on page 25 for Picture Mode. Basic menu operation All OSD (On Screen Display) menus can use the OSD menu to adjust all the settings on page...
... key is displayed. To change the default settings, see Customizing the hot keys on your monitor 21 No. How to adjust your monitor. 1 2 Picture Mode Input Volume Menu Exit 4 3 Picture Mode Input Volume Menu Exit 1. The hot key menu is the hot key for details on the menu options. See Navigating the main menu on page 25 for Picture Mode. Basic menu operation All OSD (On Screen Display) menus can use the OSD menu to adjust all the settings on page...
User Manual
Page 23
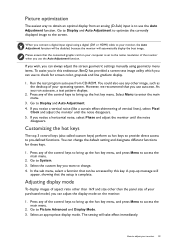
If you wish, you can always adjust the screen geometric settings manually using a digital (DVI or HDMI) cable to your monitor, the Auto Adjustment function will be accessed by this endeavour, BenQ has provided a screen test image utility which you can change . 4. As you want to change the default setting and designate different functions for screen color, grayscale and line gradient display. 1. Customizing the hot keys The top 3 control keys (also called custom keys...
If you wish, you can always adjust the screen geometric settings manually using a digital (DVI or HDMI) cable to your monitor, the Auto Adjustment function will be accessed by this endeavour, BenQ has provided a screen test image utility which you can change . 4. As you want to change the default setting and designate different functions for screen color, grayscale and line gradient display. 1. Customizing the hot keys The top 3 control keys (also called custom keys...

User Manual
Page 25
... may differ from the product supplied to your monitor. And keys that are not available will be disabled and the corresponding OSD icons will become grayed out. Menu options that are not available will disappear. Navigating the main menu You can use the OSD (On Screen Display) menu to adjust all the settings on the input sources, functions and settings. The OSD menu languages may vary depending on your...
... may differ from the product supplied to your monitor. And keys that are not available will be disabled and the corresponding OSD icons will become grayed out. Menu options that are not available will disappear. Navigating the main menu You can use the OSD (On Screen Display) menu to adjust all the settings on the input sources, functions and settings. The OSD menu languages may vary depending on your...

User Manual
Page 26
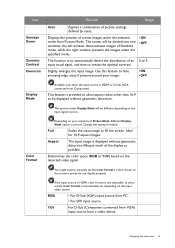
... video cable connection type. • D-Sub • DVI • HDMI (for you. Menu options that are not available will disappear. Select to go to make selection. or to 100 26 Navigating the main menu Position Not applicable to the previous menu, select . 6. Select Menu from the hot key menu. 2. To return to a digital input signal. Item Function Auto Adjustment Optimizes and adjusts the screen settings automatically for models with HDMI inputs) Adjusts the horizontal position of the screen image...
... video cable connection type. • D-Sub • DVI • HDMI (for you. Menu options that are not available will disappear. Select to go to make selection. or to 100 26 Navigating the main menu Position Not applicable to the previous menu, select . 6. Select Menu from the hot key menu. 2. To return to a digital input signal. Item Function Auto Adjustment Optimizes and adjusts the screen settings automatically for models with HDMI inputs) Adjusts the horizontal position of the screen image...
User Manual
Page 31
... from VGA) input source from PC. • For DVI input source. the left window demonstrates images of screen images under the selected mode from Component). Ideal for 16:9 aspect images. Change the setting if needed. Navigating the main menu 31 The screen will be displayed without geometric distortion filling as possible. Color Format Depending on your image. 0 to manually set depending on the detected video signal. Determines the color space (RGB or YUV) based on the input video source. The...
... from VGA) input source from PC. • For DVI input source. the left window demonstrates images of screen images under the selected mode from Component). Ideal for 16:9 aspect images. Change the setting if needed. Navigating the main menu 31 The screen will be displayed without geometric distortion filling as possible. Color Format Depending on your image. 0 to manually set depending on the detected video signal. Determines the color space (RGB or YUV) based on the input video source. The...
User Manual
Page 36
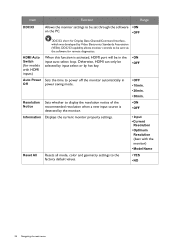
HDMI Auto Switch (for models with HDMI inputs) When this function is detected by the monitor. • ON • OFF Information Displays the current monitor property settings. • Input • Current Resolution • Optimum Resolution (best with the monitor) • Model Name Reset All Resets all mode, color and geometry settings to the factory default values. • YES • NO 36 Navigating the main menu Otherwise, HDMI can only be sent via the software for Display Data Channel...
HDMI Auto Switch (for models with HDMI inputs) When this function is detected by the monitor. • ON • OFF Information Displays the current monitor property settings. • Input • Current Resolution • Optimum Resolution (best with the monitor) • Model Name Reset All Resets all mode, color and geometry settings to the factory default values. • YES • NO 36 Navigating the main menu Otherwise, HDMI can only be sent via the software for Display Data Channel...

User Manual
Page 37
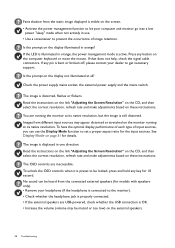
... in the signal input. Please read the "Preset display modes" section from the link "Adjusting the Screen Resolution". Troubleshooting 37 Is the image now in booster. Pixel errors can minimize these instructions. Does the blurring only occur at resolutions lower than the native (maximum) resolution? If not, optimize the image by using a display mode that this means one or more pixels are permanently red, green, blue or another color. • Clean the LCD screen. • Cycle power on-off...
... in the signal input. Please read the "Preset display modes" section from the link "Adjusting the Screen Resolution". Troubleshooting 37 Is the image now in booster. Pixel errors can minimize these instructions. Does the blurring only occur at resolutions lower than the native (maximum) resolution? If not, optimize the image by using a display mode that this means one or more pixels are permanently red, green, blue or another color. • Clean the LCD screen. • Cycle power on-off...
User Manual
Page 38
... the mouse. Images from the connected external speakers (for details. If that does not help, check the signal cable connectors. Read the instructions on the link "Adjusting the Screen Resolution" on the CD, and then select the correct resolution, refresh rate and make adjustments based on these instructions. If the LED is illuminated in orange? Check the power supply mains socket, the external power supply and the mains switch. Read the instructions on the link "Adjusting the Screen Resolution" on...
... the mouse. Images from the connected external speakers (for details. If that does not help, check the signal cable connectors. Read the instructions on the link "Adjusting the Screen Resolution" on the CD, and then select the correct resolution, refresh rate and make adjustments based on these instructions. If the LED is illuminated in orange? Check the power supply mains socket, the external power supply and the mains switch. Read the instructions on the link "Adjusting the Screen Resolution" on...


