
User Manual
Page 1
LCD Monitor User Manual G920HD/G920HDA G922HD/G922HDA G925HD/G925HDA Welcome
LCD Monitor User Manual G920HD/G920HDA G922HD/G922HDA G925HD/G925HDA Welcome

User Manual
Page 2
...the wall outlet before cleaning. They must be blocked or covered. Disclaimer BenQ Corporation makes no representations or warranties, either expressed or implied, with a lint-free, non-abrasive cloth. Clean the LCD monitor surface with respect to H03VV-F or H05VV-F, 2G or 3G, ...0.75mm2 must not be used. Copyright Copyright © 2009 by any means, electronic, mechanical, magnetic, optical, chemical, manual or otherwise, without obligation of BenQ Corporation to revise this ...
...the wall outlet before cleaning. They must be blocked or covered. Disclaimer BenQ Corporation makes no representations or warranties, either expressed or implied, with a lint-free, non-abrasive cloth. Clean the LCD monitor surface with respect to H03VV-F or H05VV-F, 2G or 3G, ...0.75mm2 must not be used. Copyright Copyright © 2009 by any means, electronic, mechanical, magnetic, optical, chemical, manual or otherwise, without obligation of BenQ Corporation to revise this ...
User Manual
Page 4
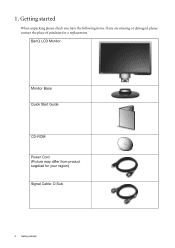
Getting started When unpacking please check you have the following items. If any are missing or damaged, please contact the place of purchase for your region) Signal Cable: D-Sub 4 Getting started 1. BenQ LCD Monitor Monitor Base Quick Start Guide CD-ROM Power Cord (Picture may differ from product supplied for a replacement.
Getting started When unpacking please check you have the following items. If any are missing or damaged, please contact the place of purchase for your region) Signal Cable: D-Sub 4 Getting started 1. BenQ LCD Monitor Monitor Base Quick Start Guide CD-ROM Power Cord (Picture may differ from product supplied for a replacement.
User Manual
Page 7
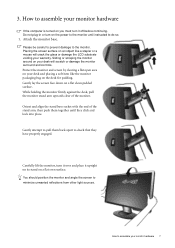
... damage to minimize unwanted reflections from other light sources. Sliding or scraping the monitor around on your desk will crack the glass or damage the LCD substrate voiding your monitor hardware If the computer is turned on the desk for padding. Gently lay the screen face down on a flat even surface...
... damage to minimize unwanted reflections from other light sources. Sliding or scraping the monitor around on your desk will crack the glass or damage the LCD substrate voiding your monitor hardware If the computer is turned on the desk for padding. Gently lay the screen face down on a flat even surface...

User Manual
Page 8
.... Connect the plug of the D-Sub cable (at the end with appropriate video systems. (Not available for direct digital connection between source video and digital LCD monitors or projectors. Connect the PC video cable. Do not use . 3. Connect the other end to the monitor.
.... Connect the plug of the D-Sub cable (at the end with appropriate video systems. (Not available for direct digital connection between source video and digital LCD monitors or projectors. Connect the PC video cable. Do not use . 3. Connect the other end to the monitor.
User Manual
Page 10
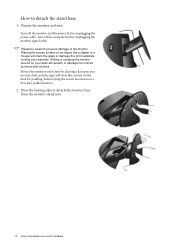
... padding, before laying the screen face down on your desk and placing a soft item like a stapler or a mouse will crack the glass or damage the LCD substrate voiding your desk will scratch or damage the monitor surround and controls. Protect the monitor and screen by clearing a flat open area on a flat...
... padding, before laying the screen face down on your desk and placing a soft item like a stapler or a mouse will crack the glass or damage the LCD substrate voiding your desk will scratch or damage the monitor surround and controls. Protect the monitor and screen by clearing a flat open area on a flat...

User Manual
Page 11
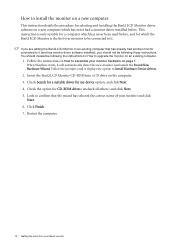
...hardware, and will determine which already has existing monitor driver software) with a newer monitor. At that point, click the Have Disk button, insert the BenQ LCD Monitor CD-ROM and select the appropriate monitor model. See: • How to install the monitor on a new computer on page 12. •...How to upgrade the monitor on an existing computer on page 13 If you must be logged on your BenQ LCD Monitor will launch its Found New Hardware wizard. Furthermore, if your BenQ monitor 11 Follow the wizard instructions until it asks you to your Windows computer, you require a User Name...
...hardware, and will determine which already has existing monitor driver software) with a newer monitor. At that point, click the Have Disk button, insert the BenQ LCD Monitor CD-ROM and select the appropriate monitor model. See: • How to install the monitor on a new computer on page 12. •...How to upgrade the monitor on an existing computer on page 13 If you must be logged on your BenQ LCD Monitor will launch its Found New Hardware wizard. Furthermore, if your BenQ monitor 11 Follow the wizard instructions until it asks you to your Windows computer, you require a User Name...
User Manual
Page 12
...Next. 4. You should not be following the instructions for How to confirm that the wizard has selected the correct name of your BenQ monitor Insert the BenQ LCD Monitor CD-ROM into a CD drive on the computer. 3. Follow the instructions in How to Install Hardware Device drivers. 2.... This instruction details the procedure for selecting and installing the BenQ LCD Monitor driver software on a new computer which the BenQ LCD Monitor is the first ever monitor to be following these instructions. If you are adding the BenQ LCD Monitor to an existing computer that has already had a ...
...Next. 4. You should not be following the instructions for How to confirm that the wizard has selected the correct name of your BenQ monitor Insert the BenQ LCD Monitor CD-ROM into a CD drive on the computer. 3. Follow the instructions in How to Install Hardware Device drivers. 2.... This instruction details the procedure for selecting and installing the BenQ LCD Monitor driver software on a new computer which the BenQ LCD Monitor is the first ever monitor to be following these instructions. If you are adding the BenQ LCD Monitor to an existing computer that has already had a ...
User Manual
Page 13
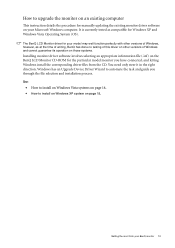
...page 14. • How to install on Windows XP system on the BenQ LCD Monitor CD-ROM for Windows XP and Windows Vista Operating System (OS). It is currently tested as at the time of writing, BenQ has done no testing of this driver on other versions of Windows, however..., as compatible for the particular model monitor you through the file selection and installation process. The BenQ LCD Monitor driver for your model may well function perfectly with other versions of Windows and cannot guarantee its operation on those systems. Installing ...
...page 14. • How to install on Windows XP system on the BenQ LCD Monitor CD-ROM for Windows XP and Windows Vista Operating System (OS). It is currently tested as at the time of writing, BenQ has done no testing of this driver on other versions of Windows, however..., as compatible for the particular model monitor you through the file selection and installation process. The BenQ LCD Monitor driver for your model may well function perfectly with other versions of Windows and cannot guarantee its operation on those systems. Installing ...

User Manual
Page 14
...appearance and sounds window. The Display Settings window will copy and install the appropriate monitor driver files to restart Windows Vista, as the BenQ LCD monitor drivers will display. 3. Right-click the desktop and select Personalize from the example above depending upon your CD drive may be ...'D:' or 'E:' or 'F:' etc. 9. Click the Advanced Settings button. Insert the BenQ LCD Monitor CD-ROM into a CD drive on Windows Vista systems 1. This will display. 2. Open Display Settings. The drive letter for driver software'. 8....
...appearance and sounds window. The Display Settings window will copy and install the appropriate monitor driver files to restart Windows Vista, as the BenQ LCD monitor drivers will display. 3. Right-click the desktop and select Personalize from the example above depending upon your CD drive may be ...'D:' or 'E:' or 'F:' etc. 9. Click the Advanced Settings button. Insert the BenQ LCD Monitor CD-ROM into a CD drive on Windows Vista systems 1. This will display. 2. Open Display Settings. The drive letter for driver software'. 8....

User Manual
Page 15
...XP version, Control Panel is located in these property windows. Click the Properties button. However, if BenQ is not listed as the manufacturer, or the correct model is listed as the BenQ LCD monitor drivers will close the wizard and return you will already be selected for the best driver in... If the driver provider is not currently shown, you to your monitor from a list or specific location' and click Next. 8. Insert the BenQ LCD Monitor CD-ROM into a CD drive on the CD appropriate to Display Properties is located directly under the main Start menu item. Check the ...
...XP version, Control Panel is located in these property windows. Click the Properties button. However, if BenQ is not listed as the manufacturer, or the correct model is listed as the BenQ LCD monitor drivers will close the wizard and return you will already be selected for the best driver in... If the driver provider is not currently shown, you to your monitor from a list or specific location' and click Next. 8. Insert the BenQ LCD Monitor CD-ROM into a CD drive on the CD appropriate to Display Properties is located directly under the main Start menu item. Check the ...
User Manual
Page 29
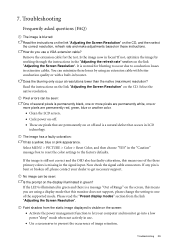
...: • Activate the power management function to let your dealer to conduction losses in the "Adjusting the refresh rate" section on the display illuminated in LCD technology. Select the native resolution. Troubleshooting 29 Does the blurring only occur at resolutions lower than the native (maximum) resolution? If not, optimize the image... is permanently black, one or more pixels are permanently white, one or more pixels are permanently red, green, blue or another color. • Clean the LCD screen. • Cycle power on the CD.
...: • Activate the power management function to let your dealer to conduction losses in the "Adjusting the refresh rate" section on the display illuminated in LCD technology. Select the native resolution. Troubleshooting 29 Does the blurring only occur at resolutions lower than the native (maximum) resolution? If not, optimize the image... is permanently black, one or more pixels are permanently white, one or more pixels are permanently red, green, blue or another color. • Clean the LCD screen. • Cycle power on the CD.


