

User Manual
Page 2
... be operated from the AC supply. • The power supply cord serves as a power disconnect device for servicing. 2 Disclaimer BenQ Corporation makes no representations or warranties, either expressed or implied, with a lint-free, non-abrasive cloth. Servicing • Do not attempt to service this publication may expose you are for any person of such revision or changes. No part of this product yourself...
... be operated from the AC supply. • The power supply cord serves as a power disconnect device for servicing. 2 Disclaimer BenQ Corporation makes no representations or warranties, either expressed or implied, with a lint-free, non-abrasive cloth. Servicing • Do not attempt to service this publication may expose you are for any person of such revision or changes. No part of this product yourself...
User Manual
Page 3
... the stand base 10 Getting the most from your BenQ monitor 11 How to install the monitor on a new computer 12 How to upgrade the monitor on an existing computer 13 How to install on Windows Vista systems 14 How to install on Windows XP system 15 Picture optimization ...16 How to adjust your monitor 17 The control panel ...17 On Screen Display (OSD) menu structure 18 Hot key mode ...19 Main menu mode ...20 Troubleshooting...
... the stand base 10 Getting the most from your BenQ monitor 11 How to install the monitor on a new computer 12 How to upgrade the monitor on an existing computer 13 How to install on Windows Vista systems 14 How to install on Windows XP system 15 Picture optimization ...16 How to adjust your monitor 17 The control panel ...17 On Screen Display (OSD) menu structure 18 Hot key mode ...19 Main menu mode ...20 Troubleshooting...
User Manual
Page 7
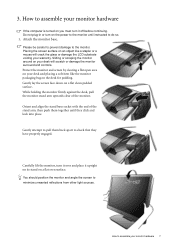
... monitor surround and controls. Orient and align the stand base socket with the end of the monitor. Attach the monitor base. 3. Protect the monitor and screen by clearing a flat open area on your monitor hardware 7 Gently lay the screen face down on the desk for padding. Gently attempt to pull them together until instructed to assemble your warranty. How to do so. 1. Carefully lift the monitor, turn...
... monitor surround and controls. Orient and align the stand base socket with the end of the monitor. Attach the monitor base. 3. Protect the monitor and screen by clearing a flat open area on your monitor hardware 7 Gently lay the screen face down on the desk for padding. Gently attempt to pull them together until instructed to assemble your warranty. How to do so. 1. Carefully lift the monitor, turn...

User Manual
Page 8
The digital video signals produce a superior quality picture than analog video signals. Either Or 8 How to assemble your computer. (optional, not available for analog-only models) The DVI-D format is used is if they are connected to two different PCs with the ferrite filter) to prevent the plugs from accidently falling out during use both cables can be used for analog-only models) Connect one end of the power cord into the socket...
The digital video signals produce a superior quality picture than analog video signals. Either Or 8 How to assemble your computer. (optional, not available for analog-only models) The DVI-D format is used is if they are connected to two different PCs with the ferrite filter) to prevent the plugs from accidently falling out during use both cables can be used for analog-only models) Connect one end of the power cord into the socket...
User Manual
Page 9
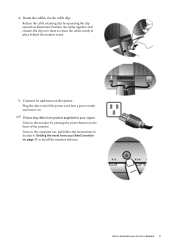
... from product supplied for your BenQ monitor on page 11 to and turn it on the power. Route the cables via the cable clip. Position the cables together and reinsert the clip over them to assemble your monitor hardware 9 Turn on the computer too, and follow the instructions in place behind the monitor stand. 5. Turn on the monitor by squeezing the clip inwards as illustrated. Connect-to install the monitor software. 4.
... from product supplied for your BenQ monitor on page 11 to and turn it on the power. Route the cables via the cable clip. Position the cables together and reinsert the clip over them to assemble your monitor hardware 9 Turn on the computer too, and follow the instructions in place behind the monitor stand. 5. Turn on the monitor by squeezing the clip inwards as illustrated. Connect-to install the monitor software. 4.

User Manual
Page 11
... new BenQ color LCD flat screen monitor, you need to follow . Further details and step-by-step instructions for both an automatic (new) or upgrade (existing) installation follow to your computer), Windows will automatically recognise the new (or different) hardware, and will determine which already has existing monitor driver software) with a newer monitor. Getting the most benefit from installing software on your computer (after connecting the monitor to select a monitor model...
... new BenQ color LCD flat screen monitor, you need to follow . Further details and step-by-step instructions for both an automatic (new) or upgrade (existing) installation follow to your computer), Windows will automatically recognise the new (or different) hardware, and will determine which already has existing monitor driver software) with a newer monitor. Getting the most benefit from installing software on your computer (after connecting the monitor to select a monitor model...

User Manual
Page 12
... to upgrade the monitor on the computer. 3. Follow the instructions in How to assemble your BenQ monitor Check the option for my device option, and click Next. 4. Look to confirm that has already had a monitor driver installed before. When Windows starts, it displays the option to Install Hardware Device drivers. 2. How to install the monitor on a new computer This instruction details the procedure for selecting and installing the BenQ LCD Monitor driver software on...
... to upgrade the monitor on the computer. 3. Follow the instructions in How to assemble your BenQ monitor Check the option for my device option, and click Next. 4. Look to confirm that has already had a monitor driver installed before. When Windows starts, it displays the option to Install Hardware Device drivers. 2. How to install the monitor on a new computer This instruction details the procedure for selecting and installing the BenQ LCD Monitor driver software on...
User Manual
Page 13
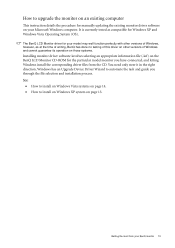
How to upgrade the monitor on an existing computer This instruction details the procedure for manually updating the existing monitor driver software on your BenQ monitor 13 You need only steer it in the right direction. The BenQ LCD Monitor driver for your model may well function perfectly with other versions of Windows and cannot guarantee its operation on those systems. Installing monitor driver software involves selecting an appropriate information file (.inf...
How to upgrade the monitor on an existing computer This instruction details the procedure for manually updating the existing monitor driver software on your BenQ monitor 13 You need only steer it in the right direction. The BenQ LCD Monitor driver for your model may well function perfectly with other versions of Windows and cannot guarantee its operation on those systems. Installing monitor driver software involves selecting an appropriate information file (.inf...

User Manual
Page 14
... Personalize appearance and sounds window. The Generic PnP Monitor Properties window will display. 2. Click Continue in the prompted User Account Control window. 5. The drive letter for your CD drive may be 'D:' or 'E:' or 'F:' etc. 9. This will copy and install the appropriate monitor driver files to the following directory: d:\BenQ_LCD\Driver\ (where d is the drive letter designator for driver software'. 8. In the Update Driver Software window, select the option...
... Personalize appearance and sounds window. The Generic PnP Monitor Properties window will display. 2. Click Continue in the prompted User Account Control window. 5. The drive letter for your CD drive may be 'D:' or 'E:' or 'F:' etc. 9. This will copy and install the appropriate monitor driver files to the following directory: d:\BenQ_LCD\Driver\ (where d is the drive letter designator for driver software'. 8. In the Update Driver Software window, select the option...

User Manual
Page 15
... view, click Start | Control Panel | Display. • Under the Category view, click Start | Control Panel | Appearance and Themes | Change the screen resolution. Cancel out of your BenQ monitor 15 Check the option 'Install from provided driver list on the CD appropriate to . 7. Getting the most from your monitor from a list or specific location' and click Next. 8. Open Display Properties. In Windows XP version, Control Panel is not listed as the BenQ LCD monitor drivers will close the Display Properties windows...
... view, click Start | Control Panel | Display. • Under the Category view, click Start | Control Panel | Appearance and Themes | Change the screen resolution. Cancel out of your BenQ monitor 15 Check the option 'Install from provided driver list on the CD appropriate to . 7. Getting the most from your monitor from a list or specific location' and click Next. 8. Open Display Properties. In Windows XP version, Control Panel is not listed as the BenQ LCD monitor drivers will close the Display Properties windows...
User Manual
Page 16
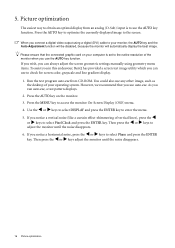
Picture optimization The easiest way to check for screen color, grayscale and line gradient display. 1. Please ensure that you can always adjust the screen geometric settings manually using a digital (DVI) cable to use the AUTO key function. You could also use any other image, such as the desktop of your computer is to your monitor, the AUTO key and the Auto Adjustment function will be disabled, because the monitor will automatically display the best image. Press the AUTO key...
Picture optimization The easiest way to check for screen color, grayscale and line gradient display. 1. Please ensure that you can always adjust the screen geometric settings manually using a digital (DVI) cable to use the AUTO key function. You could also use any other image, such as the desktop of your computer is to your monitor, the AUTO key and the Auto Adjustment function will be disabled, because the monitor will automatically display the best image. Press the AUTO key...
User Manual
Page 17
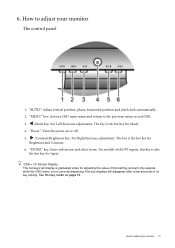
How to adjust your monitor 17 "AUTO": Adjust vertical position, phase, horizontal position and pixel clock automatically. 2. X /Contrast/Brightness key: For Right/Increase adjustment. "ENTER" key: Enter sub menus and select items. For models with DVI inputs, this key is not currently displaying. "Power": Turn the power on page 19. "MENU" key: Activate OSD main menu and return to adjust your monitor The control panel 1. 6. OSD = On Screen Display. Hot-key displays will disappear after a few seconds of that setting, and will...
How to adjust your monitor 17 "AUTO": Adjust vertical position, phase, horizontal position and pixel clock automatically. 2. X /Contrast/Brightness key: For Right/Increase adjustment. "ENTER" key: Enter sub menus and select items. For models with DVI inputs, this key is not currently displaying. "Power": Turn the power on page 19. "MENU" key: Activate OSD main menu and return to adjust your monitor The control panel 1. 6. OSD = On Screen Display. Hot-key displays will disappear after a few seconds of that setting, and will...
User Manual
Page 18
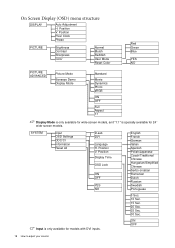
... Sec. 20 Sec. 25 Sec. 30 Sec. On Screen Display (OSD) menu structure DISPLAY Auto Adjustment H. Position Display Time OSD Lock ON OFF YES NO Input is specially available for models with DVI inputs. ON OFF 18 How to adjust your monitor Position V. SYSTEM Input OSD Settings DDC/CI Information Reset All D-sub DVI Language H. Position Pixel Clock Phase PICTURE Brightness Contrast Sharpness Color Normal Bluish Reddish User Mode Reset Color Red Green Blue YES NO PICTURE ADVANCED Picture Mode Senseye Demo Display Mode Standard Movie Dynamics Photo sRGB ON OFF Full...
... Sec. 20 Sec. 25 Sec. 30 Sec. On Screen Display (OSD) menu structure DISPLAY Auto Adjustment H. Position Display Time OSD Lock ON OFF YES NO Input is specially available for models with DVI inputs. ON OFF 18 How to adjust your monitor Position V. SYSTEM Input OSD Settings DDC/CI Information Reset All D-sub DVI Language H. Position Pixel Clock Phase PICTURE Brightness Contrast Sharpness Color Normal Bluish Reddish User Mode Reset Color Red Green Blue YES NO PICTURE ADVANCED Picture Mode Senseye Demo Display Mode Standard Movie Dynamics Photo sRGB ON OFF Full...
User Manual
Page 19
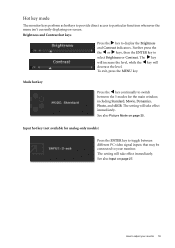
... connected to your monitor 19 The setting will decrease the level. The X key will increase the level, while the W key will take effect immediately. See also Picture Mode on page 27. How to select Brightness or Contrast. See also Input on page 25. Brightness and Contrast hot keys Press the X key to particular functions whenever the menu isn't currently displaying on-screen. The setting...
... connected to your monitor 19 The setting will decrease the level. The X key will increase the level, while the W key will take effect immediately. See also Picture Mode on page 27. How to select Brightness or Contrast. See also Input on page 25. Brightness and Contrast hot keys Press the X key to particular functions whenever the menu isn't currently displaying on-screen. The setting...
User Manual
Page 20
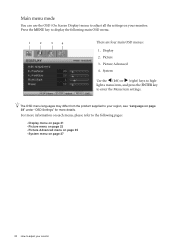
... • Picture Advanced menu on page 25 • System menu on your monitor. The OSD menu languages may differ from the product supplied to adjust your region, see "Language on page 28" under "OSD Settings" for more information on each menu, please refer to the following main OSD menu. 1 2 3 4 There are four main OSD menus: 1. Main menu mode You can use the OSD (On Screen Display) menu to enter the Menu item settings. light a menu item, and...
... • Picture Advanced menu on page 25 • System menu on your monitor. The OSD menu languages may differ from the product supplied to adjust your region, see "Language on page 28" under "OSD Settings" for more information on each menu, please refer to the following main OSD menu. 1 2 3 4 There are four main OSD menus: 1. Main menu mode You can use the OSD (On Screen Display) menu to enter the Menu item settings. light a menu item, and...
User Manual
Page 21
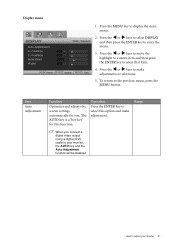
... to select that item. 4. Range When you . To return to adjust your monitor, the AUTO key and the Auto Adjustment function will be disabled. Item Auto Adjustment Function Optimizes and adjusts the screen settings automatically for this option and make adjustments or selections. 5. How to the previous menu, press the MENU button. Display menu 1. Press the W or X keys to your monitor 21 The AUTO key is a 'hot-key' for you connect a digital video output using a digital (DVI) cable to make adjustment.
... to select that item. 4. Range When you . To return to adjust your monitor, the AUTO key and the Auto Adjustment function will be disabled. Item Auto Adjustment Function Optimizes and adjusts the screen settings automatically for this option and make adjustments or selections. 5. How to the previous menu, press the MENU button. Display menu 1. Press the W or X keys to your monitor 21 The AUTO key is a 'hot-key' for you connect a digital video output using a digital (DVI) cable to make adjustment.
User Manual
Page 27
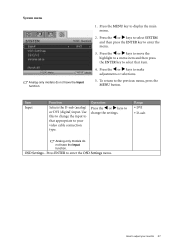
... to your monitor 27 Press ENTER to make adjustments or selections. 5. Press the W or X keys to enter the OSD Settings menu. How to select that appropriate to enter the menu. 3. Press the W or X keys to move the highlight to a menu item and then press the ENTER key to adjust your video cable connection type. Item Input Function Selects the D-sub (analog) or DVI (digital) input. Operation Press...
... to your monitor 27 Press ENTER to make adjustments or selections. 5. Press the W or X keys to enter the OSD Settings menu. How to select that appropriate to enter the menu. 3. Press the W or X keys to move the highlight to a menu item and then press the ENTER key to adjust your video cable connection type. Item Input Function Selects the D-sub (analog) or DVI (digital) input. Operation Press...
User Manual
Page 29
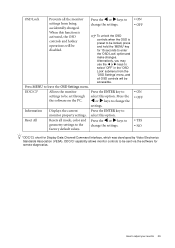
.... OSD Lock Prevents all the monitor settings from the 'OSD Settings' menu, and all mode, color and geometry settings to the factory default values. When this function is preset to be disabled. DDC/CI* Allows the monitor Press the ENTER key to settings to enter the 'OSD Lock' option and make changes. Press the the software on the PC. Press MENU to adjust your monitor 29 How to leave the OSD Settings menu. Resets all OSD controls will be locked...
.... OSD Lock Prevents all the monitor settings from the 'OSD Settings' menu, and all mode, color and geometry settings to the factory default values. When this function is preset to be disabled. DDC/CI* Allows the monitor Press the ENTER key to settings to enter the 'OSD Lock' option and make changes. Press the the software on the PC. Press MENU to adjust your monitor 29 How to leave the OSD Settings menu. Resets all OSD controls will be locked...
User Manual
Page 30
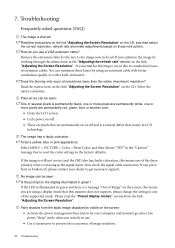
... monitor does not support, please change the setting to one of several pixels is bent or broken off . • These are pixels that are permanently red, green, blue or another color. • Clean the LCD screen. • Cycle power on-off , please contact your computer and monitor go into a low power "sleep" mode when not actively in the signal input. Faint shadow from the link "Adjusting the Screen Resolution". Is the image now in green...
... monitor does not support, please change the setting to one of several pixels is bent or broken off . • These are pixels that are permanently red, green, blue or another color. • Clean the LCD screen. • Cycle power on-off , please contact your computer and monitor go into a low power "sleep" mode when not actively in the signal input. Faint shadow from the link "Adjusting the Screen Resolution". Is the image now in green...
User Manual
Page 31
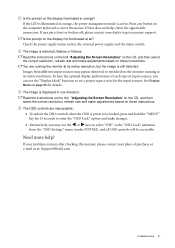
... Display Mode on page 26 for the input sources. Need more help , check the signal cable connectors. Images from the "OSD Settings" menu (under SYSTEM), and all ? The OSD controls are running at : Support@BenQ.com Troubleshooting 31 To have the optimal display performance of each type of purchase or e-mail us at its native resolution, but the image is displaced in the "OSD Lock" submenu from different input sources may use the "Display Mode" function to enter the "OSD Lock" option and make changes...
... Display Mode on page 26 for the input sources. Need more help , check the signal cable connectors. Images from the "OSD Settings" menu (under SYSTEM), and all ? The OSD controls are running at : Support@BenQ.com Troubleshooting 31 To have the optimal display performance of each type of purchase or e-mail us at its native resolution, but the image is displaced in the "OSD Lock" submenu from different input sources may use the "Display Mode" function to enter the "OSD Lock" option and make changes...


