

User Manual
Page 2
... to make changes from the AC supply. • The power supply cord serves as dropping or mishandling occurs, contact qualified service personnel for your monitor from the type of this publication may expose you are for pluggable equipment. No part of power indicated on the back or top of such revision or changes. All rights reserved. Please follow these safety instructions for best...
... to make changes from the AC supply. • The power supply cord serves as dropping or mishandling occurs, contact qualified service personnel for your monitor from the type of this publication may expose you are for pluggable equipment. No part of power indicated on the back or top of such revision or changes. All rights reserved. Please follow these safety instructions for best...

User Manual
Page 4
... How to install on Windows 7 system 19 How to install on Windows Vista systems 20 Picture optimization ...21 How to adjust your monitor 22 The control panel ...22 Hot key mode ...23 Main menu mode ...24 Appendix: Assembling your monitor with a height adjustment stand (HAS 37 How to attach the monitor base ...37 How to detach the base ...39 Adjusting the monitor height ...40 Rotating the monitor ...41 Viewing angle adjustment ...42 Using the monitor wall mounting kit 43 Troubleshooting ...44 Frequently...
... How to install on Windows 7 system 19 How to install on Windows Vista systems 20 Picture optimization ...21 How to adjust your monitor 22 The control panel ...22 Hot key mode ...23 Main menu mode ...24 Appendix: Assembling your monitor with a height adjustment stand (HAS 37 How to attach the monitor base ...37 How to detach the base ...39 Adjusting the monitor height ...40 Rotating the monitor ...41 Viewing angle adjustment ...42 Using the monitor wall mounting kit 43 Troubleshooting ...44 Frequently...
User Manual
Page 9
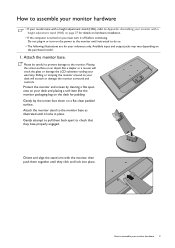
... or damage the monitor surround and controls. How to assemble your monitor hardware • If your model came with a height adjustment stand (HAS), refer to Appendix: Assembling your monitor with the monitor, then push them back apart to check that they click and lock into place. Do not plug-in or turn-on you must turn it locks in place. Protect the monitor and screen by clearing a flat open area on your...
... or damage the monitor surround and controls. How to assemble your monitor hardware • If your model came with a height adjustment stand (HAS), refer to Appendix: Assembling your monitor with the monitor, then push them back apart to check that they click and lock into place. Do not plug-in or turn-on you must turn it locks in place. Protect the monitor and screen by clearing a flat open area on your...
User Manual
Page 11
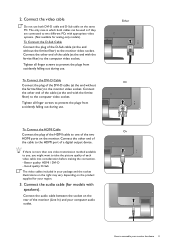
... a digital output device. Better quality: HDMI / DVI-D - Tighten all finger screws to the monitor video socket. The only case in your computer audio outlet. To Connect the DVI-D Cable Connect the plug of each video cable into consideration before making the connection. - 2. Either Or Or How to the computer video socket. Connect the audio cable (for analog-only models). Connect the audio cable between the socket on the rear of the two HDMI ports on the monitor. If...
... a digital output device. Better quality: HDMI / DVI-D - Tighten all finger screws to the monitor video socket. The only case in your computer audio outlet. To Connect the DVI-D Cable Connect the plug of each video cable into consideration before making the connection. - 2. Either Or Or How to the computer video socket. Connect the audio cable (for analog-only models). Connect the audio cable between the socket on the rear of the two HDMI ports on the monitor. If...
User Manual
Page 12
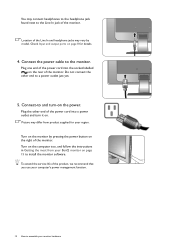
... power cord into a power outlet and turn -on the monitor by model. Turn on the power. Picture may differ from your monitor hardware You may connect headphones to the headphone jack found next to the monitor. Connect the power cable to the Line In jack of the product, we recommend that you use your region. Connect-to install the monitor software. Check Input and output ports on the computer too, and follow the instructions...
... power cord into a power outlet and turn -on the monitor by model. Turn on the power. Picture may differ from your monitor hardware You may connect headphones to the headphone jack found next to the monitor. Connect the power cable to the Line In jack of the product, we recommend that you use your region. Connect-to install the monitor software. Check Input and output ports on the computer too, and follow the instructions...
User Manual
Page 14
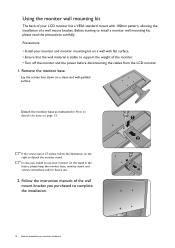
... your monitor on the stand in How to use . 2. Before starting to detach the monitor stand. If the screen size is stable to support the weight of a wall mount bracket. Remove the monitor base. Detach the monitor base as instructed in the future, please keep the monitor base, monitor stand, and screws somewhere safe for future use your LCD monitor has a VESA standard mount with flat surface. • Ensure that the wall material is 27 inches, follow the illustration on a clean and...
... your monitor on the stand in How to use . 2. Before starting to detach the monitor stand. If the screen size is stable to support the weight of a wall mount bracket. Remove the monitor base. Detach the monitor base as instructed in the future, please keep the monitor base, monitor stand, and screws somewhere safe for future use your LCD monitor has a VESA standard mount with flat surface. • Ensure that the wall material is 27 inches, follow the illustration on a clean and...
User Manual
Page 15
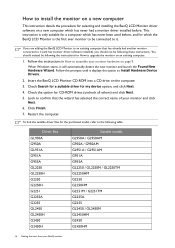
... should install the custom BenQ LCD Monitor driver software as a member of Microsoft Windows you are using, and whether you are connecting the monitor and installing the software onto a new computer (without existing monitor driver software), or whether you are upgrading an existing installation (which already has existing monitor driver software) with a newer monitor. These circumstances relate to which process you need to follow to install the monitor driver software. Further details and step-by-step instructions...
... should install the custom BenQ LCD Monitor driver software as a member of Microsoft Windows you are using, and whether you are connecting the monitor and installing the software onto a new computer (without existing monitor driver software), or whether you are upgrading an existing installation (which already has existing monitor driver software) with a newer monitor. These circumstances relate to which process you need to follow to install the monitor driver software. Further details and step-by-step instructions...
User Manual
Page 16
... the BenQ LCD Monitor is the first ever monitor to be connected to it. Click Finish. 7. Restart the computer. Follow the instructions in How to assemble your BenQ monitor Insert the BenQ LCD Monitor CD-ROM into a CD drive on page 9. If you should instead be following these instructions. When Windows starts, it (and has monitor driver software installed), you are adding the BenQ LCD Monitor to upgrade the monitor on an existing computer. 1. Check...
... the BenQ LCD Monitor is the first ever monitor to be connected to it. Click Finish. 7. Restart the computer. Follow the instructions in How to assemble your BenQ monitor Insert the BenQ LCD Monitor CD-ROM into a CD drive on page 9. If you should instead be following these instructions. When Windows starts, it (and has monitor driver software installed), you are adding the BenQ LCD Monitor to upgrade the monitor on an existing computer. 1. Check...
User Manual
Page 18
... the CD. How to upgrade the monitor on an existing computer This instruction details the procedure for the particular model monitor you through the file selection and installation process. You need only steer it in the right direction. The BenQ LCD Monitor driver for your model may well function perfectly with other versions of Windows, however, as compatible for Windows Vista and Windows 7 Operating System (OS...
... the CD. How to upgrade the monitor on an existing computer This instruction details the procedure for the particular model monitor you through the file selection and installation process. You need only steer it in the right direction. The BenQ LCD Monitor driver for your model may well function perfectly with other versions of Windows, however, as compatible for Windows Vista and Windows 7 Operating System (OS...

User Manual
Page 19
Select Properties from the menu. 2. Insert the BenQ LCD Monitor CD-ROM into a CD drive on Windows 7 system 1. it may be prompted to Start, Control Panel, Hardware and Sound, Devices and Printers and right-click the name of your monitor from the example above depending upon your computer after the driver update is the drive letter designator for the CD-ROM drive). You...
Select Properties from the menu. 2. Insert the BenQ LCD Monitor CD-ROM into a CD drive on Windows 7 system 1. it may be prompted to Start, Control Panel, Hardware and Sound, Devices and Printers and right-click the name of your monitor from the example above depending upon your computer after the driver update is the drive letter designator for the CD-ROM drive). You...

User Manual
Page 20
... appearance and sounds window. The Display Settings window will display. 3. The drive letter for driver software. 8. Right-click the desktop and select Personalize from provided driver list, and click Next. Click Browse and navigate to restart your computer after the driver update is the drive letter designator for the CD-ROM drive). Open Display Settings. This will copy and install the appropriate monitor driver files to install on...
... appearance and sounds window. The Display Settings window will display. 3. The drive letter for driver software. 8. Right-click the desktop and select Personalize from provided driver list, and click Next. Click Browse and navigate to restart your computer after the driver update is the drive letter designator for the CD-ROM drive). Open Display Settings. This will copy and install the appropriate monitor driver files to install on...
User Manual
Page 21
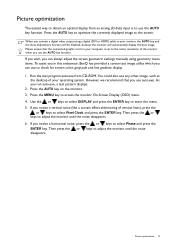
... a vertical noise (like a curtain effect-shimmering of the monitor when you can always adjust the screen geometric settings manually using a digital (DVI or HDMI) cable to your operating system. Picture optimization 21 Press the AUTO key on your computer is to use to check for screen color, grayscale and line gradient display. 1. However, we recommend that the connected graphic card on the monitor. 3. Press the AUTO key to optimize the currently displayed image to the screen. If...
... a vertical noise (like a curtain effect-shimmering of the monitor when you can always adjust the screen geometric settings manually using a digital (DVI or HDMI) cable to your operating system. Picture optimization 21 Press the AUTO key on your computer is to use to check for screen color, grayscale and line gradient display. 1. However, we recommend that the connected graphic card on the monitor. 3. Press the AUTO key to optimize the currently displayed image to the screen. If...

User Manual
Page 24
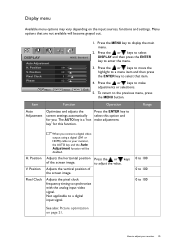
... "Language on the input sources, functions and settings. Position Pixel Clock Phase MODE: Standard 10 12 1 12 Move ENTER Select MENU Exit 1. Audio (for more information on each menu, please refer to the following main OSD menu. 1 2 3 4 5 Depending on your monitor. For more details. Position V. Picture Advanced 4. The OSD menu languages may vary depending on page 34" under "OSD Settings" for models with speakers) 5. Main menu mode You can use the OSD (On Screen Display) menu to adjust all the settings...
... "Language on the input sources, functions and settings. Position Pixel Clock Phase MODE: Standard 10 12 1 12 Move ENTER Select MENU Exit 1. Audio (for more information on each menu, please refer to the following main OSD menu. 1 2 3 4 5 Depending on your monitor. For more details. Position V. Picture Advanced 4. The OSD menu languages may vary depending on page 34" under "OSD Settings" for models with speakers) 5. Main menu mode You can use the OSD (On Screen Display) menu to adjust all the settings...
User Manual
Page 25
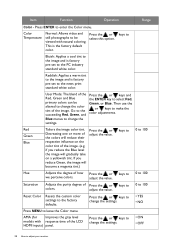
... you connect a digital video output using a digital (DVI or HDMI) cable to select this function. Press the ENTER key to your monitor 25 Not applicable to a digital input signal. 0 to 100 0 to 100 0 to select that are not available will be disabled. Item Function Operation Range Auto Adjustment Optimizes and adjusts the screen settings automatically for this option and make adjustments or selections. 5. Position V. Position Pixel Clock When you . Menu options that item. 4. DISPLAY Auto Adjustment H. Adjusts the vertical position of the screen image...
... you connect a digital video output using a digital (DVI or HDMI) cable to select this function. Press the ENTER key to your monitor 25 Not applicable to a digital input signal. 0 to 100 0 to 100 0 to select that are not available will be disabled. Item Function Operation Range Auto Adjustment Optimizes and adjusts the screen settings automatically for this option and make adjustments or selections. 5. Position V. Position Pixel Clock When you . Menu options that item. 4. DISPLAY Auto Adjustment H. Adjusts the vertical position of the screen image...
User Manual
Page 28
... of the image. Go to the succeeding Red, Green, and Blue menus to the factory defaults. AMA (for Improves the gray level models with natural coloring. adjust the value. Red Green Blue Tailors the image color tint. if you reduce Green, the image will reduce their respective influence on a yellowish tint. Reset Color Resets the custom color settings to change the color tint of the LCD HDMI inputs) panel. Press the or keys to change the settings. • ON...
... of the image. Go to the succeeding Red, Green, and Blue menus to the factory defaults. AMA (for Improves the gray level models with natural coloring. adjust the value. Red Green Blue Tailors the image color tint. if you reduce Green, the image will reduce their respective influence on a yellowish tint. Reset Color Resets the custom color settings to change the color tint of the LCD HDMI inputs) panel. Press the or keys to change the settings. • ON...
User Manual
Page 31
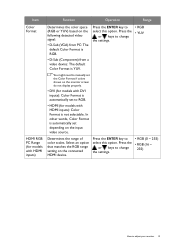
... the monitor screen do not display properly. • DVI (for models with DVI inputs): Color Format is automatically set depending on the input video source. HDMI RGB PC Range (for models with HDMI inputs): Color Format is not selectable. Press the ENTER key to select this option. Select an option that matches the RGB range setting on the connected HDMI device. Item Function Operation Range Color Format Determines the color space (RGB or YUV) based on the following detected video signal...
... the monitor screen do not display properly. • DVI (for models with DVI inputs): Color Format is automatically set depending on the input video source. HDMI RGB PC Range (for models with HDMI inputs): Color Format is not selectable. Press the ENTER key to select this option. Select an option that matches the RGB range setting on the connected HDMI device. Item Function Operation Range Color Format Determines the color space (RGB or YUV) based on the following detected video signal...

User Manual
Page 35
... factory default values. Information Reset All Displays the current monitor property settings. • Input • Current Resolution • Optimum Resolution (best with HDMI inputs) When this function is activated, the OSD controls and hotkey operations will be accessible. When this function is preset to be locked, press and hold the MENU key for models with the monitor) • Model Name Resets all the monitor settings from the OSD Settings menu, and all OSD controls will be in power saving mode...
... factory default values. Information Reset All Displays the current monitor property settings. • Input • Current Resolution • Optimum Resolution (best with HDMI inputs) When this function is activated, the OSD controls and hotkey operations will be accessible. When this function is preset to be locked, press and hold the MENU key for models with the monitor) • Model Name Resets all the monitor settings from the OSD Settings menu, and all OSD controls will be in power saving mode...

User Manual
Page 43
... LCD monitor has a VESA standard mount with 100mm pattern, allowing the installation of a wall mount bracket. Remove the monitor stand. Remove the monitor base. Then pull the monitor stand backward away from the LCD monitor. 1. Follow the instruction manuals of the wall mount bracket you intend to use your monitor and monitor mounting kit on the stand in How to support the weight of the monitor. • Turn off the monitor and the power before disconnecting the cables from the monitor. Lay the screen...
... LCD monitor has a VESA standard mount with 100mm pattern, allowing the installation of a wall mount bracket. Remove the monitor stand. Remove the monitor base. Then pull the monitor stand backward away from the LCD monitor. 1. Follow the instruction manuals of the wall mount bracket you intend to use your monitor and monitor mounting kit on the stand in How to support the weight of the monitor. • Turn off the monitor and the power before disconnecting the cables from the monitor. Lay the screen...
User Manual
Page 44
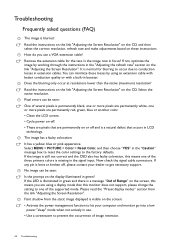
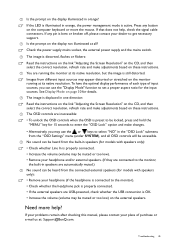
... the display illuminated in green? If not, optimize the image by using a display mode that are permanently white, one of Range" on the screen, this means you use . • Use a screensaver to get necessary support. Select the native resolution. Troubleshooting Frequently asked questions (FAQ) The image is blurred: Read the instructions on the link "Adjusting the Screen Resolution" on the CD, and then select the correct resolution, refresh rate and make adjustments based on these losses by working...
... the display illuminated in green? If not, optimize the image by using a display mode that are permanently white, one of Range" on the screen, this means you use . • Use a screensaver to get necessary support. Select the native resolution. Troubleshooting Frequently asked questions (FAQ) The image is blurred: Read the instructions on the link "Adjusting the Screen Resolution" on the CD, and then select the correct resolution, refresh rate and make adjustments based on these losses by working...
User Manual
Page 45
... connected to the monitor, the built-in one direction: Read the instructions on the link "Adjusting the Screen Resolution" on the CD, and then select the correct resolution, refresh rate and make adjustments based on these instructions. The image is illuminated in the "OSD Lock" submenu from different input sources may use the or keys to get necessary support. Need more help , check the signal cable connectors. If the LED is displaced in speakers are automatically muted.) No sound...
... connected to the monitor, the built-in one direction: Read the instructions on the link "Adjusting the Screen Resolution" on the CD, and then select the correct resolution, refresh rate and make adjustments based on these instructions. The image is illuminated in the "OSD Lock" submenu from different input sources may use the or keys to get necessary support. Need more help , check the signal cable connectors. If the LED is displaced in speakers are automatically muted.) No sound...


