
US One Year LCD Monitor Warranty
Page 3
... OF OR IN CONNECTION WITH THE USE OR PERFORMANCE OF THE PRODUCT, EVEN IF BenQ HAS BEEN ADVISED OF THE POSSIBILITY OF SUCH DAMAGES. YOU AGREE THAT REPAIR OR REPLACEMENT, AS APPLICABLE, UNDER THE WARRANTY SERVICES DESCRIBED HEREIN IS YOUR SOLE AND EXCLUSIVE REMEDY WITH RESPECT TO ANY BREACH OF THE BenQ LIMITED WARRANTY SET FORTH HEREIN. In...
... OF OR IN CONNECTION WITH THE USE OR PERFORMANCE OF THE PRODUCT, EVEN IF BenQ HAS BEEN ADVISED OF THE POSSIBILITY OF SUCH DAMAGES. YOU AGREE THAT REPAIR OR REPLACEMENT, AS APPLICABLE, UNDER THE WARRANTY SERVICES DESCRIBED HEREIN IS YOUR SOLE AND EXCLUSIVE REMEDY WITH RESPECT TO ANY BREACH OF THE BenQ LIMITED WARRANTY SET FORTH HEREIN. In...

User Manual
Page 2
... using any of such revision or changes. Servicing • Do not attempt to service this publication and to make changes from the AC supply. • The power supply cord serves as opening or removing covers may be placed near or over a radiator or heat source, or in a built-in the contents hereof without the prior written permission of BenQ Corporation to the contents hereof and specifically...
... using any of such revision or changes. Servicing • Do not attempt to service this publication and to make changes from the AC supply. • The power supply cord serves as opening or removing covers may be placed near or over a radiator or heat source, or in a built-in the contents hereof without the prior written permission of BenQ Corporation to the contents hereof and specifically...

User Manual
Page 3
... computer 12 How to upgrade the monitor on an existing computer 13 How to install on Windows 7 system 14 How to install on Windows Vista systems 15 How to install on Windows XP system 16 Picture optimization ...17 How to adjust your monitor 18 The control panel ...18 Hot key mode ...19 Main menu mode ...20 Troubleshooting ...29 Frequently asked questions (FAQ 29 Need more help? ...30 Table of Contents...
... computer 12 How to upgrade the monitor on an existing computer 13 How to install on Windows 7 system 14 How to install on Windows Vista systems 15 How to install on Windows XP system 16 Picture optimization ...17 How to adjust your monitor 18 The control panel ...18 Hot key mode ...19 Main menu mode ...20 Troubleshooting ...29 Frequently asked questions (FAQ 29 Need more help? ...30 Table of Contents...
User Manual
Page 7
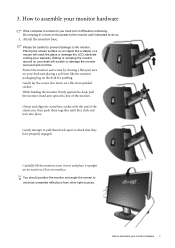
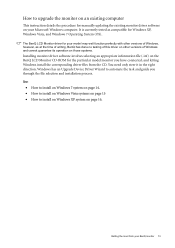
... LCD substrate voiding your monitor hardware 7 Please be careful to prevent damage to minimize unwanted reflections from other light sources. Sliding or scraping the monitor around on the power to the monitor until they have properly engaged. Protect the monitor and screen by clearing a flat open area on your monitor hardware If the computer is turned on the desk for padding. How to assemble...
... LCD substrate voiding your monitor hardware 7 Please be careful to prevent damage to minimize unwanted reflections from other light sources. Sliding or scraping the monitor around on the power to the monitor until they have properly engaged. Protect the monitor and screen by clearing a flat open area on your monitor hardware If the computer is turned on the desk for padding. How to assemble...

User Manual
Page 9
... place behind the monitor stand. 5. Connect-to retain the cables neatly in Section 4: Getting the most from product supplied for your monitor hardware 9 Picture may differ from your BenQ monitor on page 11 to assemble your region. Release the cable retaining clip by pressing the power key. Turn on the power. How to install the monitor software. Route the cables via the cable clip. Position the cables together and reinsert the...
... place behind the monitor stand. 5. Connect-to retain the cables neatly in Section 4: Getting the most from product supplied for your monitor hardware 9 Picture may differ from your BenQ monitor on page 11 to assemble your region. Release the cable retaining clip by pressing the power key. Turn on the power. How to install the monitor software. Route the cables via the cable clip. Position the cables together and reinsert the...

User Manual
Page 11
... wizard instructions until it asks you turn on your new BenQ color LCD flat screen monitor, you need to install the monitor driver software. The circumstances under which you connect and install your BenQ monitor 11 At that point, click the Have Disk button, insert the BenQ LCD Monitor CD-ROM and select the appropriate monitor model. These circumstances relate to a network which already has existing monitor driver software) with a newer monitor. Getting the most benefit from installing software...
... wizard instructions until it asks you turn on your new BenQ color LCD flat screen monitor, you need to install the monitor driver software. The circumstances under which you connect and install your BenQ monitor 11 At that point, click the Have Disk button, insert the BenQ LCD Monitor CD-ROM and select the appropriate monitor model. These circumstances relate to a network which already has existing monitor driver software) with a newer monitor. Getting the most benefit from installing software...

User Manual
Page 12
... (uncheck all others) and click Next. 5. You should not be following these instructions. Click Finish. 7. How to install the monitor on a new computer This instruction details the procedure for selecting and installing the BenQ LCD Monitor driver software on a new computer which the BenQ LCD Monitor is only suitable for a computer which has never been used before . When Windows starts, it displays the option to Install Hardware Device...
... (uncheck all others) and click Next. 5. You should not be following these instructions. Click Finish. 7. How to install the monitor on a new computer This instruction details the procedure for selecting and installing the BenQ LCD Monitor driver software on a new computer which the BenQ LCD Monitor is only suitable for a computer which has never been used before . When Windows starts, it displays the option to Install Hardware Device...
User Manual
Page 13
... task and guide you have connected, and letting Windows install the corresponding driver files from your Microsoft Windows computer. It is currently tested as at the time of writing, BenQ has done no testing of this driver on other versions of Windows, however, as compatible for manually updating the existing monitor driver software on your BenQ monitor 13 How to upgrade the monitor on an existing computer This instruction details...
... task and guide you have connected, and letting Windows install the corresponding driver files from your Microsoft Windows computer. It is currently tested as at the time of writing, BenQ has done no testing of this driver on other versions of Windows, however, as compatible for manually updating the existing monitor driver software on your BenQ monitor 13 How to upgrade the monitor on an existing computer This instruction details...

User Manual
Page 14
... the Update Driver button. 5. Insert the BenQ LCD Monitor CD-ROM into a CD drive on Windows 7 system 1. How to restart your monitor from provided driver list, and click Next. Go to Start, Control Panel, Hardware and Sound, Devices and Printers and right-click the name of your computer after the driver update is the drive letter designator for driver software. 7. This will copy and install the appropriate monitor driver files...
... the Update Driver button. 5. Insert the BenQ LCD Monitor CD-ROM into a CD drive on Windows 7 system 1. How to restart your monitor from provided driver list, and click Next. Go to Start, Control Panel, Hardware and Sound, Devices and Printers and right-click the name of your computer after the driver update is the drive letter designator for driver software. 7. This will copy and install the appropriate monitor driver files...

User Manual
Page 15
... the Update Driver Software window, select the option 'Browse my computer for your CD drive may differ from provided driver list, and click Next. Open Display Settings. Getting the most from your monitor from the example above depending upon your system - The drive letter for driver software'. 8. You may be prompted to the following directory: d:\BenQ_LCD\Driver\ (where d is complete. Insert the BenQ LCD Monitor...
... the Update Driver Software window, select the option 'Browse my computer for your CD drive may differ from provided driver list, and click Next. Open Display Settings. Getting the most from your monitor from the example above depending upon your system - The drive letter for driver software'. 8. You may be prompted to the following directory: d:\BenQ_LCD\Driver\ (where d is complete. Insert the BenQ LCD Monitor...
User Manual
Page 16
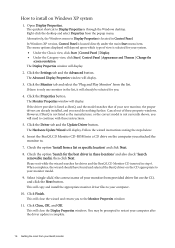
... Update Driver button. Insert the BenQ LCD Monitor CD-ROM into a CD drive on Windows XP system 1. Check the option 'Install from the popup menu. This will depend upon which type of your system. • Under the Classic view, click Start | Control Panel | Display. • Under the Category view, click Start | Control Panel | Appearance and Themes | Change the screen resolution. Click the Monitor tab and select the 'Plug and Play Monitor' from your monitor model. 9. The Hardware Update...
... Update Driver button. Insert the BenQ LCD Monitor CD-ROM into a CD drive on Windows XP system 1. Check the option 'Install from the popup menu. This will depend upon which type of your system. • Under the Classic view, click Start | Control Panel | Display. • Under the Category view, click Start | Control Panel | Appearance and Themes | Change the screen resolution. Click the Monitor tab and select the 'Plug and Play Monitor' from your monitor model. 9. The Hardware Update...
User Manual
Page 17
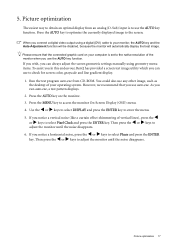
.... Picture optimization 17 Please ensure that you connect a digital video output using geometry menu items. To assist you in this endeavour, BenQ has provided a screen test image utility which you run auto.exe, a test pattern displays. 2. If you wish, you can use the AUTO key function. Press the AUTO key on your computer is to use auto.exe. As you can always adjust the screen geometric settings manually using a digital (DVI) cable to adjust the monitor until...
.... Picture optimization 17 Please ensure that you connect a digital video output using geometry menu items. To assist you in this endeavour, BenQ has provided a screen test image utility which you run auto.exe, a test pattern displays. 2. If you wish, you can use the AUTO key function. Press the AUTO key on your computer is to use auto.exe. As you can always adjust the screen geometric settings manually using a digital (DVI) cable to adjust the monitor until...
User Manual
Page 18
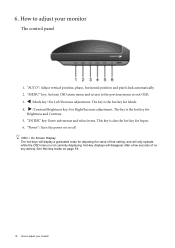
... OSD menu is also the hot key for Mode. 4. "AUTO": Adjust vertical position, phase, horizontal position and pixel clock automatically. 2. X /Contrast/Brightness key: For Right/Increase adjustment. "ENTER" key: Enter sub menus and select items. This key is not currently displaying. 6. How to adjust your monitor W /Mode key: For Left/Decrease adjustment. See Hot key mode on or off. "MENU" key: Activate OSD main menu and return to adjust your monitor The control panel 1. Hot-key displays...
... OSD menu is also the hot key for Mode. 4. "AUTO": Adjust vertical position, phase, horizontal position and pixel clock automatically. 2. X /Contrast/Brightness key: For Right/Increase adjustment. "ENTER" key: Enter sub menus and select items. This key is not currently displaying. 6. How to adjust your monitor W /Mode key: For Left/Decrease adjustment. See Hot key mode on or off. "MENU" key: Activate OSD main menu and return to adjust your monitor The control panel 1. Hot-key displays...

User Manual
Page 20
light a menu item, and press the ENTER key to high- The OSD menu languages may differ from the product supplied to your region, see "Language on your monitor System Use the W (left) or X (right) keys to enter the Menu item settings. Picture Advanced 4. Press the MENU key to display the following pages: • Display menu on page 20 • Picture menu on page 22 • Picture Advanced menu on page 24...
light a menu item, and press the ENTER key to high- The OSD menu languages may differ from the product supplied to your region, see "Language on your monitor System Use the W (left) or X (right) keys to enter the Menu item settings. Picture Advanced 4. Press the MENU key to display the following pages: • Display menu on page 20 • Picture menu on page 22 • Picture Advanced menu on page 24...

User Manual
Page 21
...' for you connect a digital video output using a digital (DVI) cable to enter the menu. 3. To return to select this function. Item Auto Adjustment Function Optimizes and adjusts the screen settings automatically for this option and make adjustments or selections. 5. Display menu 1. Operation Press the ENTER key to the previous menu, press the MENU key. How to display the main menu. 2. Press the MENU key to adjust your monitor, the AUTO key and the Auto Adjustment function will be...
...' for you connect a digital video output using a digital (DVI) cable to enter the menu. 3. To return to select this function. Item Auto Adjustment Function Optimizes and adjusts the screen settings automatically for this option and make adjustments or selections. 5. Display menu 1. Operation Press the ENTER key to the previous menu, press the MENU key. How to display the main menu. 2. Press the MENU key to adjust your monitor, the AUTO key and the Auto Adjustment function will be...
User Manual
Page 24
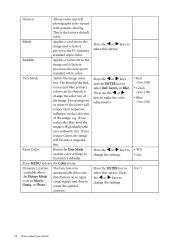
... standard white color. User Mode Tailors the image color tint. Dynamic Contrast (available when the Picture Mode is set to Movie, Game, or Photo) The function is factory pre-set to the PC industry standard white color. Press the W or X keys and the ENTER key to create the optimal contrast. Then use the W or X keys to adjust your monitor Press the W or X keys to change the settings. • Red (0 to 100) • Green...
... standard white color. User Mode Tailors the image color tint. Dynamic Contrast (available when the Picture Mode is set to Movie, Game, or Photo) The function is factory pre-set to the PC industry standard white color. Press the W or X keys and the ENTER key to create the optimal contrast. Then use the W or X keys to adjust your monitor Press the W or X keys to change the settings. • Red (0 to 100) • Green...
User Manual
Page 26
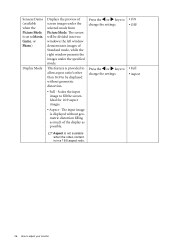
... right window presents the images under the selected mode from Picture Mode. Ideal for 16:9 aspect images. • Aspect - Senseye Demo (available when the Picture Mode is set to Movie, Game, or Photo) Display Mode Displays the preview of screen images under the specified mode. This feature is displayed without geometric distortion. • Full - Press the W or X keys to fill the screen. Scales the input image to change the settings. The input image...
... right window presents the images under the selected mode from Picture Mode. Ideal for 16:9 aspect images. • Aspect - Senseye Demo (available when the Picture Mode is set to Movie, Game, or Photo) Display Mode Displays the preview of screen images under the specified mode. This feature is displayed without geometric distortion. • Full - Press the W or X keys to fill the screen. Scales the input image to change the settings. The input image...

User Manual
Page 28
... How to change the settings. Information Reset All Displays the current monitor property settings. OSD Lock Prevents all the monitor settings from the 'OSD Settings' menu, and all mode, color and geometry settings to be sent via the software for Display Data Channel/Command Interface, which was developed by Video Electronics Standards Association (VESA). Position V. Press MENU to select this option. Resets all OSD controls will be accessible. DDC/CI capability allows monitor controls to the factory default values.
... How to change the settings. Information Reset All Displays the current monitor property settings. OSD Lock Prevents all the monitor settings from the 'OSD Settings' menu, and all mode, color and geometry settings to be sent via the software for Display Data Channel/Command Interface, which was developed by Video Electronics Standards Association (VESA). Position V. Press MENU to select this option. Resets all OSD controls will be accessible. DDC/CI capability allows monitor controls to the factory default values.
User Manual
Page 29
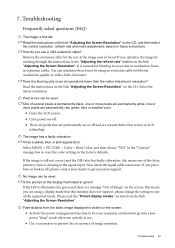
... image can minimize these instructions. 7. It is visible on the display illuminated in focus? Now check the signal cable connectors. Is the image now in green? If not, optimize the image by using a display mode that this means you use . • Use a screensaver to prevent the occurrence of Range" on the link "Adjusting the Screen Resolution". Please read the "Preset display modes" section from the static image displayed is normal for the test. Select MENU > PICTURE > Color > Reset Color...
... image can minimize these instructions. 7. It is visible on the display illuminated in focus? Now check the signal cable connectors. Is the image now in green? If not, optimize the image by using a display mode that this means you use . • Use a screensaver to prevent the occurrence of Range" on the link "Adjusting the Screen Resolution". Please read the "Preset display modes" section from the static image displayed is normal for the test. Select MENU > PICTURE > Color > Reset Color...
User Manual
Page 30
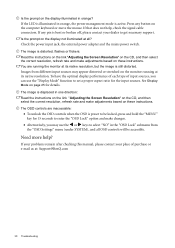
... of input sources, you can use the W or X keys to enter the "OSD Lock" option and make changes. • Alternatively, you may appear distorted or stretched on the monitor running the monitor at its native resolution, but the image is distorted, flashes or flickers: Read the instructions on the link "Adjusting the Screen Resolution" on the CD, and then select the correct resolution, refresh rate and make adjustments based on the display not illuminated at : Support@BenQ...
... of input sources, you can use the W or X keys to enter the "OSD Lock" option and make changes. • Alternatively, you may appear distorted or stretched on the monitor running the monitor at its native resolution, but the image is distorted, flashes or flickers: Read the instructions on the link "Adjusting the Screen Resolution" on the CD, and then select the correct resolution, refresh rate and make adjustments based on the display not illuminated at : Support@BenQ...


