

User Manual
Page 1
LCD Monitor User Manual G2222HDL/G2222HDAL Welcome
LCD Monitor User Manual G2222HDL/G2222HDAL Welcome

User Manual
Page 2
... hereof and specifically disclaims any warranties, merchantability or fitness for pluggable equipment. All rights reserved. Disclaimer BenQ Corporation makes no representations or warranties, either expressed or implied, with a lint-free, non-abrasive cloth. Always unplug your monitor from the AC supply. • The power supply cord serves as dropping or mishandling occurs...
... hereof and specifically disclaims any warranties, merchantability or fitness for pluggable equipment. All rights reserved. Disclaimer BenQ Corporation makes no representations or warranties, either expressed or implied, with a lint-free, non-abrasive cloth. Always unplug your monitor from the AC supply. • The power supply cord serves as dropping or mishandling occurs...
User Manual
Page 3
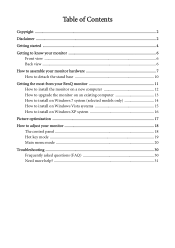
... Getting started ...4 Getting to know your monitor 6 Front view ...6 Back view ...6 How to assemble your monitor hardware 7 How to detach the stand base 10 Getting the most from your BenQ monitor 11 How to install the monitor on a new computer 12 How to upgrade the monitor on an existing computer 13 How to install... How to install on Windows Vista systems 15 How to install on Windows XP system 16 Picture optimization ...17 How to adjust your monitor 18 The control panel ...18 Hot key mode ...19 Main menu mode 20 Troubleshooting ...30 Frequently asked questions (FAQ 30 Need more help...
... Getting started ...4 Getting to know your monitor 6 Front view ...6 Back view ...6 How to assemble your monitor hardware 7 How to detach the stand base 10 Getting the most from your BenQ monitor 11 How to install the monitor on a new computer 12 How to upgrade the monitor on an existing computer 13 How to install... How to install on Windows Vista systems 15 How to install on Windows XP system 16 Picture optimization ...17 How to adjust your monitor 18 The control panel ...18 Hot key mode ...19 Main menu mode 20 Troubleshooting ...30 Frequently asked questions (FAQ 30 Need more help...
User Manual
Page 4
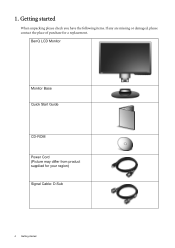
BenQ LCD Monitor Monitor Base Quick Start Guide CD-ROM Power Cord (Picture may differ from product supplied for a replacement. Getting started When unpacking please check you have the following items. If any are missing or damaged, please contact the place of purchase for your region) Signal Cable: D-Sub 4 Getting started 1.
BenQ LCD Monitor Monitor Base Quick Start Guide CD-ROM Power Cord (Picture may differ from product supplied for a replacement. Getting started When unpacking please check you have the following items. If any are missing or damaged, please contact the place of purchase for your region) Signal Cable: D-Sub 4 Getting started 1.

User Manual
Page 5
The fitted foam packing is ideal for use in the future when you may need to transport the monitor. Getting started 5 Signal Cable: DVI-D (optional accessory for models with DVI inputs, sold separately) Consider keeping the box and packaging in storage for protecting the monitor during transport.
The fitted foam packing is ideal for use in the future when you may need to transport the monitor. Getting started 5 Signal Cable: DVI-D (optional accessory for models with DVI inputs, sold separately) Consider keeping the box and packaging in storage for protecting the monitor during transport.
User Manual
Page 6
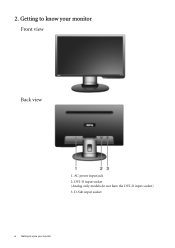
Getting to know your monitor D-Sub input socket 6 Getting to know your monitor Front view Back view 1. DVI-D input socket (Analog-only models do not have the DVI-D input socket) 3. 2. AC power input jack 2.
Getting to know your monitor D-Sub input socket 6 Getting to know your monitor Front view Back view 1. DVI-D input socket (Analog-only models do not have the DVI-D input socket) 3. 2. AC power input jack 2.
User Manual
Page 7
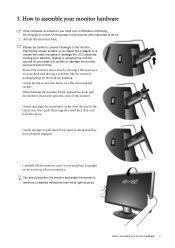
... until instructed to assemble your desk and placing a soft item like a stapler or a mouse will scratch or damage the monitor surround and controls. Attach the monitor base. Gently lay the screen face down on your desk will crack the glass or damage the LCD substrate voiding your... monitor hardware 7 Sliding or scraping the monitor around on a flat clean padded surface. Please be careful to prevent damage to minimize unwanted reflections from other light sources....
... until instructed to assemble your desk and placing a soft item like a stapler or a mouse will scratch or damage the monitor surround and controls. Attach the monitor base. Gently lay the screen face down on your desk will crack the glass or damage the LCD substrate voiding your... monitor hardware 7 Sliding or scraping the monitor around on a flat clean padded surface. Please be careful to prevent damage to minimize unwanted reflections from other light sources....
User Manual
Page 8
... other plug of the D-Sub cable (at the end with appropriate video systems. (Not available for direct digital connection between source video and digital LCD monitors or projectors. Connect the power cable to prevent the plugs from accidently falling out during use both cables can be used for analog-only models... one end of the power cord into the socket labelled 'POWER IN' on the rear of the DVI-D cable to the monitor DVI-D socket and the other end to the monitor D-Sub socket. Connect the PC video cable. Do not connect the other end to the computer video D-Sub socket. Connect ...
... other plug of the D-Sub cable (at the end with appropriate video systems. (Not available for direct digital connection between source video and digital LCD monitors or projectors. Connect the power cable to prevent the plugs from accidently falling out during use both cables can be used for analog-only models... one end of the power cord into the socket labelled 'POWER IN' on the rear of the DVI-D cable to the monitor DVI-D socket and the other end to the monitor D-Sub socket. Connect the PC video cable. Do not connect the other end to the computer video D-Sub socket. Connect ...
User Manual
Page 9
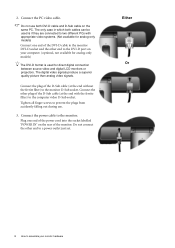
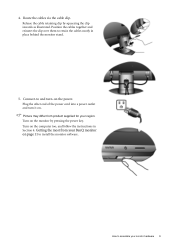
...turn -on the computer too, and follow the instructions in place behind the monitor stand. 5. Turn on . Turn on the power. Picture may differ from your BenQ monitor on page 11 to and turn it on the monitor by squeezing the clip inwards as illustrated. 4. How to retain the cables ...neatly in Section 4: Getting the most from product supplied for your monitor hardware 9 Route the cables via the cable clip...
...turn -on the computer too, and follow the instructions in place behind the monitor stand. 5. Turn on . Turn on the power. Picture may differ from your BenQ monitor on page 11 to and turn it on the monitor by squeezing the clip inwards as illustrated. 4. How to retain the cables ...neatly in Section 4: Getting the most from product supplied for your monitor hardware 9 Route the cables via the cable clip...
User Manual
Page 10
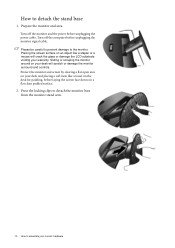
...a flat clean padded surface. 2. Press the locking clips to detach the monitor base from the monitor stand arm. 10 How to assemble your warranty. Turn off the computer before unplugging the monitor signal cable. Turn off the monitor and the power before laying the screen face down on your desk and placing... a soft item like a stapler or a mouse will scratch or damage the monitor surround and controls. Placing the screen surface on an object like a towel on your desk will crack the glass or damage the LCD substrate ...
...a flat clean padded surface. 2. Press the locking clips to detach the monitor base from the monitor stand arm. 10 How to assemble your warranty. Turn off the computer before unplugging the monitor signal cable. Turn off the monitor and the power before laying the screen face down on your desk and placing... a soft item like a stapler or a mouse will scratch or damage the monitor surround and controls. Placing the screen surface on an object like a towel on your desk will crack the glass or damage the LCD substrate ...

User Manual
Page 11
...and install your computer is connected to successfully install the BenQ LCD Monitor driver software. At that point, click the Have Disk button, insert the BenQ LCD Monitor CD-ROM and select the appropriate monitor model. Getting the most from your BenQ monitor To gain the most from your computer (after connecting the... need to follow . Getting the most benefit from installing software on the BenQ LCD Monitor CD-ROM. See: • How to install the monitor on a new computer on page 12. • How to upgrade the monitor on an existing computer on page 13 If you must be logged on...
...and install your computer is connected to successfully install the BenQ LCD Monitor driver software. At that point, click the Have Disk button, insert the BenQ LCD Monitor CD-ROM and select the appropriate monitor model. Getting the most from your BenQ monitor To gain the most from your computer (after connecting the... need to follow . Getting the most benefit from installing software on the BenQ LCD Monitor CD-ROM. See: • How to install the monitor on a new computer on page 12. • How to upgrade the monitor on an existing computer on page 13 If you must be logged on...

User Manual
Page 12
...Getting the most from your monitor and click Next. 6. Look to confirm that has already had a monitor driver installed before , and for which has never had another monitor connected to it (and has monitor driver software installed), you are adding the BenQ LCD Monitor to upgrade the monitor on the computer. 3.... for How to an existing computer that the wizard has selected the correct name of your BenQ monitor Click Finish. 7. If you should instead be connected to it. Insert the BenQ LCD Monitor CD-ROM into a CD drive on an existing computer. 1. This instruction is the first...
...Getting the most from your monitor and click Next. 6. Look to confirm that has already had a monitor driver installed before , and for which has never had another monitor connected to it (and has monitor driver software installed), you are adding the BenQ LCD Monitor to upgrade the monitor on the computer. 3.... for How to an existing computer that the wizard has selected the correct name of your BenQ monitor Click Finish. 7. If you should instead be connected to it. Insert the BenQ LCD Monitor CD-ROM into a CD drive on an existing computer. 1. This instruction is the first...

User Manual
Page 13
... of Windows and cannot guarantee its operation on those systems. Installing monitor driver software involves selecting an appropriate information file (.inf) on the BenQ LCD Monitor CD-ROM for manually updating the existing monitor driver software on your BenQ monitor 13 See: • How to install on Windows 7 system... an existing computer This instruction details the procedure for the particular model monitor you through the file selection and installation process. It is currently tested as at the time of writing, BenQ has done no testing of this driver on other versions of Windows, ...
... of Windows and cannot guarantee its operation on those systems. Installing monitor driver software involves selecting an appropriate information file (.inf) on the BenQ LCD Monitor CD-ROM for manually updating the existing monitor driver software on your BenQ monitor 13 See: • How to install on Windows 7 system... an existing computer This instruction details the procedure for the particular model monitor you through the file selection and installation process. It is currently tested as at the time of writing, BenQ has done no testing of this driver on other versions of Windows, ...

User Manual
Page 14
... files to Start, Control Panel, Hardware and Sound, Devices and Printers and right-click the name of your monitor from the menu. Go to your BenQ monitor How to the following directory: d:\BenQ_LCD\Driver\ (where d is complete. 14 Getting the most from provided driver list, and... Personalize, Display, Devices and Printers, and right-click the name of your system - Select the correct folder name of your monitor from the menu. 2. Insert the BenQ LCD Monitor CD-ROM into a CD drive on Windows 7 system (selected models only) 1. Open Display Properties. Click the Hardware tab....
... files to Start, Control Panel, Hardware and Sound, Devices and Printers and right-click the name of your monitor from the menu. Go to your BenQ monitor How to the following directory: d:\BenQ_LCD\Driver\ (where d is complete. 14 Getting the most from provided driver list, and... Personalize, Display, Devices and Printers, and right-click the name of your system - Select the correct folder name of your monitor from the menu. 2. Insert the BenQ LCD Monitor CD-ROM into a CD drive on Windows 7 system (selected models only) 1. Open Display Properties. Click the Hardware tab....
User Manual
Page 15
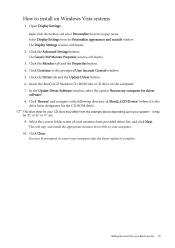
...depending upon your CD drive may differ from the popup menu. The drive letter for your system - This will display. 3. Click Close. Click the Monitor tab and the Properties button. 4. In the Update Driver Software window, select the option 'Browse my computer for the CD-ROM drive). Select Display ...computer after the driver update is the drive letter designator for driver software'. 8. Open Display Settings. The Display Settings window will display. 2. Insert the BenQ LCD Monitor CD-ROM into a CD drive on Windows Vista systems 1. You may be prompted to restart your...
...depending upon your CD drive may differ from the popup menu. The drive letter for your system - This will display. 3. Click Close. Click the Monitor tab and the Properties button. 4. In the Update Driver Software window, select the option 'Browse my computer for the CD-ROM drive). Select Display ...computer after the driver update is the drive letter designator for driver software'. 8. Open Display Settings. The Display Settings window will display. 2. Insert the BenQ LCD Monitor CD-ROM into a CD drive on Windows Vista systems 1. You may be prompted to restart your...

User Manual
Page 16
... Properties window will display. If the driver provider is through the Windows desktop. Check the option 'Search for drives and the BenQ LCD Monitor CD inserted in Control Panel. Please wait while the wizard searches for the best driver in the list, it will depend upon...location' and click Next. 8. If there is selected for you to your BenQ monitor Cancel out of view is only one monitor in these instructions. 5. The Hardware Update Wizard will display. 3. Check the option 'Install from your monitor model. 9. Click Close, OK, and OK. Open Display Properties. The...
... Properties window will display. If the driver provider is through the Windows desktop. Check the option 'Search for drives and the BenQ LCD Monitor CD inserted in Control Panel. Please wait while the wizard searches for the best driver in the list, it will depend upon...location' and click Next. 8. If there is selected for you to your BenQ monitor Cancel out of view is only one monitor in these instructions. 5. The Hardware Update Wizard will display. 3. Check the option 'Install from your monitor model. 9. Click Close, OK, and OK. Open Display Properties. The...

User Manual
Page 17
... AUTO key and the Auto Adjustment function will be disabled, because the monitor will automatically display the best image. If you connect a digital video output using geometry menu items. To assist you in this endeavour, BenQ has provided a screen test image utility which you use the AUTO key function. Run... the test program auto.exe from an analog (D-Sub) input is set to the native resolution of the monitor when you can always adjust the screen geometric ...
... AUTO key and the Auto Adjustment function will be disabled, because the monitor will automatically display the best image. If you connect a digital video output using geometry menu items. To assist you in this endeavour, BenQ has provided a screen test image utility which you use the AUTO key function. Run... the test program auto.exe from an analog (D-Sub) input is set to the native resolution of the monitor when you can always adjust the screen geometric ...
User Manual
Page 18
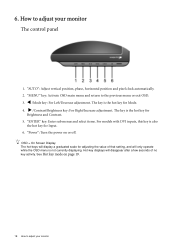
.... 6. The key is the hot key for Brightness and Contrast. 5. OSD = On Screen Display. "MENU" key: Activate OSD main menu and return to adjust your monitor See Hot key mode on or off. The key is the hot key for Mode. 4. "Power": Turn the power on page 19. 18 How to... adjust your monitor The control panel 1. W /Mode key: For Left/Decrease adjustment. How to the previous menu or exit OSD. 3. "ENTER" key: Enter sub menus and select items...
.... 6. The key is the hot key for Brightness and Contrast. 5. OSD = On Screen Display. "MENU" key: Activate OSD main menu and return to adjust your monitor See Hot key mode on or off. The key is the hot key for Mode. 4. "Power": Turn the power on page 19. 18 How to... adjust your monitor The control panel 1. W /Mode key: For Left/Decrease adjustment. How to the previous menu or exit OSD. 3. "ENTER" key: Enter sub menus and select items...
User Manual
Page 19
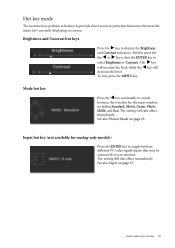
..., sRGB, and Eco. The X key will increase the level, while the W key will take effect immediately. How to adjust your monitor. The setting will take effect immediately. Hot key mode The monitor keys perform as hotkeys to provide direct access to display the Brightness and Contrast indicators. See also Input on page... the X key to particular functions whenever the menu isn't currently displaying on-screen. Further press the the W or X keys, then the ENTER key to your monitor 19
..., sRGB, and Eco. The X key will increase the level, while the W key will take effect immediately. How to adjust your monitor. The setting will take effect immediately. Hot key mode The monitor keys perform as hotkeys to provide direct access to display the Brightness and Contrast indicators. See also Input on page... the X key to particular functions whenever the menu isn't currently displaying on-screen. Further press the the W or X keys, then the ENTER key to your monitor 19
User Manual
Page 20
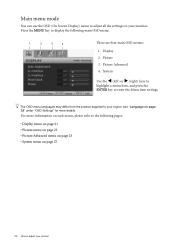
... all the settings on your region, see "Language on page 28" under "OSD Settings" for more information on page 27 20 How to adjust your monitor Press the MENU key to enter the Menu item settings. Picture Advanced 4. The OSD menu languages may differ from the product supplied to your... monitor. Picture 3. System Use the W (left) or X (right) keys to highlight a menu item, and press the ENTER key to display the following pages: • Display menu ...
... all the settings on your region, see "Language on page 28" under "OSD Settings" for more information on page 27 20 How to adjust your monitor Press the MENU key to enter the Menu item settings. Picture Advanced 4. The OSD menu languages may differ from the product supplied to your... monitor. Picture 3. System Use the W (left) or X (right) keys to highlight a menu item, and press the ENTER key to display the following pages: • Display menu ...

