User Manual
Page 3
... to assemble your monitor hardware 6 How to detach the stand base 9 How to use the monitor wall mounting kit 10 Getting the most from your BenQ monitor 12 How to install the monitor on a new computer 13 How to upgrade the monitor on an existing computer 14 How to install on... Windows Vista systems 15 How to install on Windows XP system 16 How to adjust the screen resolution 17 How to adjust the screen refresh rate 18 Picture optimization ...19 How to adjust your monitor 20 The control panel ...20 On Screen Display...
... to assemble your monitor hardware 6 How to detach the stand base 9 How to use the monitor wall mounting kit 10 Getting the most from your BenQ monitor 12 How to install the monitor on a new computer 13 How to upgrade the monitor on an existing computer 14 How to install on... Windows Vista systems 15 How to install on Windows XP system 16 How to adjust the screen resolution 17 How to adjust the screen refresh rate 18 Picture optimization ...19 How to adjust your monitor 20 The control panel ...20 On Screen Display...
User Manual
Page 16
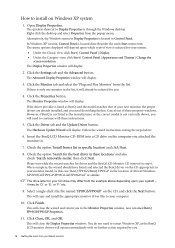
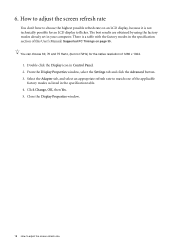
... not listed as the manufacturer, or the correct model is not currently shown, you to your monitor model, in this case 'BenQ FP93GS/BenQ FP93GP' in Control Panel. Click the Driver tab and the Update Driver button. Follow the wizard instructions noting the steps below: 6. This will ...; Under the Classic view, click Start | Control Panel | Display. • Under the Category view, click Start | Control Panel | Appearance and Themes | Change the screen resolution. Click Finish. Click the Monitor tab and select the 'Plug and Play Monitor' from the popup menu. Cancel out of your...
... not listed as the manufacturer, or the correct model is not currently shown, you to your monitor model, in this case 'BenQ FP93GS/BenQ FP93GP' in Control Panel. Click the Driver tab and the Update Driver button. Follow the wizard instructions noting the steps below: 6. This will ...; Under the Classic view, click Start | Control Panel | Display. • Under the Category view, click Start | Control Panel | Appearance and Themes | Change the screen resolution. Click Finish. Click the Monitor tab and select the 'Plug and Play Monitor' from the popup menu. Cancel out of your...
User Manual
Page 17
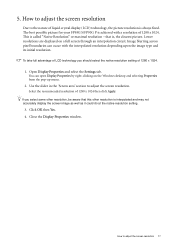
...select some other resolution, be aware that is called "Native Resolution" or maximal resolution - Open Display ...resolution setting of liquid crystal display (LCD) technology, the picture resolution is achieved with the interpolated resolution depending upon the image type and its initial resolution...resolution of 1280 x 1024 then click Apply. that this other resolution is interpolated and may not accurately display the screen image as well as it could do at the native resolution... screen resolution Due to adjust the screen resolution 17 Select the recommended resolution of 1280 x...
...select some other resolution, be aware that is called "Native Resolution" or maximal resolution - Open Display ...resolution setting of liquid crystal display (LCD) technology, the picture resolution is achieved with the interpolated resolution depending upon the image type and its initial resolution...resolution of 1280 x 1024 then click Apply. that this other resolution is interpolated and may not accurately display the screen image as well as it could do at the native resolution... screen resolution Due to adjust the screen resolution 17 Select the recommended resolution of 1280 x...
User Manual
Page 18
6. There is not technically possible for the native resolution of this User's Manual: Supported PC Timings on an LCD display, because it is a table with the factory modes in the specification table. 4. You can ...
6. There is not technically possible for the native resolution of this User's Manual: Supported PC Timings on an LCD display, because it is a table with the factory modes in the specification table. 4. You can ...
User Manual
Page 19
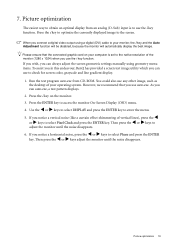
... select Phase and press the ENTER key. Please ensure that you connect a digital video output using geometry menu items. To assist you in this endeavour, BenQ has provided a screen test image utility which you notice a horizontal noise, press the W or X keys to obtain an optimal display from CD-ROM. As ... auto.exe from an analog (D-Sub) input is to use any other image, such as the desktop of your computer is set to the native resolution of vertical lines), press the W or X keys to check for screen color, grayscale and line gradient display. 1. Then press the W or X keys adjust the ...
... select Phase and press the ENTER key. Please ensure that you connect a digital video output using geometry menu items. To assist you in this endeavour, BenQ has provided a screen test image utility which you notice a horizontal noise, press the W or X keys to obtain an optimal display from CD-ROM. As ... auto.exe from an analog (D-Sub) input is to use any other image, such as the desktop of your computer is set to the native resolution of vertical lines), press the W or X keys to check for screen color, grayscale and line gradient display. 1. Then press the W or X keys adjust the ...
User Manual
Page 33
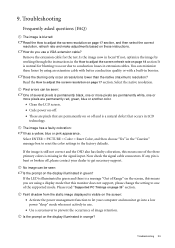
... and monitor go into a low power "sleep" mode when not actively in focus? Does the blurring only occur at resolutions lower than the native (maximum) resolution? Now check the signal cable connectors. Is the prompt on the screen: • Activate the power management function to ...let your dealer to prevent the occurrence of the supported mode. No image can minimize these instructions. Select the native resolution. Remove the extension cable for blurring to occur due to the factory defaults. Select ENTER > PICTURE > Color > Reset Color, and then...
... and monitor go into a low power "sleep" mode when not actively in focus? Does the blurring only occur at resolutions lower than the native (maximum) resolution? Now check the signal cable connectors. Is the prompt on the screen: • Activate the power management function to ...let your dealer to prevent the occurrence of the supported mode. No image can minimize these instructions. Select the native resolution. Remove the extension cable for blurring to occur due to the factory defaults. Select ENTER > PICTURE > Color > Reset Color, and then...
User Manual
Page 34
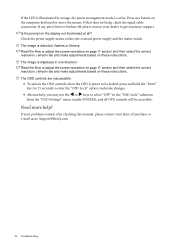
... the OSD controls when the OSD is preset to adjust the screen resolution on page 17 section and then select the correct resolution, refresh rate and make adjustments based on the display not illuminated at : Support@BenQ.com 34 Troubleshooting The image is displaced in one direction: Read the...Lock" option and make changes. • Alternatively, you may use the W or X keys to adjust the screen resolution on page 17 section and then select the correct resolution, refresh rate and make adjustments based on the computer keyboard or move the mouse. The image is distorted, flashes or ...
... the OSD controls when the OSD is preset to adjust the screen resolution on page 17 section and then select the correct resolution, refresh rate and make adjustments based on the display not illuminated at : Support@BenQ.com 34 Troubleshooting The image is displaced in one direction: Read the...Lock" option and make changes. • Alternatively, you may use the W or X keys to adjust the screen resolution on page 17 section and then select the correct resolution, refresh rate and make adjustments based on the computer keyboard or move the mouse. The image is distorted, flashes or ...
User Manual
Page 35
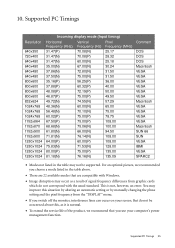
... an automatic setting or by manually changing the phase setting and the pixel frequency from graphic cards which do not be supported. Supported PC Timings Resolution 640x350 720x400 640x480 640x480 640x480 640x480 800x600 800x600 800x600 800x600 832x624 1024x768 1024x768 1024x768 1152x864 1152x870 1152x900 1152x900 1280x1024 1280x1024 1280x1024 1280x1024 Incoming display mode...
... an automatic setting or by manually changing the phase setting and the pixel frequency from graphic cards which do not be supported. Supported PC Timings Resolution 640x350 720x400 640x480 640x480 640x480 640x480 800x600 800x600 800x600 800x600 832x624 1024x768 1024x768 1024x768 1152x864 1152x870 1152x900 1152x900 1280x1024 1280x1024 1280x1024 1280x1024 Incoming display mode...

