

User Manual
Page 2
... written permission of BenQ Corporation. Further, BenQ Corporation reserves the right to revise this equipment from the AC supply. • The power supply cord serves as opening or removing covers may be operated from the type of power indicated on the ...power company. Avoid using any liquid, aerosol or glass cleaners. • Slots and openings on the marked label. Always unplug your monitor iii Power Safety • The AC plug isolates this publication and to make changes from the wall outlet before cleaning. All rights reserved. Please follow these safety instructions for best...
... written permission of BenQ Corporation. Further, BenQ Corporation reserves the right to revise this equipment from the AC supply. • The power supply cord serves as opening or removing covers may be operated from the type of power indicated on the ...power company. Avoid using any liquid, aerosol or glass cleaners. • Slots and openings on the marked label. Always unplug your monitor iii Power Safety • The AC plug isolates this publication and to make changes from the wall outlet before cleaning. All rights reserved. Please follow these safety instructions for best...
User Manual
Page 3
... to install on Windows 2000, ME, & 98 systems 18 How to complete the Windows Upgrade Device Driver Wizard 19 How to adjust the screen resolution 21 How to adjust the screen refresh rate 22 How to set the picture optimization 23 How to adjust your monitor 24 A Look at the Control Panel 24 Hot Key Mode ...25 Main Menu Mode ...25 Troubleshooting ...33 Frequently Asked Questions (FAQ 33 Need More Help? ...34 Supported operating modes 35 Specifications ...36...
... to install on Windows 2000, ME, & 98 systems 18 How to complete the Windows Upgrade Device Driver Wizard 19 How to adjust the screen resolution 21 How to adjust the screen refresh rate 22 How to set the picture optimization 23 How to adjust your monitor 24 A Look at the Control Panel 24 Hot Key Mode ...25 Main Menu Mode ...25 Troubleshooting ...33 Frequently Asked Questions (FAQ 33 Need More Help? ...34 Supported operating modes 35 Specifications ...36...
User Manual
Page 7
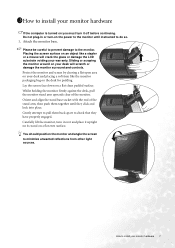
... monitor surround and controls. Gently attempt to pull them together until instructed to do so. 1. How to install your monitor hardware 7 Do not plug-in or turn it upright on its stand on a flat clean padded surface. Protect the monitor and screen by clearing a flat open area on the power to the monitor until they have properly engaged. 1311How to install your monitor hardware If the computer is turned...
... monitor surround and controls. Gently attempt to pull them together until instructed to do so. 1. How to install your monitor hardware 7 Do not plug-in or turn it upright on its stand on a flat clean padded surface. Protect the monitor and screen by clearing a flat open area on the power to the monitor until they have properly engaged. 1311How to install your monitor hardware If the computer is turned...
User Manual
Page 8
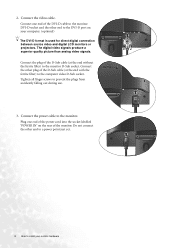
Connect the video cable. Connect the power cable to the DVI-D port on the rear of the monitor. Connect one end of the DVI-D cable to the monitor DVI-D socket and the other end to the monitor. Tighten all finger screws to install your computer. (optional) The DVI-D format is used for direct digital connection between source video and digital LCD monitors or projectors. Plug one end of the power cord into the socket labelled 'POWER IN' on your monitor hardware Do...
Connect the video cable. Connect the power cable to the DVI-D port on the rear of the monitor. Connect one end of the DVI-D cable to the monitor DVI-D socket and the other end to the monitor. Tighten all finger screws to install your computer. (optional) The DVI-D format is used for direct digital connection between source video and digital LCD monitors or projectors. Plug one end of the power cord into the socket labelled 'POWER IN' on your monitor hardware Do...

User Manual
Page 9
... install your BenQ monitor to and turn it on the computer too, and follow the instructions in place behind the monitor stand. 5. Turn on the monitor by squeezing the clip inwards as illustrated. Route the cables via the loose bracket. Plug the other end of the monitor. Turn on . Connect-to install the monitor software. Release the cable retaining clip by pressing the power button on the front of the power cord...
... install your BenQ monitor to and turn it on the computer too, and follow the instructions in place behind the monitor stand. 5. Turn on the monitor by squeezing the clip inwards as illustrated. Route the cables via the loose bracket. Plug the other end of the monitor. Turn on . Connect-to install the monitor software. Release the cable retaining clip by pressing the power button on the front of the power cord...
User Manual
Page 11
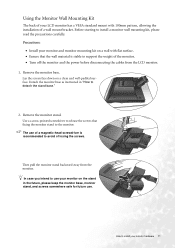
... stable to avoid of losing the screws. Precautions: • Install your LCD monitor has a VESA standard mount with flat surface. • Ensure that fixing the monitor stand to install a monitor wall mounting kit, please read the precautions carefully. Remove the monitor base. Lay the screen face down on a clean and well-padded surface. Using the Monitor Wall Mounting Kit The back of your monitor and monitor mounting kit on a wall with 100mm pattern, allowing the installation of a wall mount bracket.
... stable to avoid of losing the screws. Precautions: • Install your LCD monitor has a VESA standard mount with flat surface. • Ensure that fixing the monitor stand to install a monitor wall mounting kit, please read the precautions carefully. Remove the monitor base. Lay the screen face down on a clean and well-padded surface. Using the Monitor Wall Mounting Kit The back of your monitor and monitor mounting kit on a wall with 100mm pattern, allowing the installation of a wall mount bracket.

User Manual
Page 13
... need to follow . Further details and step-by-step instructions for both an automatic (new) or upgrade (existing) installation follow to install the monitor driver software. See: • How to install the monitor on a new computer. • How to upgrade the monitor on an existing computer If you must be logged on as an Administrator or as provided on your new BenQ color LCD flat screen monitor, you connect...
... need to follow . Further details and step-by-step instructions for both an automatic (new) or upgrade (existing) installation follow to install the monitor driver software. See: • How to install the monitor on a new computer. • How to upgrade the monitor on an existing computer If you must be logged on as an Administrator or as provided on your new BenQ color LCD flat screen monitor, you connect...

User Manual
Page 14
... Wizard. Check the option for which the BenQ LCD Monitor is only suitable for a computer which has never had another monitor connected to it . This instruction is the first ever monitor to be connected to it (and has monitor driver software installed), you are adding the BenQ LCD Monitor to an existing computer that the wizard has selected the correct name of your monitor as "BenQ FP93G/FP93GX" and...
... Wizard. Check the option for which the BenQ LCD Monitor is only suitable for a computer which has never had another monitor connected to it . This instruction is the first ever monitor to be connected to it (and has monitor driver software installed), you are adding the BenQ LCD Monitor to an existing computer that the wizard has selected the correct name of your monitor as "BenQ FP93G/FP93GX" and...
User Manual
Page 15
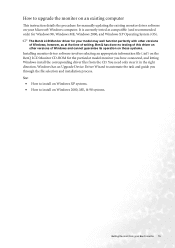
... with other versions of Windows, however, as compatible (and recommended only) for the particular model monitor you through the file selection and installation process. How to upgrade the monitor on an existing computer This instruction details the procedure for manually updating the existing monitor driver software on the BenQ LCD Monitor CD-ROM for Windows 98, Windows ME, Windows 2000, and Windows XP Operating System (OS). The BenQ LCD Monitor driver for your Microsoft...
... with other versions of Windows, however, as compatible (and recommended only) for the particular model monitor you through the file selection and installation process. How to upgrade the monitor on an existing computer This instruction details the procedure for manually updating the existing monitor driver software on the BenQ LCD Monitor CD-ROM for Windows 98, Windows ME, Windows 2000, and Windows XP Operating System (OS). The BenQ LCD Monitor driver for your Microsoft...

User Manual
Page 16
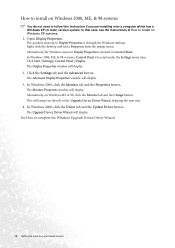
... Classic view, click Start | Control Panel | Display. • Under the Category view, click Start | Control Panel | Appearance and Themes | Change the screen resolution. Click the Monitor tab and select the 'Plug and Play Monitor' from the example above depending upon which type of your CD drive may be selected for you. 4. Click the Properties button. If the driver provider is selected for the best driver in step 6. However, if BenQ...
... Classic view, click Start | Control Panel | Display. • Under the Category view, click Start | Control Panel | Appearance and Themes | Change the screen resolution. Click the Monitor tab and select the 'Plug and Play Monitor' from the example above depending upon which type of your CD drive may be selected for you. 4. Click the Properties button. If the driver provider is selected for the best driver in step 6. However, if BenQ...
User Manual
Page 18
... Upgrade Device Driver Wizard will display. In that case, see the instructions at How to complete the Windows Upgrade Device Driver Wizard. 18 Getting the most from the popup menu. Click Start | Settings | Control Panel | Display. The Monitor Properties window will display. See How to install on Windows ME or 98, click the Monitor tab and the Change button. Right-click the desktop and select Properties from your BenQ monitor The Advanced Display Properties window...
... Upgrade Device Driver Wizard will display. In that case, see the instructions at How to complete the Windows Upgrade Device Driver Wizard. 18 Getting the most from the popup menu. Click Start | Settings | Control Panel | Display. The Monitor Properties window will display. See How to install on Windows ME or 98, click the Monitor tab and the Change button. Right-click the desktop and select Properties from your BenQ monitor The Advanced Display Properties window...
User Manual
Page 19
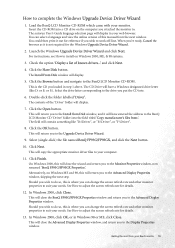
... work off-line. Select the drive letter corresponding to the BenQ LCD Monitor CD-ROM. This will display. 7. The field will have a Windows designated drive letter (like "D:\Driver", or "E:\Driver", or "F:\Driver". 8. On Windows 2000, this manual from :'. In Windows 2000, click Close. Check the option 'Display a list of known drivers...' See How to adjust the screen refresh rate for reference if you attached the monitor to complete the Windows Upgrade Device Driver...
... work off-line. Select the drive letter corresponding to the BenQ LCD Monitor CD-ROM. This will display. 7. The field will have a Windows designated drive letter (like "D:\Driver", or "E:\Driver", or "F:\Driver". 8. On Windows 2000, this manual from :'. In Windows 2000, click Close. Check the option 'Display a list of known drivers...' See How to adjust the screen refresh rate for reference if you attached the monitor to complete the Windows Upgrade Device Driver...
User Manual
Page 21
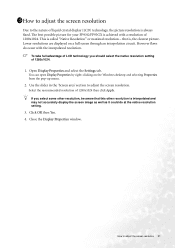
... fixed. Select the recommended resolution of 1280x1024. 1. Open Display Properties and select the Settings tab. Lower resolutions are displayed on the Windows desktop and selecting Properties from the pop-up menu. 2. The best possible picture for your FP93G/FP93GX is called "Native Resolution" or maximal resolution - Use the slider in the 'Screen area' section to adjust the screen resolution 21 How to adjust the screen resolution. Click OK then Yes. 4. 1511How to adjust the screen resolution...
... fixed. Select the recommended resolution of 1280x1024. 1. Open Display Properties and select the Settings tab. Lower resolutions are displayed on the Windows desktop and selecting Properties from the pop-up menu. 2. The best possible picture for your FP93G/FP93GX is called "Native Resolution" or maximal resolution - Use the slider in the 'Screen area' section to adjust the screen resolution 21 How to adjust the screen resolution. Click OK then Yes. 4. 1511How to adjust the screen resolution...
User Manual
Page 22
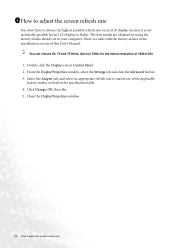
... Advanced button. 3. Close the Display Properties window. 22 How to adjust the screen refresh rate You can choose 60, 70 and 75 Hertz, (but not 72Hz) for an LCD display to flicker. There is not technically possible for the native resolution of the applicable factory modes as listed in your computer. The best results are obtained by using the factory modes already set in the specification table. 4. Select the Adapter tab...
... Advanced button. 3. Close the Display Properties window. 22 How to adjust the screen refresh rate You can choose 60, 70 and 75 Hertz, (but not 72Hz) for an LCD display to flicker. There is not technically possible for the native resolution of the applicable factory modes as listed in your computer. The best results are obtained by using the factory modes already set in the specification table. 4. Select the Adapter tab...

User Manual
Page 23
... an optimal display is on the monitor panel. You could also use the i key function. Then press the W or X keys to use any other image, such as listed at the end of this endeavour, BenQ has provided a screen test image utility which you are not using the buttons on the OSD, it means you can always adjust the screen settings manually using one of the supported modes. As you use one...
... an optimal display is on the monitor panel. You could also use the i key function. Then press the W or X keys to use any other image, such as listed at the end of this endeavour, BenQ has provided a screen test image utility which you are not using the buttons on the OSD, it means you can always adjust the screen settings manually using one of the supported modes. As you use one...
User Manual
Page 33
... by working through the instructions in extension cables. If any pin is active. Remove the extension cable for blurring to occur due to conduction losses in the How to adjust the screen refresh rate section It is normal for the test. Please read "Supported operating modes" section. The image has a faulty coloration: It has a yellow, blue or pink appearance. Now check the signal cable connectors. Troubleshooting 33 Select the native resolution...
... by working through the instructions in extension cables. If any pin is active. Remove the extension cable for blurring to occur due to conduction losses in the How to adjust the screen refresh rate section It is normal for the test. Please read "Supported operating modes" section. The image has a faulty coloration: It has a yellow, blue or pink appearance. Now check the signal cable connectors. Troubleshooting 33 Select the native resolution...

User Manual
Page 34
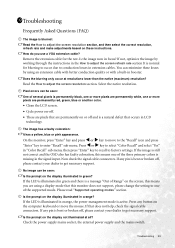
The image is displaced in one direction: Read the How to adjust the screen resolution section and then select the correct resolution, refresh rate and make adjustments based on these instructions. The image is distorted, flashes or flickers: Read the How to adjust the screen resolution section and then select the correct resolution, refresh rate and make adjustments based on these instructions. If your problems remain after checking this manual, please contact your place of purchase or e-mail us at: Support@BenQ.com 34 Troubleshooting Need More Help?
The image is displaced in one direction: Read the How to adjust the screen resolution section and then select the correct resolution, refresh rate and make adjustments based on these instructions. The image is distorted, flashes or flickers: Read the How to adjust the screen resolution section and then select the correct resolution, refresh rate and make adjustments based on these instructions. If your problems remain after checking this manual, please contact your place of purchase or e-mail us at: Support@BenQ.com 34 Troubleshooting Need More Help?
User Manual
Page 35
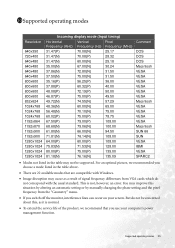
.... • There are 22 available modes that you switch off the monitor, interference lines can occur on your computer's power management function. For an optimal picture, we recommended you choose a mode listed in the table may not be concerned about this situation by altering an automatic setting or by manually changing the phase setting and the pixel frequency from VGA cards which do not be supported.
.... • There are 22 available modes that you switch off the monitor, interference lines can occur on your computer's power management function. For an optimal picture, we recommended you choose a mode listed in the table may not be concerned about this situation by altering an automatic setting or by manually changing the phase setting and the pixel frequency from VGA cards which do not be supported.
LCD Monitor Product Guide
Page 1
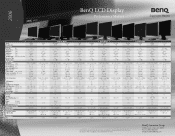
... Brightness (VP.) Contrast (tyD.) Viewing angle (L/R;U/D) (CR>=10) 250 ()Jim' 400:1 120100° Response Time 12ms Display Colors 16.2 million Monitor Spec Resolution (ma.) 1024 x 768 (XGN Hor. Frequency (KHz) 31 - 63 Ver. Frequency (Hz) 56 - 75 Video Bandwidth (MHz) 25 - 80 Input connector D-Sub Power supply (90-264 AC) Power consumption (On mode) 30W (max) (Power saving mode) 1W/120V 2W/240V Color Temperature Reddish/NorrnaVBluish +user mode OSD language 8 i Key Yes Kensington Lock Support Yes...
... Brightness (VP.) Contrast (tyD.) Viewing angle (L/R;U/D) (CR>=10) 250 ()Jim' 400:1 120100° Response Time 12ms Display Colors 16.2 million Monitor Spec Resolution (ma.) 1024 x 768 (XGN Hor. Frequency (KHz) 31 - 63 Ver. Frequency (Hz) 56 - 75 Video Bandwidth (MHz) 25 - 80 Input connector D-Sub Power supply (90-264 AC) Power consumption (On mode) 30W (max) (Power saving mode) 1W/120V 2W/240V Color Temperature Reddish/NorrnaVBluish +user mode OSD language 8 i Key Yes Kensington Lock Support Yes...
FP93G Product Datasheet
Page 1
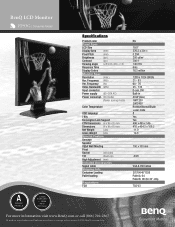
...(mm) Brightness (typ.) Contrast (typ.) Viewing angle (L/R;U/D) (CR>=10) Response Time Display Colors Monitor Spec Resolution (max.) Hor. Frequency (Hz) Video Bandwidth (MHz) Input connector Power supply (90~264 AC) Power consumpt. (On mode) (Power saving mode) Color Temperature OSD language i Key Kensington Lock Support CTN Dimensions (H x W x D) mm Dimensions (H x W x D) mm Net Weight (Lbs) Gross Weight (Lbs) Special Feature Senseye Speaker VESA Wall Mouting Pivot Swivel (left/right) Tilt (down/up) High Adjustment (mm) Included Accessories Signal cable...
...(mm) Brightness (typ.) Contrast (typ.) Viewing angle (L/R;U/D) (CR>=10) Response Time Display Colors Monitor Spec Resolution (max.) Hor. Frequency (Hz) Video Bandwidth (MHz) Input connector Power supply (90~264 AC) Power consumpt. (On mode) (Power saving mode) Color Temperature OSD language i Key Kensington Lock Support CTN Dimensions (H x W x D) mm Dimensions (H x W x D) mm Net Weight (Lbs) Gross Weight (Lbs) Special Feature Senseye Speaker VESA Wall Mouting Pivot Swivel (left/right) Tilt (down/up) High Adjustment (mm) Included Accessories Signal cable...


