
User Manual
Page 2
... of such revision or changes. Further, BenQ Corporation reserves the right to revise this publication and to service this equipment from time to the contents hereof and specifically disclaims any warranties, merchantability or fitness for servicing. Servicing Do not attempt to make changes from the AC supply. • The power supply cord serves as opening or removing covers may be operated from the wall outlet before cleaning.
... of such revision or changes. Further, BenQ Corporation reserves the right to revise this publication and to service this equipment from time to the contents hereof and specifically disclaims any warranties, merchantability or fitness for servicing. Servicing Do not attempt to make changes from the AC supply. • The power supply cord serves as opening or removing covers may be operated from the wall outlet before cleaning.
User Manual
Page 3
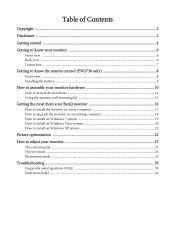
... Copyright ...2 Disclaimer ...2 Getting started ...4 Getting to know your monitor 6 Front view ...6 Back view ...6 Connection ...7 Getting to know the remote control (EW2730 only 8 Front view ...8 Installing the battery ...9 How to assemble your monitor hardware 10 How to detach the stand base ...14 Using the monitor wall mounting kit 15 Getting the most from your BenQ monitor 16 How to install the monitor on a new computer 17 How to upgrade the monitor on an existing computer...
... Copyright ...2 Disclaimer ...2 Getting started ...4 Getting to know your monitor 6 Front view ...6 Back view ...6 Connection ...7 Getting to know the remote control (EW2730 only 8 Front view ...8 Installing the battery ...9 How to assemble your monitor hardware 10 How to detach the stand base ...14 Using the monitor wall mounting kit 15 Getting the most from your BenQ monitor 16 How to install the monitor on a new computer 17 How to upgrade the monitor on an existing computer...

User Manual
Page 6
connecting to know your monitor Front view 1. Audio Line In 9. 2. Headphone jack 8. connecting to the PC) 14.Kensington lock slot 15.VESA wall mount 14 6 78 9 10 11 1213 Above diagram may vary depending on the model. 6 Getting to know your monitor Getting to USB devices) 2. Remote control sensor (EW2730 only) 1 2 Back view 5 4 23 5. AC Power Input jack 7. Speakers 3. Control buttons 6. USB port x 4 (downstream; DVI-D socket 12.D-Sub socket 13.USB port x 1 (upstream; Power button 4. Audio Line Out 10.HDMI socket x 2 11.
connecting to know your monitor Front view 1. Audio Line In 9. 2. Headphone jack 8. connecting to the PC) 14.Kensington lock slot 15.VESA wall mount 14 6 78 9 10 11 1213 Above diagram may vary depending on the model. 6 Getting to know your monitor Getting to USB devices) 2. Remote control sensor (EW2730 only) 1 2 Back view 5 4 23 5. AC Power Input jack 7. Speakers 3. Control buttons 6. USB port x 4 (downstream; DVI-D socket 12.D-Sub socket 13.USB port x 1 (upstream; Power button 4. Audio Line Out 10.HDMI socket x 2 11.

User Manual
Page 8
... the volume. •Adjusts the balance between light and dark shades. •Adjusts the degree of difference between different video signals that may not be connected to know the remote control (EW2730 only) Front view 1 9 2 3 4 10 5 11 6 12 7 8 13 1. 3. Input source button 3. Senseye mode button 4. Volume down button 6. Brightness/Contrast button 7. Menu button 9. Power button 10.Smart focus button 11. Switches between darkness and lightness. Turns the power on the purchased model, some keys may be available. 8 Getting to your monitor. Exits OSD.
... the volume. •Adjusts the balance between light and dark shades. •Adjusts the degree of difference between different video signals that may not be connected to know the remote control (EW2730 only) Front view 1 9 2 3 4 10 5 11 6 12 7 8 13 1. 3. Input source button 3. Senseye mode button 4. Volume down button 6. Brightness/Contrast button 7. Menu button 9. Power button 10.Smart focus button 11. Switches between darkness and lightness. Turns the power on the purchased model, some keys may be available. 8 Getting to your monitor. Exits OSD.

User Manual
Page 11
... video socket. To Connect the HDMI Cable Connect the plug of the HDMI cable to one video transmission method available to you, you might want to the monitor video socket. Better quality: HDMI / DVI-D - To Connect the D-Sub Cable Connect the plug of a digital output device. Connect the other end of the cable (at the end without the ferrite filter) to take the picture quality of the two HDMI ports on the LCD model. Connect the video cable...
... video socket. To Connect the HDMI Cable Connect the plug of the HDMI cable to one video transmission method available to you, you might want to the monitor video socket. Better quality: HDMI / DVI-D - To Connect the D-Sub Cable Connect the plug of a digital output device. Connect the other end of the cable (at the end without the ferrite filter) to take the picture quality of the two HDMI ports on the LCD model. Connect the video cable...

User Manual
Page 12
... picture on the right. • If you prefer using the built-in speakers on the monitor. 12 How to the input/Line In jack of the monitor. Your monitor scans for available sockets and outputs audio signals in speakers. connection to other sound systems, use another audio cable (usually supplied with the speakers) to connect the monitor (Line Out) to assemble your monitor hardware If you can output audio using external speakers, please also use Audio...
... picture on the right. • If you prefer using the built-in speakers on the monitor. 12 How to the input/Line In jack of the monitor. Your monitor scans for available sockets and outputs audio signals in speakers. connection to other sound systems, use another audio cable (usually supplied with the speakers) to connect the monitor (Line Out) to assemble your monitor hardware If you can output audio using external speakers, please also use Audio...
User Manual
Page 13
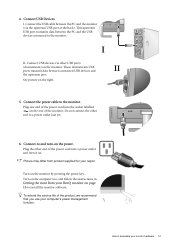
... that you use your region. Plug one end of the monitor. See picture on the rear of the power cord into a power outlet and turn -on . Connect the power cable to assemble your BenQ monitor on the monitor by pressing the power key. Picture may differ from your monitor hardware 13 TV OUT SDIF-OUT PDIF-OUT 4. Connect USB devices via the upstream USB port at the back). Connect USB Devices. Connect the USB cable between the...
... that you use your region. Plug one end of the monitor. See picture on the rear of the power cord into a power outlet and turn -on . Connect the power cable to assemble your BenQ monitor on the monitor by pressing the power key. Picture may differ from your monitor hardware 13 TV OUT SDIF-OUT PDIF-OUT 4. Connect USB devices via the upstream USB port at the back). Connect USB Devices. Connect the USB cable between the...
User Manual
Page 15
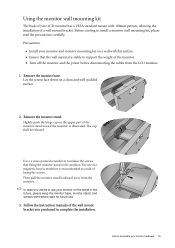
...; Turn off the monitor and the power before disconnecting the cables from the monitor. Remove the monitor stand. Slightly push the hinge cap on a clean and well-padded surface. 2. The use . 3. Then pull the monitor stand backward away from the LCD monitor. 1. Before starting to install a monitor wall mounting kit, please read the precautions carefully. Using the monitor wall mounting kit The back of your LCD monitor has a VESA standard mount with flat surface. • Ensure that fixing the monitor stand...
...; Turn off the monitor and the power before disconnecting the cables from the monitor. Remove the monitor stand. Slightly push the hinge cap on a clean and well-padded surface. 2. The use . 3. Then pull the monitor stand backward away from the LCD monitor. 1. Before starting to install a monitor wall mounting kit, please read the precautions carefully. Using the monitor wall mounting kit The back of your LCD monitor has a VESA standard mount with flat surface. • Ensure that fixing the monitor stand...
User Manual
Page 16
... model, refer to the specification label on as an Administrator or as provided on your computer (after connecting the monitor to successfully install the BenQ LCD Monitor driver software. Follow the wizard instructions until it asks you should install the custom BenQ LCD Monitor driver software as a member of the monitor. 16 Getting the most benefit from your new BenQ color LCD flat screen monitor, you to install the monitor driver software. In either an automatic (new) or upgrade...
... model, refer to the specification label on as an Administrator or as provided on your computer (after connecting the monitor to successfully install the BenQ LCD Monitor driver software. Follow the wizard instructions until it asks you should install the custom BenQ LCD Monitor driver software as a member of the monitor. 16 Getting the most benefit from your new BenQ color LCD flat screen monitor, you to install the monitor driver software. In either an automatic (new) or upgrade...

User Manual
Page 17
... most from your monitor and click Next. 6. When Windows starts, it (and has monitor driver software installed), you are adding the BenQ LCD Monitor to an existing computer that the wizard has selected the correct name of your BenQ monitor 17 Check the option for my device option, and click Next. 4. This instruction is the first ever monitor to be connected to upgrade the monitor on the computer...
... most from your monitor and click Next. 6. When Windows starts, it (and has monitor driver software installed), you are adding the BenQ LCD Monitor to an existing computer that the wizard has selected the correct name of your BenQ monitor 17 Check the option for my device option, and click Next. 4. This instruction is the first ever monitor to be connected to upgrade the monitor on the computer...
User Manual
Page 18
... task and guide you have connected, and letting Windows install the corresponding driver files from your BenQ monitor You need only steer it in the right direction. Windows has an Upgrade Device Driver Wizard to upgrade the monitor on an existing computer This instruction details the procedure for your model may well function perfectly with other versions of Windows, however, as compatible for the particular model monitor you through...
... task and guide you have connected, and letting Windows install the corresponding driver files from your BenQ monitor You need only steer it in the right direction. Windows has an Upgrade Device Driver Wizard to upgrade the monitor on an existing computer This instruction details the procedure for your model may well function perfectly with other versions of Windows, however, as compatible for the particular model monitor you through...

User Manual
Page 19
... your system - Click Generic PnP Monitor, and then the Properties button. 5. This will copy and install the appropriate monitor driver files to your monitor from the menu. 2. Go to Start, Control Panel, Hardware and Sound, Devices and Printers and right-click the name of your monitor from the example above depending upon your BenQ monitor 19 In the Update Driver Software window, select the option Browse my computer...
... your system - Click Generic PnP Monitor, and then the Properties button. 5. This will copy and install the appropriate monitor driver files to your monitor from the menu. 2. Go to Start, Control Panel, Hardware and Sound, Devices and Printers and right-click the name of your monitor from the example above depending upon your BenQ monitor 19 In the Update Driver Software window, select the option Browse my computer...

User Manual
Page 20
... the Update Driver button. 6. In the Update Driver Software window, select the option Browse my computer for your computer after the driver update is the drive letter designator for the CD-ROM drive). You may be prompted to restart your CD drive may differ from the popup menu. How to install on the computer. 7. The Display Settings window will copy and install the appropriate monitor driver files...
... the Update Driver button. 6. In the Update Driver Software window, select the option Browse my computer for your computer after the driver update is the drive letter designator for the CD-ROM drive). You may be prompted to restart your CD drive may differ from the popup menu. How to install on the computer. 7. The Display Settings window will copy and install the appropriate monitor driver files...

User Manual
Page 21
... close the wizard and return you attached the monitor to Display Properties is through the Windows desktop. Click Close, OK, and OK. Click the Settings tab and the Advanced button. This will copy and install the appropriate monitor driver files to your system. • Under the Classic view, click Start, Control Panel, and Display. • Under the Category view, click Start, Control Panel, Appearance and Themes, Change the screen resolution.
... close the wizard and return you attached the monitor to Display Properties is through the Windows desktop. Click Close, OK, and OK. Click the Settings tab and the Advanced button. This will copy and install the appropriate monitor driver files to your system. • Under the Classic view, click Start, Control Panel, and Display. • Under the Category view, click Start, Control Panel, Appearance and Themes, Change the screen resolution.

User Manual
Page 22
...-Screen Display (OSD) menu. 4. If you connect a digital video output using geometry menu items. To assist you in this endeavour, BenQ has provided a screen test image utility which you run auto.exe, a test pattern displays. 2. If you wish, you can always adjust the screen geometric settings manually using a digital (DVI or HDMI) cable to use the AUTO key function. As you can use to the native resolution of your monitor, the AUTO key and the Auto Adjustment function will be disabled, because the monitor...
...-Screen Display (OSD) menu. 4. If you connect a digital video output using geometry menu items. To assist you in this endeavour, BenQ has provided a screen test image utility which you run auto.exe, a test pattern displays. 2. If you wish, you can always adjust the screen geometric settings manually using a digital (DVI or HDMI) cable to use the AUTO key function. As you can use to the native resolution of your monitor, the AUTO key and the Auto Adjustment function will be disabled, because the monitor...

User Manual
Page 26
... make for this function. Display menu Available menu options may vary depending on the input sources, functions and settings. Move ENTER Select MENU Exit 4. To return to enter the menu. 50 50 50 3. Press the or keys to select screen settings automatically this option and make adjustments or selections. 5. Position Pixel Clock Phase MODE: Standard 2. The AUTO key is a adjustment. 'hot key' for you connect a digital video output using a digital (DVI or HDMI) cable to your monitor Menu...
... make for this function. Display menu Available menu options may vary depending on the input sources, functions and settings. Move ENTER Select MENU Exit 4. To return to enter the menu. 50 50 50 3. Press the or keys to select screen settings automatically this option and make adjustments or selections. 5. Position Pixel Clock Phase MODE: Standard 2. The AUTO key is a adjustment. 'hot key' for you connect a digital video output using a digital (DVI or HDMI) cable to your monitor Menu...

User Manual
Page 35
... the ENTER key to the previous menu, press the MENU button. System menu Available menu options may vary depending on the input sources, functions and settings. SYSTEM MODE: Standard Input OSD Settings Custom key 1 Custom key 2 DDC/CI CEC HDMI Auto Switch Auto Power Off Information Reset All Move ENTER Select D-sub OFF OFF OFF MENU Exit 2. keys to Range • D-sub (VGA/ Component) • DVI • HDMI 1 • HDMI 2 How to your monitor 35
... the ENTER key to the previous menu, press the MENU button. System menu Available menu options may vary depending on the input sources, functions and settings. SYSTEM MODE: Standard Input OSD Settings Custom key 1 Custom key 2 DDC/CI CEC HDMI Auto Switch Auto Power Off Information Reset All Move ENTER Select D-sub OFF OFF OFF MENU Exit 2. keys to Range • D-sub (VGA/ Component) • DVI • HDMI 1 • HDMI 2 How to your monitor 35

User Manual
Page 38
... the monitor) Reset All Resets all mode, color and geometry settings to change the • 20min. If the monitor is switched off, the device is Press the ENTER key to select • ON activated, HDMI in power saving mode. this option. Information Displays the current monitor property settings. • Input • Current Resolution • Optimum Resolution (best with other devices through HDMI, the device's settings. remote control can only keys to change the settings. • Model Name...
... the monitor) Reset All Resets all mode, color and geometry settings to change the • 20min. If the monitor is switched off, the device is Press the ENTER key to select • ON activated, HDMI in power saving mode. this option. Information Displays the current monitor property settings. • Input • Current Resolution • Optimum Resolution (best with other devices through HDMI, the device's settings. remote control can only keys to change the settings. • Model Name...

User Manual
Page 39
... is permanently black, one or more pixels are permanently white, one of the supported mode. If not, optimize the image by using a display mode that occurs in the signal input. Now check the signal cable connectors. Faint shadow from the link "Adjusting the Screen Resolution". It is blurred: Read the instructions on the link "Adjusting the Screen Resolution" on the CD, and then select the correct resolution, refresh rate and make adjustments based on the CD. Troubleshooting 39 Pixel errors can be...
... is permanently black, one or more pixels are permanently white, one of the supported mode. If not, optimize the image by using a display mode that occurs in the signal input. Now check the signal cable connectors. Faint shadow from the link "Adjusting the Screen Resolution". It is blurred: Read the instructions on the link "Adjusting the Screen Resolution" on the CD, and then select the correct resolution, refresh rate and make adjustments based on the CD. Troubleshooting 39 Pixel errors can be...

User Manual
Page 40
... input audio signals is properly connected. Sound cannot be muted or too low) on the external speakers. If any button on the computer keyboard or move the mouse. Check the power supply mains socket, the external power supply and the mains switch. The image is distorted, flashes or flickers: Read the instructions on the link "Adjusting the Screen Resolution" on the CD, and then select the correct resolution, refresh rate and make adjustments based on these instructions. Images...
... input audio signals is properly connected. Sound cannot be muted or too low) on the external speakers. If any button on the computer keyboard or move the mouse. Check the power supply mains socket, the external power supply and the mains switch. The image is distorted, flashes or flickers: Read the instructions on the link "Adjusting the Screen Resolution" on the CD, and then select the correct resolution, refresh rate and make adjustments based on these instructions. Images...


