

User Manual
Page 7
section Overview Equipment Requirements 1 Cables: 2 Connecting the PRO3 KVM Switch to a server requires a Belkin Dual-Port Micro-Cable Kit. Belkin Dual-Port Micro-Cable Kits: 3 F1D9400-XX (PS/2-style) 4 5 6 7 8 Belkin PRO3 Daisy-Chain Cable: F1D108-CBL (Available in a 2 feet version) Note: Product codes and availability may vary. 5
section Overview Equipment Requirements 1 Cables: 2 Connecting the PRO3 KVM Switch to a server requires a Belkin Dual-Port Micro-Cable Kit. Belkin Dual-Port Micro-Cable Kits: 3 F1D9400-XX (PS/2-style) 4 5 6 7 8 Belkin PRO3 Daisy-Chain Cable: F1D108-CBL (Available in a 2 feet version) Note: Product codes and availability may vary. 5

User Manual
Page 12
... (F1D005) is available for use to connect your servers to the PRO3 KVM Switch Cable-Distance Requirements: For PS/2 Servers: VGA signals transmit best up to 300 feet (91m). Note: The Belkin OmniView CAT5 Extender (F1D084vea2) may cause irreversible damage of the servers and/or the PRO3 KVM Switches. You are now ready to begin installation of your console •...
... (F1D005) is available for use to connect your servers to the PRO3 KVM Switch Cable-Distance Requirements: For PS/2 Servers: VGA signals transmit best up to 300 feet (91m). Note: The Belkin OmniView CAT5 Extender (F1D084vea2) may cause irreversible damage of the servers and/or the PRO3 KVM Switches. You are now ready to begin installation of your console •...

User Manual
Page 16
Installation Connecting the Console to the PRO3 KVM Switch Step 1 Connect the VGA monitor cable to the HDDB15 female port on the back of the PRO3 KVM Switch in the "Console" section. (Refer to diagram below.) Step 2 Connect the PS/2 keyboard cable to the keyboard port on the back of the PRO3 KVM Switch in the "Console" section. (Refer to diagram below.) Step...
Installation Connecting the Console to the PRO3 KVM Switch Step 1 Connect the VGA monitor cable to the HDDB15 female port on the back of the PRO3 KVM Switch in the "Console" section. (Refer to diagram below.) Step 2 Connect the PS/2 keyboard cable to the keyboard port on the back of the PRO3 KVM Switch in the "Console" section. (Refer to diagram below.) Step...

User Manual
Page 17
section Installation 1 2 3 Your PRO3 KVM Switch is now installed and you are ready to connect 4 your servers. 5 Connecting PS/2 Servers to the PRO3 KVM Switch 6 Step 1 Make sure your server is powered off. 7 Step 2 Using the Belkin Dual-Port Micro-Cable Kit for PS/2 (F1D9400-XX), connect the 8 VGA connector to the monitor port on your server. (Refer to diagram below.) Step 3 Connect the PS/2 mouse and keyboard connectors to the mouse and keyboard ports on the server. (Refer to diagram below.) 15
section Installation 1 2 3 Your PRO3 KVM Switch is now installed and you are ready to connect 4 your servers. 5 Connecting PS/2 Servers to the PRO3 KVM Switch 6 Step 1 Make sure your server is powered off. 7 Step 2 Using the Belkin Dual-Port Micro-Cable Kit for PS/2 (F1D9400-XX), connect the 8 VGA connector to the monitor port on your server. (Refer to diagram below.) Step 3 Connect the PS/2 mouse and keyboard connectors to the mouse and keyboard ports on the server. (Refer to diagram below.) 15
User Manual
Page 18
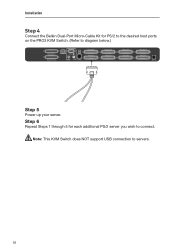
Installation Step 4 Connect the Belkin Dual-Port Micro-Cable Kit for each additional PS/2 server you wish to diagram below.) Step 5 Power up your server. Step 6 Repeat Steps 1 through 5 for PS/2 to the desired host ports on the PRO3 KVM Switch. (Refer to connect. Note: This KVM Switch does NOT support USB connection to servers. 16
Installation Step 4 Connect the Belkin Dual-Port Micro-Cable Kit for each additional PS/2 server you wish to diagram below.) Step 5 Power up your server. Step 6 Repeat Steps 1 through 5 for PS/2 to the desired host ports on the PRO3 KVM Switch. (Refer to connect. Note: This KVM Switch does NOT support USB connection to servers. 16

User Manual
Page 19
...) Note: A Daisy-Chain Cable (F1D108-CBL) is required to daisy-chain each PRO3 KVM Switch and is available through 15 are referred to as "secondary" KVM switches. 4 Note: Your PRO3 KVM Switch is backward-compatible with Belkin OmniView PRO2 KVM Switches with micro- The PRO3 KVM Switch connected to a maximum of 256 servers from one console. In a daisy-chain configuration, the PRO3 KVM Switch with standard cabling (F1DA104Tea, F1DA108Tea, 5 F1DA116Tea...
...) Note: A Daisy-Chain Cable (F1D108-CBL) is required to daisy-chain each PRO3 KVM Switch and is available through 15 are referred to as "secondary" KVM switches. 4 Note: Your PRO3 KVM Switch is backward-compatible with Belkin OmniView PRO2 KVM Switches with micro- The PRO3 KVM Switch connected to a maximum of 256 servers from one console. In a daisy-chain configuration, the PRO3 KVM Switch with standard cabling (F1DA104Tea, F1DA108Tea, 5 F1DA116Tea...
User Manual
Page 21
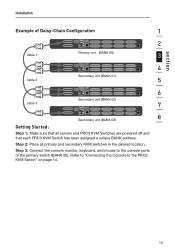
... (BANK 02) cable 3 7 Secondary unit (BANK 03) 8 Getting Started: Step 1: Make sure that all primary and secondary KVM switches in the desired location. section Installation Example of the primary switch (BANK 00). Step 3: Connect the console monitor, keyboard, and mouse to the PRO3 KVM Switch" on page 14. 19 Step 2: Place all servers and PRO3 KVM Switches are powered off...
... (BANK 02) cable 3 7 Secondary unit (BANK 03) 8 Getting Started: Step 1: Make sure that all primary and secondary KVM switches in the desired location. section Installation Example of the primary switch (BANK 00). Step 3: Connect the console monitor, keyboard, and mouse to the PRO3 KVM Switch" on page 14. 19 Step 2: Place all servers and PRO3 KVM Switches are powered off...

User Manual
Page 22
... Out" port of the next secondary KVM switch(for additional PRO3 KVM Switches you wish to daisy-chain together. Note: Your PRO3 KVM Switch is backward-compatible with Belkin OmniView PRO2 KVM Switches with microcabling (F1DA104Zea, F1DA108Zea, F1DA116Zea) must be designated as the primary KVM switch. 20 Installation Connecting the Primary and Secondary KVM Switches: Step 1 Using the Daisy-Chain Cable (F1D108-CBL), connect one end of...
... Out" port of the next secondary KVM switch(for additional PRO3 KVM Switches you wish to daisy-chain together. Note: Your PRO3 KVM Switch is backward-compatible with Belkin OmniView PRO2 KVM Switches with microcabling (F1DA104Zea, F1DA108Zea, F1DA116Zea) must be designated as the primary KVM switch. 20 Installation Connecting the Primary and Secondary KVM Switches: Step 1 Using the Daisy-Chain Cable (F1D108-CBL), connect one end of...

User Manual
Page 23
...KVM switch should see the primary KVM switch light up the primary switch. Step 4: Verify that all KVM switches have the correct BANK address assigned 8 to detect newly 7 added secondary KVM switches. You can also reset the primary KVM switch to them and that all daisy-chain cables are detected properly, the LED display on page 15 for instructions. If all secondary KVM switches... KVM switches. 2 Refer to the "Connecting PS/2 Servers to the PRO3 KVM Switch" section on the primary KVM switch will register and display the BANK address of the attached secondary KVM switch....
...KVM switch should see the primary KVM switch light up the primary switch. Step 4: Verify that all KVM switches have the correct BANK address assigned 8 to detect newly 7 added secondary KVM switches. You can also reset the primary KVM switch to them and that all daisy-chain cables are detected properly, the LED display on page 15 for instructions. If all secondary KVM switches... KVM switches. 2 Refer to the "Connecting PS/2 Servers to the PRO3 KVM Switch" section on the primary KVM switch will register and display the BANK address of the attached secondary KVM switch....

User Manual
Page 24
...the "Troubleshooting" section in this time. Installation Powering Up the Systems Verify that all servers connected to verify that all occupied ports to the PRO3 KVM Switch are powered on. If any connected servers have not been powered on, it is okay to Port "1" will be displayed on each port... and allows your cable connections for that the keyboard, monitor, and mouse are working normally. The PRO3 KVM Switch emulates both a mouse and keyboard on the monitor. The server connected to do so at this User Manual...
...the "Troubleshooting" section in this time. Installation Powering Up the Systems Verify that all servers connected to verify that all occupied ports to the PRO3 KVM Switch are powered on. If any connected servers have not been powered on, it is okay to Port "1" will be displayed on each port... and allows your cable connections for that the keyboard, monitor, and mouse are working normally. The PRO3 KVM Switch emulates both a mouse and keyboard on the monitor. The server connected to do so at this User Manual...

User Manual
Page 34
.../. To update your PRO3 KVM Switch Updating Firmware The PRO3 KVM Switch features flash-upgradeable firmware to unexpected operational problems. Please contact Belkin Technical Support if you select the correct FW upgrade file and set the Flash DIP switch in the correct position. A custom Serial Flash Cable (DB9 female-to follow these instructions: 1. Power off the KVM Switch. 2. A separate computer running...
.../. To update your PRO3 KVM Switch Updating Firmware The PRO3 KVM Switch features flash-upgradeable firmware to unexpected operational problems. Please contact Belkin Technical Support if you select the correct FW upgrade file and set the Flash DIP switch in the correct position. A custom Serial Flash Cable (DB9 female-to follow these instructions: 1. Power off the KVM Switch. 2. A separate computer running...

User Manual
Page 35
...PRO3 KVM Switch 4. Run "BELKIN Firmware Upgrade Utility.exe". The OSD will enter into 8 flash-upgrade mode and wait for the data to start the upgrade. Make sure the Comm-port setting matches the port where the Serial Flash Cable is connected. 2 3 4 5 6 7 5. You should be running on the KVM Switch... about six seconds. Apply power to select the FW 1 upgrade file. Click "Browse" to the PRO3 KVM Switch. Disconnect the Serial Flash Cable, POWER OFF the KVM Switch, set the DIP switch back to the Normal Run Operation position "ON, ON", and then power on the new firmware. ...
...PRO3 KVM Switch 4. Run "BELKIN Firmware Upgrade Utility.exe". The OSD will enter into 8 flash-upgrade mode and wait for the data to start the upgrade. Make sure the Comm-port setting matches the port where the Serial Flash Cable is connected. 2 3 4 5 6 7 5. You should be running on the KVM Switch... about six seconds. Apply power to select the FW 1 upgrade file. Click "Browse" to the PRO3 KVM Switch. Disconnect the Serial Flash Cable, POWER OFF the KVM Switch, set the DIP switch back to the Normal Run Operation position "ON, ON", and then power on the new firmware. ...

User Manual
Page 37
Q: Does the PRO3 KVM Switch require an AC adapter? 3 A: Yes, the PRO3 KVM Switch requires a 12-volt DC, 1-Amp power adapter in order to function properly. 4 Q: Can I use the PRO3 KVM Switch on your servers to the Belkin KVM Cable Kits, and then attach one keyboard, monitor, and mouse to the 2 console port, and it is the warranty for PS/2 support. The PRO3 KVM Switch detects the...
Q: Does the PRO3 KVM Switch require an AC adapter? 3 A: Yes, the PRO3 KVM Switch requires a 12-volt DC, 1-Amp power adapter in order to function properly. 4 Q: Can I use the PRO3 KVM Switch on your servers to the Belkin KVM Cable Kits, and then attach one keyboard, monitor, and mouse to the 2 console port, and it is the warranty for PS/2 support. The PRO3 KVM Switch detects the...

User Manual
Page 38
...functioning properly. Troubleshooting My server does not boot up when connected to the PRO3 KVM Switch, but works fine when I get a keyboard error reported at boot up. • Check that the keyboard cable on the PRO3 KVM Switch is completely connected to your server. The server does not detect a ...keyboard and I connect the keyboard, video, and mouse directly to the server. • Make sure that the keyboard and mouse cables are connected tightly between the...
...functioning properly. Troubleshooting My server does not boot up when connected to the PRO3 KVM Switch, but works fine when I get a keyboard error reported at boot up. • Check that the keyboard cable on the PRO3 KVM Switch is completely connected to your server. The server does not detect a ...keyboard and I connect the keyboard, video, and mouse directly to the server. • Make sure that the keyboard and mouse cables are connected tightly between the...
User Manual
Page 39
...on page 14 of the PRO3 KVM Switch. • Tighten any mouse drivers loaded in properly. • Make sure the mouse works when directly plugged into the server. • If the server is coming out of standby mode, allow up . • Check the cables and make sure you hot...selected and wait until the operating system loads before switching away to a different port. 1 • Check that the mouse you are using is either for a standard PS/2 mouse, or a Microsoft server-compatible PS/2 mouse. • Make sure you do not have any loose cable connections. 2 • If you are using...
...on page 14 of the PRO3 KVM Switch. • Tighten any mouse drivers loaded in properly. • Make sure the mouse works when directly plugged into the server. • If the server is coming out of standby mode, allow up . • Check the cables and make sure you hot...selected and wait until the operating system loads before switching away to a different port. 1 • Check that the mouse you are using is either for a standard PS/2 mouse, or a Microsoft server-compatible PS/2 mouse. • Make sure you do not have any loose cable connections. 2 • If you are using...
User Manual
Page 40
... adapter. Glossary The following definitions are connected one port to another in a series. Control: When discussing switching between multiple consoles for the keyboard, video monitor, and mouse connected to a KVM switch. Console: The all-in a device cable. A KVM switch daisy-chain uses common settings to allow seamless, complex interactions between ports, control means that can attach...
... adapter. Glossary The following definitions are connected one port to another in a series. Control: When discussing switching between multiple consoles for the keyboard, video monitor, and mouse connected to a KVM switch. Console: The all-in a device cable. A KVM switch daisy-chain uses common settings to allow seamless, complex interactions between ports, control means that can attach...

User Manual
Page 2
... AutoScan Mode 18 Selecting a Computer Using Direct-Access Port Selectors 18 Bank Up and Bank Down Scroll Buttons 18 On-Screen Display Menu Control 20 Belkin KVM Switches and Accessories OmniView KVM Switches 23 OmniView All-In-One KVM Cables 25 OmniView Accessories and Adapters 26 PRO2 Series FAQs 27 Troubleshooting 30 Information 34
... AutoScan Mode 18 Selecting a Computer Using Direct-Access Port Selectors 18 Bank Up and Bank Down Scroll Buttons 18 On-Screen Display Menu Control 20 Belkin KVM Switches and Accessories OmniView KVM Switches 23 OmniView All-In-One KVM Cables 25 OmniView Accessories and Adapters 26 PRO2 Series FAQs 27 Troubleshooting 30 Information 34

User Manual
Page 3
... result is engineered to delivering high-quality, durable products at a reasonable price. Thank you control over 1 million Belkin OmniView products are being used worldwide. OmniView™ PRO2 Series KVM Switch Congratulations on the market. Designed to -RJ45 Parallel Flash Cable • User Manual • Quick Installation Guide • 12-Volt DC, 1-Amp Power Supply • Registration...
... result is engineered to delivering high-quality, durable products at a reasonable price. Thank you control over 1 million Belkin OmniView products are being used worldwide. OmniView™ PRO2 Series KVM Switch Congratulations on the market. Designed to -RJ45 Parallel Flash Cable • User Manual • Quick Installation Guide • 12-Volt DC, 1-Amp Power Supply • Registration...

User Manual
Page 4
...VGA cabling. AutoScan: The AutoScan feature allows you to set your PRO2 to maintain consistent compatibility with one computer from as many as VGA, SVGA, XGA, and XGA-2 video. To preserve signal integrity at belkin.com for the life of all operating computers connected to the switch-...one by allowing you to assign individual names to each computer can be defined or adjusted through the On-Screen Display (OSD) menu. They support PS/2 input devices (keyboard and mouse...
...VGA cabling. AutoScan: The AutoScan feature allows you to set your PRO2 to maintain consistent compatibility with one computer from as many as VGA, SVGA, XGA, and XGA-2 video. To preserve signal integrity at belkin.com for the life of all operating computers connected to the switch-...one by allowing you to assign individual names to each computer can be defined or adjusted through the On-Screen Display (OSD) menu. They support PS/2 input devices (keyboard and mouse...

User Manual
Page 5
... requires one VGA cable, one PS/2 keyboard cable, and one USB A-to preserve signal integrity. All-In-One Cables are 3 OVERVIEW Front-Panel Push Button: Direct-access port selectors, located conveniently on the face of the PRO2 serves as a quick indicator of the PRO2, allow for noise immunity; OmniView Cables are molded together for a clean and...
... requires one VGA cable, one PS/2 keyboard cable, and one USB A-to preserve signal integrity. All-In-One Cables are 3 OVERVIEW Front-Panel Push Button: Direct-access port selectors, located conveniently on the face of the PRO2 serves as a quick indicator of the PRO2, allow for noise immunity; OmniView Cables are molded together for a clean and...
