User Manual
Page 3
... this user manual first! B Warning for future use. Follow all other accompanying documents carefully before using the latest technology in environmentally friendly conditions. Explanation of -the-art technology. Remember that you handover the product to someone else, give the user manual as a reference for electric shock. Please read this entire user manual and all warnings and information in the user manual. Dear Customer, We...
... this user manual first! B Warning for future use. Follow all other accompanying documents carefully before using the latest technology in environmentally friendly conditions. Explanation of -the-art technology. Remember that you handover the product to someone else, give the user manual as a reference for electric shock. Please read this entire user manual and all warnings and information in the user manual. Dear Customer, We...
User Manual
Page 4
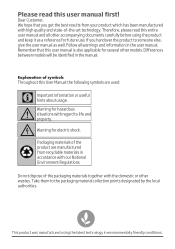
... be identified in the user manual. Do not dispose of the product are used: C Important information or useful hints about usage. Take them to someone else, give the user manual as a reference for hazardous situations with the domestic or other models. Therefore, please read this User Manual the following symbols are manufactured from your product which has been manufactured with our National...
... be identified in the user manual. Do not dispose of the product are used: C Important information or useful hints about usage. Take them to someone else, give the user manual as a reference for hazardous situations with the domestic or other models. Therefore, please read this User Manual the following symbols are manufactured from your product which has been manufactured with our National...

User Manual
Page 5
... functions 25 Scheduling the washing time........... 26 Starting the programme 27 Cancelling the programme 27 Salt indicator 27 Rinse Aid indicator 27 End of programme 28 Water cut-off warning 28 Overflowing warning 28 6 MAINTENANCE AND CLEANING 29 Cleaning the outer surface of the product 29 Cleaning the interior of the machine.29 Cleaning the filters 29 Cleaning the hose filter 30 Cleaning the impellers 30 Lower impeller 30 Upper impeller 31 7 TROUBLESHOOTING 32 8 GUARANTEE 37
... functions 25 Scheduling the washing time........... 26 Starting the programme 27 Cancelling the programme 27 Salt indicator 27 Rinse Aid indicator 27 End of programme 28 Water cut-off warning 28 Overflowing warning 28 6 MAINTENANCE AND CLEANING 29 Cleaning the outer surface of the product 29 Cleaning the interior of the machine.29 Cleaning the filters 29 Cleaning the hose filter 30 Cleaning the impellers 30 Lower impeller 30 Upper impeller 31 7 TROUBLESHOOTING 32 8 GUARANTEE 37

User Manual
Page 6
... grabbing the plug. •• The product must be unplugged during installation, maintenance, cleaning and repairing procedures. •• Always have the grounding installation made by the Authorised Service Agent. otherwise, the product may arise from risk of the product will help to open the door. 1 Instructions for domestic use. 4 /39 EN Dishwasher / User's Manual This will cause problems with the local regulations. •• The water supply and draining hoses must be...
... grabbing the plug. •• The product must be unplugged during installation, maintenance, cleaning and repairing procedures. •• Always have the grounding installation made by the Authorised Service Agent. otherwise, the product may arise from risk of the product will help to open the door. 1 Instructions for domestic use. 4 /39 EN Dishwasher / User's Manual This will cause problems with the local regulations. •• The water supply and draining hoses must be...

User Manual
Page 7
... it get wet and damaged. 1. Keep packaging materials in the product completely. 5/39 EN Drain the remaining water in a safe place away from reach of the children. Instructions for the children. Remove water drainage and water supply connections. 3. Dishwasher / User's Manual •• Store all detergents and additives in household and similar applications such as: - Dispose of them properly and sort in accordance...
... it get wet and damaged. 1. Keep packaging materials in the product completely. 5/39 EN Drain the remaining water in a safe place away from reach of the children. Instructions for the children. Remove water drainage and water supply connections. 3. Dishwasher / User's Manual •• Store all detergents and additives in household and similar applications such as: - Dispose of them properly and sort in accordance...

User Manual
Page 9
Lower impeller 5. Lower impeller slot 11. Lower basket 4. Filters 6. Rating Label 7. Detergent dispenser 10. Cutlery basket 12. 2 Dishwasher Overview 1. Top Cover (depends on model) 2. Door 9. Upper basket rail 14. Upper impeller 3. Control panel 8. Salt reservoir lid 13. Upper basket Dishwasher / User's Manual 7/39 EN
Lower impeller 5. Lower impeller slot 11. Lower basket 4. Filters 6. Rating Label 7. Detergent dispenser 10. Cutlery basket 12. 2 Dishwasher Overview 1. Top Cover (depends on model) 2. Door 9. Upper basket rail 14. Upper impeller 3. Control panel 8. Salt reservoir lid 13. Upper basket Dishwasher / User's Manual 7/39 EN

User Manual
Page 10
... address: dishwasher@standardloading.com Do not forget to provide the code, stock and serial numbers of the product to be found on the model) Drain pump power consumption Water pressure 220-240 V, 50 Hz (see rating label) 1800-2100 W (see rating label) 1800 W (see rating label) 10 A (see rating label) 30 W (see rating label) 0.3 -10 bar (= 3 - 100 N/cm² = 0.01-1.0 Mpa) C Technical specifications may be tested in...
... address: dishwasher@standardloading.com Do not forget to provide the code, stock and serial numbers of the product to be found on the model) Drain pump power consumption Water pressure 220-240 V, 50 Hz (see rating label) 1800-2100 W (see rating label) 1800 W (see rating label) 10 A (see rating label) 30 W (see rating label) 0.3 -10 bar (= 3 - 100 N/cm² = 0.01-1.0 Mpa) C Technical specifications may be tested in...

User Manual
Page 11
... between. •• Open the tap completely after making the connections to check for water leaks. Connection to the drain Water discharge hose can directly be changed after the connections are appropriate before calling the Authorised Service Agent. Do not place it on the new product. C Preparation of installation is over. When placing the product, pay attention not to installation, visually check if the product has any necessary arrangements...
... between. •• Open the tap completely after making the connections to check for water leaks. Connection to the drain Water discharge hose can directly be changed after the connections are appropriate before calling the Authorised Service Agent. Do not place it on the new product. C Preparation of installation is over. When placing the product, pay attention not to installation, visually check if the product has any necessary arrangements...

User Manual
Page 12
... surface water drain. In the event of this connection must be earthed If the fitted moulded plug is cut off as that this appliance incorporates a 13A fuse. A discharge hose longer than 4 meters will cause washing performance to be replaced by a Authorised Service Agent or a similarly qualified person. Colour of the replacement fuse cover must be affected.Attach the water discharge hose to the mains supply via...
... surface water drain. In the event of this connection must be earthed If the fitted moulded plug is cut off as that this appliance incorporates a 13A fuse. A discharge hose longer than 4 meters will cause washing performance to be replaced by a Authorised Service Agent or a similarly qualified person. Colour of the replacement fuse cover must be affected.Attach the water discharge hose to the mains supply via...
User Manual
Page 15
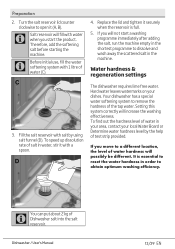
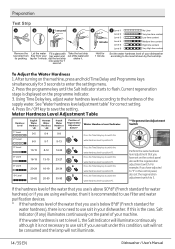
... is essential to reset the water hardness in the machine. Setting this system correctly will possibly be different. Dishwasher / User's Manual 13/39 EN C Before initial use, fill the water softening system with a spoon. The dishwasher requires lime free water. To speed up dissolution rate of test strip provided. Fill the salt reservoir with water when you move to a different location, the level of water (C). 4. Replace the lid...
... is essential to reset the water hardness in the machine. Setting this system correctly will possibly be different. Dishwasher / User's Manual 13/39 EN C Before initial use, fill the water softening system with a spoon. The dishwasher requires lime free water. To speed up dissolution rate of test strip provided. Fill the salt reservoir with water when you move to a different location, the level of water (C). 4. Replace the lid...
User Manual
Page 16
... control panel also with test strip from flow from your dishwasher. tap for correct setting. 4. Using Time Delay key, adjust water hardness level according to level 1, the Salt Indicator will not illuminate. 14 /39 EN Dishwasher / User's Manual To Adjust the Water Hardness 1. If this condition, salt will not be consumed and the lamp will illuminate continuously although it is displayed on the panel of the supply water. dip the test strip into water...
... control panel also with test strip from flow from your dishwasher. tap for correct setting. 4. Using Time Delay key, adjust water hardness level according to level 1, the Salt Indicator will not illuminate. 14 /39 EN Dishwasher / User's Manual To Adjust the Water Hardness 1. If this condition, salt will not be consumed and the lamp will illuminate continuously although it is displayed on the panel of the supply water. dip the test strip into water...

User Manual
Page 19
... stainless steel protectors in the rinse aid reservoir and to detergent, rinse aid and water softening salt C Observe the instructions of the rinse aid reservoir by hand, it lightly. 2. Fill the reservoir until "MAX" level. Turn the rinse aid amount adjuster manually to suit the water supply. B When you switch to the highest level and perform an empty run. 3. Dishwasher / User's Manual 4 4. Set the water hardness to powder detergent 2. C Wipe clean any spilled rinse aid outside the reservoir. Preparation 2in1: Contains detergent, rinse aid...
... stainless steel protectors in the rinse aid reservoir and to detergent, rinse aid and water softening salt C Observe the instructions of the rinse aid reservoir by hand, it lightly. 2. Fill the reservoir until "MAX" level. Turn the rinse aid amount adjuster manually to suit the water supply. B When you switch to the highest level and perform an empty run. 3. Dishwasher / User's Manual 4 4. Set the water hardness to powder detergent 2. C Wipe clean any spilled rinse aid outside the reservoir. Preparation 2in1: Contains detergent, rinse aid...

User Manual
Page 25
.... Start/Pause/Cancel key It is used to select the washing programme you selected appears on the programme indicator. Make sure that the upper and lower impellers rotate freely. 4. Put adequate amount of the dishwasher. 2. Preparing the machine 1. Dishwasher / User's Manual 23/39 EN Programme selection 1. Machine will appear on the Programme indicator. Refer to set the time delay duration. Check if the Salt and Rinse Aid indicators light...
.... Start/Pause/Cancel key It is used to select the washing programme you selected appears on the programme indicator. Make sure that the upper and lower impellers rotate freely. 4. Put adequate amount of the dishwasher. 2. Preparing the machine 1. Dishwasher / User's Manual 23/39 EN Programme selection 1. Machine will appear on the Programme indicator. Refer to set the time delay duration. Check if the Salt and Rinse Aid indicators light...

User Manual
Page 27
... desired washing programme by pressing Start / Pause / Cancel key. C With the Half Load function you can save time, water and energy and to perform a more comfortable washing with conditions specific to you to save both water and power while using the lower and upper baskets of the machine. Selecting the tablet function will remove the resulting stains from the multi-purpose detergents called as all washing programs. Indicator of...
... desired washing programme by pressing Start / Pause / Cancel key. C With the Half Load function you can save time, water and energy and to perform a more comfortable washing with conditions specific to you to save both water and power while using the lower and upper baskets of the machine. Selecting the tablet function will remove the resulting stains from the multi-purpose detergents called as all washing programs. Indicator of...

User Manual
Page 28
... the door is opened while the Time Delay is activated, you can use the Time Delay function to wash your region, you cannot make changes in the washing programme, auxiliary functions or the duration of the selected programme until the 3-6-9 hours duration indicators disappear. You can select and start of delay time. C Time Delay function cannot be displayed. Operating the product C Tablet Detergent function may cause change in your dishes during appropriate...
... the door is opened while the Time Delay is activated, you can use the Time Delay function to wash your region, you cannot make changes in the washing programme, auxiliary functions or the duration of the selected programme until the 3-6-9 hours duration indicators disappear. You can select and start of delay time. C Time Delay function cannot be displayed. Operating the product C Tablet Detergent function may cause change in your dishes during appropriate...

User Manual
Page 29
... indicator on the dishes completely and to see whether there is installed, temperature of the supply water and amount of softening salt in Water Softening System section. C Adjusting the water hardness level is running . C Your machine performs water softening depending on the display of your machine and press Start/Pause/ Cancel key again. Dishwasher / User's Manual 27/39 EN You need to refill the salt reservoir with rinse aid whenever rinse aid indicator...
... indicator on the dishes completely and to see whether there is installed, temperature of the supply water and amount of softening salt in Water Softening System section. C Adjusting the water hardness level is running . C Your machine performs water softening depending on the display of your machine and press Start/Pause/ Cancel key again. Dishwasher / User's Manual 27/39 EN You need to refill the salt reservoir with rinse aid whenever rinse aid indicator...
User Manual
Page 31
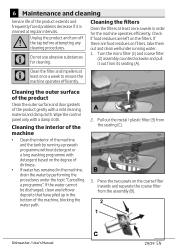
... the procedures under running a prewash programme without detergent or a long washing programme with detergent based on the filters. Dishwasher / User's Manual 29/39 EN 6 Maintenance and cleaning Service life of the product extends and frequently faced problems decrease if it out from the seating (C). 3. Turn the micro filter (1) and coarse filter (2) assembly counterclockwise and pull it is cleaned at least once a week to ensure the machine operates efficiently. Press the...
... the procedures under running a prewash programme without detergent or a long washing programme with detergent based on the filters. Dishwasher / User's Manual 29/39 EN 6 Maintenance and cleaning Service life of the product extends and frequently faced problems decrease if it out from the seating (C). 3. Turn the micro filter (1) and coarse filter (2) assembly counterclockwise and pull it is cleaned at least once a week to ensure the machine operates efficiently. Press the...

User Manual
Page 34
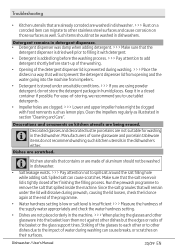
... sure that the detergent dispenser lid is closed container if possible. Increase the rinse aid setting if there is enough amount of -storing, we recommend you have turned on the machine by hand to starting the programme, turn the lower and upper impellers by pressing the On / Off button. Dishes are not washed clean • Dishes are not placed orderly in the machine. >>> Load the dishes as described...
... sure that the detergent dispenser lid is closed container if possible. Increase the rinse aid setting if there is enough amount of -storing, we recommend you have turned on the machine by hand to starting the programme, turn the lower and upper impellers by pressing the On / Off button. Dishes are not washed clean • Dishes are not placed orderly in the machine. >>> Load the dishes as described...
User Manual
Page 37
.... Dishwasher / User's Manual 35/39 EN Decorations and ornaments on kitchen utensils are not suitable for washing in the dishwasher. Detergent remains in detergent dispenser. • Detergent dispenser was damp when adding detergent. >>> Make sure that the detergent dispenser is stored under the lid will not prevent the detergent dispenser lid from opening and the water going into the basket lean them not against other dishes but the edges or racks...
.... Dishwasher / User's Manual 35/39 EN Decorations and ornaments on kitchen utensils are not suitable for washing in the dishwasher. Detergent remains in detergent dispenser. • Detergent dispenser was damp when adding detergent. >>> Make sure that the detergent dispenser is stored under the lid will not prevent the detergent dispenser lid from opening and the water going into the basket lean them not against other dishes but the edges or racks...
User Manual
Page 38
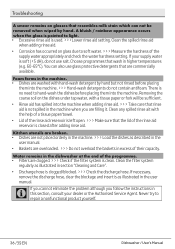
.... >>> Load the dishes as described in the user manual. If necessary, remove the discharge hose, clear the blockage and insert is soft (>> Hand-wash detergents do not contain antifoam. C If you cannot eliminate the problem although you are overloaded. >>> Do not overload the baskets in section "Cleaning and Care". • Discharge hose is used. >>>Lower rinse aid setting. A bluish / rainbow appearance occurs when the glass is pointed to repair...
.... >>> Load the dishes as described in the user manual. If necessary, remove the discharge hose, clear the blockage and insert is soft (>> Hand-wash detergents do not contain antifoam. C If you cannot eliminate the problem although you are overloaded. >>> Do not overload the baskets in section "Cleaning and Care". • Discharge hose is used. >>>Lower rinse aid setting. A bluish / rainbow appearance occurs when the glass is pointed to repair...


