User Guide
Page 3
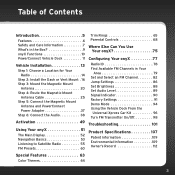
Table of Contents Introduction 5 Features 6 Safety and Care Information 7 What's in the Box 9 onyX Functions 10 PowerConnect Vehicle Dock 11 Vehicle Installation 13 Step 1: Choose a Location for Your Radio 14 Step 2: Install the Dash or Vent Mount . 16 Step 3: Mount the Magnetic Mount Antenna 20 Step 4: Route the Magnetic Mount Antenna Cable 25 Step 5: Connect...
Table of Contents Introduction 5 Features 6 Safety and Care Information 7 What's in the Box 9 onyX Functions 10 PowerConnect Vehicle Dock 11 Vehicle Installation 13 Step 1: Choose a Location for Your Radio 14 Step 2: Install the Dash or Vent Mount . 16 Step 3: Mount the Magnetic Mount Antenna 20 Step 4: Route the Magnetic Mount Antenna Cable 25 Step 5: Connect...

User Guide
Page 8
...personal injury, death, and/ or damage to your device, accessories, and/or to your vehicle in a safe location before beginning installation. • This product contains chemicals known to the State of airbags. If the liquid crystal fluid is always important to you are using... crystal fluid comes into contact with your audio connection option, it is advisable not to simultaneously power other property. • Vehicle installation and radio configuration functions should be performed while driving. Seek medical care. • Make sure that you insert the PowerConnect Power Adapter...
...personal injury, death, and/ or damage to your device, accessories, and/or to your vehicle in a safe location before beginning installation. • This product contains chemicals known to the State of airbags. If the liquid crystal fluid is always important to you are using... crystal fluid comes into contact with your audio connection option, it is advisable not to simultaneously power other property. • Vehicle installation and radio configuration functions should be performed while driving. Seek medical care. • Make sure that you insert the PowerConnect Power Adapter...
User Guide
Page 14
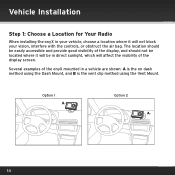
menu FM jump 123 4 56 789 0 direct Option 2 menu FM jump 123 4 56 789 0 direct A. 14 Several examples of the onyX mounted in your vehicle, choose a location where it will affect the visibility of the display, and should not be located where it will be in ...direct sunlight, which will not block your vision, interfere with the controls, or obstruct the air bag. Vehicle Installation Step 1: Choose a Location for Your Radio When installing the onyX in a vehicle are shown: A is the on dash method using the Dash Mount, and B is the vent clip method using the...
menu FM jump 123 4 56 789 0 direct Option 2 menu FM jump 123 4 56 789 0 direct A. 14 Several examples of the onyX mounted in your vehicle, choose a location where it will affect the visibility of the display, and should not be located where it will be in ...direct sunlight, which will not block your vision, interfere with the controls, or obstruct the air bag. Vehicle Installation Step 1: Choose a Location for Your Radio When installing the onyX in a vehicle are shown: A is the on dash method using the Dash Mount, and B is the vent clip method using the...
User Guide
Page 16
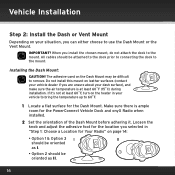
... dealer if you selected in your vehicle to bring the temperature up to 60ûF. 1 Locate a flat surface for the PowerConnect Vehicle Dock and onyX Radio when installed. 2 Set the orientation of the Dash Mount before adhering it 's not at least 60ûF (15ûC) during...Dash Mount. IMPORTANT! The adhesive used on the Dash Mount may be oriented as I. • Option 2 should be attached to the dock prior to connecting the dock to the mount. All cables should be difficult to remove. Vehicle Installation Step 2: Install the Dash or Vent Mount Depending on your situation, you...
... dealer if you selected in your vehicle to bring the temperature up to 60ûF. 1 Locate a flat surface for the PowerConnect Vehicle Dock and onyX Radio when installed. 2 Set the orientation of the Dash Mount before adhering it 's not at least 60ûF (15ûC) during...Dash Mount. IMPORTANT! The adhesive used on the Dash Mount may be oriented as I. • Option 2 should be attached to the dock prior to connecting the dock to the mount. All cables should be difficult to remove. Vehicle Installation Step 2: Install the Dash or Vent Mount Depending on your situation, you...

User Guide
Page 18
Vehicle Installation Installing the Vent Mount: 1 Locate a vent with horizontal Extended Vent Clamps louvers sturdy enough to hold your PowerConnect Vehicle Dock and radio. 2 If the vent louvers in your vehicle are recessed, you may need to observe the orientation of the vent clamps as shown. If so, remove the shorter vent clamps and install the longer ones into the Vent Mount. Be sure to use Short Vent Clamps the longer vent clamps with the Vent Mount. Remove End Cap Slide Short Vent Clamps Out Slide Extended Vent Clamps In Replace End Cap 18
Vehicle Installation Installing the Vent Mount: 1 Locate a vent with horizontal Extended Vent Clamps louvers sturdy enough to hold your PowerConnect Vehicle Dock and radio. 2 If the vent louvers in your vehicle are recessed, you may need to observe the orientation of the vent clamps as shown. If so, remove the shorter vent clamps and install the longer ones into the Vent Mount. Be sure to use Short Vent Clamps the longer vent clamps with the Vent Mount. Remove End Cap Slide Short Vent Clamps Out Slide Extended Vent Clamps In Replace End Cap 18

User Guide
Page 20
Magnet Sedan/Coupe: We recommend mounting the antenna just above either the front windshield or the back window as shown. 20 Pay particular attention to any accessories that you may have like luggage racks and how frequently you may use them. To install the Magnetic Mount Antenna: 1 Choose the best location for your antenna considering your vehicle, but will stick to any metal part of your vehicle type. Vehicle Installation Step 3: Mount the Magnetic Mount Antenna The Magnetic Mount Antenna contains a strong magnet which will not damage the vehicle.
Magnet Sedan/Coupe: We recommend mounting the antenna just above either the front windshield or the back window as shown. 20 Pay particular attention to any accessories that you may have like luggage racks and how frequently you may use them. To install the Magnetic Mount Antenna: 1 Choose the best location for your antenna considering your vehicle, but will stick to any metal part of your vehicle type. Vehicle Installation Step 3: Mount the Magnetic Mount Antenna The Magnetic Mount Antenna contains a strong magnet which will not damage the vehicle.

User Guide
Page 22
Follow the Tips and Cautions shown on the roof (for most vehicles) or trunk (for convertibles) where it has a clear view of the sky in the location you selected. TIP! Mount the antenna on the next several pages. Vehicle Installation 3 Place the antenna in all directions. 22
Follow the Tips and Cautions shown on the roof (for most vehicles) or trunk (for convertibles) where it has a clear view of the sky in the location you selected. TIP! Mount the antenna on the next several pages. Vehicle Installation 3 Place the antenna in all directions. 22

User Guide
Page 24
Mount it at least 3 inches away. 24 Don't mount the antenna close to another antenna. Vehicle Installation CAUTION!
Mount it at least 3 inches away. 24 Don't mount the antenna close to another antenna. Vehicle Installation CAUTION!

User Guide
Page 26
Route cable through trunk to avoid sharp bends Pull cable out of weatherstripping and route through weatherstripping several inches Pull weatherstripping from trunk opening Tuck cable into weatherstripping around trunk opening 26 Vehicle Installation Route cable out from under rear windshield moulding and tuck into weatherstripping around trunk opening Avoid sharp bends by running cable through weatherstripping for several inches to cabin Route cable out of window moulding and into weatherstripping.
Route cable through trunk to avoid sharp bends Pull cable out of weatherstripping and route through weatherstripping several inches Pull weatherstripping from trunk opening Tuck cable into weatherstripping around trunk opening 26 Vehicle Installation Route cable out from under rear windshield moulding and tuck into weatherstripping around trunk opening Avoid sharp bends by running cable through weatherstripping for several inches to cabin Route cable out of window moulding and into weatherstripping.

User Guide
Page 28
Vehicle Installation Use a blunt plastic putty knife or similar blunt tool to lift edge of vehicle 28 Continue towards front of vehicle Route cable under trim or upholstery Continue routing cable under trim or carpet towards front of vehicle Route cable from trunk under interior trim, into cabin and towards front of interior trim and tuck cable under trim.
Vehicle Installation Use a blunt plastic putty knife or similar blunt tool to lift edge of vehicle 28 Continue towards front of vehicle Route cable under trim or upholstery Continue routing cable under trim or carpet towards front of vehicle Route cable from trunk under interior trim, into cabin and towards front of interior trim and tuck cable under trim.

User Guide
Page 30
...4. Route the cable through a conduit or along the trunk wall. If your rear window does not have rubber molding, we recommend consulting a professional installer. 2. To avoid sharp bends in the cable, run the cable inside the weather stripping for a few inches, then remove the cable from the ... damage it , then replace the weather stripping. Keep the cable away from the opening . Route the antenna cable around the rear window. Vehicle Installation • Sedan/Coupe With Antenna Placed at the Rear of the vehicle. Use a blunt plastic putty 30 Use a blunt plastic putty knife or...
...4. Route the cable through a conduit or along the trunk wall. If your rear window does not have rubber molding, we recommend consulting a professional installer. 2. To avoid sharp bends in the cable, run the cable inside the weather stripping for a few inches, then remove the cable from the ... damage it , then replace the weather stripping. Keep the cable away from the opening . Route the antenna cable around the rear window. Vehicle Installation • Sedan/Coupe With Antenna Placed at the Rear of the vehicle. Use a blunt plastic putty 30 Use a blunt plastic putty knife or...

User Guide
Page 32
...bottom of the door opening and route it to the lowest point. 2. Bring the end of the cable out at the Front of the dock. 32 Run the cable inside it away from the antenna underneath the rubber molding around the door opening. Use a blunt plastic putty knife ... wire ties. 4. At the lowest corner of the windshield, route the cable out of the door opening . 3. Vehicle Installation • Sedan/Coupe With Antenna Placed at the PowerConnect Vehicle Dock location. Feed the antenna cable from any excess cable in a hidden location, such as under the carpet toward the dashboard....
...bottom of the door opening and route it to the lowest point. 2. Bring the end of the cable out at the Front of the dock. 32 Run the cable inside it away from the antenna underneath the rubber molding around the door opening. Use a blunt plastic putty knife ... wire ties. 4. At the lowest corner of the windshield, route the cable out of the door opening . 3. Vehicle Installation • Sedan/Coupe With Antenna Placed at the PowerConnect Vehicle Dock location. Feed the antenna cable from any excess cable in a hidden location, such as under the carpet toward the dashboard....

User Guide
Page 34
... it . Route the cable along the trunk wall and into the trunk at the PowerConnect Vehicle Dock location. Bring the end of the cable out at the front edge of the dock. 5. Tape or tie the cable along an existing wiring harness. 3. Use a blunt plastic ...putty knife or similar blunt tool to lift the plastic trim just enough to the antenna connector of the trunk lid. Continue with wire ties (purchased separately). 4. Keep any excess cable in the cable loose. Vehicle Installation...
... it . Route the cable along the trunk wall and into the trunk at the PowerConnect Vehicle Dock location. Bring the end of the cable out at the front edge of the dock. 5. Tape or tie the cable along an existing wiring harness. 3. Use a blunt plastic ...putty knife or similar blunt tool to lift the plastic trim just enough to the antenna connector of the trunk lid. Continue with wire ties (purchased separately). 4. Keep any excess cable in the cable loose. Vehicle Installation...

User Guide
Page 36
...the cable out at the bottom of the door opening and tuck the cable inside of the weather stripping to the antenna connector of the dock. 6. Leave yourself enough cable so you can easily connect it , then replace the weather stripping. Coil any vehicle pedals or controls. ...Pull the cable out of the weather stripping at the PowerConnect Vehicle Dock location. Run the cable inside it to the bottom of the door opening . Vehicle Installation windshield, route the cable out of the windshield molding and into the rubber weather stripping around the...
...the cable out at the bottom of the door opening and tuck the cable inside of the weather stripping to the antenna connector of the dock. 6. Leave yourself enough cable so you can easily connect it , then replace the weather stripping. Coil any vehicle pedals or controls. ...Pull the cable out of the weather stripping at the PowerConnect Vehicle Dock location. Run the cable inside it to the bottom of the door opening . Vehicle Installation windshield, route the cable out of the windshield molding and into the rubber weather stripping around the...

User Guide
Page 38
... or go to xmradio.com/accessories. • Option 3: Good: Use the PowerConnect feature in the onyX. To learn more, check with the retailer where you have selected. 38 Follow the installation instructions in the next several sections for the audio connection option that you bought your radio, or go...work in your vehicle, then you will need to use the FM Direct Adapter (FMDA) (sold separately and can be installed by a professional installer and directly connects the onyX to find the location of the radio, anywhere on the back of the auxiliary input jack, or consult the vehicle dealer....
... or go to xmradio.com/accessories. • Option 3: Good: Use the PowerConnect feature in the onyX. To learn more, check with the retailer where you have selected. 38 Follow the installation instructions in the next several sections for the audio connection option that you bought your radio, or go...work in your vehicle, then you will need to use the FM Direct Adapter (FMDA) (sold separately and can be installed by a professional installer and directly connects the onyX to find the location of the radio, anywhere on the back of the auxiliary input jack, or consult the vehicle dealer....
User Guide
Page 39
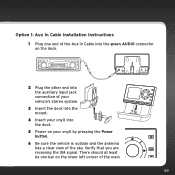
Option 1: Aux In Cable Installation Instructions 1 Plug one bar on the dock. Verify that you are receiving the XM signal. AUDIO ANT PWR FM 2 Plug the other end into the auxiliary input jack connection of your vehicle's stereo system. 3 Insert the dock into the mount. 4 Insert your onyX into the dock. 5 Power on your onyX by pressing the...
Option 1: Aux In Cable Installation Instructions 1 Plug one bar on the dock. Verify that you are receiving the XM signal. AUDIO ANT PWR FM 2 Plug the other end into the auxiliary input jack connection of your vehicle's stereo system. 3 Insert the dock into the mount. 4 Insert your onyX into the dock. 5 Power on your onyX by pressing the...
User Guide
Page 40
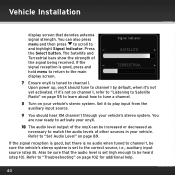
...the audio levels of the signal being received. If it 's not yet activated. You are now ready to activate your onyX. 10 The audio level output of the onyX can also press menu and then press to scroll to tune a channel. 8 Turn on page 55 to learn about how... "Listening to Satellite Radio" on your vehicle's stereo system. Upon power up, onyX should tune to play input from the auxiliary input source. 9 You should hear XM channel 1 through your vehicle. Press the Select button. Vehicle Installation display screen that the audio level is set high enough to the main display...
...the audio levels of the signal being received. If it 's not yet activated. You are now ready to activate your onyX. 10 The audio level output of the onyX can also press menu and then press to scroll to tune a channel. 8 Turn on page 55 to learn about how... "Listening to Satellite Radio" on your vehicle's stereo system. Upon power up, onyX should tune to play input from the auxiliary input source. 9 You should hear XM channel 1 through your vehicle. Press the Select button. Vehicle Installation display screen that the audio level is set high enough to the main display...
User Guide
Page 41
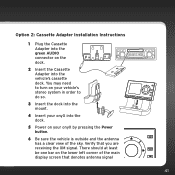
...dock. 5 Power on the lower left corner of the sky. There should at least menu be one bar on your onyX by pressing the Power button. 6 Be sure the vehicle is outside and the antenna has a clear view of the main display screen that you are receiving the XM signal. Option 2: Cassette Adapter Installation... Instructions 1 Plug the Cassette Adapter into the green AUDIO connector on your vehicle's stereo system in order to do so. 3 Insert the dock into the mount. You may need to ...
...dock. 5 Power on the lower left corner of the sky. There should at least menu be one bar on your onyX by pressing the Power button. 6 Be sure the vehicle is outside and the antenna has a clear view of the main display screen that you are receiving the XM signal. Option 2: Cassette Adapter Installation... Instructions 1 Plug the Cassette Adapter into the green AUDIO connector on your vehicle's stereo system in order to do so. 3 Insert the dock into the mount. You may need to ...

User Guide
Page 42
... tune to channel 1 by default, when it to play input from the cassette source. 9 You should hear XM channel 1 through your onyX. 10 The audio level output of the onyX can also press menu and then press to scroll to "Troubleshooting" on page 89. If the signal reception is good, but there is... high enough to match the audio levels of the signal being received. Also be increased or decreased as necessary to be heard (step 10). Vehicle Installation strength. The Satellite and Terrestrial bars show the strength of other sources in your vehicle's stereo system.
... tune to channel 1 by default, when it to play input from the cassette source. 9 You should hear XM channel 1 through your onyX. 10 The audio level output of the onyX can also press menu and then press to scroll to "Troubleshooting" on page 89. If the signal reception is good, but there is... high enough to match the audio levels of the signal being received. Also be increased or decreased as necessary to be heard (step 10). Vehicle Installation strength. The Satellite and Terrestrial bars show the strength of other sources in your vehicle's stereo system.
User Guide
Page 43
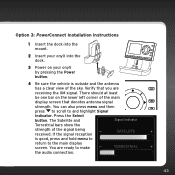
... also press menu and then FM press to scroll to the main display screen. There should at least be one bar on your onyX into the dock. menu FM 12 3 4 5 6 78 9 jump 0 direct 3 Power on the lower left corner of the signal being received...0 direct strength of the main display screen that you are ready to make TERRESTRIAL the audio connection. 43 Option 3: PowerConnect Installation Instructions 1 Insert the dock into the mount. 2 Insert your onyX by pressing the Power button. 4 Be sure the vehicle is good, press and hold menu to return to and highlight Signal...
... also press menu and then FM press to scroll to the main display screen. There should at least be one bar on your onyX into the dock. menu FM 12 3 4 5 6 78 9 jump 0 direct 3 Power on the lower left corner of the signal being received...0 direct strength of the main display screen that you are ready to make TERRESTRIAL the audio connection. 43 Option 3: PowerConnect Installation Instructions 1 Insert the dock into the mount. 2 Insert your onyX by pressing the Power button. 4 Be sure the vehicle is good, press and hold menu to return to and highlight Signal...

