Operation Manual
Page 5
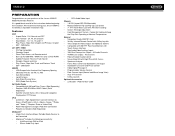
... Line Output - iPod interface Cable 1 We recommend having your purchase of the instructions before beginning the installation. All Channels • Rotary Encoder Audio Control • Seven-Band EQ with Touch Screen Interface • Two Audio/Video Auxiliary Inputs • 100-Ohm Preamp Line Output - Forced-Air Cooling to Keep the Chip-Sets Operating at Nominal Temperatures General • Navigation Ready (NAV101 Only) • 38-Key Infrared Remote Control with...
... Line Output - iPod interface Cable 1 We recommend having your purchase of the instructions before beginning the installation. All Channels • Rotary Encoder Audio Control • Seven-Band EQ with Touch Screen Interface • Two Audio/Video Auxiliary Inputs • 100-Ohm Preamp Line Output - Forced-Air Cooling to Keep the Chip-Sets Operating at Nominal Temperatures General • Navigation Ready (NAV101 Only) • 38-Key Infrared Remote Control with...
Operation Manual
Page 6
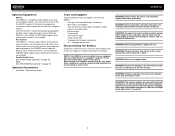
... NAV option appears gray, indicating the function is not available. • Rear Camera The VM9412 is "navigation ready." NOTE: If the VM9412 is connected and operating properly, the CAMERA source mode will be lost. All installation and operating instructions will become active. iPod interface Cable Tools and Supplies You will become active. WARNING! Never disassemble or adjust the unit. To prevent damage to the mechanism inside this unit to the TFT monitor. Using an improper fuse...
... NAV option appears gray, indicating the function is not available. • Rear Camera The VM9412 is "navigation ready." NOTE: If the VM9412 is connected and operating properly, the CAMERA source mode will be lost. All installation and operating instructions will become active. iPod interface Cable Tools and Supplies You will become active. WARNING! Never disassemble or adjust the unit. To prevent damage to the mechanism inside this unit to the TFT monitor. Using an improper fuse...
Operation Manual
Page 7
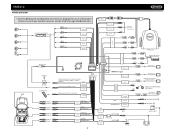
... AV System AUX IN 2 Antenna Jack VIDEO OUT 1 RED RED YELLOW Rear Video 1 Antenna Harness Cord NAV101 Input VIDEO OUT 2 YELLOW Rear Video 2 Auto antenna control (connect to antenna control lead & power supply of antenna amplifier) BLUE ANT.CONT External power amplifier control BLUE/WHITE Car Phone P.CONT Car Mute (leave open if not connected) BROWN MUTE HEADPHONE MULTIZONE MZ-TFT CAMERA BLACK MZ-TFT Touch Screen (Sold Separately) WHITE RED WIRELESS HEADPHONE (OPTIONAL) Rear View YELLOW YELLOW Video Camera FRONT L+ FRONT L- REAR L+ REAR L- VM9412 WIRING DIAGRAM...
... AV System AUX IN 2 Antenna Jack VIDEO OUT 1 RED RED YELLOW Rear Video 1 Antenna Harness Cord NAV101 Input VIDEO OUT 2 YELLOW Rear Video 2 Auto antenna control (connect to antenna control lead & power supply of antenna amplifier) BLUE ANT.CONT External power amplifier control BLUE/WHITE Car Phone P.CONT Car Mute (leave open if not connected) BROWN MUTE HEADPHONE MULTIZONE MZ-TFT CAMERA BLACK MZ-TFT Touch Screen (Sold Separately) WHITE RED WIRELESS HEADPHONE (OPTIONAL) Rear View YELLOW YELLOW Video Camera FRONT L+ FRONT L- REAR L+ REAR L- VM9412 WIRING DIAGRAM...

Operation Manual
Page 9
... to use only the supplied screws). Once proper operation is achieved, turn the unit on to the dashboard. Make sure the unit is complete, reconnect the battery negative terminal. Attach one 10 amp mini-ATM fuse, located in the black filter box in-line with a switch. FINAL INSTALLATION 5 4 1 BAND AS Press Audio VM9412 SRC REAR RPT SCN PTY RDM STOP DISP OPEN MUTE Enter 3 2 Final ISO-DIN Installation 1. VM9412 INSTALLATION Pre-installation 1. Install...
... to use only the supplied screws). Once proper operation is achieved, turn the unit on to the dashboard. Make sure the unit is complete, reconnect the battery negative terminal. Attach one 10 amp mini-ATM fuse, located in the black filter box in-line with a switch. FINAL INSTALLATION 5 4 1 BAND AS Press Audio VM9412 SRC REAR RPT SCN PTY RDM STOP DISP OPEN MUTE Enter 3 2 Final ISO-DIN Installation 1. VM9412 INSTALLATION Pre-installation 1. Install...

Operation Manual
Page 11
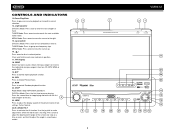
.... OPEN/CLOSE Press to go down . 12. LCD Display 8. SRC Press to adjust the volume. MENU Mode: Press once to move the cursor to move the TFT monitor into viewing position. AUDIO Rotate to select playing mode. 7. MUTE Press to factory default (except the password and parental lock setting). 7 Reset Press to reset system settings to silence the receiver. IR Remote Control Receiver 10. (left . 11. (down joystick) DVD/Disc Mode: Press once for the previous available radio station...
.... OPEN/CLOSE Press to go down . 12. LCD Display 8. SRC Press to adjust the volume. MENU Mode: Press once to move the cursor to move the TFT monitor into viewing position. AUDIO Rotate to select playing mode. 7. MUTE Press to factory default (except the password and parental lock setting). 7 Reset Press to reset system settings to silence the receiver. IR Remote Control Receiver 10. (left . 11. (down joystick) DVD/Disc Mode: Press once for the previous available radio station...
Operation Manual
Page 12
...) DVD/Disc Mode: Press once to control Random playback function. 22. ANGLE/TILT Press to make adjustments while the red tilt icon is flashing. REAR Select rear zone source. Use the joystick to activate the tilt function. Press and hold to control repeat playback function. 20. TUNER Mode: Press once to reset core mechanism position. 17. RPT Press to adjust the angle in a continuous motion. 43 BAND AS 7 Multimedia Receiver VM9412 21...
...) DVD/Disc Mode: Press once to control Random playback function. 22. ANGLE/TILT Press to make adjustments while the red tilt icon is flashing. REAR Select rear zone source. Use the joystick to activate the tilt function. Press and hold to control repeat playback function. 20. TUNER Mode: Press once to reset core mechanism position. 17. RPT Press to adjust the angle in a continuous motion. 43 BAND AS 7 Multimedia Receiver VM9412 21...

Operation Manual
Page 14
... 1: Remote Control Functions Button Function Name MENU TITLE MUTE POWER/ AUDIO RPT A-B RPT SRC SUBTITLE DISP/ CLEAR PRESET PRESET ANGLE Joystick /\ VOL VOL + Joystick < Joystick (press) Joystick > GOTO Joystick \/ ||>/BAND Ref# DVD VCD TUNER CD/MP3 SATELLITE iPod 1 Enters the main menu of the Turns on /off 5 Changes the audio language for disc playback Selects iPod Music mode 6 Setup to repeat playback from Setup to repeat playback from time frame A to time frame B time frame A to correct error...
... 1: Remote Control Functions Button Function Name MENU TITLE MUTE POWER/ AUDIO RPT A-B RPT SRC SUBTITLE DISP/ CLEAR PRESET PRESET ANGLE Joystick /\ VOL VOL + Joystick < Joystick (press) Joystick > GOTO Joystick \/ ||>/BAND Ref# DVD VCD TUNER CD/MP3 SATELLITE iPod 1 Enters the main menu of the Turns on /off 5 Changes the audio language for disc playback Selects iPod Music mode 6 Setup to repeat playback from Setup to repeat playback from time frame A to time frame B time frame A to correct error...

Operation Manual
Page 16
.... Locate the extender mechanism behind the screen. 3. Monitor Tilt Angle Adjustment A known characteristic of LCD panels is the same at a time. The monitor angle can be adjusted for each playing source. Reverse Driving Use If the rear-view video camera is connected, the unit is stationed inside the main compartment of the screen near the bottom. 4. TFT Monitor Auto Open If "TFT Auto Open" is "on" when the unit is turned on , and the monitor is on , the monitor...
.... Locate the extender mechanism behind the screen. 3. Monitor Tilt Angle Adjustment A known characteristic of LCD panels is the same at a time. The monitor angle can be adjusted for each playing source. Reverse Driving Use If the rear-view video camera is connected, the unit is stationed inside the main compartment of the screen near the bottom. 4. TFT Monitor Auto Open If "TFT Auto Open" is "on" when the unit is turned on , and the monitor is on , the monitor...

Operation Manual
Page 17
... buttons to the vehicle brake switch, the front TFT monitor will display video only when the parking brake sequence is engaged. Exit Picture Quality Setting Mode: Press the PIC button on the remote control or the WIDE/ PICTURE button on the TFT monitor within 1 ~ 2 seconds. Parking Brake Sequence There are two situations that can be displayed on the monitor Parking Brake Parking Brake Inhibit When the pink "Parking" wire is turned on with the video media disc inserted and playing. To activate video...
... buttons to the vehicle brake switch, the front TFT monitor will display video only when the parking brake sequence is engaged. Exit Picture Quality Setting Mode: Press the PIC button on the remote control or the WIDE/ PICTURE button on the TFT monitor within 1 ~ 2 seconds. Parking Brake Sequence There are two situations that can be displayed on the monitor Parking Brake Parking Brake Inhibit When the pink "Parking" wire is turned on with the video media disc inserted and playing. To activate video...
Operation Manual
Page 18
... remote control (8) to change to select a turn the AUDIO control (2) to adjust the volume to restore the volume. To adjust an audio feature: 1. After a system reset, the unit restores all factory default settings. The playing mode is received by pressing the OPEN button (1) and opening the TFT screen. The Beep tone can be adjusted. 2. The LCD or TFT screen displays the volume level for the front or rear zone. Push and hold the AUDIO button (5). Table 4: Audio Adjustments Function EQ FAD-BAL Adjustment Options User...
... remote control (8) to change to select a turn the AUDIO control (2) to adjust the volume to restore the volume. To adjust an audio feature: 1. After a system reset, the unit restores all factory default settings. The playing mode is received by pressing the OPEN button (1) and opening the TFT screen. The Beep tone can be adjusted. 2. The LCD or TFT screen displays the volume level for the front or rear zone. Push and hold the AUDIO button (5). Table 4: Audio Adjustments Function EQ FAD-BAL Adjustment Options User...

Operation Manual
Page 19
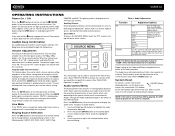
... rear zone volume can only be played simultaneously on the right side of the remote controller. To switch from front to one of your rear monitors, as illustrated below. NOTE: You cannot change or control the front zone source from the rear zone video screen. 15 VM9412 MULTI-ZONE OPERATION Independent sources can be controlled from the front. DISC SOURCE MENU DISC iPod AUX 1 RADIO F NAV R O N T SAT CAMERA R E A OFF R AUX 2 Turning the Rear Screen Off Touch the OFF button (on the front screen while DVD video...
... rear zone volume can only be played simultaneously on the right side of the remote controller. To switch from front to one of your rear monitors, as illustrated below. NOTE: You cannot change or control the front zone source from the rear zone video screen. 15 VM9412 MULTI-ZONE OPERATION Independent sources can be controlled from the front. DISC SOURCE MENU DISC iPod AUX 1 RADIO F NAV R O N T SAT CAMERA R E A OFF R AUX 2 Turning the Rear Screen Off Touch the OFF button (on the front screen while DVD video...

Operation Manual
Page 20
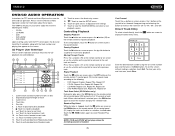
... Music Movie Matrix Sub. DVD Audio is available. Optimized for low volumes. The "GENERAL" sub-menu appears highlighted in Dolby. The color signals are output in Spanish when available. RADIO SETUP RDS Rating DivX Hardware P.VOL TS Cal General Language Audio Speaker Clock Mode Clock Video Input Beep 12 Hour 04 : 31 AM AUTO On Back Accessing Menu Items Touch the sub-menu name or use the joystick to enter the "SETUP" menu. DVD subtitles automatically appear in the standard PAL format...
... Music Movie Matrix Sub. DVD Audio is available. Optimized for low volumes. The "GENERAL" sub-menu appears highlighted in Dolby. The color signals are output in Spanish when available. RADIO SETUP RDS Rating DivX Hardware P.VOL TS Cal General Language Audio Speaker Clock Mode Clock Video Input Beep 12 Hour 04 : 31 AM AUTO On Back Accessing Menu Items Touch the sub-menu name or use the joystick to enter the "SETUP" menu. DVD subtitles automatically appear in the standard PAL format...

Operation Manual
Page 21
... the OPEN button (1) to open the TFT panel. TFT screen brightness remains constant unless manually adjusted. P.VOL Sub-menu Features Setting Source Options Function DISC RADIO SAT iPod AUX1 AUX2 NAV Choose a source for setup. After entering calibration mode, a crosshair appears in a corner quadrant of the disc and the appropriate content will automatically dim when less light is turned OFF, the TFT panel DOES NOT retract if it in display mode, the monitor automatically switches to CAMERA mode upon...
... the OPEN button (1) to open the TFT panel. TFT screen brightness remains constant unless manually adjusted. P.VOL Sub-menu Features Setting Source Options Function DISC RADIO SAT iPod AUX1 AUX2 NAV Choose a source for setup. After entering calibration mode, a crosshair appears in a corner quadrant of the disc and the appropriate content will automatically dim when less light is turned OFF, the TFT panel DOES NOT retract if it in display mode, the monitor automatically switches to CAMERA mode upon...

Operation Manual
Page 26
... not authorized, the 6-digit code must be entered and/or the disc must be displayed on the main TFT screen unless the parking brake is in random order. Press the RDM button again to eject the disc. You can also select a title using the touch screen. Ejecting a Disc Press the button (21) on the screen. "On" appears on the unit or remote control (35) to turn random play . Fast Forward Playback Press...
... not authorized, the 6-digit code must be entered and/or the disc must be displayed on the main TFT screen unless the parking brake is in random order. Press the RDM button again to eject the disc. You can also select a title using the touch screen. Ejecting a Disc Press the button (21) on the screen. "On" appears on the unit or remote control (35) to turn random play . Fast Forward Playback Press...
Operation Manual
Page 29
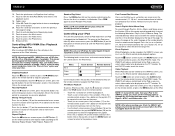
... desired track number using the on disc 2. CD Player User Interface The on the disc. Track titles 5. Direct Track Entry To select a track directly, touch the display the direct entry menu. button on screen to the next track on -screen indicators and touch key areas for CD playback are the same for information about these topics. Disc title 6. ||: Touch to pause/play music or other audio files from "2X...
... desired track number using the on disc 2. CD Player User Interface The on the disc. Track titles 5. Direct Track Entry To select a track directly, touch the display the direct entry menu. button on screen to the next track on -screen indicators and touch key areas for CD playback are the same for information about these topics. Disc title 6. ||: Touch to pause/play music or other audio files from "2X...

Operation Manual
Page 30
... they are actually played. The VM9412 player will display folders 3, 4, 6, and 8, but not 2 and 7 since it is at once" setting. Butt Phish - Current track and total number of tracks on -screen indicators and touch key areas for MP3 playback are to be burned onto a disc for a MEGA DVD music mix. Bouncin' R Phish - Elapsed playing time 3. Track titles 5. file name: 31 characters, file extension: 3 characters •...
... they are actually played. The VM9412 player will display folders 3, 4, 6, and 8, but not 2 and 7 since it is at once" setting. Butt Phish - Current track and total number of tracks on -screen indicators and touch key areas for MP3 playback are to be burned onto a disc for a MEGA DVD music mix. Bouncin' R Phish - Elapsed playing time 3. Track titles 5. file name: 31 characters, file extension: 3 characters •...
Operation Manual
Page 31
... TFT monitor. Photo Playback While iPod photos can be displayed on screen to a disc for easy music navigation. To exit VIDEO mode, touch the screen, press the >> button (14) on the remote control, or press the MENU button on the remote control. Touch to view the SOURCE MENU and select a new playback source 18. Folder name 19. 1/2 or 2/2: Touch this page button to view a second page of songs / files to play mode 22. NOTE: After disconnecting your disc. Also, use the...
... TFT monitor. Photo Playback While iPod photos can be displayed on screen to a disc for easy music navigation. To exit VIDEO mode, touch the screen, press the >> button (14) on the remote control, or press the MENU button on the remote control. Touch to view the SOURCE MENU and select a new playback source 18. Folder name 19. 1/2 or 2/2: Touch this page button to view a second page of songs / files to play mode 22. NOTE: After disconnecting your disc. Also, use the...

Operation Manual
Page 33
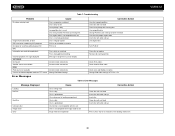
...is not compatible with unit Speaker is shorted Tel-Mute malfunction "MUTE" wire is grounded Unit resets itself when engine is off Incorrect connection between ACC and positive battery wire TFT MONITOR Monitor does not open automatically TFT Auto Open is turned off Eject current disc and insert new one 29 VM9412 TROUBLESHOOTING Table 7: Troubleshooting Problem Cause Corrective Action GENERAL Unit will not power on Radio Fuse blown Car battery fuse blown Illegal operation Remote control does not function Battery depleted Battery installed incorrectly No/low audio output...
...is not compatible with unit Speaker is shorted Tel-Mute malfunction "MUTE" wire is grounded Unit resets itself when engine is off Incorrect connection between ACC and positive battery wire TFT MONITOR Monitor does not open automatically TFT Auto Open is turned off Eject current disc and insert new one 29 VM9412 TROUBLESHOOTING Table 7: Troubleshooting Problem Cause Corrective Action GENERAL Unit will not power on Radio Fuse blown Car battery fuse blown Illegal operation Remote control does not function Battery depleted Battery installed incorrectly No/low audio output...
Operation Manual
Page 34
... Message is longer than LCD can display Incorrect cable connections Incorrect cable connections Incorrect cable connections Wrong iPod Video Settings Error Messages Corrective Action Use disc in good condition Clean disc with soft cloth Clean laser pickup with cleaning disc Use compatible disc Change Parental Lock settings to lower restriction Use disc with proper region code Insert disc with label side up Use original disc Turn PCB off Clean disc or replace Recreate disc with good files Check RCA cables Check Satellite Data cable Check jLink and MediaLink cables Change iPod video settings...
... Message is longer than LCD can display Incorrect cable connections Incorrect cable connections Incorrect cable connections Wrong iPod Video Settings Error Messages Corrective Action Use disc in good condition Clean disc with soft cloth Clean laser pickup with cleaning disc Use compatible disc Change Parental Lock settings to lower restriction Use disc with proper region code Insert disc with label side up Use original disc Turn PCB off Clean disc or replace Recreate disc with good files Check RCA cables Check Satellite Data cable Check jLink and MediaLink cables Change iPod video settings...

Operation Manual
Page 36
... Crystal Display (LCD) active matrix Response Time: 30mSec rise time, 50mSec fall time Resolution: • 336,960 sub pixels, 1440 (W) X 234 (H) Viewing angle: • 65 degrees left or right • 40 degrees up • 65 degrees down General Auxiliary Input Impedance: 10k-ohm Power Supply: 11 to 16VDC, negative ground Power Antenna (Blue): 500mA max, current limited protection Amplifier Remote (Blue/White): 500mA max, current limited protection Operating Temperature...
... Crystal Display (LCD) active matrix Response Time: 30mSec rise time, 50mSec fall time Resolution: • 336,960 sub pixels, 1440 (W) X 234 (H) Viewing angle: • 65 degrees left or right • 40 degrees up • 65 degrees down General Auxiliary Input Impedance: 10k-ohm Power Supply: 11 to 16VDC, negative ground Power Antenna (Blue): 500mA max, current limited protection Amplifier Remote (Blue/White): 500mA max, current limited protection Operating Temperature...


