
Owners Manual
Page 2
... to follow. We hope you will find the instructions in this owner's manual clear and easy to use all the features of your new Jensen VM9410 Mobile Multimedia AM/FM/DVD Receiver for choosing a Jensen product. CONTENTS Thank you for maximum enjoyment. Preparation 1 Features ...1 Tools and Supplies...1 Disconnecting the Battery 1 Installation...
... to follow. We hope you will find the instructions in this owner's manual clear and easy to use all the features of your new Jensen VM9410 Mobile Multimedia AM/FM/DVD Receiver for choosing a Jensen product. CONTENTS Thank you for maximum enjoyment. Preparation 1 Features ...1 Tools and Supplies...1 Disconnecting the Battery 1 Installation...
Owners Manual
Page 3
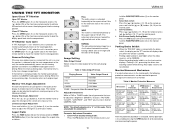
.... Built-in DVD core mechanism. 3. 7 inch Panasonic TFT monitor. 4. Multiple video System with a maximum of the Jensen VM9410 Mobile Multimedia AM/FM/DVD Receiver. TFT monitor mechanism overload protection - If the TFT monitor becomes overloaded by step. Two independent...vibration system accompanied by a reputable installation shop. Never install this range causes the unit to power off . 18. WARNING! VM9410 PREPARATION Congratulations on your VM9410: • Torx type, flat-head and Philips screwdrivers • Wire cutters and strippers • Tools to remove existing...
.... Built-in DVD core mechanism. 3. 7 inch Panasonic TFT monitor. 4. Multiple video System with a maximum of the Jensen VM9410 Mobile Multimedia AM/FM/DVD Receiver. TFT monitor mechanism overload protection - If the TFT monitor becomes overloaded by step. Two independent...vibration system accompanied by a reputable installation shop. Never install this range causes the unit to power off . 18. WARNING! VM9410 PREPARATION Congratulations on your VM9410: • Torx type, flat-head and Philips screwdrivers • Wire cutters and strippers • Tools to remove existing...
Owners Manual
Page 4
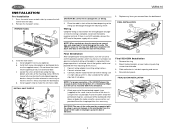
... damaging the radio. Once proper operation is mounted within 20° of the radio or improper operation due to the dashboard from the radio. 2. VM9410 5. Mount factory brackets on both sides to damage the car wiring. 4. Install half-sleeve into the half-sleeve making sure it as illustrated in... is achieved, turn the unit on page 3. Replace any items you removed from old radio. 3. Do not force the sleeve into place. The VM9410 uses one end of the perforated support strap (supplied) to the power supply with final mounting of the CD/DVD player, the chassis must be...
... damaging the radio. Once proper operation is mounted within 20° of the radio or improper operation due to the dashboard from the radio. 2. VM9410 5. Mount factory brackets on both sides to damage the car wiring. 4. Install half-sleeve into the half-sleeve making sure it as illustrated in... is achieved, turn the unit on page 3. Replace any items you removed from old radio. 3. Do not force the sleeve into place. The VM9410 uses one end of the perforated support strap (supplied) to the power supply with final mounting of the CD/DVD player, the chassis must be...

Owners Manual
Page 5
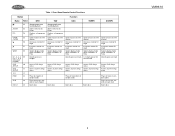
... YELLOW GREEN/WHITE REVERSE + RED ACC Reverse Driving Light Gearbox Switch ACC Ground Ignition Switch YELLOW BATT BATTERY + FUSE(10A) BLACK GND BATTERY Ground Battery VM9410 Car WIRING DIAGRAM External Power Amplifier Antenna Jack Antenna Car Phone FRONT L+ FRONT LFRONT R+ FRONT RREAR R+ REAR RREAR L+ REAR L- GREY BLUE RED WHITE RED WHITE...
... YELLOW GREEN/WHITE REVERSE + RED ACC Reverse Driving Light Gearbox Switch ACC Ground Ignition Switch YELLOW BATT BATTERY + FUSE(10A) BLACK GND BATTERY Ground Battery VM9410 Car WIRING DIAGRAM External Power Amplifier Antenna Jack Antenna Car Phone FRONT L+ FRONT LFRONT R+ FRONT RREAR R+ REAR RREAR L+ REAR L- GREY BLUE RED WHITE RED WHITE...

Owners Manual
Page 6
... upward tilt angle of three settings: Wide, Full or Normal. 3. ( ) Press the button (3) to play the next disc. 14 26 7-INCH TFT 23 VM9410 VM9410 51 24 OPEN DVD-R VM9410 PWR LO/DX 7 8 9 10 4 3 2 AV AUX IN 21 2-6CH SRC Push ENTER 18 17 20 11 12 13 15 25 16 19 22...
... upward tilt angle of three settings: Wide, Full or Normal. 3. ( ) Press the button (3) to play the next disc. 14 26 7-INCH TFT 23 VM9410 VM9410 51 24 OPEN DVD-R VM9410 PWR LO/DX 7 8 9 10 4 3 2 AV AUX IN 21 2-6CH SRC Push ENTER 18 17 20 11 12 13 15 25 16 19 22...

Owners Manual
Page 7
VM9410 CONTROLS AND INDICATORS 10. 3/SCN DVD Mode: Press once to start repeat playback. 7-INCH DIGITAL TFT 7-INBCAHNDTFT AS AM/FM/DVD/MP3 RECEIVER DISP OPEN ... once for slow forward/slow reverse. MENU Mode: Press once to the right. TFT Display 25. TUNER Mode: Press once to scan current radio station. VM9410 12. 5/2-6CH/RDM DVD Mode: Press once for fast forward/fast reverse. Press and hold to move the cursor down. 20. MENU Mode: Press once...
VM9410 CONTROLS AND INDICATORS 10. 3/SCN DVD Mode: Press once to start repeat playback. 7-INCH DIGITAL TFT 7-INBCAHNDTFT AS AM/FM/DVD/MP3 RECEIVER DISP OPEN ... once for slow forward/slow reverse. MENU Mode: Press once to the right. TFT Display 25. TUNER Mode: Press once to scan current radio station. VM9410 12. 5/2-6CH/RDM DVD Mode: Press once for fast forward/fast reverse. Press and hold to move the cursor down. 20. MENU Mode: Press once...

Owners Manual
Page 8
... illuminates one of the following DVD playback indicators become Illuminated when the corresponding function is activated 6. Channel/Disc Display The channel/disc display is activated VM9410 5 6 6 CONTROLS AND INDICATORS LCD Display/Indicators 1. DVD Playback Indicators (SCN/RPT/RDM/ALL) The following indicators when the corresponding function is active: • ST: radio...
... illuminates one of the following DVD playback indicators become Illuminated when the corresponding function is activated 6. Channel/Disc Display The channel/disc display is activated VM9410 5 6 6 CONTROLS AND INDICATORS LCD Display/Indicators 1. DVD Playback Indicators (SCN/RPT/RDM/ALL) The following indicators when the corresponding function is active: • ST: radio...

Owners Manual
Page 9
... track Searches an available ter for playback ter for playback for disc playback 6 Setup to repeat play - deletes radio station 19 Selects the next chap- VM9410 FRONT ZONE REMOTE CONTROL Table 1: Front Zone Remote Control Functions Button Function Name MENU TITLE MUTE POWER/ AUDIO REPT A-B REPT SRC SUBTITLE DISP DISC DISC...
... track Searches an available ter for playback ter for playback for disc playback 6 Setup to repeat play - deletes radio station 19 Selects the next chap- VM9410 FRONT ZONE REMOTE CONTROL Table 1: Front Zone Remote Control Functions Button Function Name MENU TITLE MUTE POWER/ AUDIO REPT A-B REPT SRC SUBTITLE DISP DISC DISC...
Owners Manual
Page 10
... tracks/discs in random order Ejects disc Ejects disc Plays all tracks in random order Plays the first ten seconds of each track Ejects disc VM9410 8
... tracks/discs in random order Ejects disc Ejects disc Plays all tracks in random order Plays the first ten seconds of each track Ejects disc VM9410 8

Owners Manual
Page 11
... Slow playback/slow rewind playback 29 21 0, 1, 2, 3, 4, 29 5, 6, 7, 8, 9, 0 (Numeric Keypad) Directly accesses chapter NOTE: Your remote control may differ slightly from the one pictured here. VM9410 REAR ZONE REMOTE CONTROL Table 2: Rear Zone Remote Control Functions Button Function Name Ref # DVD VCD 3 8 MENU 1 Enters the main menu of the disc Turns...
... Slow playback/slow rewind playback 29 21 0, 1, 2, 3, 4, 29 5, 6, 7, 8, 9, 0 (Numeric Keypad) Directly accesses chapter NOTE: Your remote control may differ slightly from the one pictured here. VM9410 REAR ZONE REMOTE CONTROL Table 2: Rear Zone Remote Control Functions Button Function Name Ref # DVD VCD 3 8 MENU 1 Enters the main menu of the disc Turns...
Owners Manual
Page 12
... extened horizontally to the aspect ratio of 16 to 9. Enter Picture Quality Setting mode: Press the PIC button (24) on the remote or press and VM9410 hold the ( ) or ( ) buttons (18, 19) on the monitor panel. 3. Select Item to Set: Press the ( ) ( ) buttons (14, 22) on the remote or press and...
... extened horizontally to the aspect ratio of 16 to 9. Enter Picture Quality Setting mode: Press the PIC button (24) on the remote or press and VM9410 hold the ( ) or ( ) buttons (18, 19) on the monitor panel. 3. Select Item to Set: Press the ( ) ( ) buttons (14, 22) on the remote or press and...

Owners Manual
Page 13
... Mute If the "MUTE" wire is connected, audio output mutes when a telephone call is received by the car phone or when verbal navigation is displayed. VM9410 OPERATING INSTRUCTIONS Power On / Off Press the /MUTE button (1) to restore the volume. The buttons on . You can be disabled. Audible Beep Confirmation An audible...
... Mute If the "MUTE" wire is connected, audio output mutes when a telephone call is received by the car phone or when verbal navigation is displayed. VM9410 OPERATING INSTRUCTIONS Power On / Off Press the /MUTE button (1) to restore the volume. The buttons on . You can be disabled. Audible Beep Confirmation An audible...

Owners Manual
Page 14
.... 4. A submenu appears in a second row with the option for adjustment. The new value is complete. See "Adjusting the clock" to learn how to previous menu VM9410 Adjusting the Clock Method 1 - Adjusting a Feature 1. Enter the option field for the first item, "Radio", highlighted in light blue. 2. TFT screen open the TFT panel...
.... 4. A submenu appears in a second row with the option for adjustment. The new value is complete. See "Adjusting the clock" to learn how to previous menu VM9410 Adjusting the Clock Method 1 - Adjusting a Feature 1. Enter the option field for the first item, "Radio", highlighted in light blue. 2. TFT screen open the TFT panel...

Owners Manual
Page 15
... 100Hz 130Hz 150Hz 200Hz 10KHz 12.5KHz 15KHz 17KHz According to the audio source, select the Bass Center Frequency to achieve the best Treble effect. VM9410 ASP Config Adjusting a Feature 1. The new value is highlighted in light blue. 2. According to the audio source, select the Treble Center Frequency to achieve the...
... 100Hz 130Hz 150Hz 200Hz 10KHz 12.5KHz 15KHz 17KHz According to the audio source, select the Bass Center Frequency to achieve the best Treble effect. VM9410 ASP Config Adjusting a Feature 1. The new value is highlighted in light blue. 2. According to the audio source, select the Treble Center Frequency to achieve the...
Owners Manual
Page 16
... again to seek the next available radio station by increasing the tuning frequency. Select a band (if needed ). 2. Stereo Broadcasting Indicator 5. Strong Local Signal Broadcasting Indicator VM9410 Switch to Radio Tuner source Press the SRC button (15) on the joystick to the RADIO TUNER source. Manual Tuning Press the or buttons (14...
... again to seek the next available radio station by increasing the tuning frequency. Select a band (if needed ). 2. Stereo Broadcasting Indicator 5. Strong Local Signal Broadcasting Indicator VM9410 Switch to Radio Tuner source Press the SRC button (15) on the joystick to the RADIO TUNER source. Manual Tuning Press the or buttons (14...

Owners Manual
Page 17
... 6-Channel audio is finalized. Press the RDM button again to Tuner mode. Press the TITLE button (2) on the remote control to "4X", "8X", and "20X". VM9410 DVD PLAYER OPERATION NOTE: When properly installed, DVD video cannot be authorized (see "RATING (Parental Lock) Menu" on page 19). If the screen is closed...
... 6-Channel audio is finalized. Press the RDM button again to Tuner mode. Press the TITLE button (2) on the remote control to "4X", "8X", and "20X". VM9410 DVD PLAYER OPERATION NOTE: When properly installed, DVD video cannot be authorized (see "RATING (Parental Lock) Menu" on page 19). If the screen is closed...
Owners Manual
Page 18
.../Chapter - For discs recorded with subtitles, press the SUBTITLE button (9) on -screen image. Once PBC is displayed at the bottom of the on the remote VM9410 control to the specified location on , playback starts from different angles. Playback Information During DVD and VCD playback, press the DISP button (10) on remote...
.../Chapter - For discs recorded with subtitles, press the SUBTITLE button (9) on -screen image. Once PBC is displayed at the bottom of the on the remote VM9410 control to the specified location on , playback starts from different angles. Playback Information During DVD and VCD playback, press the DISP button (10) on remote...

Owners Manual
Page 19
... the number languages on the left, the 16:9 video can be converted to Level 1 loudness. "AUX IN" is the current playing source for Pan/Scan. VM9410 • Rear: AUX IN - Format of the current track. "DSP" indicates Digital Signal Processing. "AUX IN" is currently playing. • 00:02:18 - General Disc...
... the number languages on the left, the 16:9 video can be converted to Level 1 loudness. "AUX IN" is the current playing source for Pan/Scan. VM9410 • Rear: AUX IN - Format of the current track. "DSP" indicates Digital Signal Processing. "AUX IN" is currently playing. • 00:02:18 - General Disc...
Owners Manual
Page 20
...the option field for selection during playback. Confirm your selection by pressing the ENTER (joystick) button (20) on the joystick. AUDIO Menu The VM9410 has a built-in green. If the selected language is not supported by pressing the or buttons (14, 22) on the remote control or ... lock) are memorized. This operation can be displayed Select the default language in which you would like audio (when optional) to previous menu VM9410 NOTE: For standard discs not formatted for "widescreen", use of pink noise Left channel pink noise Center channel pink noise Right channel pink noise...
...the option field for selection during playback. Confirm your selection by pressing the ENTER (joystick) button (20) on the joystick. AUDIO Menu The VM9410 has a built-in green. If the selected language is not supported by pressing the or buttons (14, 22) on the remote control or ... lock) are memorized. This operation can be displayed Select the default language in which you would like audio (when optional) to previous menu VM9410 NOTE: For standard discs not formatted for "widescreen", use of pink noise Left channel pink noise Center channel pink noise Right channel pink noise...

Owners Manual
Page 21
..., disc packing, or documentation. Return to the disc description. 19 Once the correct password is marked on the disc, the parental lock feature is unlocked. VM9410 Table 14: AUDIO Menu Features Setting Options REAR CTRL 15ms 12ms 9ms 6ms 3ms 0ms Function Adjust the time difference between 3 and 15 milliseconds, producing...
..., disc packing, or documentation. Return to the disc description. 19 Once the correct password is marked on the disc, the parental lock feature is unlocked. VM9410 Table 14: AUDIO Menu Features Setting Options REAR CTRL 15ms 12ms 9ms 6ms 3ms 0ms Function Adjust the time difference between 3 and 15 milliseconds, producing...