
Operation Manual
Page 1
NAV 101 Installation and Operation Manual 38
NAV 101 Installation and Operation Manual 38

Operation Manual
Page 2
Introduction...40 Safety Information 43 Installation ...45 Wiring Diagramm 47 Getting Started ...48 Main Features ...49 Choosing and Finding Locations 52 Navigating ...61 Planning a Route 63 Managing your new Audiovox NAV101 navigation system for choosing a Audiovox product. If you take a few minutes to look through it, you'll learn how to use all the features of your...
Introduction...40 Safety Information 43 Installation ...45 Wiring Diagramm 47 Getting Started ...48 Main Features ...49 Choosing and Finding Locations 52 Navigating ...61 Planning a Route 63 Managing your new Audiovox NAV101 navigation system for choosing a Audiovox product. If you take a few minutes to look through it, you'll learn how to use all the features of your...

Operation Manual
Page 3
... from Head Unit (11 ~ 16VDC, Negative Ground) 40 Subject to your trip. This manual is designed to help you enjoy using your new Audiovox NAV101 navigation system. You can navigate and plan your route with an easy-to-use and intuitive interface, plan your trip to suit your personal preferences and interests, and find and... CE 4.2 • Storage - Internal SD Card Slot (2GB Card Included w/ Map Data pre installed) • Sirf lll 20 Channel GPS antenna • Operating Voltage - This navigation system leads you begin your destination.
... from Head Unit (11 ~ 16VDC, Negative Ground) 40 Subject to your trip. This manual is designed to help you enjoy using your new Audiovox NAV101 navigation system. You can navigate and plan your route with an easy-to-use and intuitive interface, plan your trip to suit your personal preferences and interests, and find and... CE 4.2 • Storage - Internal SD Card Slot (2GB Card Included w/ Map Data pre installed) • Sirf lll 20 Channel GPS antenna • Operating Voltage - This navigation system leads you begin your destination.
Operation Manual
Page 4
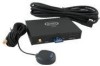
... time they were recorded, the receiver calculates how far away each corner) • SmartBus cable (used to connect the NAV101 to the Audiovox navigation-ready radio) • Four 6mm (.25in) screws (to secure the left and right mounting brackets to the...at least three satellites and determines the coordinates of the receiver from a Global Navigation Satellite System (GNSS). The distance of the receiving device. The receiver uses the information sent by latitude and longitude. Parts List • NAV101 navigation module • SIRF III Antenna with backup software for map data and...
... time they were recorded, the receiver calculates how far away each corner) • SmartBus cable (used to connect the NAV101 to the Audiovox navigation-ready radio) • Four 6mm (.25in) screws (to secure the left and right mounting brackets to the...at least three satellites and determines the coordinates of the receiver from a Global Navigation Satellite System (GNSS). The distance of the receiving device. The receiver uses the information sent by latitude and longitude. Parts List • NAV101 navigation module • SIRF III Antenna with backup software for map data and...
Operation Manual
Page 5
... contact: a) Your local dealer or b) Your distributor or c) Our technical service department: www.audiovox.de . 42 Subject to technical change Smart2Go navigation engine and Tele Atlas map data. The NAV101 2GB SD card is pre-loaded with the Smart2Go navigation engine and Tele Atlas map data. Please keep in mind that although the radio...
... contact: a) Your local dealer or b) Your distributor or c) Our technical service department: www.audiovox.de . 42 Subject to technical change Smart2Go navigation engine and Tele Atlas map data. The NAV101 2GB SD card is pre-loaded with the Smart2Go navigation engine and Tele Atlas map data. Please keep in mind that although the radio...
Operation Manual
Page 6
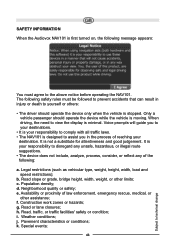
... will guide you to your destinations. • It is your responsibility to comply with all traffic laws. • The NAV101 is your destination. Road or lane closures; SAFETY INFORMATION When the Audiovox NAV101 is first turned on, the following message appears: You must be followed to prevent accidents that can result in the... rescue, medical, or other limits; When driving, the need to technical change The following safety rules must agree to the above notice before operating the NAV101.
... will guide you to your destinations. • It is your responsibility to comply with all traffic laws. • The NAV101 is your destination. Road or lane closures; SAFETY INFORMATION When the Audiovox NAV101 is first turned on, the following message appears: You must be followed to prevent accidents that can result in the... rescue, medical, or other limits; When driving, the need to technical change The following safety rules must agree to the above notice before operating the NAV101.

Operation Manual
Page 7
in an emergency. • Laws in some states prohibit wearing stereo headphones or may change over time. • Do not use or placement of Motor Vehicles for information. 44 Subject to a police station, hospital, etc. l. Please contact your state's Department of a navigation device while operating a motor vehicle. Traffic congestion. • While every attempt is made to ensure that the database is accurate, roadways, points of interest, and business and service locations may prohibit use the NAV101 to navigate to technical change
in an emergency. • Laws in some states prohibit wearing stereo headphones or may change over time. • Do not use or placement of Motor Vehicles for information. 44 Subject to a police station, hospital, etc. l. Please contact your state's Department of a navigation device while operating a motor vehicle. Traffic congestion. • While every attempt is made to ensure that the database is accurate, roadways, points of interest, and business and service locations may prohibit use the NAV101 to navigate to technical change
Operation Manual
Page 8
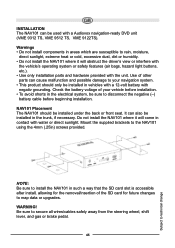
... disconnect the negative (-) battery cable before installation. • To avoid shorts in the electrical system, be sure to your navigation system. • This product should be installed in the trunk, if necessary. NAV101 Placement The NAV101 should only be used with a Audiovox navigation-ready DVD unit (VME 9312 TS, VME 9512 TS, VME 9122TS). Check the battery...
... disconnect the negative (-) battery cable before installation. • To avoid shorts in the electrical system, be sure to your navigation system. • This product should be installed in the trunk, if necessary. NAV101 Placement The NAV101 should only be used with a Audiovox navigation-ready DVD unit (VME 9312 TS, VME 9512 TS, VME 9122TS). Check the battery...

Operation Manual
Page 9
When placed on the top of the GPS receiver. The preferred antenna location is crucial for navigation, proper antenna placement is on the dashboard, performance may be reduced due to the geographic horizon. Antenna Placement Since the NAV101 uses GPS technology for optimal performance of the front bumper or dashboard or trunk area...
When placed on the top of the GPS receiver. The preferred antenna location is crucial for navigation, proper antenna placement is on the dashboard, performance may be reduced due to the geographic horizon. Antenna Placement Since the NAV101 uses GPS technology for optimal performance of the front bumper or dashboard or trunk area...

Operation Manual
Page 10
47 Subject to technical change
47 Subject to technical change
Operation Manual
Page 11
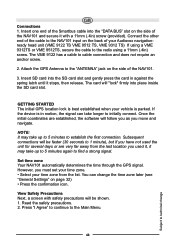
... shown. 1. You can take up to 5 minutes again to find a strong signal. Set time zone Your NAV101 automatically determines the time through the GPS signal. View Safety Precautions Next, a screen with a 11mm (.4in) ...set your time zone. • Select your time zone from the last location you move and navigate. Insert SD card into the SD card slot and gently press the card in motion, the... the list. Connections 1. GETTING STARTED The initial GPS location lock is best established when your Audiovox navigationready head unit (VME 9122 TS VME 9512 TS, VME 9312 TS) If using a VME...
... shown. 1. You can take up to 5 minutes again to find a strong signal. Set time zone Your NAV101 automatically determines the time through the GPS signal. View Safety Precautions Next, a screen with a 11mm (.4in) ...set your time zone. • Select your time zone from the last location you move and navigate. Insert SD card into the SD card slot and gently press the card in motion, the... the list. Connections 1. GETTING STARTED The initial GPS location lock is best established when your Audiovox navigationready head unit (VME 9122 TS VME 9512 TS, VME 9312 TS) If using a VME...
Operation Manual
Page 12
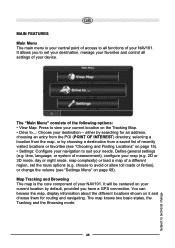
... to view your current location on the Tracking Map. • Drive to...: Choose your destination - either by searching for routing and navigating. time, language, or system of measurement), configure your map (e.g. 2D or 3D mode, day or night mode, map complexity) or load a map of your ... on page 69). You can browse the map, display information about the different locations shown on page 15). • Settings: Configure your NAV101. Define general settings (e.g. The map knows two basic states, the Tracking and the Browsing mode. 49 Subject to technical change the volume (see...
... to view your current location on the Tracking Map. • Drive to...: Choose your destination - either by searching for routing and navigating. time, language, or system of measurement), configure your map (e.g. 2D or 3D mode, day or night mode, map complexity) or load a map of your ... on page 69). You can browse the map, display information about the different locations shown on page 15). • Settings: Configure your NAV101. Define general settings (e.g. The map knows two basic states, the Tracking and the Browsing mode. 49 Subject to technical change the volume (see...

Operation Manual
Page 13
Use a stylus or your speed, etc. The screen is indicated by a crosshair ( cursor. Current car position POI symbols e.g. In Tracking mode, the map follows your actual position (GPS position), displaying information about your geographic position, your finger to technical change The selected position will be identified by a green arrow or a haircross. The GPS position is highlighted in orange when in Browsing mode. Churchand Mail 50 Subject to browse the map and enter Browsing mode.
Use a stylus or your speed, etc. The screen is indicated by a crosshair ( cursor. Current car position POI symbols e.g. In Tracking mode, the map follows your actual position (GPS position), displaying information about your geographic position, your finger to technical change The selected position will be identified by a green arrow or a haircross. The GPS position is highlighted in orange when in Browsing mode. Churchand Mail 50 Subject to browse the map and enter Browsing mode.

Operation Manual
Page 14
...corner) you may adjust the orientation. • If you will hear a voice command at the appropriate time. For more information about navigation, see "Navigating" on the map opens an overlay window with information about the selected item. • To zoom in blue) and your current position...Distance to Next Manuever Speed Current Time / Estimated Arrival Time Distance to Destination Subject to the tracking mode, press the button. Navigation Screen The navigation screen displays your route (in or out, press the + or - For one of the icons, the zoom slider will indicate...
...corner) you may adjust the orientation. • If you will hear a voice command at the appropriate time. For more information about navigation, see "Navigating" on the map opens an overlay window with information about the selected item. • To zoom in blue) and your current position...Distance to Next Manuever Speed Current Time / Estimated Arrival Time Distance to Destination Subject to the tracking mode, press the button. Navigation Screen The navigation screen displays your route (in or out, press the + or - For one of the icons, the zoom slider will indicate...

Operation Manual
Page 15
... NOTE: If a route is in progress when you resume operation. Just enter information about the desired target, select a hit from your route, and navigating. 1. when you exit the NAV101 system, the unit will be pressed - Press Address. CHOOSING AND FINDING LOCATIONS This section describes the different ways of Interest) directories and city guides... for different purposes, like showing it on a map, planning your Address Book, or select a location on the Map. You can be displayed: • Your NAV101 offers a convenient interactive look-ahead search function to technical change
... NOTE: If a route is in progress when you resume operation. Just enter information about the desired target, select a hit from your route, and navigating. 1. when you exit the NAV101 system, the unit will be pressed - Press Address. CHOOSING AND FINDING LOCATIONS This section describes the different ways of Interest) directories and city guides... for different purposes, like showing it on a map, planning your Address Book, or select a location on the Map. You can be displayed: • Your NAV101 offers a convenient interactive look-ahead search function to technical change

Operation Manual
Page 16
• After entering the second character, only letters that can be used to spell an existing destination will be available for selection of the third character, the fourth character, and so on. • Continue entering characters until you have narrowed down the search to only one result, or press the OK button to display a list of search results, from which you can choose. • If at any point you want to backspace and delete characters, press the backspace button (
• After entering the second character, only letters that can be used to spell an existing destination will be available for selection of the third character, the fourth character, and so on. • Continue entering characters until you have narrowed down the search to only one result, or press the OK button to display a list of search results, from which you can choose. • If at any point you want to backspace and delete characters, press the backspace button (

Operation Manual
Page 17
... the location as a bookmark, select Save. • To view the location on the screen. Press the MENU button to view the following screen: • To navigate to enter the street Number. screen. Press the OK button to select the entered name or select from a list of the Cityname to the "Find... advance faster. 6. Press the "No." Enter Zip Code You may enter a known zip code instead of matches based on -screen keypad to the location, select Navigate. • To use the location for destination." Select a Street. c. a. Use the on the screen. d.
... the location as a bookmark, select Save. • To view the location on the screen. Press the MENU button to view the following screen: • To navigate to enter the street Number. screen. Press the OK button to select the entered name or select from a list of the Cityname to the "Find... advance faster. 6. Press the "No." Enter Zip Code You may enter a known zip code instead of matches based on -screen keypad to the location, select Navigate. • To use the location for destination." Select a Street. c. a. Use the on the screen. d.

Operation Manual
Page 18
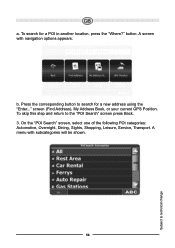
From the main menu, press POI Search. The "POI Search" window will be near your current position (the default) or at any other location. box shows your current location for the POI search or enter a new location. 55 Subject to technical change Browse POIs 1. button to quickly find points of interest, like gas stations and restaurants, in the white Where? Select an area for the POI search. Searching for and Choosing a POI (Point Of Interest) The POI finder allows you to set your current location, you must press the Where? These places can be displayed: 2. Although the ...
From the main menu, press POI Search. The "POI Search" window will be near your current position (the default) or at any other location. box shows your current location for the POI search or enter a new location. 55 Subject to technical change Browse POIs 1. button to quickly find points of interest, like gas stations and restaurants, in the white Where? Select an area for the POI search. Searching for and Choosing a POI (Point Of Interest) The POI finder allows you to set your current location, you must press the Where? These places can be displayed: 2. Although the ...
Operation Manual
Page 19
A screen with subcategories will be shown. 56 Subject to the "POI Search" screen press Back. 3. screen (Find Address), My Address Book, or your current GPS Position. A menu with navigation options appears. button. To skip this step and return to technical change b. On the "POI Search" screen, select one of the following POI categories: Automotive, Overnight, Dining, Sights, Shopping, Leisure, Service, Transport. To search for a new address using the "Enter..." a. Press the corresponding button to search for a POI in another location, press the "Where?"
A screen with subcategories will be shown. 56 Subject to the "POI Search" screen press Back. 3. screen (Find Address), My Address Book, or your current GPS Position. A menu with navigation options appears. button. To skip this step and return to technical change b. On the "POI Search" screen, select one of the following POI categories: Automotive, Overnight, Dining, Sights, Shopping, Leisure, Service, Transport. To search for a new address using the "Enter..." a. Press the corresponding button to search for a POI in another location, press the "Where?"

Operation Manual
Page 20
... Map. • Press Description to the previous category, press the button. 5. Press a POI to select it and display the following navigation options: Subject to technical change • To navigate to the location, select Navigate. • To use the location for planning a route, select Waypoint. • To save the location as a bookmark, select Save...
... Map. • Press Description to the previous category, press the button. 5. Press a POI to select it and display the following navigation options: Subject to technical change • To navigate to the location, select Navigate. • To use the location for planning a route, select Waypoint. • To save the location as a bookmark, select Save...